Page Table of Contents
Updated on Jul 01, 2026
Transferring photos from the computer to an external hard drive is a demand that many users require for various purposes, which include:
- Limited Storage Space: When the computer's internal storage is full, copying images to an external hard drive can free up space while also ensuring seamless performance.
- Backup & Data Protection: By moving images to an external hard drive, you can establish a backup copy of their priceless memories, safeguarding them against accidental deletion, hardware failures, or computer viruses.
- Portable Storage: Transferring photos to an external hard drive allows you to transport your whole photo collection with you, you can access photos on other devices or when traveling.
- Upgrading or Replacing Computers: When upgrading or replacing a computer, or giving the computer to others, moving photos to an external hard drive allows for a flawless migration of the photo collection to the new device.
- Sharing Photos with Others: Transferring photos to an external hard drive allows for easy sharing with friends, family, or colleagues who may not have direct access to the computer or online photo storage.
- Preserving Old or Rare Photos: If your photos contain precious memory of your family, transferring them to an external hard drive helps preserve them for future generations, as hard drives have a longer lifespan.
In this post, we will look at three quick and easy ways to transfer photos from computer to external hard drive. These ways include the traditional copy and paste method, using Windows' built-in File History feature, and applying the sophisticated EaseUS Todo Backup software. We have you covered whether you prefer a straightforward technique or an automated backup option. Let's look at these three ways and see which one best suits your needs.
What to Prepare Before Transferring Photos to External Hard Drive
- 💾Make sure that you have a dependable and suitable external hard drive with enough storage capacity to hold all of your photos. If your device doesn't have enough space, you may lose some of the images when the hard drive is full.
- 🪢Connect the external hard drive to your computer correctly with a cable or an adaptor. Ensure that the external hard drive is compatible with your computer's operating system, and is recognized correctly.
- 🗂️Organizing your photo files on your computer is a good idea. Creating folders or subfolders to categorize your images and make them easier to access later can help with this.
📖Also Read: Best Way to Backup Thousands of Photos
3 Easy Ways to Transfer Photos From PC to External Hard Drive
This section will present three photo-transferring methods, each with pros and cons. The three methods are compared in terms of difficulty, speed, efficacy, and suitable circumstances. Please review the chart below before deciding which method to adopt.
| Comparison | Copy and Paste | File History | EaseUS Todo Backup |
|---|---|---|---|
| Difficulty | ⭐ | ⭐⭐⭐ | ⭐⭐ |
| Speed | Slow | Medium | Very Quick |
| Effectiveness | Moderate - manually copy and paste | Moderate - can automatically save photos to an external hard drive | High - automatically transfer photos backup to an external hard drive smoothly and successfully |
| Applicable Scenarios | For a single or small number of photos | For small numbers of photos migrating | More suitable for batch photos transfer and backup |
Way 1. Copy and Paste Photos to External Hard Drive in File Explorer
Copy and Paste is the easiest way which doesn't require any techniques. Most people utilize this method to transfer and move photos, videos, and other file documents. However, using this way may be time-consuming if you move a large quantity of photos. Copy and Paste is only suitable for a single or small number of photo-transferring.
Step 1. Open File Explorer on your Windows computer, and locate the folder where the photos are stored.
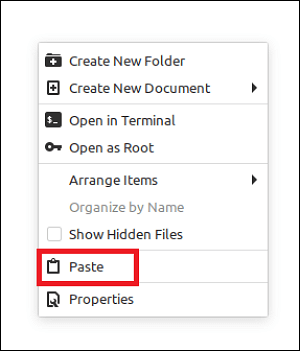
Step 2. Select the folder, right-click on it, and choose the Copy option. (Shortcut: Ctrl + C)
Step 3. Navigate to the external hard disk, and create a new folder.
Step 4. Open the new folder, right-click on any blank location, and select Paste. (Shortcut: Ctrl + V)
The copy process will start right now. Copy speed and time depend on the number of photos and file size.
Way 2. Transfer Photos to An External Hard Drive via File History
If you don't want to use Copy and Paste, or if you don't want to operate manually, you can use the Windows built-in application File History to automatically copy images to an external hard drive. File History is available on Windows 8/8.1/10/11, and allows you to save files to external storage devices or network locations.
However, File History is also suitable for a small number of folders, and it is very time-consuming if you have many photos to move. If you use an automatic backup plan, it will create multiple versions of your files, which can lead to redundancy on the external hard drive, taking up additional storage space.
Follow the steps below to set an automatic backup of your photos to an external hard drive.
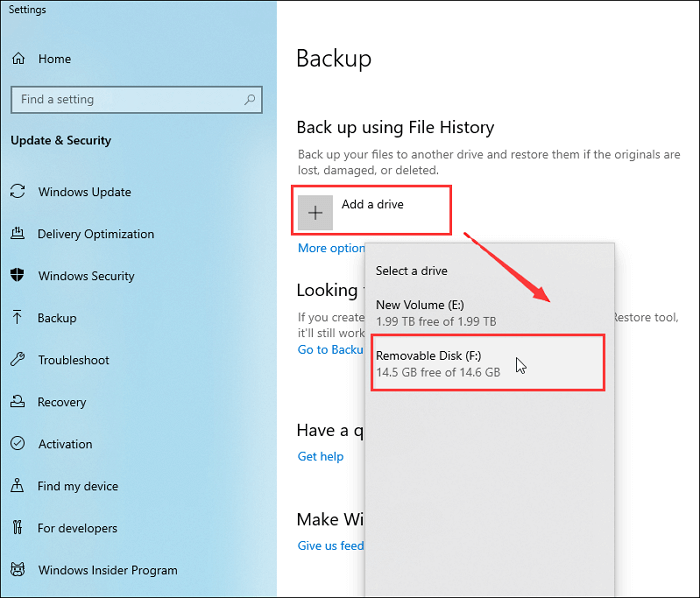
Step 1. Click Windows Start menu > Settings > Update & Security > Backup.
Step 2. Click +Add a drive to add the external hard drive as the target location to back up photos.
Step 3. Tap on more options to select a folder where you want to store Photo backup.
Step 4. You can also set and change how often the photos will be backed up, and it will automatically save photos to the external hard drive at the set time.
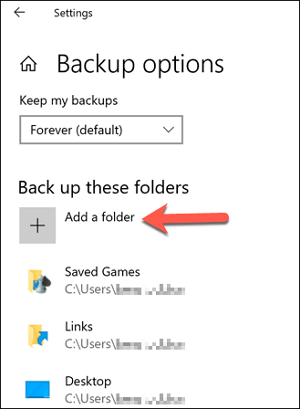
Step 5. Click on +Add a folder to select the photo folders that you organized before.
Step 6. When you finish all settings, click Back up now to start transferring your photos to the external drive immediately.
Way 3. Back and Transfer Photos to External Hard Drive Easily and Safely 🔥
Copy & Paste and File History are both effective ways to move photos from a computer to an external hard drive. However, both ways are a little time-consuming and suitable for a small number of photos. Besides, according to users' feedback, they have encountered issues like File History not working, File History not recognize this drive, etc.
With all the above drawbacks, we recommend you adopt an easier and safer file backup software to transfer your photos to external storage devices. EaseUS Todo Backup is an all-in-one backup and recovery tool with file/disk/partition/system/App data backup. With it, you can back up photos easily and quickly, which is especially suitable for large quantities of images. EaseUS has many advanced features to let you choose it with confidence.
- Scheduled backup to back up photos to the specified location, including external drives, NAS, cloud service, security zone, etc.
- Incremental and differential backup allows you to back up only changed photos, which can greatly save storage space and avoid redundancy.
- Quick recovery speed allows you to retrieve photos when your images are lost due to computer crashes or hard drive failure.
Download it and start your photo transferring right now.
Secure Download
Step 1. Click "Select backup contents" to initiate a backup.

Step 2. There are four data backup categories, File, Disk, OS, and Mail, click File.

Step 3. Local and network files will be displayed on the left side. You may extend the directory to choose which files to back up.

Step 4. Select the location where you want to store the backup by following the on-screen instructions.

Click "Options" to encrypt the backup with a password in "Backup Options," and to setup a backup schedule and choose to initiate a backup at a certain event in "Backup Scheme." There are a variety of other customization options available for the backup process.

Step 5. You may save the backup to a local disk, EaseUS' online service, or a NAS.

Step 6. EaseUS Todo Backup enables customers to back up data to a third-party cloud drive and its own cloud drive.
If you want to back up data to a third-party cloud drive, choose Local Drive, scroll down to add Cloud Device, add your account, and then log in.

You can also save backups to EaseUS's cloud storage service. Sign up for an EaseUS Account and log in after clicking EaseUS Cloud.

Step 7. To begin backup, click "Backup Now" Once the backup process has been finished, it will be shown as a card on the panel's left side. To further manage a backup job, right-click it.

You may be interested:
Conclusion
In conclusion, transferring photos from a computer to an external hard drive s a necessary operation to protect the safety and organization of your priceless memories. You can successfully transfer your images with the above tips if you do the appropriate preparations, such as using a compatible external hard drive, organizing and backing up your files, and checking for file corruption.
If you are still hesitating about which method to use, here is a recap of our findings:
- Copy & Paste: the easiest way, but it is very time-consuming, and only suitable for a small number of photos.
- File History: Windows built-in utility to automatically back up photos, but require computer techniques, and it may not work sometimes.
- EaseUS Todo Backup: overall the best way to transfer photos to external hard drives in bulk, with easy operation, and saving space.
Secure Download
Transfer Photos From Computer to External Hard Drive FAQs
1. How do I copy my entire photo library to an external hard drive?
To copy your entire photo library to an external hard drive, you can follow these steps:
- Connect the external hard drive to your computer.
- Open the file explorer on your computer (Windows Explorer on Windows or Finder on macOS) to view your files.
- Locate your photo library folder.
- Select the photo library folder by clicking on it once to highlight it.
- Right-click on the selected folder and choose Copy from the context menu. (shortcut Ctrl+C )
- Open the external hard drive in the file explorer. It should appear as a separate drive or volume.
- Right-click on an empty space within the external hard drive folder and select Paste from the context menu. (shortcut Ctrl+V)
2. How do I transfer photos from Windows 10 to an external hard drive?
Transferring photos from Windows 10 to an external hard drive is the same as on other Windows devices. You can use Copy & Paste, File History, or a backup tool, EaseUS Todo Backup to migrate photos to the external drive.
3. What is the fastest way to transfer files from a PC to an external hard drive?
To fastest way to transfer files from a PC to an external hard drive is by using professional backup software, like EaseUS Todo Backup. It will back up your photo to your specified location automatically with a very quick speed without any data loss.
Was this page helpful? Your support is truly important to us!

EaseUS Todo Backup
EaseUS Todo Backup is a dependable and professional data backup solution capable of backing up files, folders, drives, APP data and creating a system image. It also makes it easy to clone HDD/SSD, transfer the system to different hardware, and create bootable WinPE bootable disks.
Secure Download
-
Updated by
![]()
Larissa
Larissa has rich experience in writing technical articles and is now a professional editor at EaseUS. She is good at writing articles about data recovery, disk cloning, disk partitioning, data backup, and other related knowledge. Her detailed and ultimate guides help users find effective solutions to their problems. She is fond of traveling, reading, and riding in her spare time.…Read full bio
Related Articles


Topic Clusters


Interesting Topics