To begin with, I'd like to share a story with you.
"It was the middle of the semester and I had just lost my final copy of my research paper. I had been working on it for weeks and now it was gone, probably forever. Or so I thought. I went to File History and typed in 'research paper.' To my surprise, there it was! I clicked on it and opened it up. It looked like the file had been damaged, but with a little editing, I was able to finish my paper on time."
Restoring a backup file from File History has saved your day? We cannot agree anymore that File History is a lifesaver when it comes to accidentally deleting files or files being infected with computer viruses. Today, we will talk about File History in Windows 10, and how it works to make copies of files and folders to a backup drive. It's all too easy to overlook the importance of having a file backup system until you need it, so we hope that by the end of this guide, you're able to choose your preferrable way to back up Windows 10 files and other important contents.
Ⅰ. How Windows 10 File History Works

Simply put, File History is a free backup feature that first appears in Microsoft Windows 8.1 and remains to be available in Windows 10 and Windows 11. File History backs up files automatically and keeps a history of all your changes. Only to note that File History only backs up copies of files that are in the Documents, Music, Pictures, Videos, and Desktop folders and the OneDrive files available offline on your PC. In a word, File History creates snapshot(s) of files and folders that are associated with user accounts. Over time, you'll have a complete history of your files.
A tip: Formerly, the Documents, Music, Pictures, Videos, and Desktop folders are organized and collected in Libraries. The Libraries is a reference to one or more folders on your computer and the files found inside those folders. It helps you organize all your files together in one place. Hence, when it comes to what File History backs up, it can refer to the Libraries folders as well.
Whenever you add, change, or delete a file from the original location, File History creates a copy of that file and stores it in a separate location called a backup drive. This way, if you ever need to restore your personal files from a previous date, you can easily make it by using the File History tool.
LEARN MORE
Does Windows 10 File History backup everything? As the feature's name suggests, File History doesn't back up whatever is on your PC but individual files and folders of certain types. Follow the linked article and know more.
Ⅱ. How to Enable File History in Windows 10
In Windows 10, the File History feature is turned off by default, and you need to set it up before you can start using it. In addition, if you want File History to work properly, you need to have a USB external hard drive or a network drive that is connected to your computer at all times. Here's how to set up and configure File History in your Windows 10 PC or laptop.
Step 1.
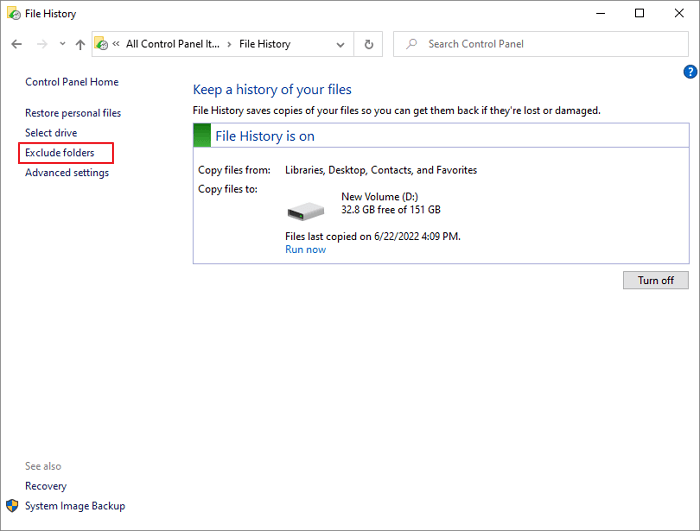
Users can access File History via either Control Panel or Windows Settings. The below figures shows clearly how to get to the entry on both sides.
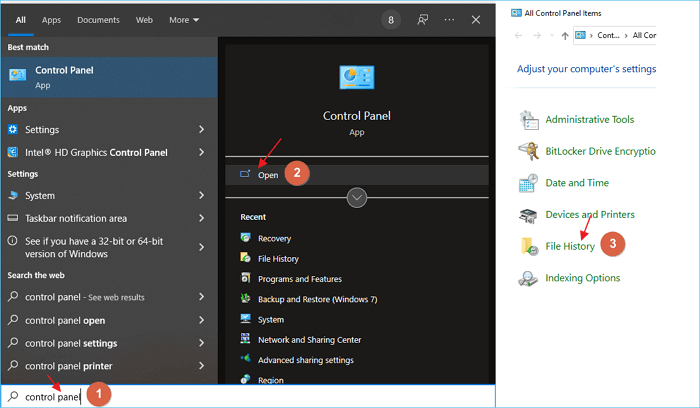
Figure 1. Access File History in Windows 10 via Control Panel

Figure 2. Access File History in Windows 10 via the Settings app
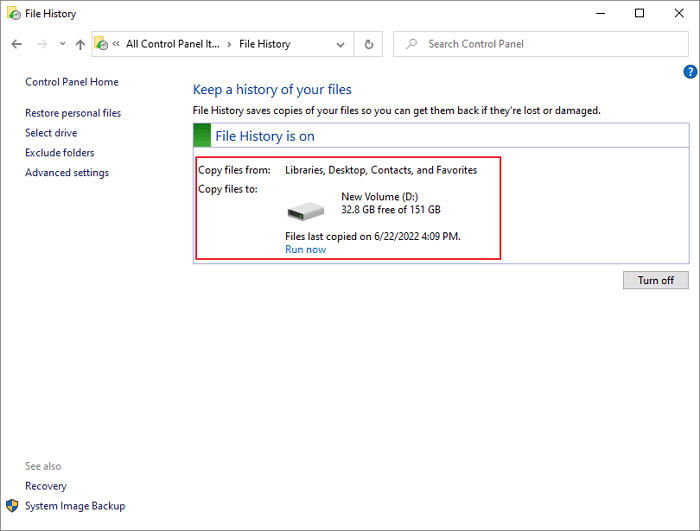
* To get more control of the setup and configuration of the whole backup thing, the better place to open the File History window is by going to Control Panel > File History. The top part of the window displays the last time that File History was run, as well as the location of the backup files.
Step 2.
If you have not yet set up a backup drive, you will see a message that says "File History is turned off". Click the "Turn On" button to enable File History. You will be asked to choose a location for storing your backup files - this can be an external hard drive or a network drive. Once you have selected a location, click "OK" to start backing up your personal files.
If you want to change the location of your backup files at any time, simply click the "Select drive" link in the File History window. For more setup options for backup locations, we'll cover this part later on.
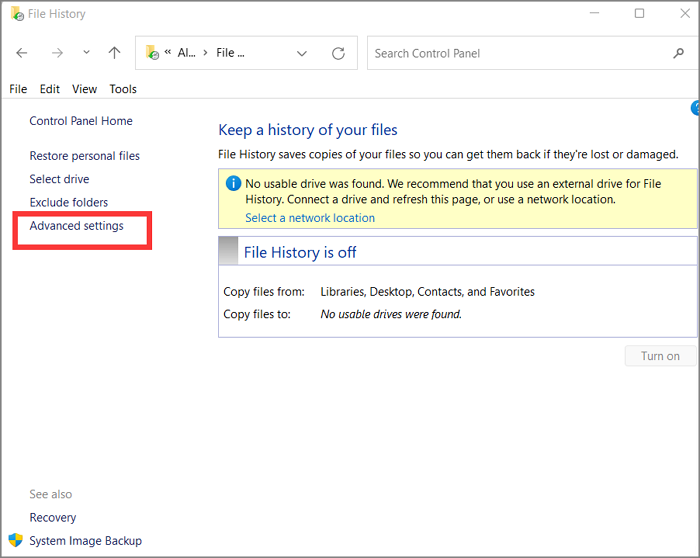
Ⅲ. How to Configure File History Settings
File History has a number of different settings that you can configure to suit your needs. To access these settings, go to Control Panel > File History and click the "Advanced settings" link. Let's first tame File History's storage appetite by tuning up the backup frequency and backup retention strategy.
In the Advanced settings window, you will see a number of different options that you can change. Let's keep digging step by step.
Step 1.
First, you can change how often File History backs up your files. By default, it runs every hour, but you can change this to any interval that you want from a minimum every 10 minutes to a maximum daily (24 hours). We highly recommend choosing every 6 or 12 hours to create a backup, which is good for ensured backup frequency and less disk space consumption.
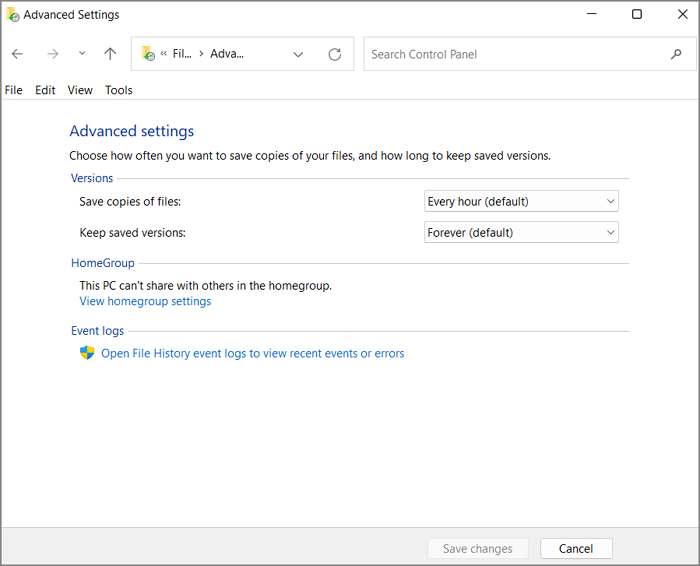
Step 2.
Next, you can change how long file backups are kept. By default, File History keeps backups for as long as possible (forever), but you can change this to any time period that you want. And, a good idea to keep backup snapshots is until space is needed.

Step 3.
By default, File History backs up files that are in the Documents, Music, Pictures, Videos, and Desktop folders. However, you can decide by yourself what folders are unnecessary to back up by clicking the "Exclude folders" link in the File History window. For example, you might want to exclude .tmp files or .log files as these are usually temporary files that can be recreated if they are deleted.
Another tip: Here's what I would try to exclude from the backup list and why:
- Downloads: Usually this folder saves downloaded programs from browsers, which you can always redownload from the source again. And believe me, these programs are usually huge, you don't need to sacrifice precious disk space for those "renewable resources".
- Music, Videos and Pictures (Camera Roll): Aren't those multimedia files the most valuable? Yes, so you need more advanced protection measures rather than relying too heavily on File History. Compared with file history backup, the cloud backup solution is more persuasive.
- OneDrive: It's a backup and sync plan for itself, why should you spend extra time and space in it?
After opening the new window, as the prompt hints, if you don't want to save copies of specific folders or libraries, add them here. Just click the "Add" button, choose the unwanted folder and click "Select folder". Double click on that folder allows you to choose sub-folders to exclude from the backup list. You can only add one folder to the exclusion list at one time. Repeat several times if you want to give up multiple folders. Here, I excluded the folders of Pictures, Music and Videos. Click "Save changes" to take effect.

Step 4.
Apart from using an external USB drive as a backup drive, you can also add a network drive to save File History backups. To do so, click "Select drive" and then the "Add network location" button.
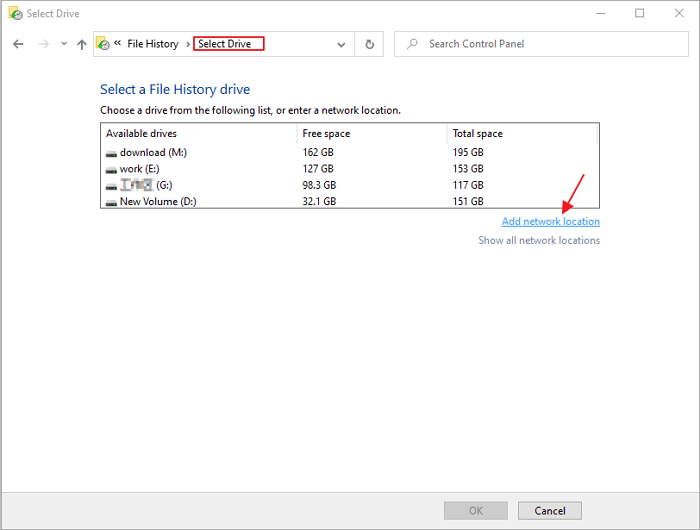
You will be asked to enter the path of the network drive - this can be a local network drive or a shared folder on another computer. Once you have entered the path, click "OK" to add the network drive as a backup location.
LEARN MORE
To be able to use a network drive as the backup drive, you need to map the drive on your computer in advance. Follow a detailed setup guide on how to Backup Windows 10 to the Network drive.
With all configuration setup, your File History program should run perfectly on your PC, to monitor the changes you made on the primary folders and keeps saving history versions for future use.
Ⅳ. How to Restore Previous Versions of Files from File History
If you have accidentally deleted a file or made changes to a file that you later regret, you can use the File History feature to restore a previous version of that file. Here's how to get an older version of certain files back:
Step 1.
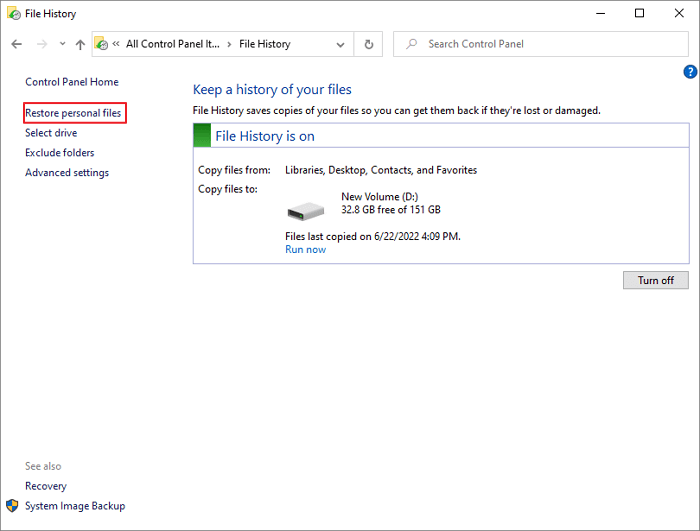
Open File History and click the "Restore personal files" tab on the left menu.
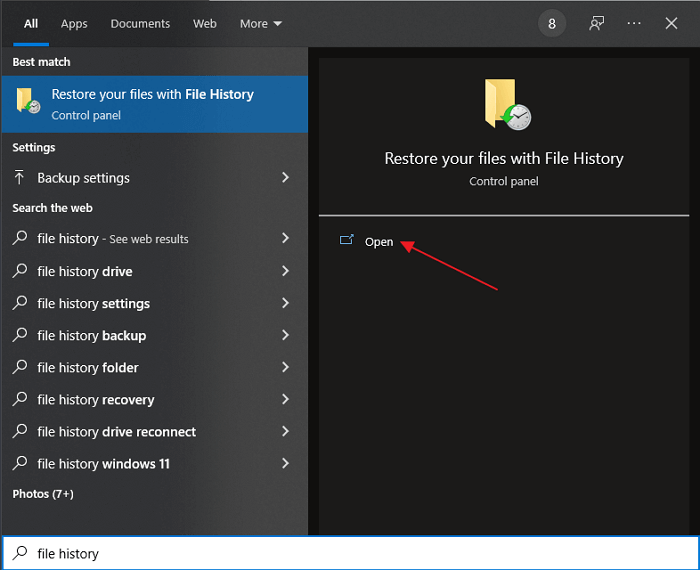
Or, search "File History" and click the result "Restore your files with File History". This will directly open the restore window without going through extra steps.
Step 2.
In the file history window, you can browse through all of the different versions of each file that have been backed up. To view a particular file, simply click on it.
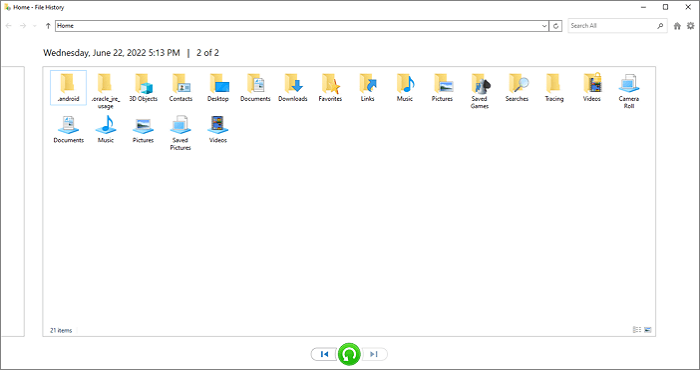
If you want to restore a file, click the "Restore" button at the bottom of the window. The file will then be restored to its original location.
You can also choose to restore a file to a different location by right-clicking the green arrow button and choosing the "Restore to" option. This is useful if you want to restore a file but don't want to overwrite the current version of that file.

LEARN MORE
When you first set up File History to work, you must connect an external hard drive or select a drive on your PC to store the backup data. It's important to know where Windows backup files are stored if you wish for a trouble-free and successful recovery.
Ⅴ. File History Any Good? Pros & Cons
If you are looking for a way to back up your files, then you may be wondering if File History is any good. There are a number of different factors that you need to consider when deciding if File History is the right backup solution for you.
The Goods:
✔ One of the main advantages of File History is that it is very easy to use. The interface is extremely user-friendly and even beginner users will be able to use it without any problems.
✔ Another advantage of File History is that it integrates seamlessly with Windows 10. This means that you can access your backups from within the operating system without having to install any additional software.
✔ File History also offers some flexibility in terms of how often it backs up your files. By default, it will create a new backup every hour but you can change this to suit your own needs.
The Shortcomings:
✘ The biggest disadvantage of File History is that it only backs up individual files from your user account by default. This means that if you want to backup your entire system, i.e., the whole Windows installation, it can no longer meet your demand.
✘ Another disadvantage of such an inbuilt backup tool is that it can't back up open files. This means that if you are working on a file when a backup is created, that file will not be backed up.
✘ Finally, you should also be aware that File History can take up a lot of space on your hard drive. As it saves multiple versions of each file and additionally lacks differential and incremental backup ability, the backups can quickly add up and take up a significant amount of space.
Overall, File History is a good backup solution for users who are looking for a simple and easy-to-use solution. However, it does have some limitations which may make it unsuitable for more advanced users.
If you are looking for a more comprehensive backup solution, then you may want to consider using third-party free backup software such as EaseUS Todo Backup, which has been rated as the superior File History alternative for Windows-based computers. This software allows you to backup your entire system, a whole hard disk, including open files, and offers a range of other features such as file compression and encryption to largely enhance the backup security, which basic tools like File History in Windows 10 cannot do this job at all.
Secure Download
Ⅵ. Common Windows 10 File History Problems & Troubleshooting
There are a number of common problems that users experience with File History in Windows 10. These problems can range from file history not working properly to file history taking up too much space on your hard drive. In this section, we will take a look at some of the most common file history problems and how to fix them.
Problem 1: File History Not Working Properly
If you find that file history is not working properly, there are a few things that you can try. First, make sure that file history is turned on by going to Settings > Update & Security > Backup and checking the "Turn On" option.
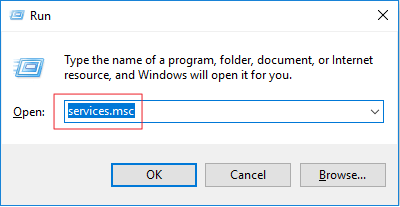
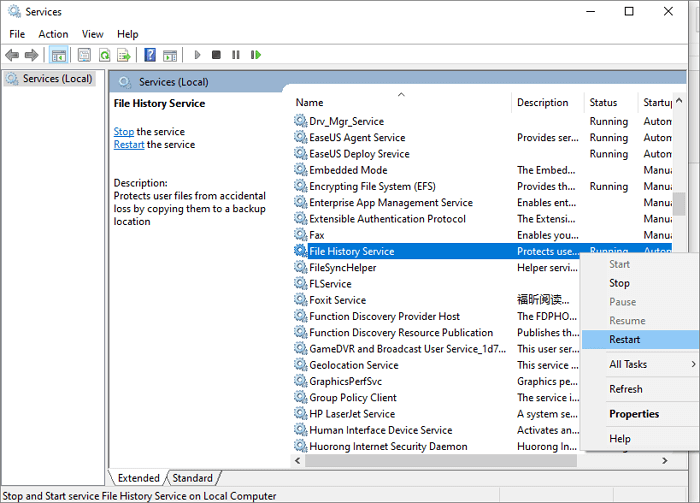
Step 1. If file history is turned on but still not working, then you may need to restart the File History service. To do this, open the Start Menu and type "services.msc" into the search box.
Step 2. Find the "File History Service" in the list of services and right-click on it and select "Restart".
LEARN MORE
The "File History not working" issue can be specified with various errors and symptoms. For example, File History not backing up every hour, File History restore not working, File History service cannot be started...Check the linked article so you can figure out where goes wrong and how to make File History work again.
Problem 2: File History Taking Up Too Much Space
Another common problem with file history is that it can take up a lot of space on your hard drive. This is because file history saves multiple versions of each file, which can quickly add up. If you find that file history is taking up too much space, there are a few things that you can do.
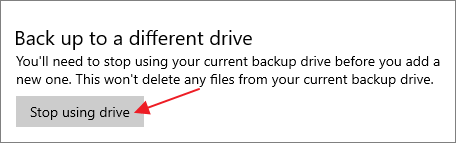
Step 1. First, you can try replacing a small backup drive with a big one to increase the amount of space that file history uses. To do this, go to Settings > Update & Security > Backup and click on "More options". Under "Back up to a different drive", click on the "Stop using drive" button.
And then back to the Backup window, click "Add a drive" to select a larger drive to be the backup location.
* You'll need to stop using your current backup drive before you can add a new one. This won't delete any files from your current backup drive.
Step 2. And, you may consider deleting older versions of historical backups. If you're a permanent user of File History, this option will help release a considerable amount of disk space. However, if you're using File History for less than a year, cleanup seems not a feasible solution because we won't let you delete backup versions earlier than 1 year.
LEARN MORE
It's of great importance to regularly clean up old backups from your physical hard drive for saving disk space. Click here to learn about how to delete old File History backups in a safe condition.
Problem 3: File History Not Backing Up All Files
Sometimes users report that they didn't find any backup version of the covered folders in Libraries. It seems that File History is not backing up all files they added in.
There are a few workarounds for this problem. First, you can try turning off File History and turning it on again. This will give File History a force restart. Also, try removing the folder(s) from the included list and adding them back again.
Ⅶ. Windows 10 vs. Windows 11 File History: What's Different?
If you've upgraded to Windows 11 and found that the File History feature is missing, you're not alone. Many users have reported this issue, and it can be quite frustrating. Is it a fact that Windows 11 has removed File History?
Difference 1: Don't worry, File History is still available in Windows 11, only to note that Microsoft has removed the access from the Windows Settings. That's one of the biggest changes you see in Windows 11. As mentioned, we can get to the File History option in Windows 10 from either the Control Panel or the Windows Settings app. However, in Windows 11, we can only find File History in Control Panel.
Difference 2: Another change, to File History in Windows 11, which is unpleasant to most people, is that we can no longer add any folder outside of the primary folders selected by File History by default.
LEARN MORE
Still curious? Click here to learn about what's new in File History in Windows 11.
All in all, File History has been gradually losing its power in saving users' personal files in Windows 11, and we cannot expect a leap forward in File History in the next generation of Windows OS. However, your data is your power, and it needs to be protected! If you don't take steps to secure your data, a scammer will do it for you.
Alternatively, it's time to look for a competent Windows 11 backup software that performs higher-level backup tasks. If you're a Windows 11 member who values data, we recommend EaseUS Todo Backup, as we've mentioned earlier as the best free Windows 11 backup software. It has a number of features that File History doesn't have, and it's a great choice for protecting your data. Merely a free version can help with the primary backup purposes. Download now and give it a try.
Secure Download

- Full system backup: Backup your operating system, settings, applications, and files.
- Files backup without limit: Backup unlimited types of personal files on your computer hard drive, external HDD, USB pen drive or SD card.
- Entire hard drive/partition backup: By selecting a whole drive to backup, you can freely back up OS, files, applications, settings, and whatever you have there.
- Incremental and differential backups: Only back up the files that have changed since the last backup, which saves time and storage space.
- Bootable rescue media: Create a bootable rescue disk so you can restore your system even if Windows won't start.
Ⅷ. Conclusion
There you have it! This is our comprehensive guide on how to use File History in Windows 10, including how to set it up, how to select or exclude backup contents, how to restore a previous backup, and manage the backup hard drive space by deleting the old backups on your computer. We also compared the power of third-party EaseUS backup software and File History in Windows 10 and Windows 11 and found that there are more details you should be aware of when choosing a backup solution. We hope this guide has been helpful in getting you started with backing up your data!
At any time you want to switch File History to a complete backup solution for not only the user account's associated files but also the entire thing on your computer, feel free to download EaseUS Todo Backup for a happy journey to safeguard data.
Secure Download
Was This Page Helpful?
Updated by Larissa
Larissa has rich experience in writing technical articles and is now a professional editor at EaseUS. She is good at writing articles about data recovery, disk cloning, disk partitioning, data backup, and other related knowledge. Her detailed and ultimate guides help users find effective solutions to their problems. She is fond of traveling, reading, and riding in her spare time.
Jean is recognized as one of the most professional writers in EaseUS. She has kept improving her writing skills over the past 10 years and helped millions of her readers solve their tech problems on PC, Mac, and iOS devices.
Related Articles
-
Create Windows 10 Recovery USB (Including Windows 11, 8.1, 7)
![author icon]() Jean/Jan 21, 2026
Jean/Jan 21, 2026 -
Create System Image: Complete Guide and Walkthrough in 2026
![author icon]() Jerry/Jun 18, 2026
Jerry/Jun 18, 2026 -
A Complete Guide to System Image Recovery in Windows 11/10/8.1/7
![author icon]() Jean/Jun 18, 2026
Jean/Jun 18, 2026 -
(2026) SD Card Backup and Restore on Android, PC and Raspberry Pi
![author icon]() Jean/Jun 18, 2026
Jean/Jun 18, 2026