Part 1. What Is a System Image
A system image, generally speaking, is a snapshot or an exact copy of a hard drive. It is a complete backup of everything on your PC's hard drive. With a system image, if your computer stops working or your hard drive crashes, you can quickly return everything the way it was without reinstalling Windows and programs.
But is a system image the same as a backup? The answer is NO. Backup has a broader definition. A system image differs from a backup, with some differences in backup content, speed and storage space, and flexibility. Let's take a closer look at the system image vs backup:
🧑💻Backup Content
A system image backup back up all data on your system. Therefore, you back up all system files when selecting a system image backup. Additionally, you cannot choose to omit particular components while restoring files.
While for a backup, you can back up files and specific components as needed. You can exclude items you don't want to back up. And a backup usually has 3 types: full, incremental and differential backups.
🚗Speed and Storage Space
The extent of the data you want to back up and the capabilities of the computer's hardware will determine how quickly you can create a system image and perform a routine backup.
However, the system image will take longer if every condition is identical. This is because a system image must also back up additional files and combine them into a single file.
In addition, a system image takes up more space because the system image includes an entire snapshot of everything on your PC's hard drive. Specifically, if your system uses 400 GB of space on a hard drive, this system image will also be about 400 GB. But this can be better if you use professional system image backup software, like EaseUS Todo Backup, to help you compress backups.
🔣Flexibility
Your computer has many things stored in it, but some files are indispensable while others are not. Additionally, if you have already performed a routine backup, you can select only to restore one or two of these files, thus saving time.
However, you can only select to restore everything if you've already performed a system image. Restoring the full system image would take a long time because it duplicates the entire hard drive. Theoretically, it is feasible to restore specific particular files, but doing so is incredibly time-consuming and complicated.
LEARN MORE
Part 1 explains what a system image is. Click here to learn more about system image What Is A System Image.
Part 2. What Does a System Image Backup Include
From the above, it is known that a system image backup is different from a backup in many aspects. But does a system image backup everything?
The answer is negative. It is crystally clear that a system image is an extra copy of your computer's hard drive. It includes Windows operating system (OS), system settings, installed programs, executable files, and all other files.
When something goes wrong with your system, you can use the system image to easily restore the computer to a normal state without reinstalling the OS, drivers, installed software, etc.
And to answer the query one more time, "Does a system image backup everything?" No, a system image does not back up everything on your computer. It can only back up items, such as your OS and installed programs, on your hard drive.
Part 3. How to Create System Image for Windows 11/10/8/7
You can create a system image backup on your Windows 11/10/8/7 computers via third-party backup software or Windows built-in backup programs. Here, a guide to creating a system image backup with both methods will be shared with you. Let's move on.
Way 1. Using Automatic Windows Backup Software
Advantages: 100% safe, simple operation, compressing system image backup, more advanced backup options, applicable for all levels of users
When it comes to creating a system image, the easiest and most reliable way is to use professional backup software. This is because such a tool can offer you more advanced backup options and fewer limitations. To this end, EaseUS Todo Backup is exactly the one that can satisfy your needs.
Secure Download
EaseUS Todo Backup Home allows you to back up your entire hard drive or selected files and folders. And it also allows you to schedule automatic backups and then store them on an external drive, network drive, NAS, or cloud storage. In addition, it can help install Windows on a hard drive for another computer.
Here is how to use EaseUS Todo Backup to create a system image on your Windows computers.
Step 1. Launch EaseUS Todo Backup on your computer, and click Create Backup on the home screen and then hit the big question mark to select backup contents.

Step 2. To back up your Windows operating system, click "OS" to begin the backup task.

Step 3. Your Windows operating system information and all system related files and partitions will be automatically selected so you don't need to do any manual selection at this step. Next, you'll need to choose a location to save the system image backup by clicking the illustrated area.

Step 4. The backup location can be another local drive on your computer, an external hard drive, network, cloud or NAS. Generally, we recommend you use an external physical drive or cloud to preserve the system backup files.

Step 5. Customiztion settings like enabling an automatic backup schedule in daily, weekly, monthly, or upon an event, and making a differential and incremental backup are available in the Options button if you're interested. Click "Backup Now", and the Windows system backup process will begin. The completed backup task will display on the left side in a card style.

⭐Note: If you want to store the system image on a USB flash drive, ensure the USB drive has enough space (at least 16GB) for the Windows system image.
Way 2. Using Windows Backup and Restore (Windows 7)
Advantages: free
Another way to create a system image for your Windows computer is to use the Windows built-in backup program - Backup and Restore (Windows 7). It can also help you create an image backup, which includes your OS, installed programs, and settings.
Again, if you want to back up your Windows system image to a USB flash drive, you should first format your USB drive to NTFS. Otherwise, you will meet the "can't create system image on USB drive" error.
Here is how to use Backup and Restore (Windows 7) to create a system image for Windows 11/10/8/7.
Step 1. Connect an empty external drive to your computer. If it's a USB drive, format it to NTFS first.
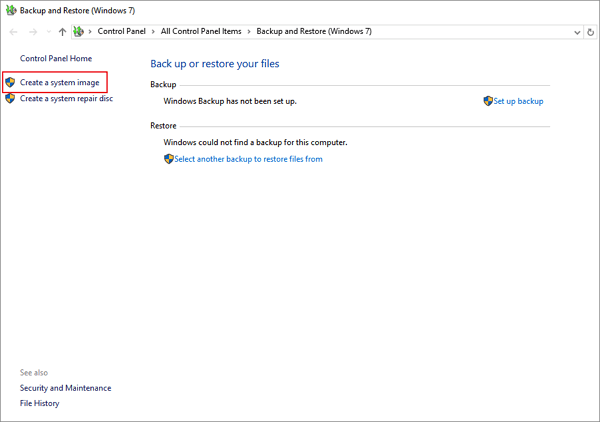
Step 2. Click Start and head for Settings > Update & Security > Backup > Backup and Restore (Windows 7). Then, click Create a system image.
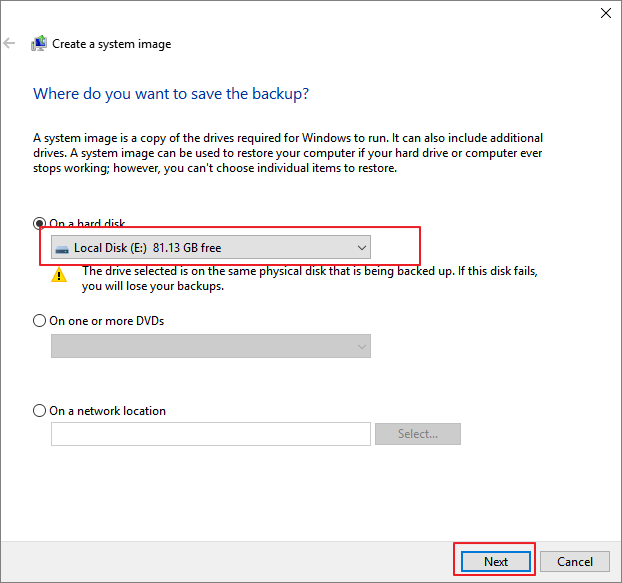
Step 3. Under On a hard disk, select the external drive or USB drive as the destination disk to save the system image, and click Next to proceed.
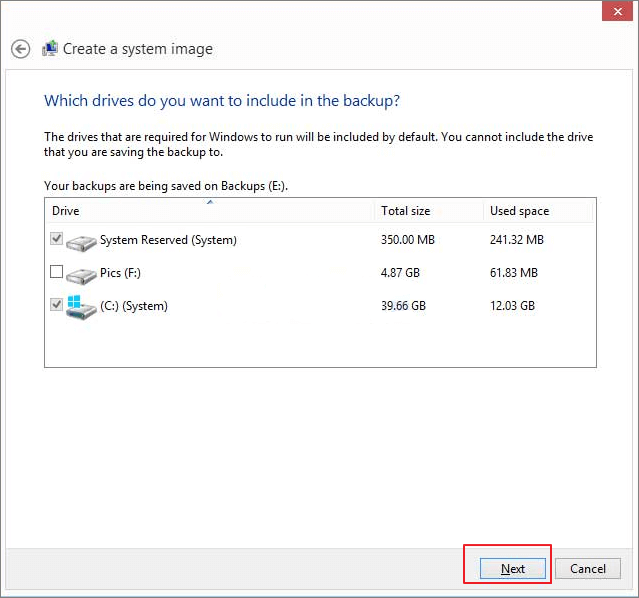
Step 4. The System and the System Reserved partitions will be selected by default. Click Next to continue.
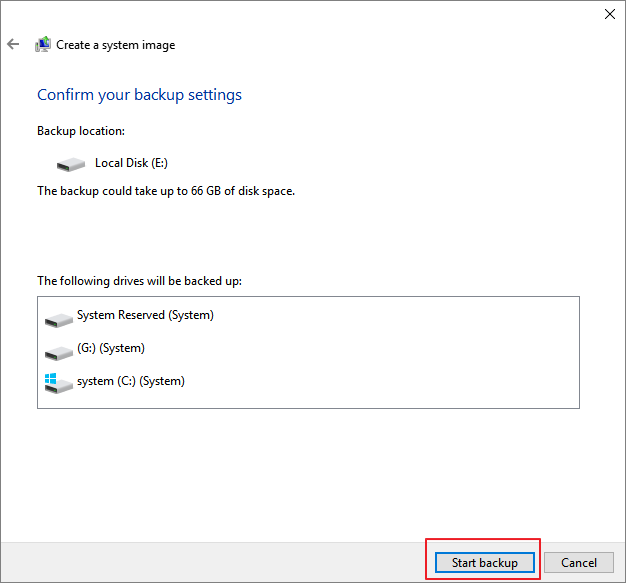
Step 5. Confirm the backup settings again and click Start backup to begin creating a system image.
📃Things you should know when using Windows Backup and Restore:
- The system image created by Windows Backup and Restore can only be restored when the current Windows OS can boot up or boot into the restore window. In other words, you can't use the system image on your external drive to restore Windows if the present system can't boot up.
- The created system image can only be restored to the source computer.
- You cannot restore the system image to a computer running a different operating system, such as restoring Windows 7 to a PC running Windows 10.
- The system image cannot be compressed. Therefore, it will take up a lot of disk space.
Part 4. How to Create System Image for Another Computer
From the above, it is known that if you want to create a system image for another computer, Backup and Restore (Windows 7) may not be your ideal choice anymore. Under such circumstances, you can still use EaseUS Todo Backup to help you, which can help you create a Windows system image on an external drive.
Secure Download
And before you start any operations on your computer, it is highly recommendable to back up your data on the target computer in case something goes wrong to cause data loss.
After that, you can use EaseUS Todo Backup to create an emergency bootable disk, create a system image, and then restore the system image to another computer without trouble.
Stage 1. Create an Emergency Disk to USB
Step 1. Prepare a USB drive which can be written and read.
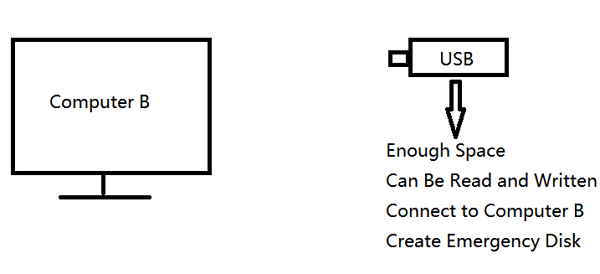
Step 2. Launch and install EaseUS Todo Backup on the Computer B.
Step 3. Find and click "Tools" and choose "Create Emergency Disk".

Step 4. Choose the Boot disk location. You can create an ISO file, a bootable USB or CD/DVD disc.

Step 5. Then click "Create" to start.
Stage 2. Create System Image Backup on Source Computer
Step 1. On the main page, click "Select backup contents".
Step 2. Among the four available categories, click OS.
Step 3. EaseUS Todo Backup will automatically select your system partition, you only need to select the backup destination.
Step 4. Both Local Drive and NAS are available for you to save the backup file.
Step 5. After finishing the backup process, you can check the backup status, recover, open, or delete the backup by right-clicking the backup task on the left.
Stage 3. Boot Target Computer from Emergency Disk Created by EaseUS Todo Backup
Step 1. Eject the EaseUS emergency disk and system image USB and connect it to another computer.
Step 2. Restart the computer and press the DEL/F2/F10/F12 key to enter BIOS.
Step 3. Navigate to the boot menu and set the PC to boot from the emergency disk created by EaseUS Todo Backup.
⭐Note: You must change the boot mode in BIOS to EUFI if you want to restore the system image on a GPT disk. Your computer will then launch the main interface of EaseUS Todo Backup.
Stage 4. Transfer the System to the New/Another Computer
⭐Note: The data on the destination drive will be removed if you restore the system image to another computer. To prevent data loss, back up your data beforehand or restore the system image using an empty disk.
* To perform system recovery on a none-bootable machine, try to boot the computer through the EaseUS Todo Backup emergency disk.
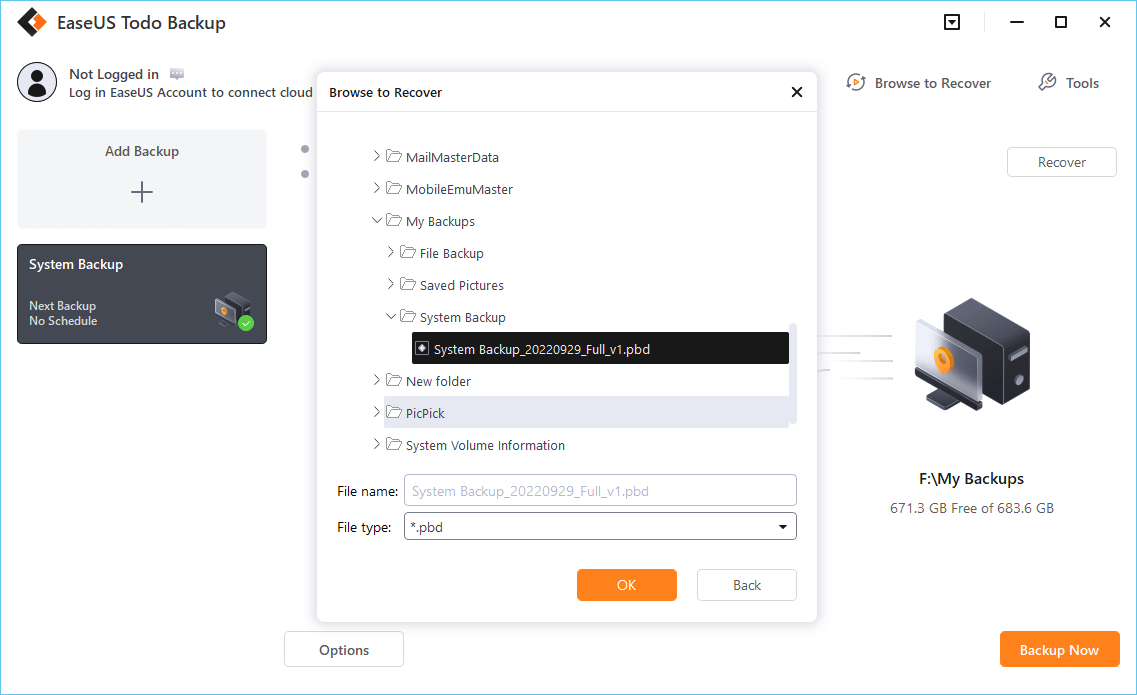
Step 1. Launch EaseUS Todo Backup, click "Browse to Recover".
Step 2. Guide to your backup destination, choose the system backup file you need. (The backup file created by EaseUS Todo Backup is a pbd file.)
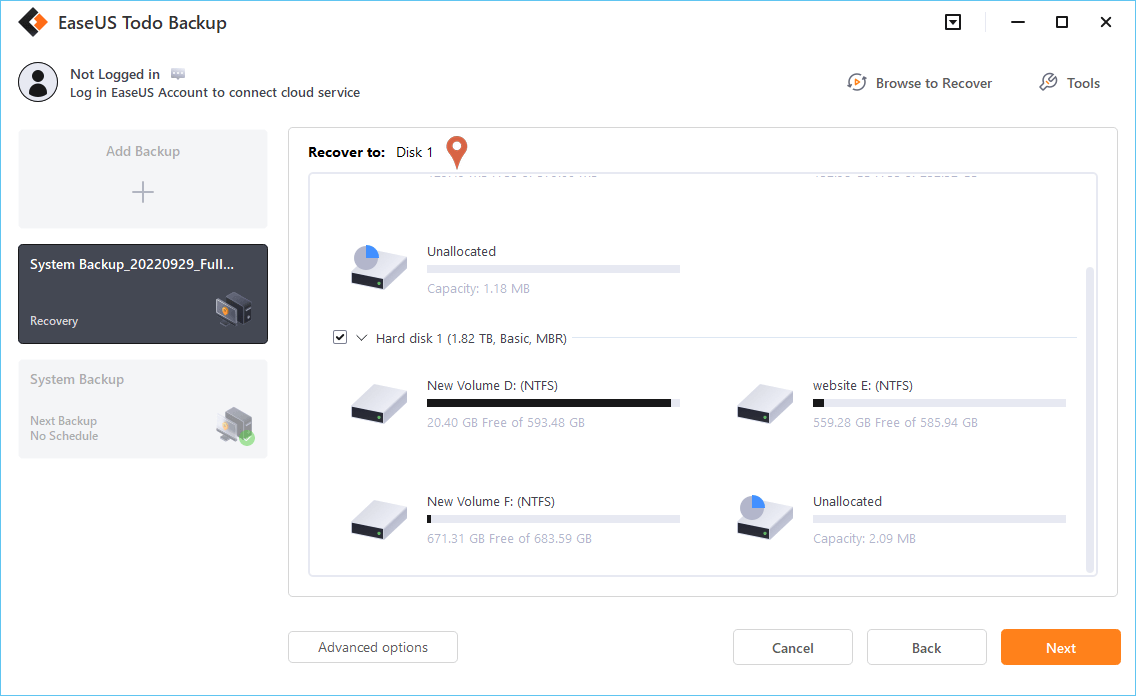
Step 3. Choose the recovery disk. Make sure that the partition style of the source disk and the recovery disk are the same.
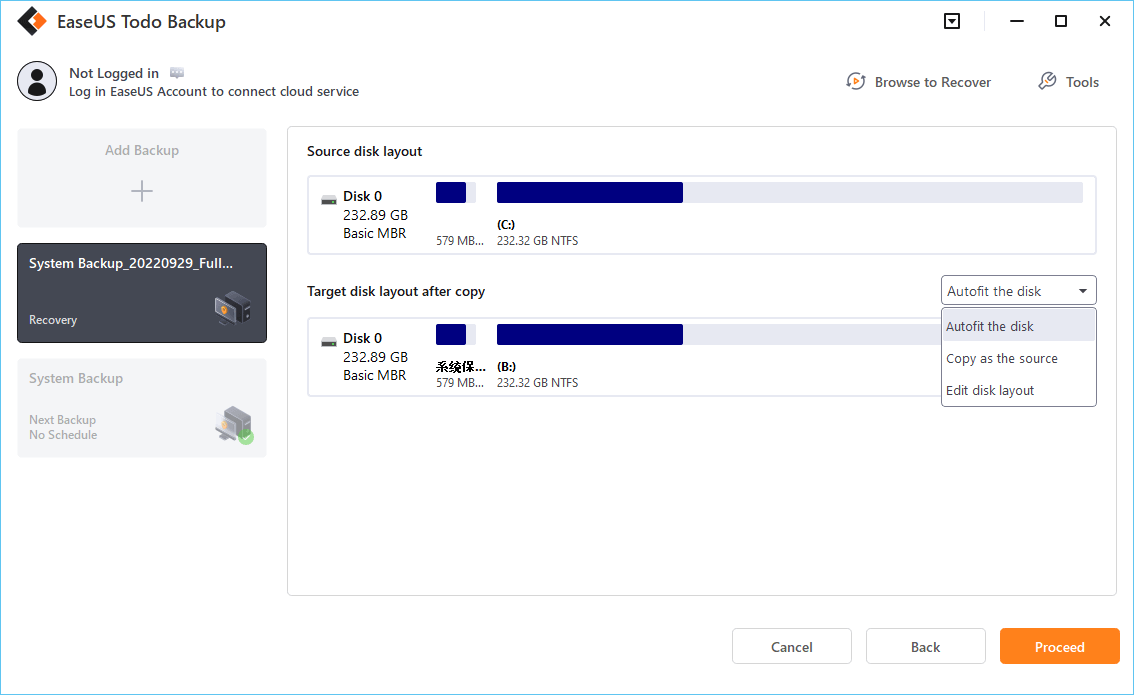
Step 4. You can customize the disk layout according to your needs. Then click "Proceed" to start system backup recovery.
Stage 5. Restart Target Computer with the Transferred System
Step 1. Enter BIOS again and set up the computer to boot from the disk with the transferred system.
Step 2. Save changes and restart the computer.
Step 3. Update necessary drive drivers and programs to make everything work fine on the new computer.
Stage 6. Make Transferred System Bootable on New/Another Computer
One more step remains after the system transfer process is done. It involves setting up your computer's BIOS boot mode to be the same as that of your source PC:
Step 1. Restart the PC and press the DEL/F2/F10/F12 key to access BIOS.
Step 2. Navigate to the Boot menu and locate BIOS Mode.
Step 3. Change the boot mode on the new computer to the same as it was on your old computer - Legacy or UEFI.
Step 4. Save changes and exit to boot the PC.
Wait for a while, and you will find that your computer will boot up successfully with the same operating system on your old computer.
⭐Note: You need an activation key to activate Windows because EaseUS Todo Backup only transfers your OS.
LEARN MORE
Part 4 explains how to create a system image for another computer. Click here to learn more about it How to Create and Restore (Windows 10) System Image to Different Computer.
Part 5. Best Windows Backup Software for Creating System Image
EaseUS Todo Backup, one of the best Windows backup software available on the market, is highly recommended to help you protect your data and computer safe and sound. This is because the Windows backup utilities really fall behind in some areas!
When choosing a backup software, you should consider the following factors:
- Easy to use. It should have an intuitive interface for easy to install and use.
- Diverse backup options. It should allow you to create full, incremental, or differential backups.
- Scheduling options. It should allow you to schedule backups to free up your hands.
- Various storage options. It should let you store the backups on an external drive, network drive, or Cloud.
- File encryption. It should allow you to encrypt your backup drive to protect data.
- Well after-sales service. It should provide good customer support if you run into software problems.
That is why EaseUS Todo Backup is so recommendable and popular because, considering all, it can suit you well in almost every aspect:
- It has a simple UI and can show the backup speeds
- It lets you easily and quickly create a system image
- It lets you create different types of backups and store them in different locations
- It also lets you create hot, intelligent, automatic, and Security Zone backups
- It lets you clone a hard drive and migrate OS from HDD to SSD
- It lets you mount and unmount backup images and encrypt backup files
- It lets you perform a universal restore to install Windows 10 from one PC to another
- It provides all-weather technical support from well-trained staff
…
All in all, EaseUS Todo Backup can meet every backup need on your PC. You can feel free to download it on your PC and use it safely.
Secure Download
Part 6. How to Perform a System Image Recovery
After knowing how to create an image backup on your current computer and for another computer, let's see how to perform a system image restore. Generally speaking, it has 3 cases:
How to Restore System Image Without Repair Disc
If you are worried about whether you can restore system image without repair disc, it is possible. In this post, we will see a professional backup tool, EaseUS Todo Backup to create a system image on an external device and use it to restore it on your device.
Case 1. Perform System Restore in Safe Mode
The detailed steps to perform a system image restore in Safe Mode are as follows:
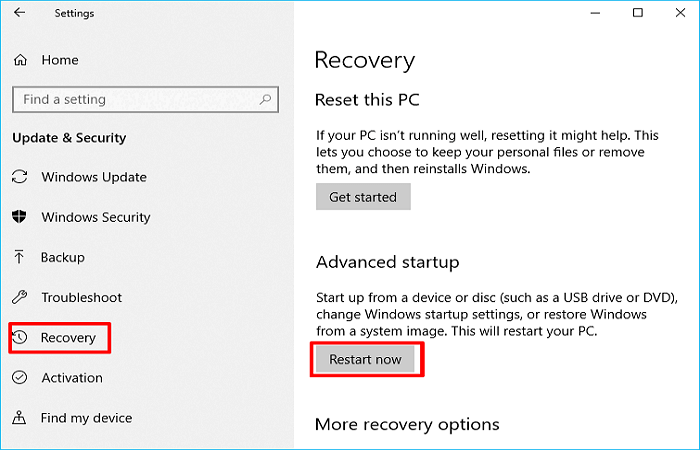
Step 1. Go to Settings > Update & Security > Recovery. In the right pane, scroll down and click Restart now under Advanced Startup.
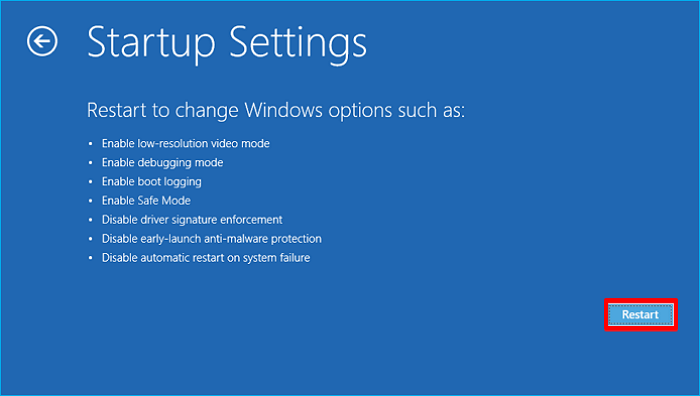
Step 2. After the PC restarts, go to Troubleshoot > Advanced options > Startup Settings and tap Restart.
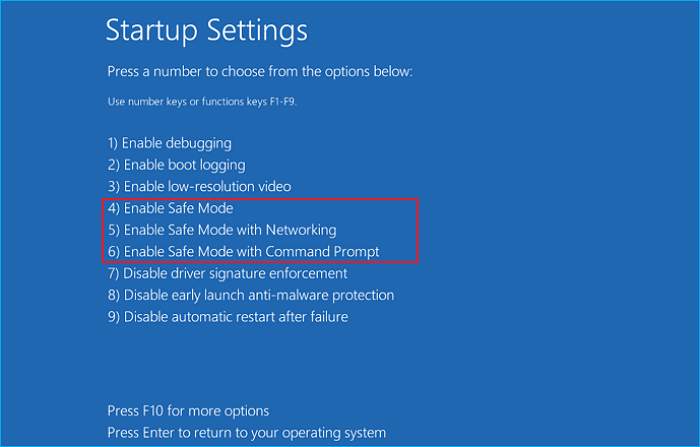
Step 3. Once the computer restarts, press F4, and it will boot into Safe Mode.
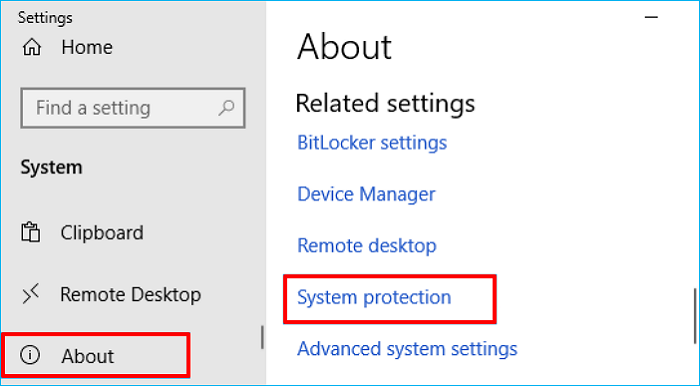
Step 4. After the computer is in Safe Mode, go to Settings > System and select About. In the right pane, click System Protection under Related settings.
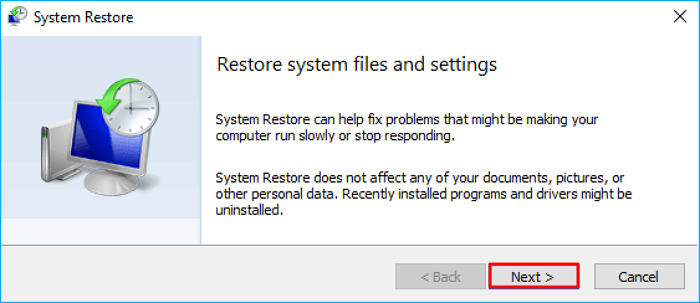
Step 5. Click Next.
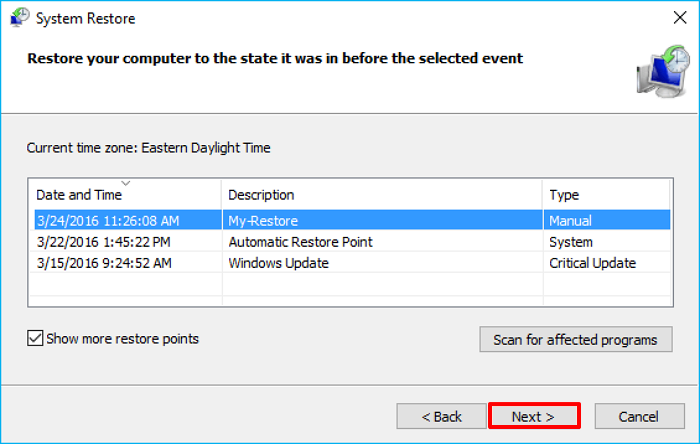
Step 6. Select the Restore Point you want to use and click Next.
Wait patiently for the restore process to be finished (a pop-up will show you the status of the restore process). You will get a pop-up notification once the restoration process is completed, letting you know the system has been restored.
The System Restore process will undo recent changes that caused issues on your computer and return it to its prior state (when the Restore Point was created).
Case 2. Perform System Restore from Command Prompt
When you can't access your Windows session regularly due to a problem (driver installation, Windows update, or virus), it is the perfect time to execute a system restore from the command line. It enables you to roll back the date on your system settings.
⭐Note: The change cannot be reversed once you use system restore in safe mode to restore your computer's operating system. Use the installation media that came with your computer to undo this action. If you don't have one, install one on a different computer with the same hardware or make a Windows recovery drive.
Here, you will get how to start a system restore in Windows 10's Safe Mode using the Command Prompt and perform a system restore.
Step 1. Press the Shift key while selecting Power > Restart from the Start menu.
Step2. After the PC restarts and goes to the Choose an option screen, head for Troubleshoot > Advanced options > Startup Settings > Restart.
Step 3. Choose Enable Safe Mode with Command Prompt by holding number 6 or function key F6.
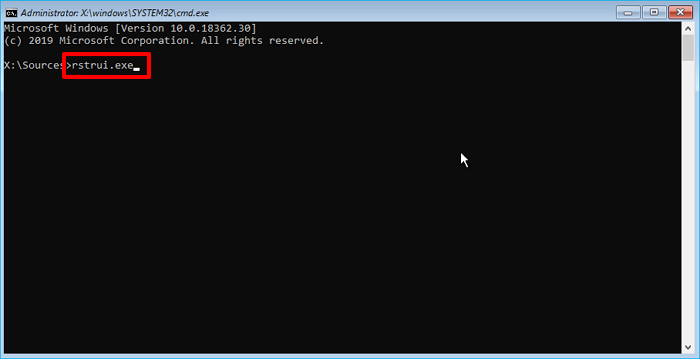
Step 4. Sign in with an administrator account if required. Once the command prompt is popped up, type rstrui.exe, then press Enter.
Step 5. The System Restore wizard will appear. You can use recommended restore point or select a restore point and click Next. Then, follow the on-screen instruction to complete the system restore.

Case 3. Perform System Image Recovery
To perform a system image recovery includes 3 steps: create a system image, create a system repair disc, and restore the PC from a system image. Let's come to the details.
Part 1. Create a System Image
As mentioned above, the system image is created from an earlier system state backup. Therefore, the first step is to make a system image of your computer. You can refer to the ways offered in the article, like using EaseUS Todo Backup or Backup and Restore (Windows 7).
Part 2. Create a System Repair Disc
A system image is technically necessary to do a system image recovery. When you store a system image backup on a local disk, external drive, or network drive, accessing it when your computer boots up is typically not a problem. What would happen if the system failed and you could not access the image?
When your computer goes down unexpectedly, you can use a system repair disc, first released for Windows 7 but still available in later Windows versions, to boot your PC. You can use it to diagnose and fix major issues that might make Windows boot improperly.
Here is how to create a system repair disc on Windows 11/10/8/7.
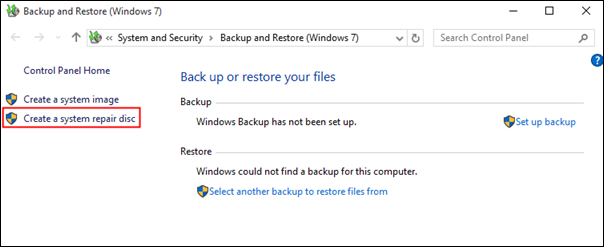
Step 1. Go to Start > Control Panel > Backup and Restore. Then click Create a system repair disc.
Step 2. Select the CD or DVD drive where you want to make the system repair disc. Then click Create disc.
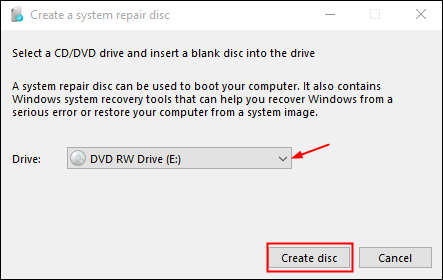
Step 3. The system will automatically burn a system repair disc and wait until the process is done.
Step 4. When the system repair disc is successfully created, click Close to finish.
Part 3. Restore PC from System Image
We will show you how to perform a system image recovery on Windows 11/10/8.1/7 stepwise. The interface may look slightly different if you're using an older Windows version, but the procedures are pretty similar.
Step 1. Launch system image recovery on your computer.
If your PC can still turn on. Go to Settings > Update and Security > Recovery. Then click Restart now under Advanced startup.
If your computer cannot boot, you will use the system repair disc. Insert it into your CD/DVD drive, then restart your PC. Connect your external drive containing the system image.
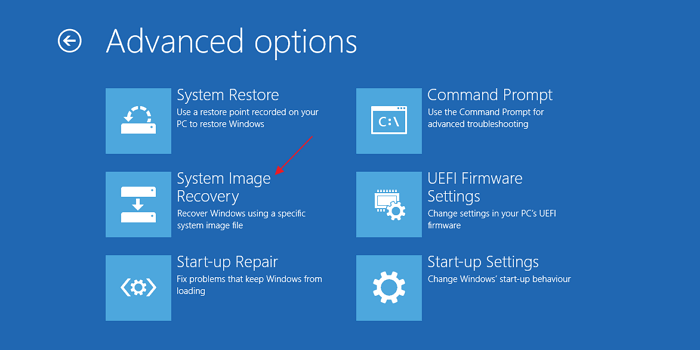
Step 2. Then, you will go to the Choose an option screen, head for Troubleshoot > Advanced options > Startup Settings > System Image Recovery.
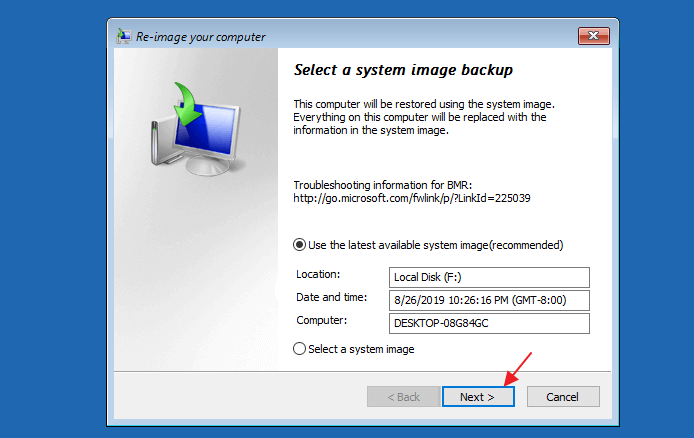
Step 3. System image recovery will scan all system images on available drives and show them in a list. Select the latest system image and click Next.
Step 4. Verify the operation. System image recovery will notify you that it will erase everything from your hard disk and replace it with the chosen system image backup. Click Finish to proceed.
Step 5. The Re-image Your Computer Wizard window will display when the system image recovery process begins. Choose a system image version to restore. By default, Windows advises utilizing the most recent system image. Click Next to continue.
Step 6. You need to select additional restore points.
- Format and repartition disks: It's preferable to enable this option if you're restoring to a fresh hard drive.
- Exclude disks: Choose the disks you wish to exclude from the restore procedure if you have numerous hard drives and don't want to restore the system image backup to each one.
- Advanced settings: Set up more system image recovery options. You can modify the location of the system image backup files that Windows looks for. Choose that option if your system image is located on a network site.
The process of recovering the system image will start, and one progress bar will appear on the screen. This procedure could take some time to finish, depending on the size of your system image and the speed of your hard drive.
LEARN MORE
A system image recovery/restore is a process of restoring your PC from a system image. Click here to learn more about system image recovery A Complete Guide to System Image Recovery in Windows 11/10/8.1/7.
Part 7. Troubleshooting System Image Backup and Recovery Problems
Inevitably, you may encounter issues when creating a system image backup or restoring the system image to your PC. Here, this article will tell you how to solve the system image backup failed and system image restore failed errors.
System Image Backup Failed
Many users have a habit of creating a system image in case of unexpected system crashes or data loss. However, due to some reasons, the system image backup may fail. System image backup failure is mainly in 2 situations:
Case 1. Has the shadow copy on another volume
As the error message applies, problems with the backup location caused the Windows image backup to fail. You can try the following way to troubleshoot and fix the problem.
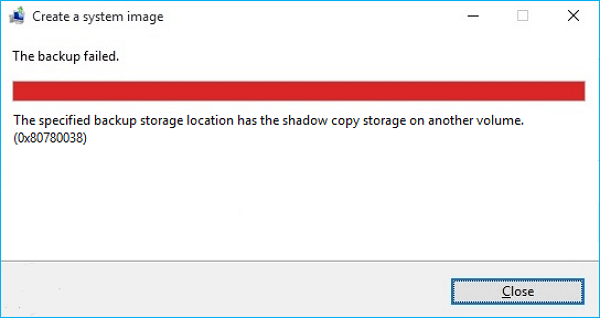
Press the Windows + X keys to launch a command prompt. Then type SFC /SCANNOW and press Enter. This can help fix this problem or tell you what goes wrong on your PC. When this finishes, you can create a system image backup without errors.
Case 2: Not enough disk space to create the volume shadow copy
The error is brought on by a lack of free space on the source partition you are attempting to back up, as the error message indicates. You should expand the system partition or free up more space on the system drive to fix Windows system image backup failure due to insufficient capacity.
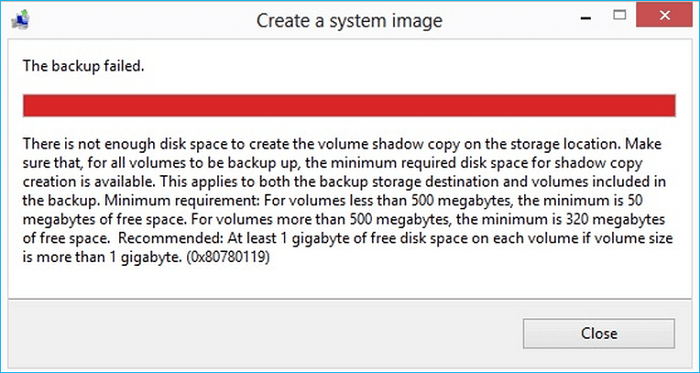
Generally speaking, there should be 50 megabytes of free space for volumes less than 500 megabytes in size that you are attempting to back up. 320 megabytes or more for volumes over 500 megabytes.
If Windows image backup still fails after trying these steps, you can turn to EaseUS Todo Backup for help. It can help you create a system image backup easily and quickly without hassle.
System Image Restore Failed
Another issue you may encounter is the system image recovery failure when trying to restore the image on your computer. The following are the solutions to fix this problem in different cases.
Case 1. System Image Restore Failed No Disk That Can Be Used
This error is caused by two reasons: the disk partition you want to restore to is smaller than the partition that was backed up, or the destination drive you want to restore to has a FAT32 file system.
Way 1: Clean Target Drive
Step 1. Create a Windows installation disc or bootable USB for the computer to boot.
Step 2. Navigate to Troubleshoot > Advanced options > Command Prompt.
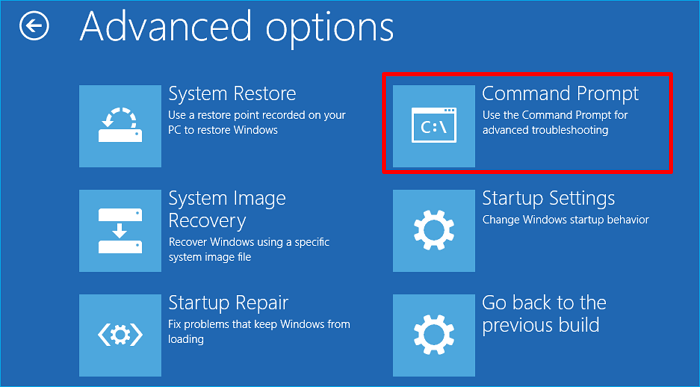
Step 3. Type the commands below and press Enter after each command:
- diskpart
- list disk
- select disk n: (n is the disk number of the target drive)
- clean
- exit
Way 2. Convert Target Drive to NTFS
You need to enter Windows Recovery Environment and use Command Prompt to do this. In the CMD window, type the command: convert n: / fs:ntfs (n is the drive letter) and press Enter.
Case 2. System Image Restore Failed 0x80070057
Way 1. Pull out Bootable USB Drive
If Windows 7 encounters this problem, this may be because Windows 7 considers the USB device you use to start your computer as an internal disk drive. The disk Windows detects that the image doesn't match the physical disk on your machine when you attempt to recover your image. Some forums advise taking the USB drive out before starting the restoring process.
Way 2: Use CHKDSK Command
Windows 11/10/8/7 may experience this problem due to hard disk corruption. Therefore, we suggest that you conduct a check disk to find any hard disk errors.
Step 1. If your computer can run, right-click on Start and choose Command Prompt (Admin). If the computer cannot boot, you must still access WinRE and the Command Prompt.
Step 2. Enter the command chkdsk c: /f. This will show and correct the precise mistakes that are occurring on your hard disk.
The system image you prepared may be corrupted if these two fixes for the error "system image restore failed 0x80070057" do not work. Perhaps, you have to reinstall Windows.
Part 8. To Wrap Things Up
That comes to an end to our topic today: how to create system image? In this article from EaseUS, you will learn how to create a system image backup for your current PC or for another PC, how to restore the system image to another computer, and how to troubleshoot problems when performing the image backup and recovery process.
It is worth noting that if you do not want to meet some errors when carrying out such a task, you can use EaseUS Todo Backup to help you. Such a tool can help you do it easily and quickly. Feel safe to download and use it on your computer. Hopefully, you can find what you want in this article.
Secure Download
Part 9. FAQs on How to Create System Image
1. Is a system image the same as a clone?
Cloning is a one-to-one transfer of one hard drive to another drive. Put another way; it involves making a perfect copy of a drive so that you cannot tell the difference between the source drive and the destination drive. If your source drive suffers a terrible loss, cloning allows you to restore your data to the destination disk. In contrast, imaging is the process of archiving the data on a hard drive byte-by-byte in a compressed (albeit still very huge) file and moving it to another drive.
2. Is system image the same as recovery disc?
An improved version of a recovery disk is a system image recovery. The System Image Recovery will restore the image of your PC, as opposed to a recovery disk that would merely reinstall Windows on the system. In other words, your system would be precisely as you had left it when the image was made.
3. Is Windows system image bootable?
Third-party software-created system image backups are bootable because they contain the partition metadata. Indeed, if the C: disk image couldn't be booted, what use would it be? No need to reinstall anything or use a recovery drive.
4. Does creating a system image wipe the drive?
Generally speaking, creating a system image backup will erase all the data on the target drive. But there is another way out. If you want to create a system image and save the original data on your destination drive, you must create a new partition and store the image on the new partition volume.
Was This Page Helpful?
Updated by Jerry
"I hope my articles can help solve your technical problems. If you are interested in other articles, you can check the articles at the bottom of this page, and you can also check my Facebook to get additional help."
Related Articles
-
System & Files | Backup Windows 10 PC with Backup and Restore Tool
![author icon]() Jean/Jan 21, 2026
Jean/Jan 21, 2026 -
A Complete Guide to System Image Recovery in Windows 11/10/8.1/7
![author icon]() Jean/Jan 21, 2026
Jean/Jan 21, 2026 -
Full Backup Guide 2026: What Is Disk Image and How to Create Disk Image
![author icon]() Jean/Jan 21, 2026
Jean/Jan 21, 2026 -
(2026) An Ultimate Guide to Backup Hard Drive and Restore Your Computer
![author icon]() Jean/Jan 21, 2026
Jean/Jan 21, 2026