Backing up your computer is one of the most important things you can do to protect your data. If your hard drive fails, you will lose everything on it if you don't have a backup. We know that the 3-2-1 backup strategy is the best way to back up your computer, which mentions saving your backups to two different types of media and keeping at least one backup file offsite. Therefore, when it comes to selecting a backup location, users have multiple choices like a local hard drive, external storage drive, Network drive, Tape, and Cloud drive.
In this post, we will show you how to back up Windows 10 to a network drive. There are three methods that we will cover: using File History, Backup and Restore, and third-party Windows backup software. We will also provide step-by-step instructions for each method. So, whether you are new to backing up your computer or just want to try a different method, we have you covered!
Why Use Network Drive to Save Your Computer Backup
Before we get into the how-to's of backing up to a network drive, let's first talk about why you would want to use a network drive. A network drive is simply a storage device on a local access network (LAN) within a business or home. A network drive can reside on a server, network-attached storage (NAS), an external hard drive, or one of the networked computers.
The benefits of using a network drive as your backup destination are:
You can backup multiple computers to the same network drive. This is convenient if you have multiple computers in your home or office.
- Network drives are usually larger than external hard drives, so you can store more data on them.
- Network drives are typically faster than external hard drives, so your backups will finish more quickly.
- Network drives are usually more reliable than external hard drives, so your backup will be safer.
- Network drives provide more flexibility to access your backups from anywhere as long as you have an internet connection.
Now that you know the benefits of using a network drive for your computer backup, let's look at how to do it!
📖Related Reading: How to Back Up Network Shared Files Using Network Backup Software
Method 1. Backup Windows 10 to Network Drive by Using File History
File History is a backup feature that comes with Windows 10. Usually, when you first set up File History to work, it asks you to add a drive as a backup drive. Since backups created by File History will become large over time (the backup schedule is set to back up every hour by default), one of the acknowledged backup retention strategies is to use a Network drive to preserve the backups forever (to keep many backup version as long as possible).
Note: File History targets only the user account folders, including Documents, Pictures, Videos, Music, and Desktop folders, plus the OneDrive files available offline on your PC.
Follow the below guide to setup and configure the network drive in File History so you can use File History to backup Windows 10 with Network locations.
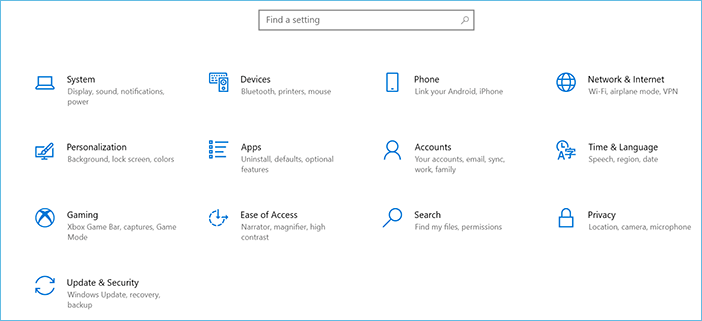
Step 1. Press the Windows key + I to open the Settings app, then click Update & Security.
Step 2. Click Backup on the left side, then click Add a drive on the right side.
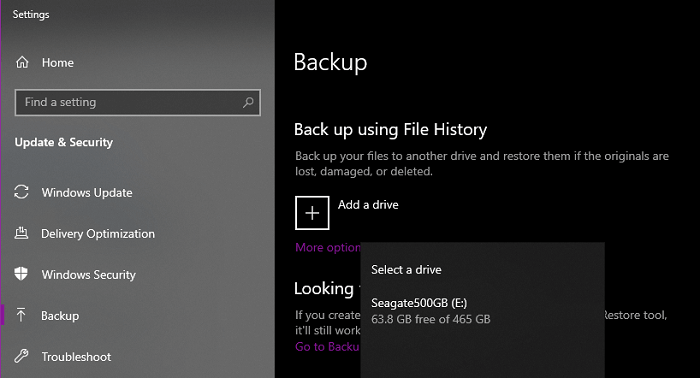
Step 3. Select your network drive from the list of available drives and click OK.
Step 4. If you want, you can change the backup frequency or other settings by clicking More options. When you're finished making changes, click Save changes.

Step 5. Now, your backup will start automatically according to the schedule you set. To run a backup immediately, click Back up now.
If you've already been running File History in Windows 10, to change to a network drive from an external hard drive, you need first stop using this current drive and select "Add a drive" again to choose the network drive to take effect.
What if you don't see any network drive option while selecting "Add a drive" while setting up File History in Windows 10 Settings? It's likely because the network drive is not indexed by Windows. To show a network drive in the list, you need to map it in File Explorer using the network address. Here's how to map a network drive:
Step 1. Press the Windows key + E to open File Explorer.
Step 2. Click This PC on the left side, then click Map network drive on the right side.
Step 3. Select a drive letter from the drop-down menu and enter the network path of your network drive. For example, if your network drive is at \\192.168.0.1\share, you would enter that as the network path.
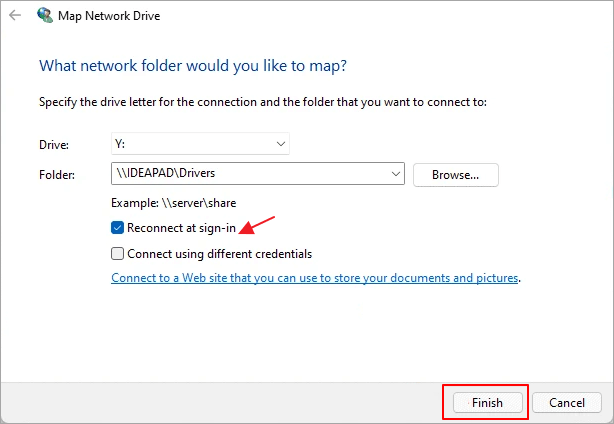
Step 4. If you want, you can check the Reconnect at sign-in box to have Windows automatically reconnect to this network drive when you sign in.
Step 5. When you're finished, click Finish.
Your network drive should now be indexed by Windows and appear in the File History backup list.
Method 2. Back up Windows 10 to Network Drive Using Windows Backup and Restore (Windows 7)
Older than File History, the Windows Backup and Restore is another free backup feature that comes with Windows 7, and it's still available in the later Windows versions. If you used Windows Backup and Restore in Windows 10, you can not only backup files but also create system image backups. Compared with File History, it's recognized as a more comprehensive backup solution that Microsoft provides for users for free.
To build a backup drive on a network drive/NAS using the Backup and Restore feature in Windows 10, follow the below steps carefully.
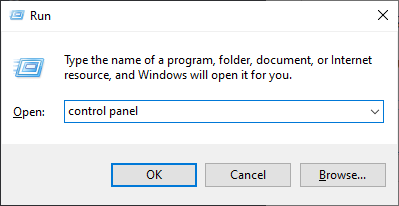
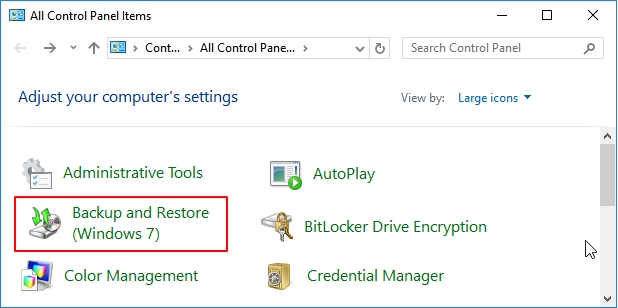
Step 1. Press the Windows key + R to open the Run dialog box, then type control panel and press Enter.
Step 2. On the Control Panel window, click Backup and Restore (Windows 7).
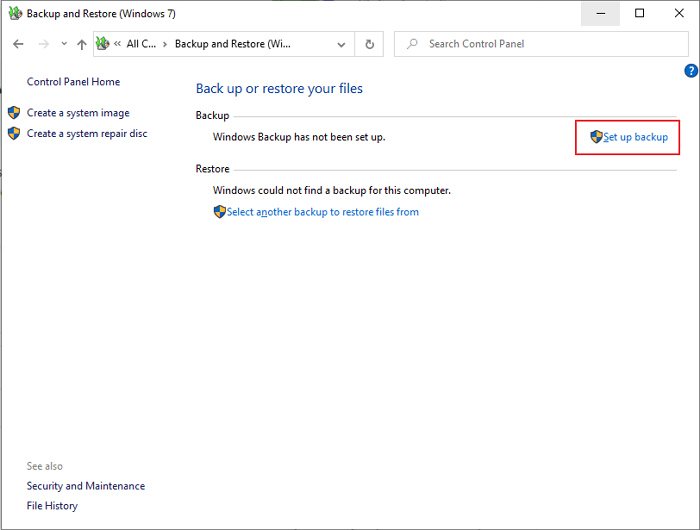
Step 3. Click Set up backup on the right side.
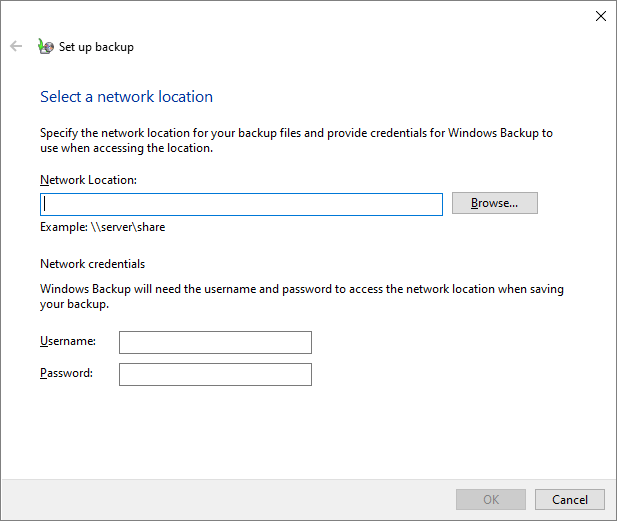
Step 4. To set up a network drive as the backup drive, click "Save on a network".
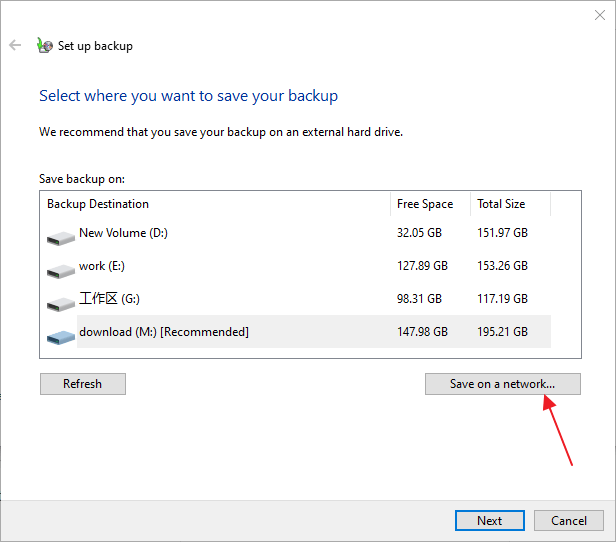
Note: Manually enter the network location or click Browse to select a current one. You might be asked to enter login credentials by providing the username and password. Click OK once setup.
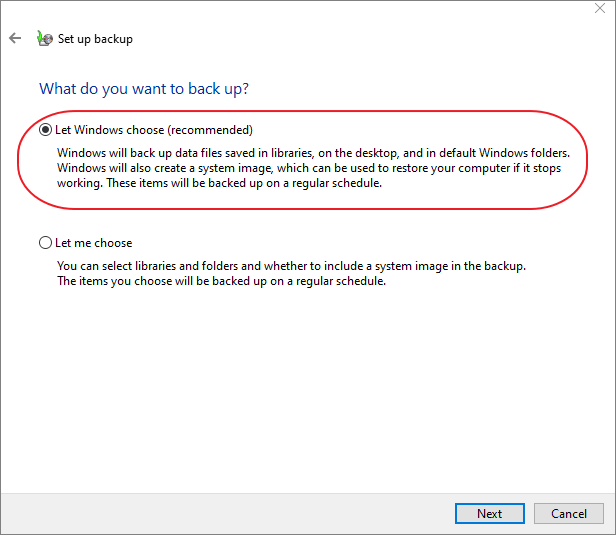
Step 5. Next, you got two options to let Windows choose contents to backup or choose by yourself. If you don't have any special backup demands, using the recommended option is enough. Windows will back up data files saved in libraries, on the desktop, and in default Windows folders. Windows will also create a system image, which can be used to restore your computer if it stops working. Click Next.
Step 5. At the last step, there is a "Change Schedule" link available for you to change a backup schedule, which by default is set to make a backup every Sunday at 7:00 PM. Review your backup settings and click Save settings and run backup.

Looking for further guides on how to restore a system image backup in Windows 10? Click the link to get instructions.
Method 3. Back up Windows 10 to Network by Using EaseUS Todo Backup
The former two methods are default solutions provided by Microsoft Windows, and the common thing they share in common is that all the functions there are free but basic, particularly the File History's limit in backing up various types of files as well as other items like a hard drive or OS.
If you want an easier and more reliable backup solution, you can try using third-party free backup software like EaseUS Todo Backup. It's one of the most popular backup programs that help users backup data, operating systems, and even hard drives to network locations with simple steps.
Secure Download
Besides the network location, the software outpaced the native programs in many aspects: It allows users to save backups to the cloud as well. Either the popular OneDrive, Dropbox, Google Drive, or its own branded EaseUS cloud. Regardless of the hard drive capacity and safety, cloud drive p can be a better alternative to the local drive as a backup location choice. See cloud backup vs local backup.
With EaseUS Todo Backup Free, you can back up everything on a Windows 10 computer with ease:
- Disk/partition
- System
- Files
Based on an event schedule, it's even possible to automatically back up Windows to an external hard drive.
Now follow a simple guide on how to use EaseUS Todo Backup to back up Windows 10 to a network drive:
Step 1. Start with selecting the backup contents.

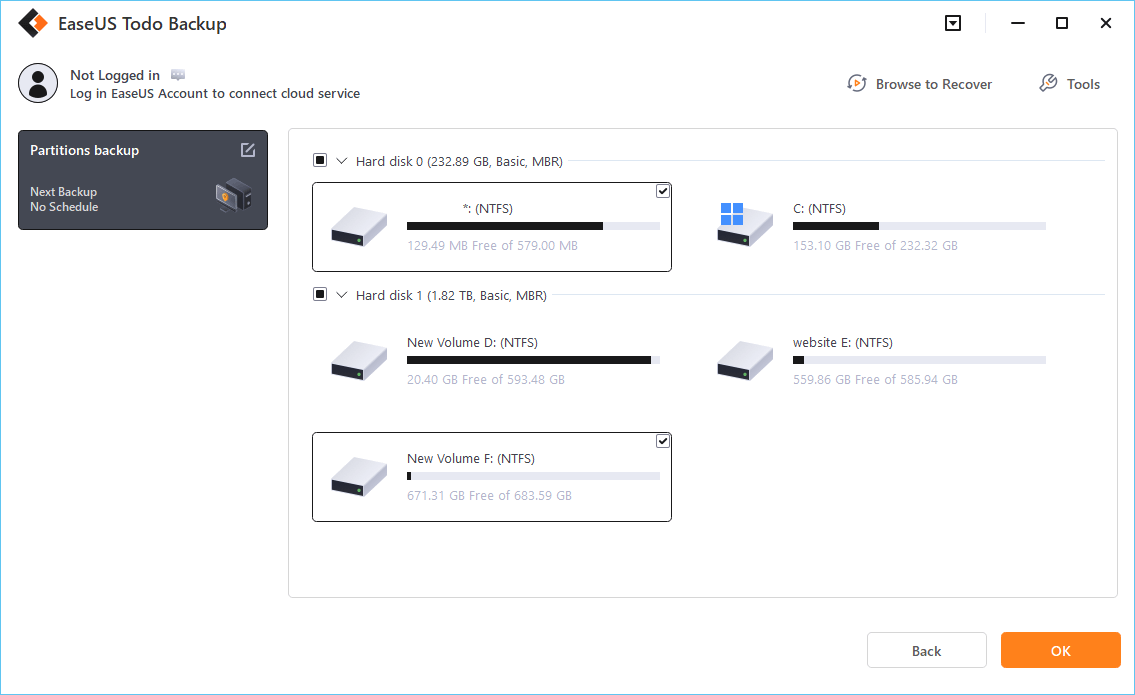
Step 2. There are four backup categories, File, Disk, OS, and Mail, click Disk.

Step 3. It is available to back up a whole disk or a certain partition. Choose the one you need and click OK.
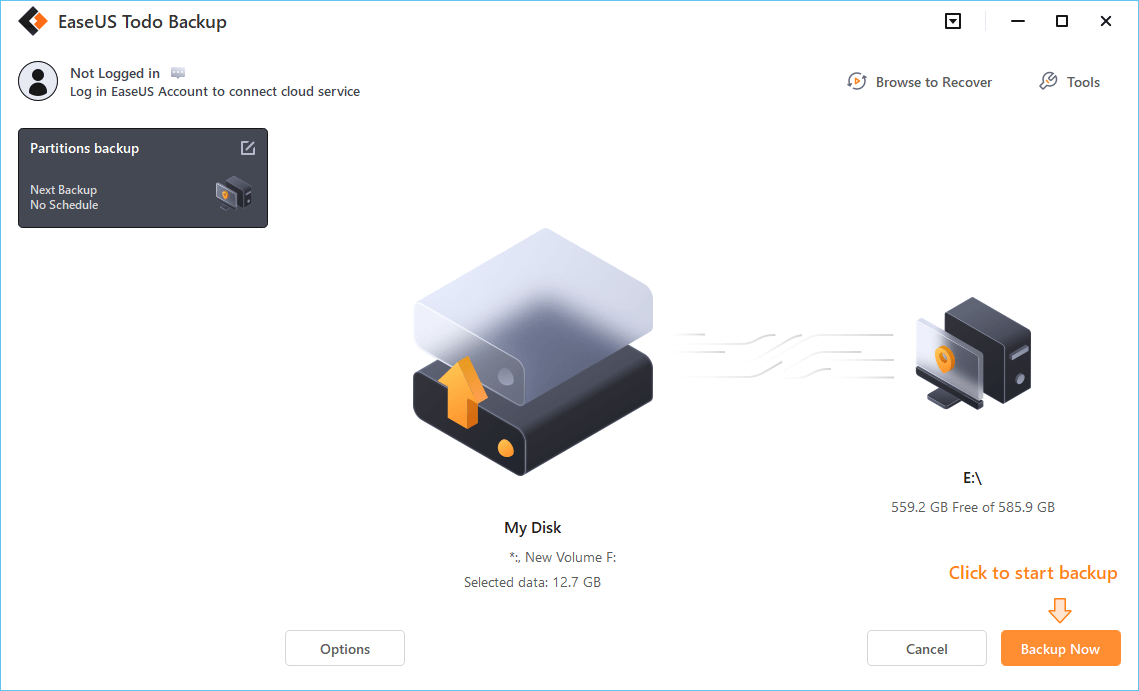
Step 4. Select the destination where you want to save the backup.
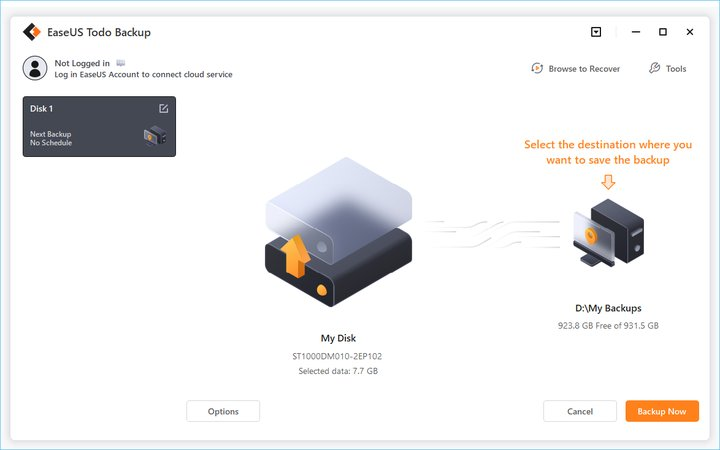
Step 5. For disk/partition backup, you can choose to save the backup to local drive or to NAS.

Step 6. After the backup process is completed, your task will be displayed at the left. Right-click any one of the task, you can further manage your backup such as recover it, create incremental backup, etc.
Closing Words
If you want to keep your data safe, it's important to backup Windows 10 to a network drive, which can ensure large enough disk space and flexible access in different locations. There are three methods that you can use to do this: using File History, Backup and Restore (Windows 7), or third-party backup software like EaseUS Todo Backup. No matter which method you choose, we hope that you find it helpful and that your data is safe!
Secure Download
Was This Page Helpful?
Updated by Larissa
Larissa has rich experience in writing technical articles and is now a professional editor at EaseUS. She is good at writing articles about data recovery, disk cloning, disk partitioning, data backup, and other related knowledge. Her detailed and ultimate guides help users find effective solutions to their problems. She is fond of traveling, reading, and riding in her spare time.
Jean is recognized as one of the most professional writers in EaseUS. She has kept improving her writing skills over the past 10 years and helped millions of her readers solve their tech problems on PC, Mac, and iOS devices.
Related Articles
-
How to Backup/Export and Restore Chrome History and Cookies
![author icon]() Tracy King/Jan 21, 2026
Tracy King/Jan 21, 2026 -
How to Fix Dropbox Not Syncing on Windows 11 - 5 Ways
![author icon]() Larissa/Jan 21, 2026
Larissa/Jan 21, 2026 -
How to Create ISO File from Folder for Free on PC & Laptop
![author icon]() Jerry/Jan 21, 2026
Jerry/Jan 21, 2026 -
[Error 0x8007016a] Fix OneDrive Cloud Error Code
![author icon]() Jean/Jan 21, 2026
Jean/Jan 21, 2026