While keeping backup of important data is useful, sometimes outdated or unneeded backup files can take up space on your device. In this case, users will have to manage their automatic backup schedule and clean up older backups as needed.
1. Delete Windows File History Files
Usually, files on a Windows computer will be automatically backed up using File History. This built-in backup tool allows Windows users to easily schedule backups of important folders. As more versions of the backups are created, the external drive used to store data can run out of space. In this case, you will have to delete some data to keep backing up new files.
Step 1. To start, go to Windows 10 Settings > Update & Security > Backup. Locate the File History interface and click "More options."
Step 2. In Backup options, you can change how often the program creates a backup under "Back up my files" and how often they're saved before being deleted under "Keep my backups".

By default, the backups will be kept forever. This can cause a lot of backup space to be used over time. Change it to delete backups every month, or when space is needed, which will free up disk space when the backup drive is running out of space.
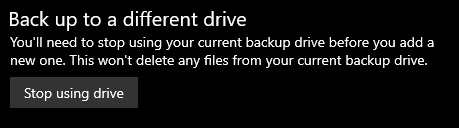
Step 3. You can also scroll down to the bottom of the backup options, then click "Stop using drive" to completely stop the feature creating new backups.
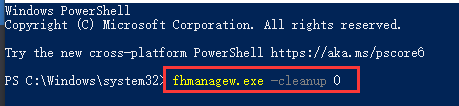
Step 4. In case you want to manually remove any saved backup files kept by File History, return to the Windows desktop. Right-click the Windows Start menu, and select the Windows PowerShell (Admin) option.

Step 5. In the PowerShell window that appears, type fhmanagew.exe -cleanup 0 to remove all but the most recent file backups, then hit enter to run the command. You can replace 0 with another set of days to leave a longer period of backups saved. If the command is successful, a pop-up window will appear to confirm.
2. Delete Windows System Restore Points
If you have System Restore activated. You can restore the Windows operating system to an older state at each restore point. If the restore points are taking up too much space on your computer, you can delete them using the following method:
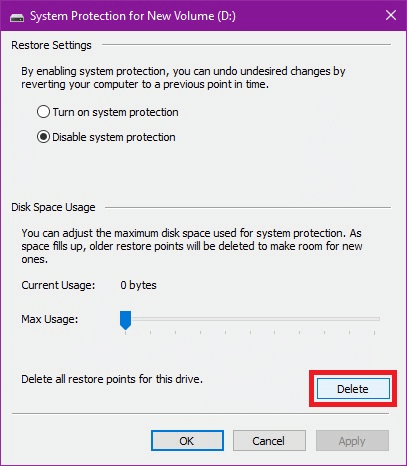
Delete All System Restore Points
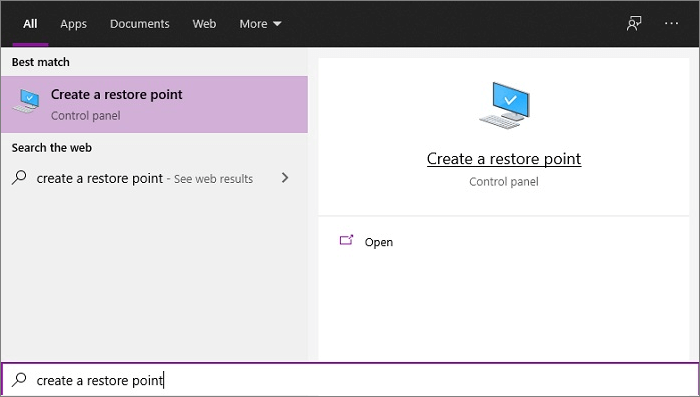
Step 1. Open the Start Menu and search for Create a restore point. Select it to open the System Properties menu.
Step 2. Select the drive you want to manage, then click Configure.
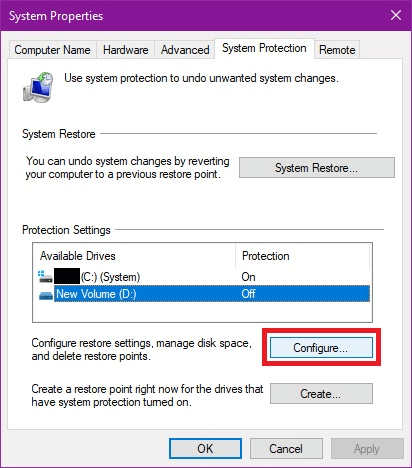
Step 3. Click Delete and confirm to delete all system restore points for the selected drive.
3. Delete the Windows.old Folder After Upgrading to Windows 10
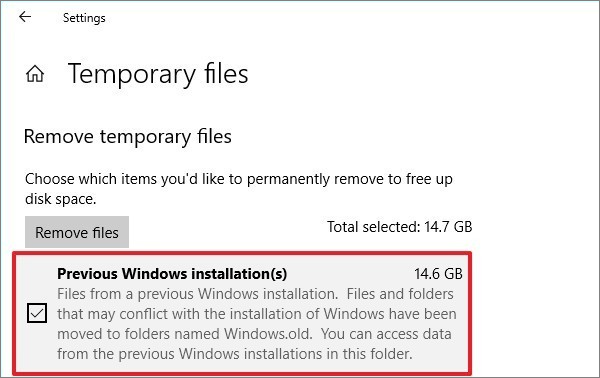
The Windows.old folder is created when you upgrade the system to Windows 10. The previous version of Windows is temporarily kept inside this folder in case you need to revert the upgrade. But if you need the disk space and you have checked all the important files on your computer, you can easily delete the Windows. old folder as needed. This cannot be undone.
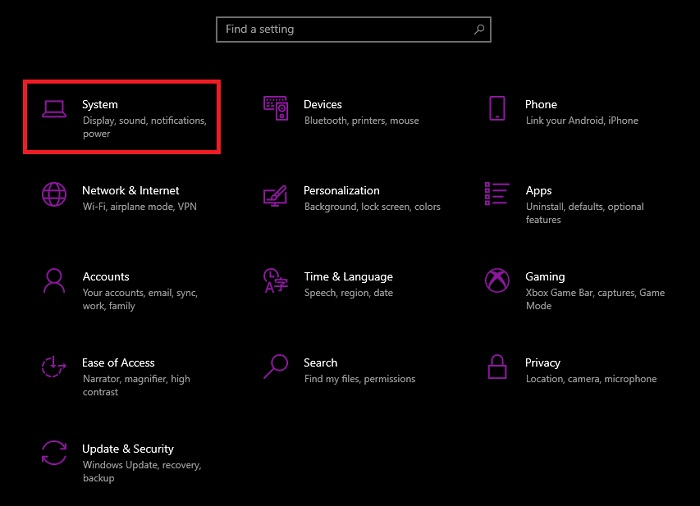
Step 1. Open Start Menu, type Settings, and click it in the results. Then choose System.
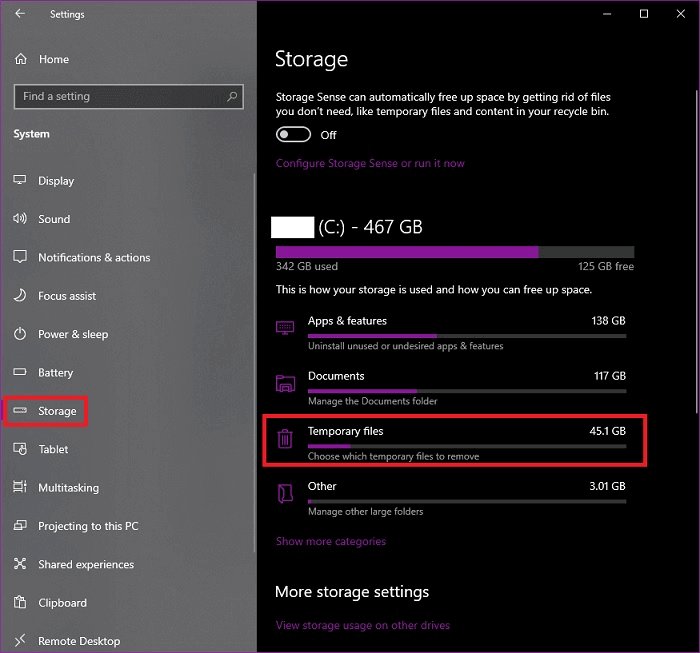
Step 2. Go to Storage and on the drive information, select Temporary Files.
Step 3. Click the check box for the Previous Windows installation(s) and then click Remove files.
4. Delete Backup Files Created by Third-Party Backup Software
Many users may find that the built-in backup tools for Windows and Mac aren't sufficient for their needs. They may prefer to purchase third-party backup software to protect their important files more efficiently.
Third-party backup software will have varying data storage systems, and usually, the user can select the preferred storage location when setting up the software. You can have the software set up to perform automatic backups and keep the files permanently. This can cause you to run out of space quickly if you don't check it regularly, however. Thus, it is important that you ensure the automatic backup schedule is set up correctly before starting the process. Some third-party software may not have an automatic deletion system. In this case, you will have to delete old and unneeded backups manually.
Generally, when you set up the backup schedule with third-party backup software, you can customize the backup file location. If you want to delete backup files, go to the location and delete the unwanted files.
Bonus Tip: How to Back Up Files with EaseUS Todo Backup
When compared with the built-in tools mentioned above, third-party tools are generally more feature-rich and have higher performance when backing up large amounts of data. For example, with EaseUS Todo Backup you can choose to back up both individual files and whole folders (Windows File History only supports selecting folders for backup.) You can also select between differential and incremental backup plans according to your needs. In this article, we will show you how to easily set up an automatic backup system with EaseUS Todo Backup.
After you have downloaded and installed EaseUS Todo Backup, follow the steps below to back up your files:
Secure Download
Step 1. To start backup, click the Select backup contents.

Step 2. There are four data backup categories: File, Disk, OS, and Mail.

Step 3. On the left-hand side, you'll see a list of local and network files. Selecting the files to be backed up by expanding the directory.

Step 4. Follow the instructions on the screen and pick the location where you wish to store the backup.

In Backup Options, click Options to encrypt the backup with a password, specify the backup schedule, and choose whether or not to start the backup at a certain event in Backup Scheme. There are a variety of customizable features available for you to explore, and you may tailor the backup operation to meet your specific requirements.

Step 5. Backups can be stored on a local disk, in EaseUS's cloud service, or on a network attached storage device (NAS).

Step 6. EaseUS Todo Backup allows customers to back up data to a third-party cloud drive or the company's own cloud storage.
If you wish to back up your data to a third-party cloud drive, select Local Drive, scroll down to add Cloud Device and enter your account information.

You may also use EaseUS's own cloud storage service. Click EaseUS Cloud, create an account using your EaseUS Account, then log in to your account.

Step 7. To begin a backup, choose Backup Now. It will appear in the shape of a card on the left-hand panel when the backup process has been successfully finished. To handle the backup job in more detail, right-click on it.

Conclusion
No matter what tools you use to back up your files, the backup data has to be kept somewhere. If left unnoticed, you may end up finding your device running out of space unexpectedly. This also applies to Window's own system backup such as Windows. old folder. In this article, we have listed the methods for deleting unneeded backups from various software and features. Before deleting any backup files, please confirm that there is no chance that you will need to use that file again in the future.
However, if you are using third-party automatic backup software like EaseUS Todo Backup, you can have the software automatically delete older backup images after a certain time period or image amount. You can also delete the backups manually if needed.
Was This Page Helpful?
Daisy is the Senior editor of the writing team for EaseUS. She has been working at EaseUS for over ten years, starting as a technical writer and moving on to being a team leader of the content group. As a professional author for over ten years, she writes a lot to help people overcome their tech troubles.
Jean is recognized as one of the most professional writers in EaseUS. She has kept improving her writing skills over the past 10 years and helped millions of her readers solve their tech problems on PC, Mac, and iOS devices.
Related Articles
-
[Unstable Wifi] How to Fix Wifi Keeps Disconnecting in Windows 11
![author icon]() Jean/Jul 01, 2026
Jean/Jul 01, 2026 -
Unable to Copy Files to External Hard Drive on Windows 11[SOLVED]
![author icon]() Larissa/Jul 01, 2026
Larissa/Jul 01, 2026 -
Fix Windows 11 Won't Shut Down with 10 Easy Solutions
![author icon]() Jean/Jul 01, 2026
Jean/Jul 01, 2026 -
How to Backup and Restore Thunderbird Emails (Windows & Mac Guide)
![author icon]() Larissa/Jul 01, 2026
Larissa/Jul 01, 2026