Not many users know that Windows has a default backup program called File History. The program was part of Windows 8 which became the main backup tool in Windows 10. Once you set up File History and connect an external drive to your Windows PC, it can automatically backup your files to it.
File History makes it easy to backup your Windows content, but there are many speculations about the program going around. For instance, does File History backup everything on Windows? If not, what's the next best solution, and so on.
To put a stop to all the File History related assumptions, this article will walk you through all the software's ins and outs. So, let's know everything about the Windows File History.
***What are Windows 10 recovery tools available to use? Click the article to know more.
How to Turn On File History on your PC?
To create a backup of your vital data on Windows 10 using the File History, first, connect an external drive to your computer. Next, select the Settings from the Start menu and follow these steps:
Step 1. Select the Update & Security > Backup > Backup Using File History.
Step 2. Now, you have to tell Windows 10 where you want to keep backup copies. In most cases, Windows automatically recognizes where to keep backup data. If your PC doesn't recognize the backup location, click on the More Options > Backup Options > See Advanced Settings. Here you can select the external drive attached to your device and select the Turn On button.

Step 3. If you have already selected the backup location, turn on the Automatically Backup My Files, and Windows will start backing up files to your hard drive.
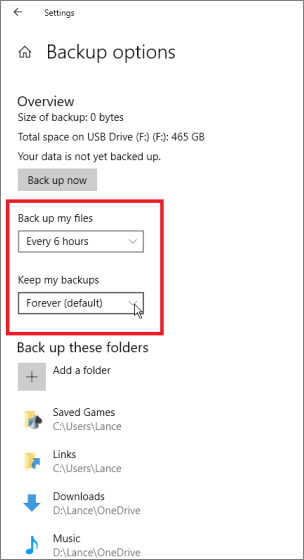
By default, Windows backup files every hour, but you can change this and other settings as per your requirements.
Does Windows File History Backup Everything?
After setting up File History, the next big question is, 'does Windows File History backup everything?'
Unfortunately, the answer is NO. Windows File History can back up certain files, including Documents, Pictures, Videos, Music, or offline OneDrive files. Except this File History can't back up anything else on your computer such as programs, system, settings, etc.
Here if you only want to backup basic files on Windows 10, File History is the best option for you. Once File History is active on your computer (mentioned above), you have to configure it. For instance, start with selecting the folders or files you want to backup and where.
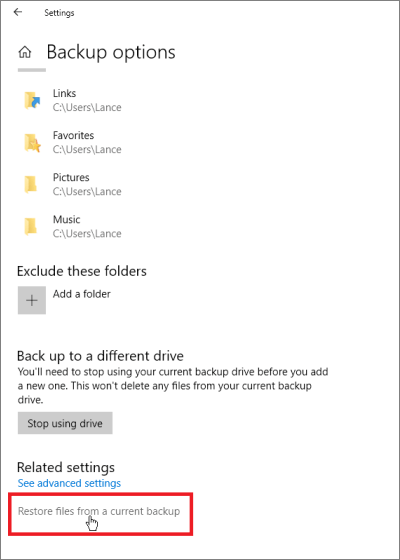
By default, File History backs up Desktop, Downloads, Media, and other folders. Here you can scroll down to remove some of the folders from the backup list. To do so, go to the Backup option window and click on the Remove button to exclude any file.
You can also configure how long you want to keep backup data and where you wish to store backup files on your hard drive.
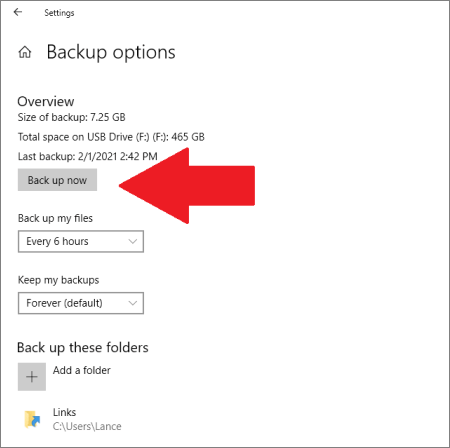
After configuring File History settings, just click on the Backup Now button. This will start backing up all your selected files to your desired location within a few minutes.
How to Restore File History Backup?
Whether you have mistakenly deleted your photos or your files get corrupted, File History can help you restore everything. It can let you flip through different file versions, compare them and restore the right version.
Here you can restore File History backup as follows:
Step 1. Click on the File Explorer and select the folder containing the items you want to restore.
Step 2. Click on the Home tab on the Ribbon icon top of your folder and then click on the History button.
Step 3. Select the item you want to restore.
Step 4. You can explore the different versions of the item you want to restore.
Step 5. Once you find the right version, click on the Restore button to restore it.
Step 6. If there's a file name conflict, a window will popup with the following options - Replace the File in the Destination Folder, Skip This File or Compare Info for Both Files. You can select the right option as per your preference.
Step 7. Now, exit the File History window and go to where your file is restored.
Free Up File History Drive Space
File History constantly backs up and protects your files. It will back up every small change. This is a great thing to backup your entire data, but it can create a problem when your disk space is full. Plus, the software will not automatically delete the older versions of the files.
So, if your disk space is full, you probably want to know how to delete the File History backup data. To do so, you have three options:
1. Change Backup Settings
- Go to the File History > Advanced Settings.
- Click on the drop-down menu and choose 'Until the space is needed' and save the changes.
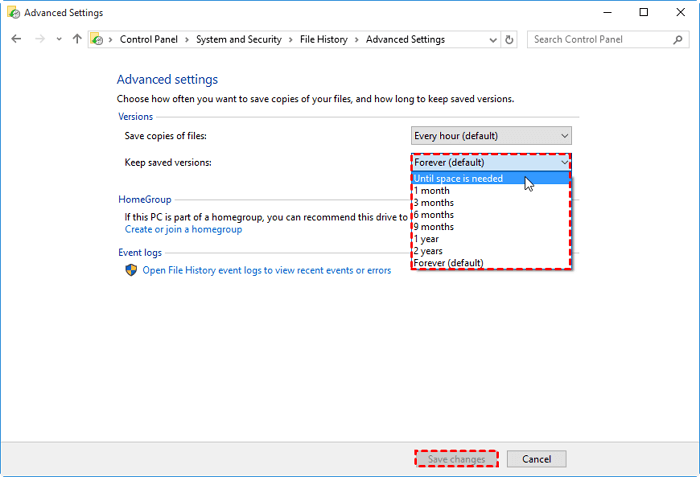
After this, the data will only be saved until your disk has sufficient space.
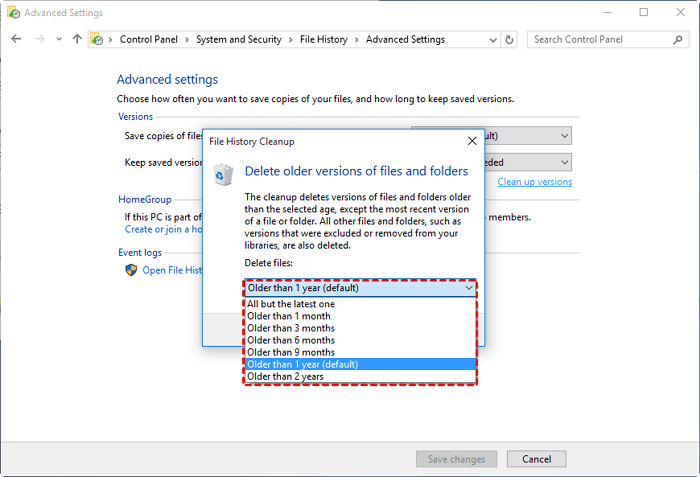
2. Delete Older File Versions
- Go to File History > Advanced Settings > Clean up versions.
- Select the time under Delete files and then click on the Cleanup.
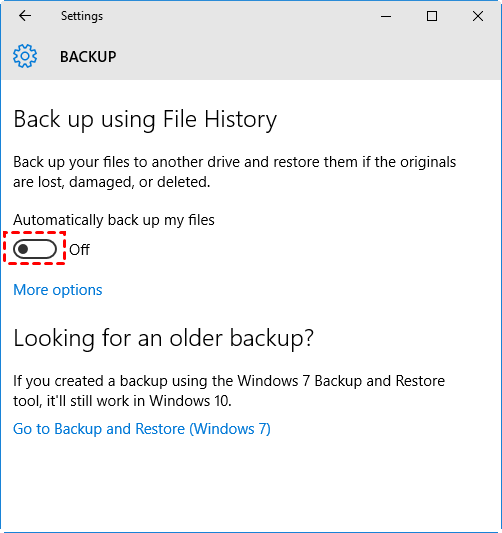
3. Completely Delete All Backups
- Navigate to Setting > Update & Security > Backup and turn off the toggle under the Automatically back up my files option.
- Open the backup drive and delete the FileBackup folder.
So, there you go. You now know how to set up File History and how to backup, restore and delete files on it. Although File History is a default Windows backup software, we can't ignore the fact that it does not back up everything.
That means you need a better and more robust substitute for File History on Windows 10 to back up everything without taking up space on your drive.
Back up More Content without Running Out of Drive Space
EaseUS Todo Backup is the best third-party backup in this situation. This tool can eliminate all the File History shortcomings, such as:
- Supports automatically deleting the old backup versions. You don't have to manually delete your unwanted backup version.
- It enables you to back up your files on cloud storage. In fact, you will get 1TB of cloud storage with the higher-tier plans.
- It can facilitate backup programs, system settings, and many other files.
- Schedules your backup and run data backup as often as you want.
- You will get four interactive backup modes - Full, Incremental, Differential, and Scheduled backup.
- Generates real-time backup reports to keep you informed at every backup stage and so on.
EaseUS Todo Backup offers so much more than File History. On top of all, it is very simple to backup and restore data with EaseUS Todo Backup. If you're interested in it, download and check how it works with the following steps:
Secure Download
Step 1. To start backup, click the Select backup contents.

Step 2. There are four data backup categories: File, Disk, OS, and Mail.

Step 3. On the left-hand side, you'll see a list of local and network files. Selecting the files to be backed up by expanding the directory.

Step 4. Follow the instructions on the screen and pick the location where you wish to store the backup.

In Backup Options, click Options to encrypt the backup with a password, specify the backup schedule, and choose whether or not to start the backup at a certain event in Backup Scheme. There are a variety of customizable features available for you to explore, and you may tailor the backup operation to meet your specific requirements.

Step 5. Backups can be stored on a local disk, in EaseUS's cloud service, or on a network attached storage device (NAS).

Step 6. EaseUS Todo Backup allows customers to back up data to a third-party cloud drive or the company's own cloud storage.
If you wish to back up your data to a third-party cloud drive, select Local Drive, scroll down to add Cloud Device and enter your account information.

You may also use EaseUS's own cloud storage service. Click EaseUS Cloud, create an account using your EaseUS Account, then log in to your account.

Step 7. To begin a backup, choose Backup Now. It will appear in the shape of a card on the left-hand panel when the backup process has been successfully finished. To handle the backup job in more detail, right-click on it.

Sum Up
File History is indeed a great tool to backup your basic files on Windows 10. But when your backup volume increases or you want to backup your apps, File History there.
That's why EaseUS Todo Backup is considered the best free alternative for Windows File History because
- It can backup everything on Windows
- It won't consume space on your drive
- And, offers many additional features
All in all, if File History is no longer sufficient for you to backup your data, download the EaseUS Todo Backup now.
Secure Download
Was This Page Helpful?
Daisy is the Senior editor of the writing team for EaseUS. She has been working at EaseUS for over ten years, starting as a technical writer and moving on to being a team leader of the content group. As a professional author for over ten years, she writes a lot to help people overcome their tech troubles.
Jean is recognized as one of the most professional writers in EaseUS. She has kept improving her writing skills over the past 10 years and helped millions of her readers solve their tech problems on PC, Mac, and iOS devices.
Related Articles
-
[Data Protection] The Differences between System Image and Full Backup
![author icon]() Jean/Jun 10, 2026
Jean/Jun 10, 2026 -
Download the Lenovo OneKey Recovery Software
![author icon]() Jean/Jun 10, 2026
Jean/Jun 10, 2026 -
Can You Copy Windows 10 to a USB Drive and Boot From It? Yes! Here's How
![author icon]() Tracy King/Jun 10, 2026
Tracy King/Jun 10, 2026 -
How to Upgrade Processor on Laptop [i5 to i7/i3 to i5/i3 to i7]
![author icon]() Larissa/Jun 10, 2026
Larissa/Jun 10, 2026