Page Table of Contents
Updated on Jul 01, 2026
You might be wondering about the best way to upgrade the CPU in windows 10/11, though the truth is that upgrading CPU can be a little complex. But you can achieve it without hassle if you follow this step-by-step guide.
There's no denying that Windows 10 and 11 are great operating systems. They're fast, reliable, secure, feature-rich, and just simple. All the users get benefits from both Windows operating systems. But you may feel difficulty while upgrading it. In this regard, we'll show you how to upgrade the CPU in windows 10/11.
🎨Related Reading: How to Upgrade Processor on Laptop
Requirement for Upgrading CPU in Windows 10/11
Before upgrading the CPU in windows 10/11, there's a dire need to understand the grading requirements. Here I've listed all.
- Your device must be running Windows10/11.
- A 64-bit processor with two or more cores running at one gigahertz (GHz) or faster is required. Or system on a Chip (Soc).
- A minimum of 4 gigabytes (GB) of RAM is recommended.
- Graphics Card: A compatible with DirectX 12 or later with WDDM 2.0 driver.
- Display: High definition (720p) display is recommended with greater than 9" diagonally. Apart from this, 8 bits per color channel is suggested.
- Internet connection: It's essential to connect to the internet to upgrade the CPU and download and use some features.

Windows 10 End of Support: Upgrade or Stay?
Windows 10 support ends October 14, 2025. After that, you'll lose security updates and tech support. Safely upgrade to Windows 11, or stay on Windows 10 with secure backups and extended protection. Whatever you choose, this page outlines specific solutions to keep your files safe and your system prepared.
How to Identify Your Current CPU and Motherboard?
Once you know the requirements now you must have an idea about your current CPU and Motherboard. If you don't know, then don't worry because we will tell you how to identify your current CPU and Motherboard. So read on.
For CPU:
- To begin, right-click on the start menu icon on the bottom left of your screen.
- Now click on the "system" in the menu that pops up.
- After that, click next to the processor. It'll list what kind of CPU you have on your computer.
For Motherboard:
- You need to go to the windows search bar, type in "Cmd," and click on enter.
- Then, in the command prompt, type in the "wmic" baseboard to get the product manufacturer.
- Finally, your motherboard manufacturer and the name/model of the motherboard will be displayed.
Backup Your Data Before Upgrading your CPU
Now, it's time to back up your data before upgrading your CPU. Let's get straight into it.
Notably, you must remember that you can lose your data while upgrading the CPU. So there's a dire need to back up the essential files.
In this regard, we've got a solution for you. The EaseUS Todo Backup Home is one of the essential tools that will solve this problem in seconds.
Whether you're a technical person, you can easily create a backup with EaseUS Todo Backup. Yes, it's as easy as you think.
More important, you don't need to worry about your data because it's a 100% secure platform that ensures 16TB of storage to all its users.
Furthermore, you'll be amazed that EaseUS Todo Backup enables you to upgrade the CPU without reinstalling the operating system because it can perform a restore worldwide. It is a perfect and secure tool to back up your data because it also has a great clone system tool. It also makes the upgrade to an SSD so much easier.
Secure Download
You can back up your system by using the following steps.
Step 1. Launch EaseUS Todo Backup and choose "Create Backup" on the home page, click "Select backup contents".

Step 2. Among the four available categories, click "OS" to start back up.

Step 3. The system partition will be automatically selected, you only need to select the location.

Step 4. Local Drive, Cloud, and NAS are available for you to save the backup file. You can also connect an external hard drive to preserve the system backup files.

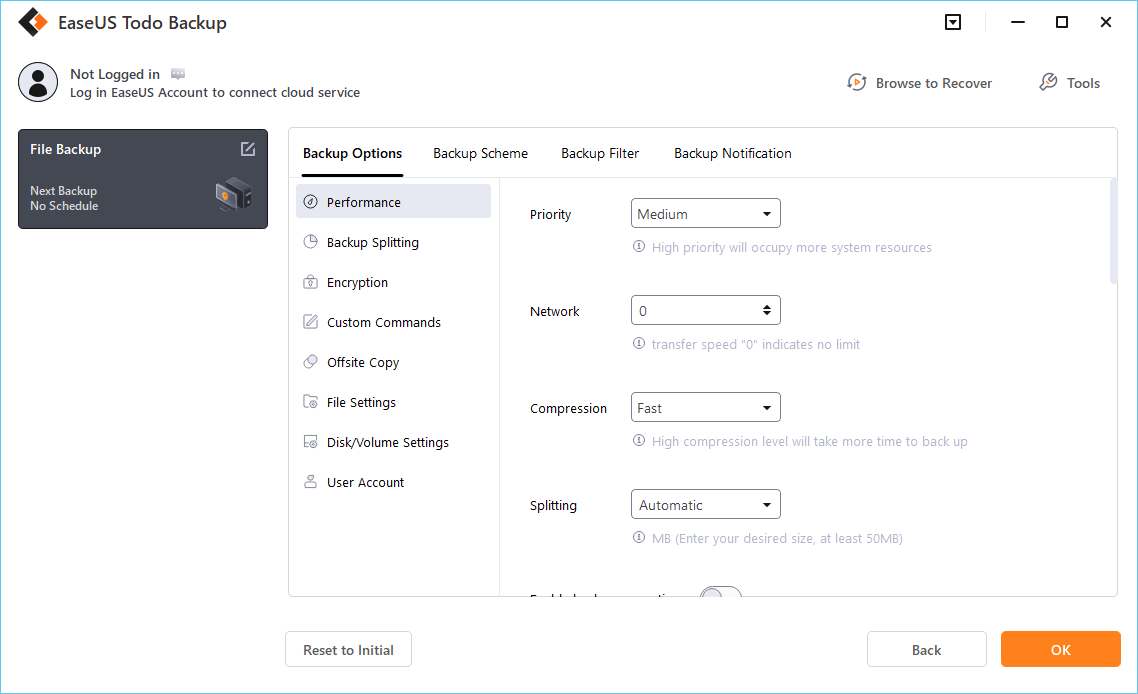
Step 5. You can customize the settings in "Options" at the left bottom. After that, click "Backup Now", and the process will begin.
*After finishing the backup process, you can check the backup status, recover, open, or delete the backup by right-clicking the backup task on the left.
Upgrade CPU in Windows 10/11 Step-by-Step Guideline
Finally, you're all set to upgrade the CPU in Windows 10/11. Just follow this step-by-step guide without missing any steps.
Operation 1. Update Motherboard BIOS
Step 1: First, you must connect your motherboard manufacturer to the newest BIOS software.
Step 2: You may notice CPU software started upgrading through the BIOS updating system.
Note: The CPU may not have any new features after a BIOS update.
Operation 2. Run Windows Update
You can also upgrade the CPU in windows 10/11 with the window updating system. A graphics card can also be updated this way.
Step 1: Search the "windows settings" on the taskbar search column.
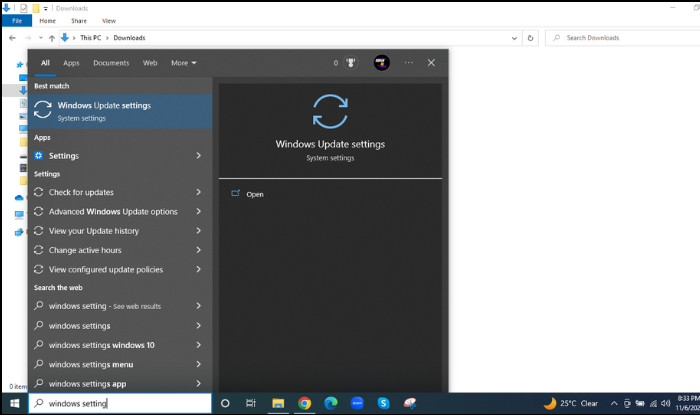
Step 2: Then select the first search result. You will be redirected to the windows updating system.
Step 3: Check the install windows updates.
By updating windows, you can easily upgrade the CPU as well.
Operation 3. Reinstall CPU Software
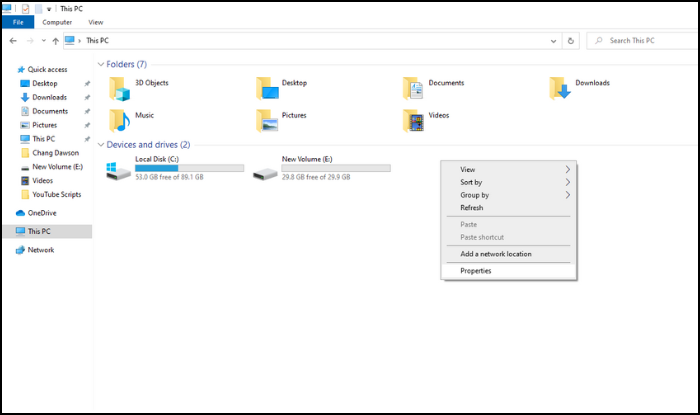
Step 1: Open this PC and select properties by right-clicking.
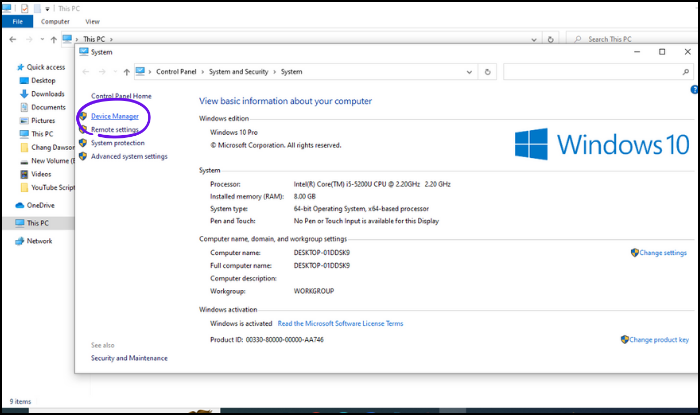
Step 2: Select Device Manager from the left menu.
Step 3: Unfold the processors.
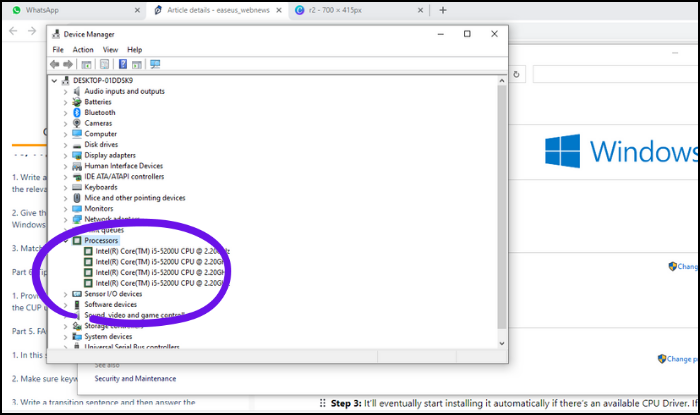
Step 4: Right-click one of the processors and select Uninstall.
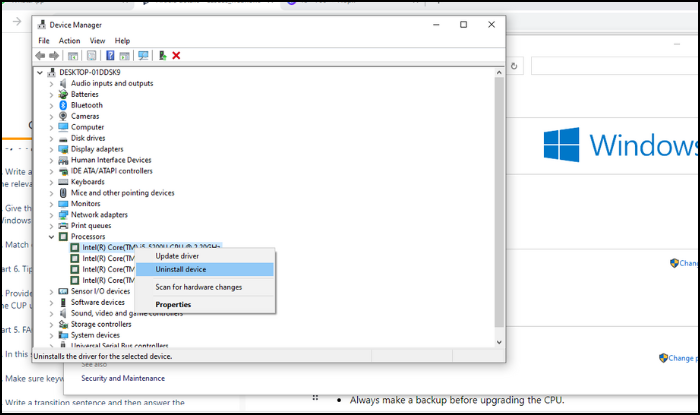
Step 5: After that, restart your computer. And Windows will try to install the latest CPU software, including the latest CPU driver software.
Operation 4. Upgrade the CPU Drivers from the Device Manager
Step 1: First, go to the Device manager, then right-click the CPU device and select the updated driver.
Step 2: Following, in the pop-up window, now choose Search automatically for updated driver software.
Step 3: It'll eventually start installing it automatically if there's an available CPU Driver. If not, it'll show you that "the best drivers for your device are already installed." Furthermore, it'll suggest other ways to update your CPU drivers.
Tips & Tricks for A Smooth CPU Upgrading
- Always make a backup before upgrading the CPU.
- Suppose you cannot upgrade the CPU by updating the motherboard BIOS. Then try the Run windows update, as it'll upgrade your CPU quickly.
Summary
To wrap up, we hope you find out all the operations helpful regarding upgrading the CPU in Windows 10/11. You may find difficulty in backing up your data. But it can be straightforward and secure if you use the right tool, such as EaseUS Todo Backup, as it’s completely secure and fast to operate.
FAQ about Upgrading CPU in Windows 10/11
1. Can I upgrade just my CPU?
Yes, you can easily upgrade the CPU. But you must remember that the CPU you want is compatible with your motherboard and CPU Cooler. Apart from this, you can also upgrade some other components to make the new CPU compatible.
2. Do I need to reinstall Windows with a new CPU?
If you change your processor, you do not need to reinstall Windows. It is not specific hardware components that are licensed with Windows, but rather the motherboard. If Windows detects your motherboard, it will automatically activate itself without reinstalling or reactivating.
3. How do I upgrade my CPU without reinstalling Windows 10?
Not necessarily. Most of the time, this isn't necessary. As drivers for the new motherboard and CPU may not work, Windows may boot into safe mode. In this case, For the new stuff, you'd need to install the correct drivers. Everything should be back to normal.
Windows may need to be reactivated. A machine's activation code is tied to its components. It is common for activation codes to expire when a motherboard is changed.
Activation should be as simple as clicking a button. Each year, Windows allows one or two of these. You may have to contact Microsoft to reactivate your account if you do it too often.
Was this page helpful? Your support is truly important to us!

EaseUS Todo Backup
EaseUS Todo Backup is a dependable and professional data backup solution capable of backing up files, folders, drives, APP data and creating a system image. It also makes it easy to clone HDD/SSD, transfer the system to different hardware, and create bootable WinPE bootable disks.
Secure Download
-
Updated by
![]()
Larissa
Larissa has rich experience in writing technical articles and is now a professional editor at EaseUS. She is good at writing articles about data recovery, disk cloning, disk partitioning, data backup, and other related knowledge. Her detailed and ultimate guides help users find effective solutions to their problems. She is fond of traveling, reading, and riding in her spare time.…Read full bio
Related Articles
![]() [Fixed] Windows 11 Virus Protection Keeps Turning Off
[Fixed] Windows 11 Virus Protection Keeps Turning Off![]() How to Update Acer BIOS with No Data Loss
How to Update Acer BIOS with No Data Loss![]() How to Fix Windows 10 System Restore Stuck (100% Works)
How to Fix Windows 10 System Restore Stuck (100% Works)![]() The Best 5 Backup Software for Ubuntu [2026 New Update]
The Best 5 Backup Software for Ubuntu [2026 New Update]![]() How to Restore When Outlook Favorites Missing[2026 Guide]
How to Restore When Outlook Favorites Missing[2026 Guide]![]() XCopy vs Robocopy: Which Is Better Windows File Copy & Windows File Backup Utility?
XCopy vs Robocopy: Which Is Better Windows File Copy & Windows File Backup Utility?


Topic Clusters


Interesting Topics