


-
![]() Fix Error Code II-E1003: Epic Games Install Failed Error
Fix Error Code II-E1003: Epic Games Install Failed Error July 23,2026
 6 min read
 -
![]()
-
![]()
-
![]()
-
![]()
-
![]()
-
![]()
-
![]() Aptio Setup Utility Ultimate Guide | How to Access/Fix ItJuly 23,20266 min read
Aptio Setup Utility Ultimate Guide | How to Access/Fix ItJuly 23,20266 min read -
![]()
-
![]()
Page Table of Contents
Thanks to its user-friendly design and extensive functionality, Windows 10 is a popular operating system all over the globe. However, users often find problems while updating the operating system. One of the most typical issues encountered by Windows 10 users is the Windows 10 update stuck at 100%. This is inconvenient since it prohibits users from accessing their systems and performing their tasks.
This article will explore several practical solutions for fixing Windows 10 Update Stuck at 100. We will also suggest software that helps you recover lost data when dealing with this problem. Let's get started!
| Workable Solutions | Step-by-step Troubleshooting |
|---|---|
| 1. Ensure Windows 10 Update | Before attempting to resolve the Windows 10 update stopped at 100% problem...Full steps |
| 2. Remove USB Peripherals | When a USB peripheral is attached to a computer, the system recognizes...Full steps |
| 3. Run Windows Troubleshooter | The Windows Update troubleshooter is an in-built utility designed to...Full step |
| 4. Relaunch Windows Update | The Windows Update Service ensures that your machine is operating...Full steps |
| More Fixes | The existence of viruses or malware on your computer might cause...Full steps |
Windows 10 Update Stuck at 100 Overview
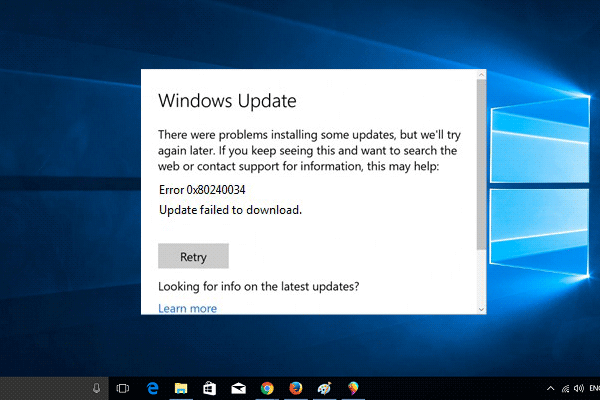
The Windows 10 update stuck at 100% is a typical problem many Windows 10 users have when upgrading; other errors like Windows update error code 0x80080005 also puzzle many users in upgrading their computers. When a user boosts their operating system, the process might get stuck at 100%, preventing the user from finishing the update and accessing their machine. This problem can be caused by various factors, including faulty system files, obsolete drivers, or competing apps operating in the background.
The update procedure is critical for keeping your system updated with the most recent security patches, bug fixes, and new features. As a result, it is essential to address the Windows 10 update stuck at 100% problem as soon as possible to guarantee the proper functioning of your system.
How to Solve Windows 10 Update Stuck at 100 [8 Methods]
Fortunately, various efficient methods are available to help you resolve the Windows 10 update stopped at 100% problem. These solutions vary from simple troubleshooting actions to more complex approaches. In this section, we have outlined some of the best solutions. We have tried and tested these methods to ensure they work for you. Let's look at them in detail here:
1. Make Sure the Windows 10 Update Is Stuck
Before attempting to resolve the Windows 10 update stopped at 100% problem, ensure the update process is stalled. The update process can take longer than usual to finish, and it can seem stuck at 100% when it is not. As a result, it is critical to wait some time to determine whether the updating process continues. Depending on the update size and your machine's speed, the update process should take around 20-30 minutes.
Inspect your system's challenging disk activity to see whether the Windows 10 update is stalled. If the hard drive LED is flickering, the update procedure is still in progress, and you should wait for it to finish. If the hard drive LED is not flashing, it might mean that the update process has been stalled. For example, when you use the Windows Update option to upgrade from Windows 10 to 11, the hard drive LED stops flickering; it refers to the Windows 11 installation being stuck.
2. Remove Any USB Peripherals on the Computer
When a USB peripheral is attached to a computer, the system recognizes it as a new device and attempts to install the required drivers. This operation can sometimes interfere with the Windows 10 update process, leading it to get stuck at 100%.
External hard drives, USB flash drives, printers, scanners, and other USB-connected devices are examples of USB peripherals. By eliminating these peripherals, you avoid any conflicts that can develop during the upgrade process, enabling it to run smoothly. As a result, before upgrading your system, you should unplug any USB devices attached to your computer.
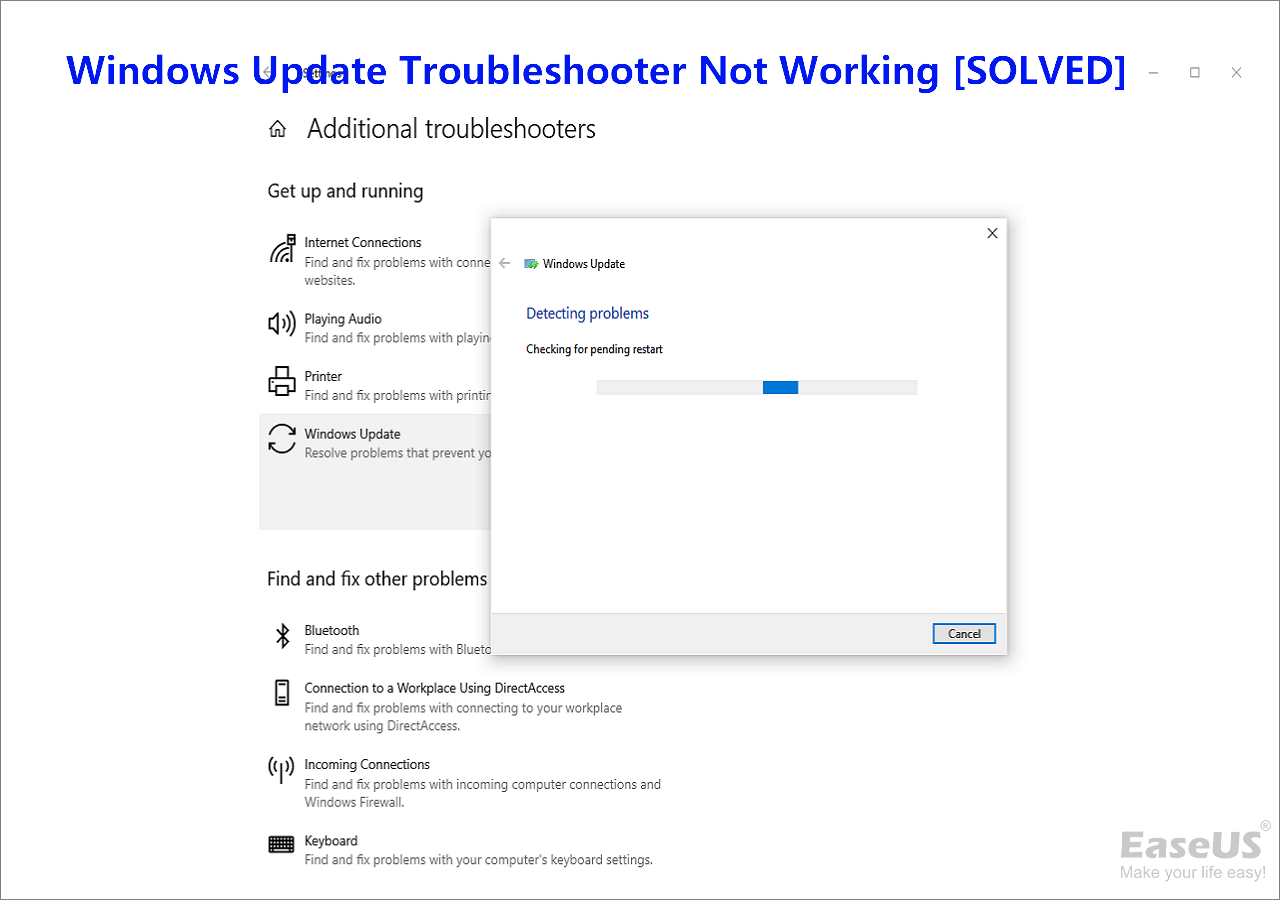
3. Fix the Problem with Windows Update Troubleshooter
The Windows Update Troubleshooter is an in-built utility designed to investigate and fix update-related problems. Try running it to test whether the Windows Update Troubleshooter can fix the problem. The procedure is as follows:
Step 1. Press the Windows key and then type Troubleshoot into the search bar that appears.
Step 2. Select "Troubleshoot" from the list of search results.
Step 3. Click the "Other Troubleshoot" button, then pick "Windows Update" in the following box.
Step 4. Once done, click the "Run" tab.
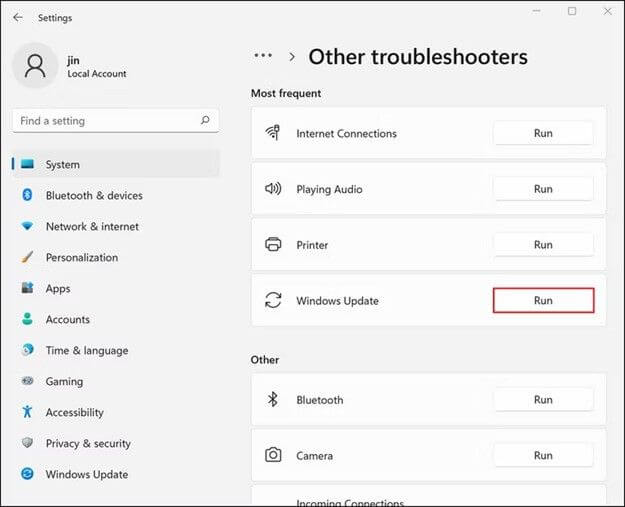
Step 5. Click "Apply" once done.
Step 6. Please refer to the on-screen prompts to resolve this problem.
Note: To test whether the update can be installed, run Windows Update once again.
What to do if Windows Update is not working? The following passage will fix it for you.
Windows Update Troubleshooter Not Working in Windows 10/11 [Fixed Quickly]
Windows Update is a remarkable service that keeps people's computers in the loop of the latest upgrades. It also dispatches security patches that keep a computer safe and secure. Besides, they offer better stability regarding drivers...
4. Relaunch the Windows Update Service on Computer
The Windows Update Service ensures that your machine is operating the most current version of the Windows operating system. This is the responsibility of the user. If you turn off the Windows Update Service on your computer, the machine cannot automatically search for and download the most current operating system update. Therefore, you should attempt to restart the Windows Update Service to prevent the Windows update from being stalled. Here are the steps to do so:
Step 1. Open "Run" by pressing Win + R.
Step 2. Enter services.msc when prompted in Run.
Step 3. Find the Windows Update Service with a right-click on the next window.
Step 4. From the menu that appears, choose "Properties". The "Stop" button can be found in the Properties dialogue. Click it.
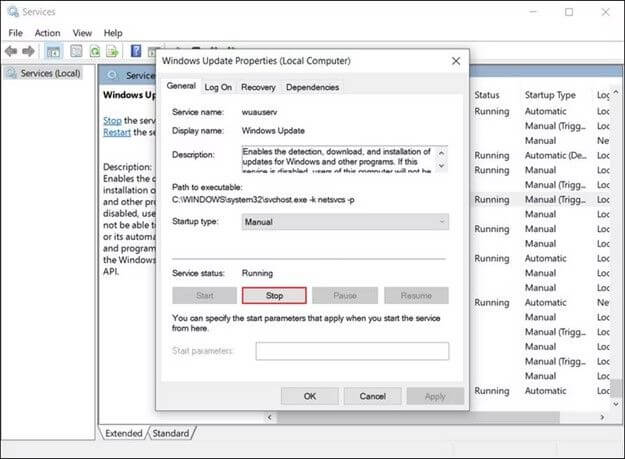
Note: Don't press the Start button again for a few seconds.
Step 5. Expand the corresponding dropdown menu to choose "Automatic as the Startup type".
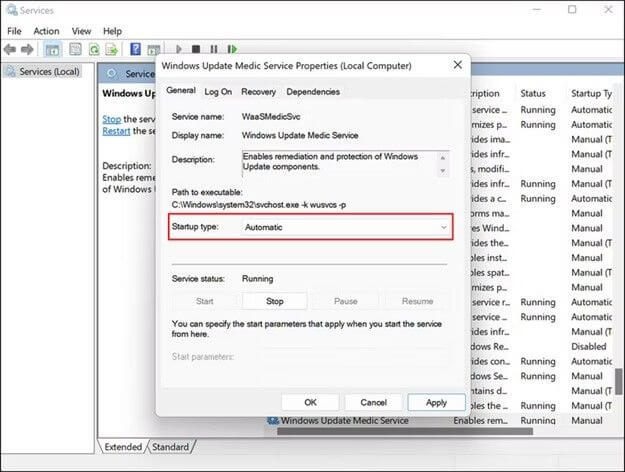
Step 6. To commit your changes, choose "Apply" > "OK".
5. Remove Computer Viruses or Malware
The existence of viruses or malware on your computer might cause the Windows 10 upgrade to get stuck at the 100 percent mark. These malicious applications can potentially interrupt the update process, among other things, and interfere with the system's regular functioning. As a result, before updating to Windows 10, you should clean your PC of any viruses or malware.
To see whether this is the case, you can use the security software on your computer to do a scan. If you do not have an external security application installed, you can boot the Command Prompt to launch built-in repair tools such as SFC, DISM command, and CHKDSK. If you remove them beforehand, your Windows 10 upgrade will go more efficiently, and your machine will be safer from malware and viruses.
6. Perform a Clean Boot on Windows
A clean boot can start Windows with a bare minimum of drivers and starting apps to minimize software incompatibilities while installing Windows updates. A clean boot requires you to complete the following:
Step 1. In the Run window, type msconfig and hit Enter.
Step 2. Then, click the "Services menu" item. To conceal all Microsoft services, choose this check box.
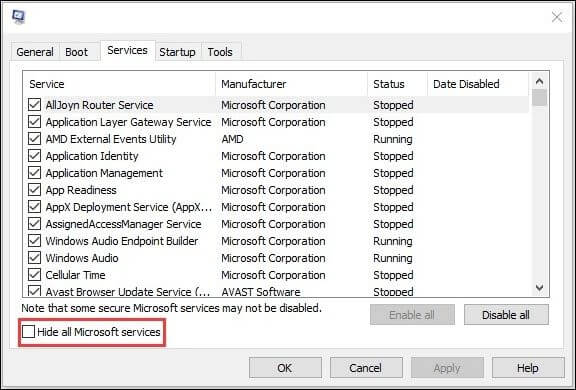
Step 3. To finish, select "Disable all" and "Apply".
Step 4. To access the Task Manager, choose the "Startup" menu item and click "Open".
Step 5. Select the first running program in the Task Manager window, then click "Disable".
Note: Here, you must manually shut down each running program.
Step 6. Click "OK" to exit Task Manager once you've disabled all unwanted software.
After that, you can restart your machine and attempt to upgrade to Windows again. If the "working on updates 100% complete" issue does not appear after a clean boot, it was caused by an application.
Suppose you find the solutions above work to fix your problems. In that case, sharing this article with all your friends or colleagues on various social platforms such as Twitter and Instagram is appreciated.
7. Run DISM Command in Safe Mode
Another option is using the DISM command in Safe Mode to repair corrupted files. Here are the steps you should take:
Step 1. In the search bar, enter "CMD," right-click the first result and choose "Run as administrator."
Step 2. Enter each of the following instructions after typing it:
Dism /Online /Cleanup-Image /CheckHealth Dism /Online /Cleanup-Image /ScanHealth Dism /Online /Cleanup-Image /RestoreHealth
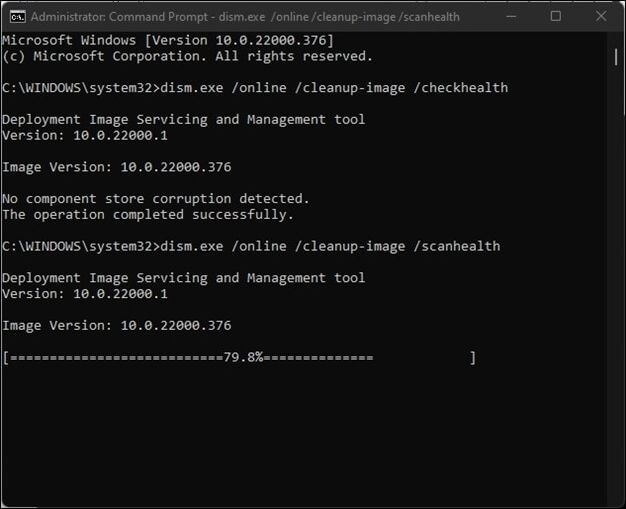
Step 3. Allow the DISM command to run through to completion. Try the following commands if the ones above don't work:
Dism /Image:C:\offline /Cleanup-Image /RestoreHealth /Source:c:\test\mount\windows Dism /Online /Cleanup-Image /RestoreHealth /Source:c:\test\mount\windows /LimitAccess
Restarting your computer should resolve the "Windows is stuck on updating" problem.
8. Run System Restore in Windows Recovery Environment
System restores can generate restore points automatically whenever you install a new program, driver, or Windows update or manually create a restore point. However, any software, drivers, or updates updated after the restore point was made will be deleted. Follow the steps below:
Step 1. To access the Control Panel (Desktop app), press the Start button, then enter the Control Panel into the search box next to the Start button on the taskbar.
Step 2. Find System Restore in the Control Panel, click on it, and then choose "Recovery", "Open System Restore", and Next.
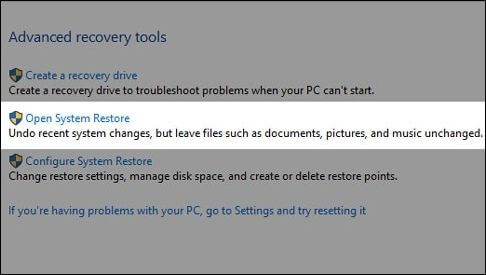
Step 3. Select the backup before installing the faulty software, driver, or update, and then hit "Next" > "Finish".
How to Restore Lost Data When Windows 10 Update Stuck/Failed
Users can be frustrated if they lose data because of a botched or stopped Windows 10 upgrade. Fortunately, data recovery software programs are available to assist you in recovering deleted files on Windows 10 and restoring lost data in various situations. EaseUS Data Recovery Wizard is one such application, a strong and dependable data recovery program that can recover lost data due to failed or blocked Windows 10 updates.
EaseUS Data Recovery Wizard is a user-friendly software that even novices can use. It offers an easy-to-use interface that walks you through the recovery procedure. The program can recover many contents, including images, movies, and documents, from various storage media, including hard disks, USB drives, SD cards, and more.
Sometimes, problems may occur after the update. For example, desktop file folders disappear after Windows 10 upgrade. What's more, data loss is another problem usually discussed after upgrading. EaseUS software also can help you recover lost files after Windows 10 update.
- Recover deleted files or lost files, documents, photos, audio, music, and emails effectively.
- Support Windows 11/10/8/7 and Windows Server 2022/2019/2016/2012/2008/2003.
- Support data recovery for system crashes and various scenarios, including sudden deletion, formatting, hard drive corruption, and virus attack.
Also, EaseUS software is easy to operate; only three steps to recover the lost data.
Step 1. Select a location and start scanning
Launch EaseUS Data Recovery Wizard and choose the partition where you lost data. Then, click "Search for Lost Data".
![select a location to scan]()
Step 2. Filter and preview files
Use the file format filter on the left or upper right corner to find the files you need. If you remember the file name, you can also search in the search box, which is the fastest way to find the target file. Then, you can click the "Preview" button or double-click a file to preview its content.
![Choose files to recover]()
Step 3. Recover lost data or files
Click the checkbox next to the file and click "Recover" to restore the lost data to your local storage or Cloud drive.
![Recover lost data]()
Conclusion
It's frustrating when the Windows 10 update gets stuck or fails, but there are ways to fix the problem and retrieve any data that has been lost. If you've lost files or data due to a Windows 10 upgrade that didn't go smoothly or got stuck, EaseUS Data Recovery Wizard will help you get it back. EaseUS is an excellent program for recovering deleted files on a computer due to its intuitive design and robust recovery features. You can use EaseUS to recover lost information after a system crash, formatting, or accidental deletion of files.
Windows 10 Update Stuck at 100 FAQs
Some frequently asked questions related to Windows updating:
1. How to fix the Windows update not working?
Try restarting your computer, running the Windows Update Troubleshooter, deleting the Windows Update cache, verifying your internet connection, turning off your antivirus software, or manually downloading and installing updates to see if it fixes the Windows update not working. If none of these suggestions work, contact Microsoft support or a professional for more help.
2. Why is Windows 10 update takes forever?
The Windows 10 update may take a while for various reasons, including a sluggish internet connection, obsolete technology, a lack of available storage, incompatible applications, or a corrupted update file. The size and complexity of the update may also be a factor that will lengthen the installation time.
3. How long will Windows 10 21H2 update take?
The speed of your internet connection, the functionality of your machine, and the size of the update are just a few of the variables that might affect how long it takes to install the Windows 10 21H2 update. However, the installation procedure might take 20 minutes to many hours to finish.
4. How to update Windows from 20H2 to 21H2?
To upgrade your Windows 10 from version 20H2 to version 21H2, utilize the Windows Update function or manually download the update from the Microsoft website. To utilize Windows Update:
- 1. Go to "Settings" > "Update & Security" > "Windows Update".
- 2. Click on "Check" for updates. If an update is available, click the "Download and Install" button.
Was this page helpful?
-
Dany is an editor of EaseUS who lives and works in Chengdu, China. She focuses on writing articles about data recovery on Mac devices and PCs. She is devoted to improving her writing skills and enriching her professional knowledge. Dany also enjoys reading detective novels in her spare time. …


20+
Years of experience

160+
Countries and regions

72 Million+
Downloads

4.9 +
Trustpilot Score


