-
![]() Fix Data Error (Cyclic Redundancy Check) | 5 Free Ways
Fix Data Error (Cyclic Redundancy Check) | 5 Free Ways January 29,2026
 6 min read
 -
![]() How to Fix Rmdir Directory Not Empty in Linux | NEW
How to Fix Rmdir Directory Not Empty in Linux | NEW January 29,2026
 6 min read
 -
![]()
-
![]() [KB5063878] SSD/HDD Not Recognized After Windows 11 Update
[KB5063878] SSD/HDD Not Recognized After Windows 11 Update January 29,2026
 6 min read
 -
![]()
-
![]() OneDrive Recycle Bin Retention | Recover Deleted Files in OneDrive
OneDrive Recycle Bin Retention | Recover Deleted Files in OneDrive February 12,2026
 6 min read
 -
![]() Windows Cannot Find Ms-Settings: How to Fix the File System Error
Windows Cannot Find Ms-Settings: How to Fix the File System Error January 29,2026
 6 min read
 -
![]() Undo Quick Format: Recover Quick Formatted Drive in 3 Ways
Undo Quick Format: Recover Quick Formatted Drive in 3 Ways February 12,2026
 6 min read
 -
![]() Fix The Type of the File System Is RAW Now with 3 Steps
Fix The Type of the File System Is RAW Now with 3 Steps January 29,2026
 6 min read
 -
![]()
Page Table of Contents
PAGE CONTENT:
If you encounter the blue screen error VIDEO_TDR_FAILURE (nvlddmkm.sys) on your computer, rest assured that Windows 10 users using NVIDIA graphics cards are experiencing the problem. Worry not, as there are ways to fix it.
First Aid the Data After Video TDR Failure
This error can lead to system crashes and reboots, potentially resulting in the loss of video files or other data stored on your disk.
To avoid losing data and retrieve video files, it's recommended to utilize a data recovery tool. One popular option is the EaseUS Data Recovery Wizard software, renowned for its effectiveness in recovering data from situations like deletions, virus intrusions, formatting mishaps, lost partitions, file corruption, or system failures.
With its success rate and efficient scanning capabilities that save time and energy, EaseUS Data Recovery Wizard enables you to recover data from storage devices, including SSDs, USB flash drives recovery, hard drives, memory cards, and more.
Step 1. Run EaseUS Data Recovery Wizard and select the location or device where you lost/deleted videos. Click "Search for Lost Data" to find the missing videos.
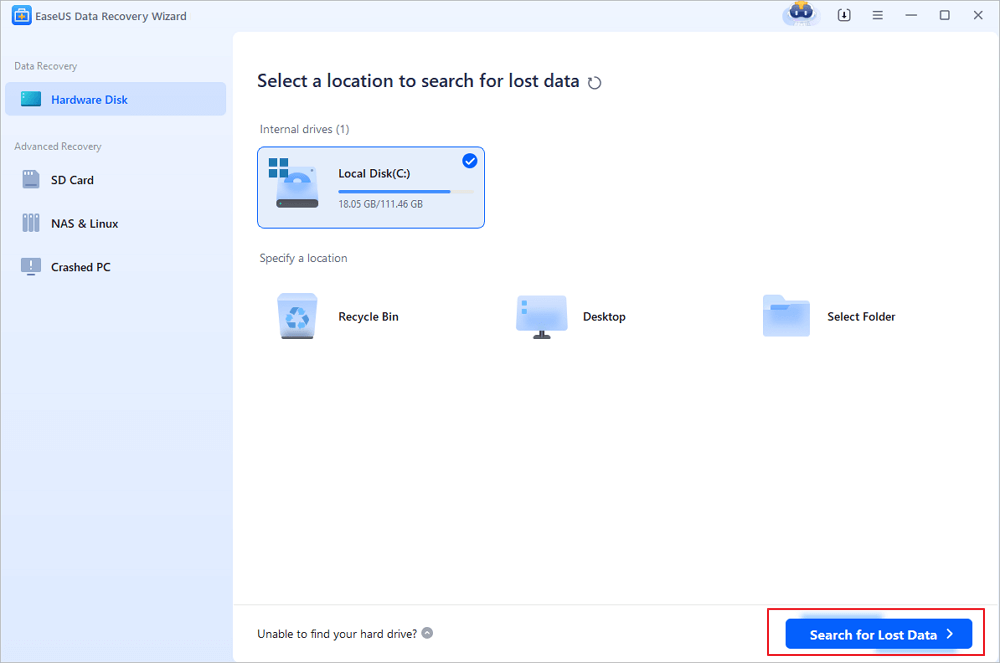
Step 2. After the scan, choose "Videos" in the left panel. You can directly type the files name in the search bar if you remember. Select the found videos and click "Preview".
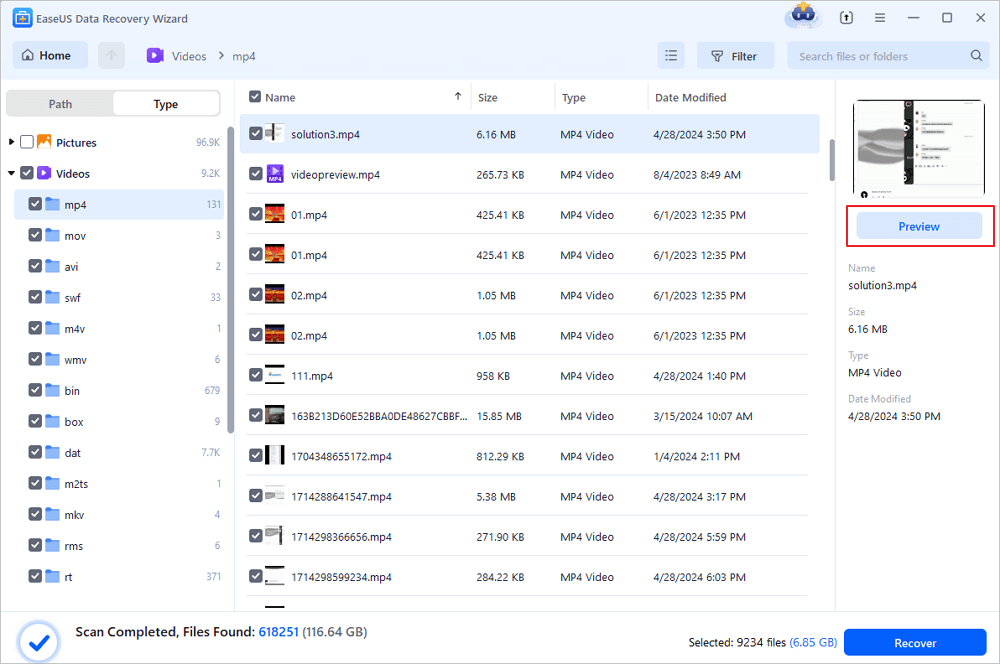
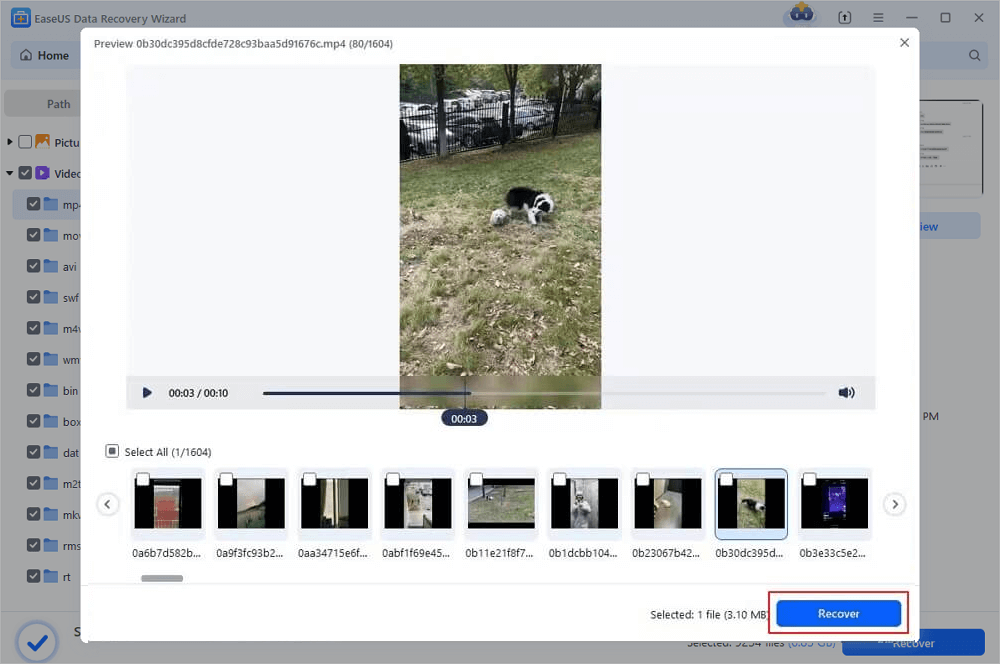
Step 3. Select the video files that you want to restore. Click "Recover" to save them to another secure location on your PC, external storage device or cloud storage.
Moreover, this software is compatible with all versions of Windows operating systems, including Windows 10/11. If you find this information helpful, please share it with others on social media to assist them in overcoming this common challenge.
Fix the Message: Video TDR Failure (NVLDDMKM.SYS)
Here are 6 possible solutions for you to explore. You don't have to try all of them at once; test each one until you discover the one that suits you best.
- Fix 1. Restart Your Windows System
- Fix 2. Update the Graphics Card Drivers
- Fix 3. Update Windows to the Latest Version
- Fix 4. Run a Disk and Memory Check on the PC
- Fix 5. Run a Disk Check Using CHKDSK
- Fix 6. Run a Memory Check Using the Windows Memory Diagnostic
We've shared a video that explains more about resolving video TDR failure NVLDDMKM.SYS. Take a look!
- 00:21 - Navigate to Device Manager
- 00:36 - Update the Intel HD Graphics Driver
- 00:58 - Check for Driver Updates
- 02:51 - Adjust Power Plan Settings
- 02:59 - Access Advanced Power Settings

Fix 1. Restart Your Windows System
It's a known fact that simply restarting your computer can often resolve Windows issues. It helps system memory, reset settings, and address hardware glitches that may crop up on your PC. So give your computer a restart. See if it resolves the nvlddmkm.sys error on your Windows.
Fix 2. Update the Graphics Card Drivers
Outdated GPU drivers are often the culprits behind errors in Windows. Therefore, updating your drivers is usually the first step in addressing this issue.
Step 1. First, open the run command by pressing "Win" +" R" and type in devmgmt.msc
Step 2. In the window that appears, locate "Display Adapters". Expand the menu.
Step 3. Right-click on your Nvidia GPU. Select "Update driver".

Step 4. A new window will show up; click on "Search automatically for drivers."

Step 5. Windows will then search for. Install the drivers available online.
Step 6. Don't forget to restart your PC.
Fix 3. Update Windows to the Latest Version
At times, outdated versions of Windows can trigger the nvlddmkm.sys BSOD error. If you are using a version, compatibility issues may be causing this problem. In some cases, it's recommended that you update your system using updates.
Step 1. Press the "Windows Key" + "I" then navigate to "Update & Security".
Step 2. The available updates will be shown automatically. If there are any updates, click on "Download or Install" to allow Windows to complete the installation process and restart it if necessary.

Fix 4. Run a Disk and Memory Check on the PC
There could be another explanation for this mistake; perhaps your memory is faulty, or your storage device is experiencing issues. The best course of action would be to eliminate these possibilities by checking them.
Fix 5. Run a Disk Check Using CHKDSK
Step 1. Search for Command Prompt (cmd) in the search bar. Choose to "Run as administrator".
Step 2. Within the Command Prompt window, input "chkdsk /f c;" and hit "Enter."
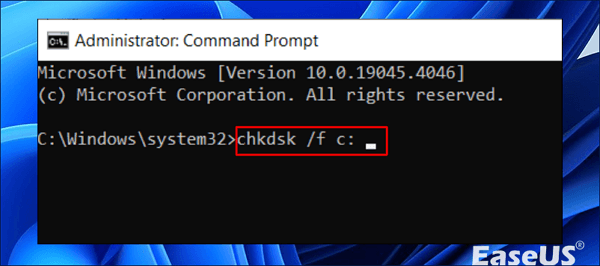
Step 3. A prompt will appear asking if you want to run CHKDSK during the boot. Type 'Y'. Press "Enter".
Step 4. Close the Command Prompt. Restart your Computer.
Fix 6. Run a Memory Check Using the Windows Memory Diagnostic
The Windows Memory Diagnostic tool is user-friendly and effective at resolving memory-related issues on Windows. It's an option to troubleshoot any problems.
Step 1. Press the "Windows Key" + "R" to open the Run command box.
Step 2. Type mfsched.exe in the text field and select "OK".

Step 3. In the window that displays, you can choose to restart your computer for a check or do it later. To address the nvlddmkm.sys error, its recommended to reboot
Step 4. Wait for the process to complete and verify if the problem has been resolved.
What Causes the Video TDR Failure (NVLDDMKM.SYS) Error
The "video TDR failure NVLDDMKM.SYS" message is a screen of death (BSOD) error commonly seen on Windows 10 and 11 computers with NVIDIA graphics cards. This error signifies that the video driver did not respond within a specified time frame, leading the system to attempt a failed reset.
These are the reasons behind this issue;
- The driver might not be compatible with the Windows updates or hardware configuration, resulting in conflicts or errors.
- Overclocking, which involves increasing component clock speeds for performance, can also raise heat and power consumption levels, potentially causing instability or damage.
- If system files get infected by viruses, malware, or mishandling, they may cause errors or system crashes.
- Faulty hardware components such as the GPU, CPU, RAM, motherboard, or power supply can also result in errors or malfunctions.
Conclusion
Resolving Video TDR Failure (NVLDDMKM.SYS) is quite straightforward. You must restart your Windows and update your Graphic Cards drivers or Windows. You can also recover lost videos using the EaseUS Data Recovery Wizard.
Video TDR Failure (NVLDDMKM.SYS) FAQs
Here, you will find some information about Video TDR Failure (NVLDDMKM.SYS).
1. How do you fix TDR failure?
There are methods you can attempt to resolve the TDR failure error. These include updating or reinstalling your graphics driver, disabling any overclocking tools, running hardware and devices, fixing registry editor issues, cleaning your CD/DVD drive, disabling antivirus programs and firewalls, or booting your PC in mode.
2. Why does Windows keep crashing video TDR failure?
Windows may repeatedly crash with video TDR failure due to issues with your graphics card or display driver. This issue could arise from a defective connection, an incompatible file system, a damaged or infected device, or a faulty sector on the device.
3. What is the video TDR feature?
The video TDR feature, known as Timeout, Detection, and Recovery, in Windows is meant to identify and recover from situations where the graphics card or display driver becomes unresponsive or hangs. In some cases, Windows will attempt to reset the device and restore functionality. Nevertheless, this process might fail and result in a screen of death (BSOD) error, such as video TDR failure or video TDR timeout detected.
4. How do I turn off TDR?
Disabling TDR is generally not recommended as it could potentially lead to issues and system instability. However, if you still wish to proceed with it, you can do so by modifying the registry. It's crucial to back up your registry before making any modifications since errors during this process could cause harm to your system. To disable TDR, follow these steps;
Step 1. Press the "Windows" + "R" to launch the Run dialog box. Enter regedit. Hit "Enter".
Step 2. Go to the registry key: HKEY_LOCAL_MACHINE\SYSTEM\CurrentControlSet\Control\GraphicsDrivers
Step 3. To create a setting, in the registry, right-click on an area, choose "New" > "DWORD (32 bit)"Value, name it "TdrLevel," and set the value to "0." Once you've done this, close the registry editor. Restart your Computer.
Was this page helpful?
-
Jaden is one of the editors of EaseUS, who focuses on topics concerning PCs and Mac data recovery. Jaden is committed to enhancing professional IT knowledge and writing abilities. She is always keen on new and intelligent products.…

20+
Years of experience

160+
Countries and regions

72 Million+
Downloads

4.9 +
Trustpilot Score


Free Data
Recovery Software
Recover data up to 2GB for free!
