RAM (Random Access Memory) is the working memory of a computer that operates almost every function. Whenever you load a program or input data related to a query, it will be transferred to RAM and then read by it to process the instructions. But faults in this memory can cause problems like application crashes, system not responding, or BSOD.
To get an idea about the health of your system's RAM, you can use Windows memory diagnostic tool. It is a built-in tool that can help you in this regard. This article will describe this particular tool, its working, benefits, and how to use it. Let us show you all of these steps by step.
Overview of Windows Memory Diagnostic
It is a built-in tool for Windows operating system to check the RAM's health and issues. Windows memory diagnostic tool is available in every Window version after Windows 7. Does not matter what is the version you are using in your device, you can access this tool and perform this test.
This tool is completely free for everyone without any registration requirements. You can use this tool with a little knowledge of the system and proficiency in working with it. With the help of this diagnostic tool, you can get results regarding memory problems. All in all, it will be a good choice for you to pick and look for problems in RAM to get them resolved.
How to Check RAM with Windows Memory Diagnostic?
Before checking RAM with this specific tool, you should need to take some precautions. Be mindful that this process needs a quick restart after following some steps. So, you should have to save your files (if working) before starting the process. If you have not done this, you will face problems because the lost data is not recoverable.
Now, let us show you the process to use Windows Memory Diagnostic tool for RAM analysis.
Step 1. Open the Control Panel of your system by clicking on "Windows Icon"
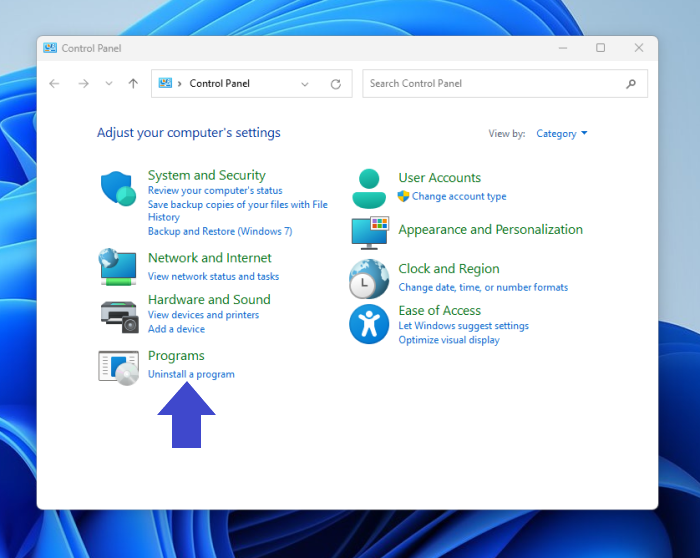
Step 2. Look for System and Security and tap to open it
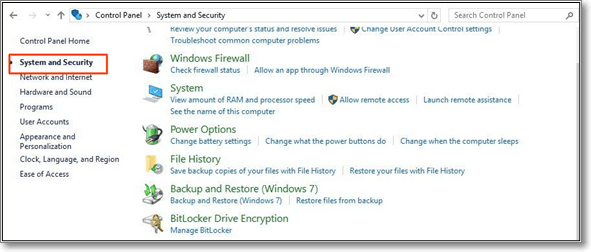
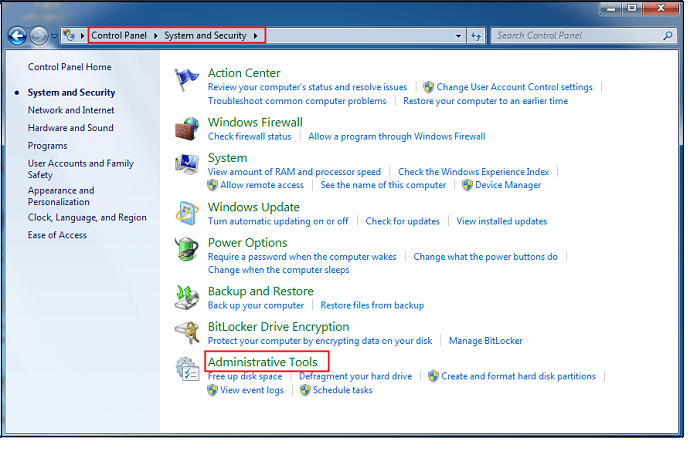
Step 3. Search for the Administrative tool in the list shown on your device's window
Step 4. Click on "Diagnose your computer's memory problems" just below that option
Step 5. A small window will pop up with the option "Restart now and check problems"
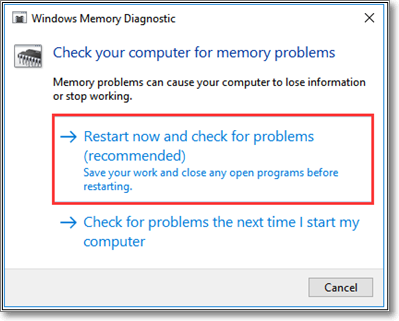
Step 6. Click on that option to restart the device
This is all that you have to do to run this test. When the device reboots, it will be opened in the Windows memory diagnostic environment. The tool will run multiple tests including LRAND, CHCKR3, and others simultaneously to analyze the RAM of your device.
There are other ways also available for accessing this tool. Those methods need little knowledge of the technical specifications of your system. You should have to use different keys to open this tool quickly and run this test. Let us show you those methods too to access this tool.
Using Run Keys
Step 1. Press the Windows button and R simultaneously
Step 2. It will open a dialogue box
Step 3. Search for "mdsched" and tap on the "OK" button
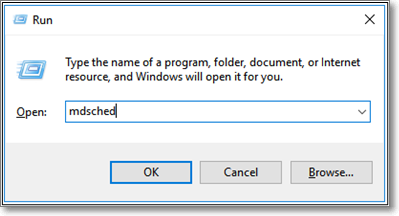
Step 4. Wait until you get the short window with "Restart now and check for problems"
Step 5. Click on that option to run this test
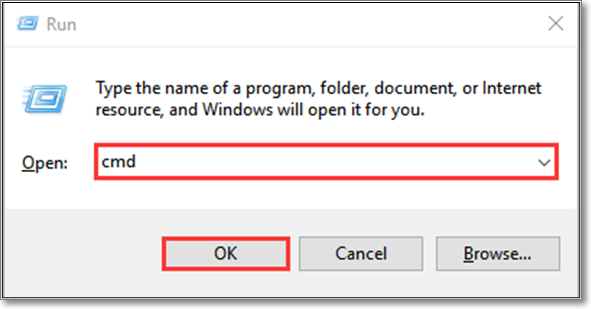
Using CMD Keys
Step 1. Press Windows and R simultaneously
Step 2. Search for "cmd" in the box and click on the "OK" button
Step 3. Type mdsched in the opened black window
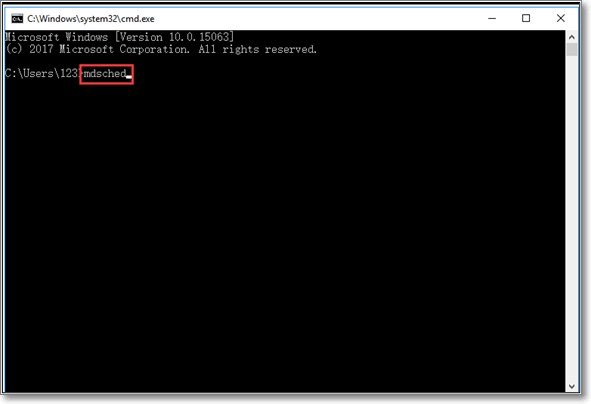
Step 4. Tap the "Enter" button available on your keyboard
Step 5. It will begin the Windows memory diagnostic test and complete it in a few minutes
How to Find Windows Memory Diagnostic Results?
Whether you have used the first method to run this test or any of the others, the process to check the results will be the same. It does not have even a single difference depending on the ways to run this test. So, you can choose any of the above methods to run this tool and wait until your device will be restarted a few minutes after its completion.
When you have signed in to your device, it is time to check the results of the Windows memory diagnostic tool test. Here are the steps that you should have to follow in this regard.
Step 1. Go to the Windows search bar
Step 2. Type eventvwr.exe in the search bar
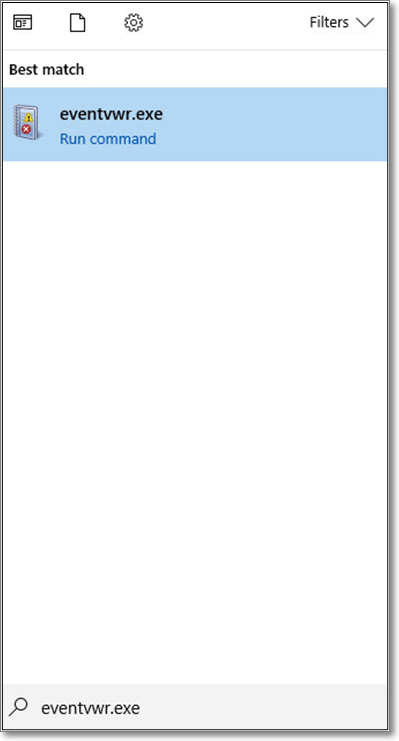
Step 3. Click on the first option shown on the screen
Step 4. It will open a window with some options in the left vertical bar
Step 5. Expand the "Windows Logs" folder by clicking on it
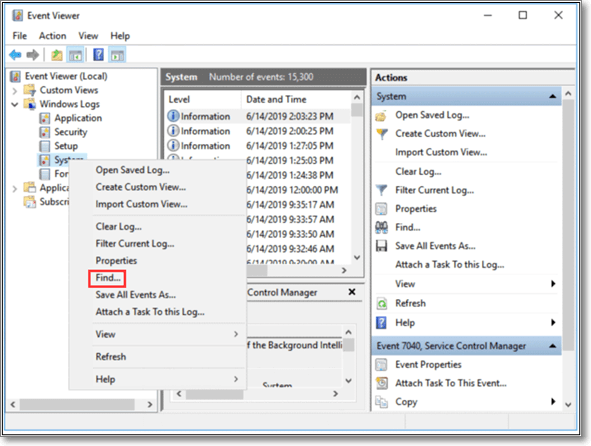
Step 6. Right-click on the System option shown in the dropdown options
Step 7. Now, click on the "Find" option given there
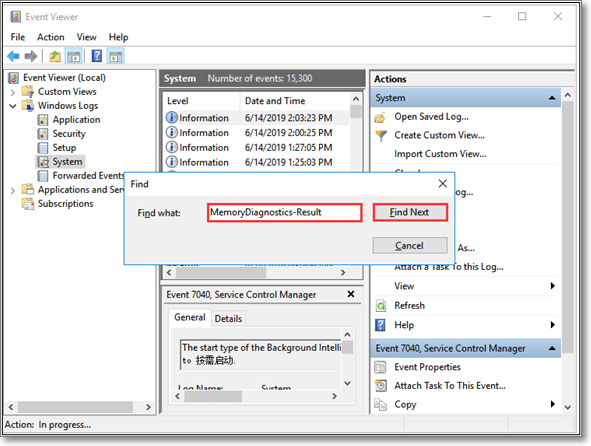
Step 8. Type MemoryDiagnostics-Results and tap on "Find Next"
Step 9. Double click on the file with this name to view the results in the form of a message
Bottom Line
This blog has properly discussed how to use Windows memory diagnostic tool and check its results. You can use any of the above methods to run this test and analyze your device's memory.
But it is recommended to follow the steps with the care mentioned above. The reason is a minor mistake in the inserted keys will run another test with which you may be unfamiliar.
Was This Page Helpful?
Daisy is the Senior editor of the writing team for EaseUS. She has been working at EaseUS for over ten years, starting as a technical writer and moving on to being a team leader of the content group. As a professional author for over ten years, she writes a lot to help people overcome their tech troubles.
Related Articles
-
macOS Monterey Installation Failed? Here Are Trustworthy Fixes for You
![author icon]() Jaden/2025-09-17
Jaden/2025-09-17 -
8 Ways to Fix MacBook Screen Goes Black But Still Running
![author icon]() Brithny/2025-09-17
Brithny/2025-09-17 -
How to Fix Starfield Keeps Crashing - 9 Fixes🔥
![author icon]() Cici/2025-07-04
Cici/2025-07-04 -
Fix Windows 10 Computer Keeps Freezing Randomly
![author icon]() Tracy King/2025-07-04
Tracy King/2025-07-04
EaseUS Data Recovery Services
EaseUS data recovery experts have uneaqualed expertise to repair disks/systems and salvage data from all devices like RAID, HDD, SSD, USB, etc.