Page Table of Contents
Updated on Jul 01, 2026
- How to Backup and Restore in Windows 10
- Windows 10 File History: How to Backup and Restore Files
- Windows Backup and Restore: How to Backup and Restore System Image
- Windows Backup and Restore: How to Create a Windows 10 Recovery USB
- System Restore: How to Create a System Restore Point
- 4-in-1 Backup Software: How to Create Full Windows 10 Backup
How to Backup and Restore in Windows 10
Windows 10 has two default backup and restore options: File History and Backup and Restore (Windows 7). File History saves your files by capturing their snapshots and then allows you to restore them in different versions. On the other hand, Backup and Recovery (Windows 7) will allow you to back up and restore your files using a system image.
🚩Related Reading: File History vs. Backup and Restore | Which Is Better?
It's a good way to back up large files. In addition to these two techniques, you can back up your files on Windows 10 using built-in tools like System Restore and external tools like recovery USB. This article will discuss the four techniques and recommend a free backup software called EaseUS Todo Backup Free that combines the functions of the different techniques into one. Read on!
Secure Download
Windows 10 File History: How to Backup and Restore Files
Microsoft created File History, intending to replace the Backup and Restore (Windows 7) feature during the release of Windows 8. Despite that, it has gained significant preference among Windows 10 users as a technique to create backup files.
File History Windows 10 allows you to choose the file or folder to back up and then capture regular snapshots. When your system fails, it allows you to restore multiple versions of your saved files and folders.
#️⃣How to Backup Files Using File History
You'll first need to set it up before getting started with File History. Below are the steps to set up and backup individual files using the tool:
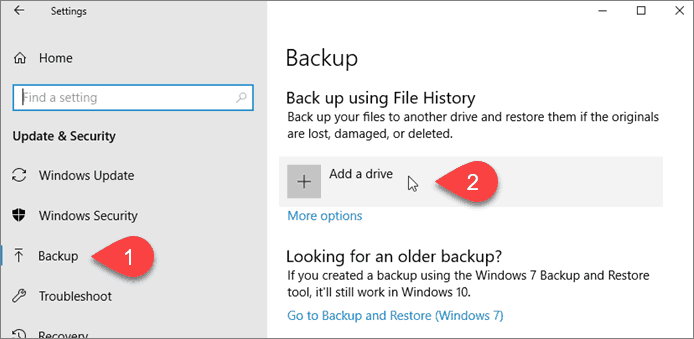
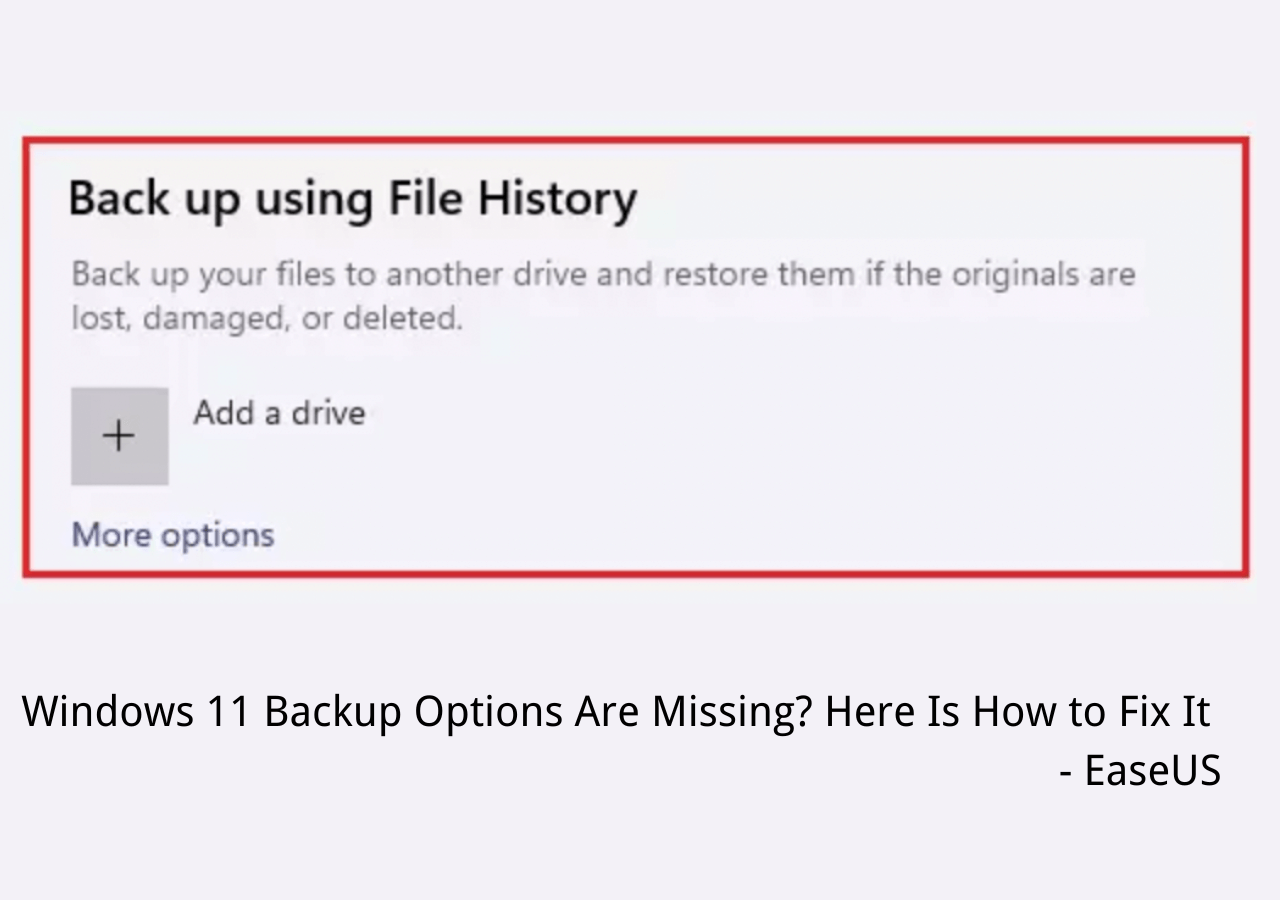
Step 1. Navigate to the Windows search bar and type Backup settings. Click on the first result.
Step 2. Under "Backup using File History", click on "Add a drive."
Step 3. Next, choose the drive to store your backup files.

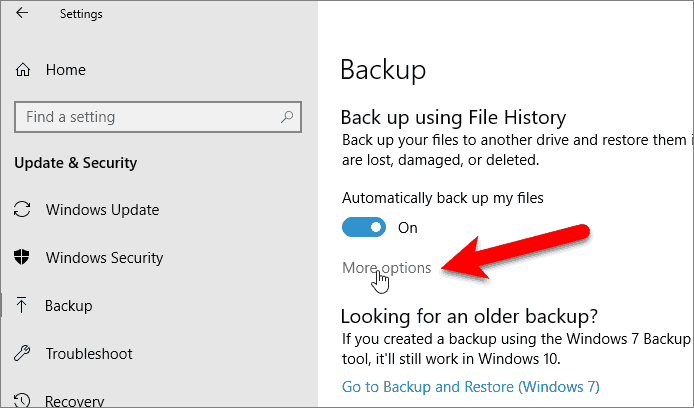
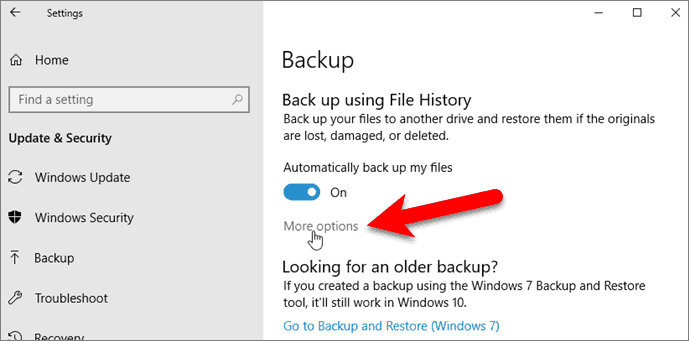
Step 4. Click on "More options" to configure the selected drive.
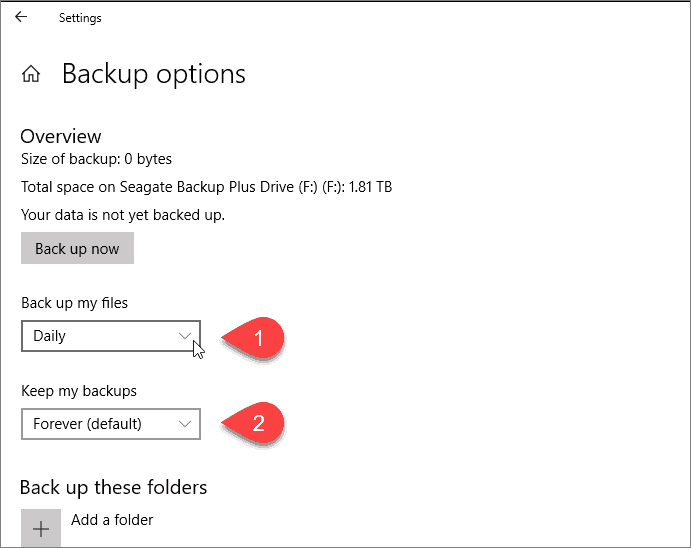
Step 5. Under "Backup options", select your preferred backup frequency and the length of time you wish to keep the backups. In most cases, backups should be made every hour and retained "forever".
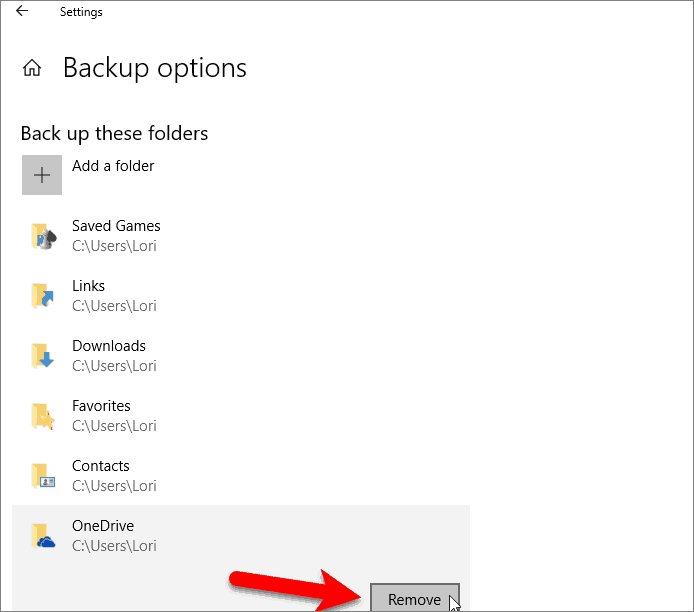
Step 6. Scroll to the "Backup these folders" section and select the files and folders you want File History to keep, i.e., Music, Downloads, Desktop, and Pictures. If the file you want to keep is not listed, you can click "Add a folder" to add it.

Step 7. If you don't want to back up a given folder, select it and click "Remove".
Step 8. When you've finished making the selection, click on "Back up now". File History will start backing up your data. Depending on the size and number of folders, this might take some time. Be patient until the entire process is completed.
📖You may be interested: Windows File History Alternative
#️⃣How to Restore Files Using File History
Once you've backed up your files using File History, you can recover them anytime you need them, i.e., when your system crashes. You can restore the files through the following steps:
Step 1. Type Backup settings on the search bar and press "Enter". Click on the first result that displays.
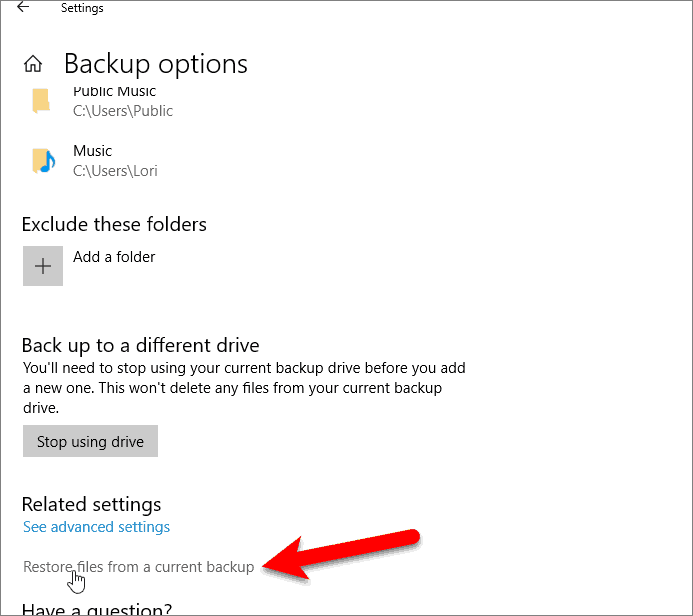
Step 2. Click on "More options" under "Backup using File History".
Step 3. Navigate to "Related settings" and click "restore files from a current backup".
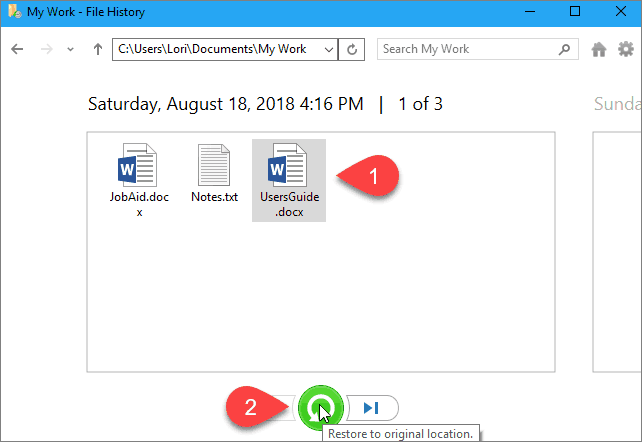
Step 4. When the list of files in the current backup is displayed, select those you want to recover and click on the "Restore" button (green). Your system will restore the selected files and make them available for use.
Windows Backup and Restore (Windows 7) Windows 10: How to Backup and Restore System Image
You can make a full backup for your Windows 10 device with a system image. It helps you save system settings, programs, and personal files. System image backups keep save a large pool of information and are hence considered adequate for large files.
The Backup and Restore feature on Windows 10 allows you to save important files using the system image. The first step of the backup in the Windows process is to create system image windows 10 on usb, a hard disk, or other devices (depends on yourself).
#️⃣How to Create a System Image in Windows 10
Below are steps to create a system image:
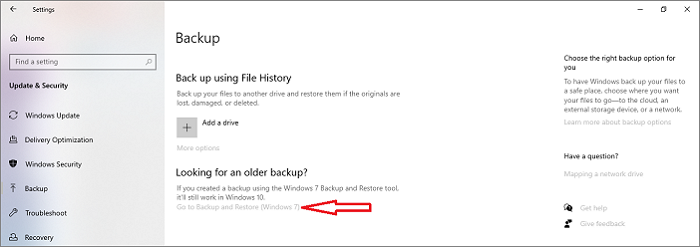
Step 1. Type Backup settings in the search bar and open it.
Step 2. Click on "Go to Backup and Restore (Windows 7)".
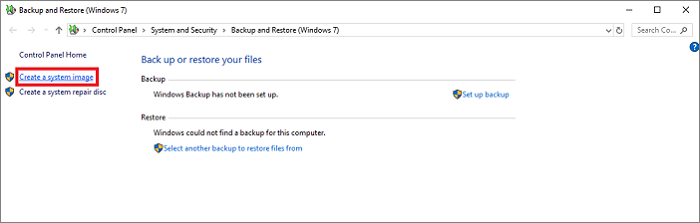
Step 3. Navigate to the left side of the panel and click on "Create a system image".
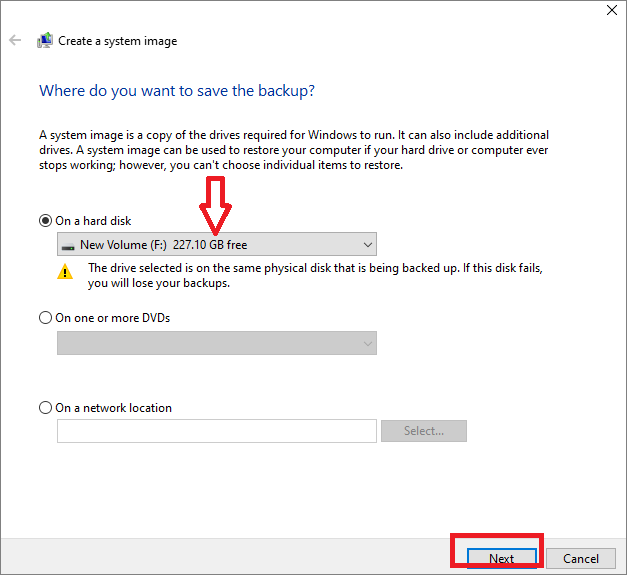
Step 4. Select where to save your backup, i.e., hard disk, DVD, or network location. Click "Next".
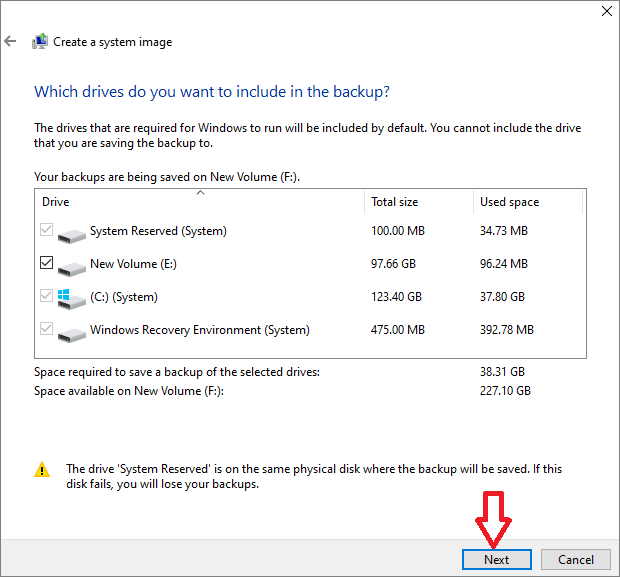
Step 5. On the next window, choose the drives to include in the backup and click "Next".
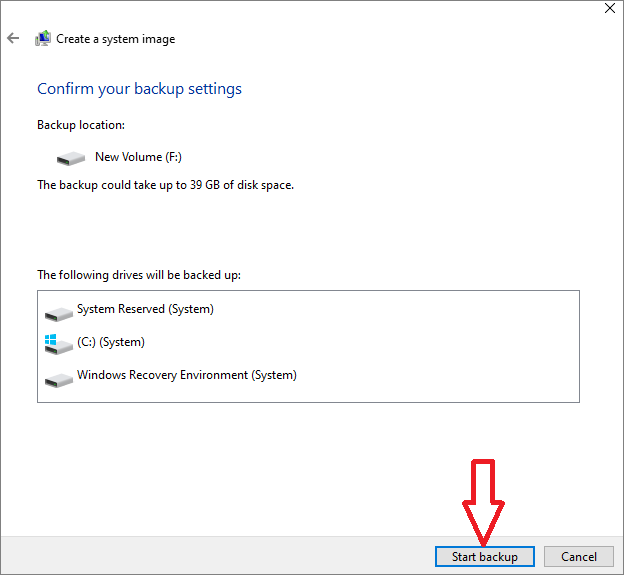
Step 6. Confirm the backup settings you've made. If everything is okay, click "Start backup". The system will then back up and save your data.
🚩The article you may be interested in: Windows 7 Backup on Windows 10 Not Working
#️⃣How to Restore Files Using System Image Backup
You can resort to system image recovery to recover files using system image backup if your computer fails or experiences a malware attack. You'll need a bootable USB or DVD before starting the process. Next, you can follow the steps below:
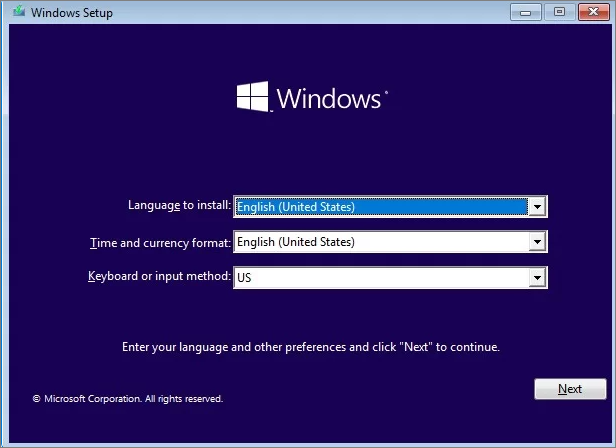
Step 1. Start your PC and boot into the Windows pre-install environment. Click "Next".
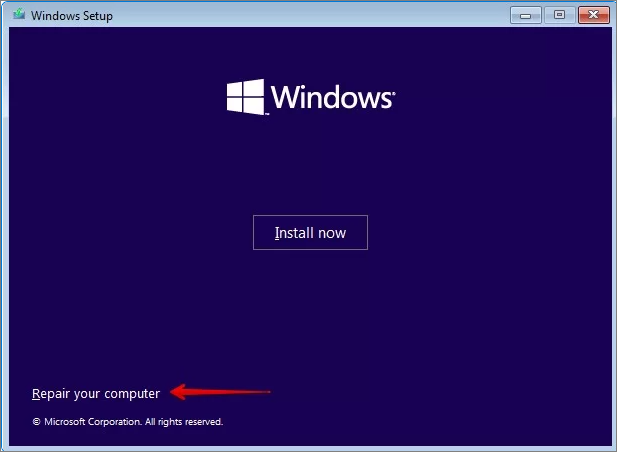
Step 2. In the next window, click "System Repair" on the bottom left.
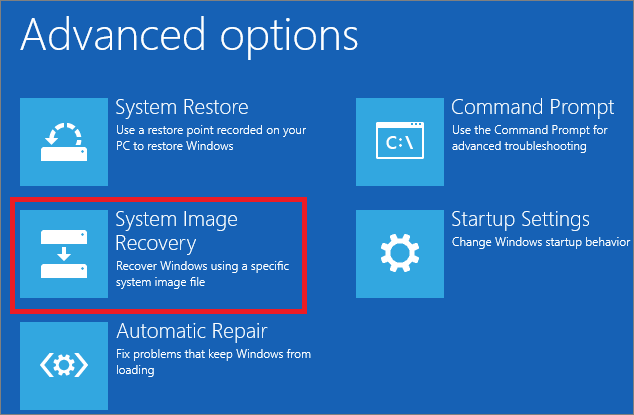
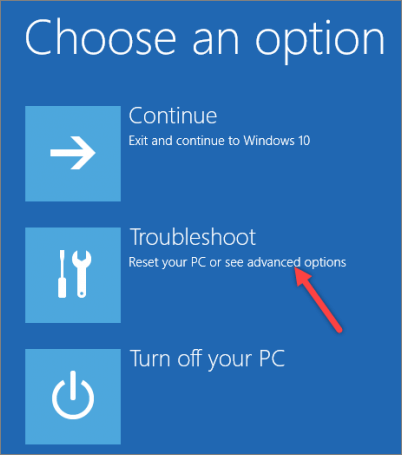
Step 3. Under "Choose an option", click "Troubleshoot."

Step 4. Next, click on "System Image Recovery".
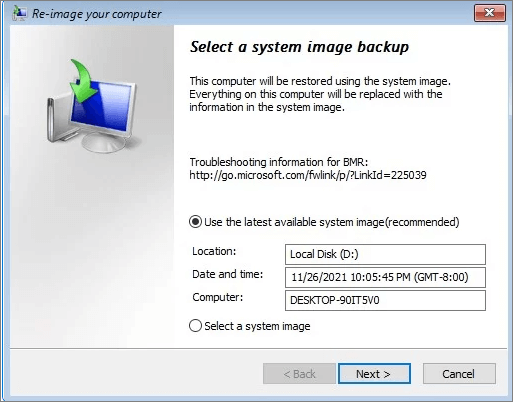
Step 5. Select your system image and click "Next".
Step 6. Under additional restore options, select whether to "Format and repartition disks" and click "Next".
Step 7. Click "Finish".
Step 8. Confirm if you want to replace the current files with the system image and click "Yes". The restoration process will then begin.

Windows Backup and Restore (Windows 7) Windows 10: How to Create a Windows 10 Recovery USB
The Backup and Restore feature on Windows 10 allows you to create a recovery drive so that you can save your system files and recover them when disaster strikes. To get started, you'll need a USB drive of at least 16GB. If you use a smaller one, you'll have "insufficient space" to create a recovery drive. You can create windows 10 recovery drive through the following steps:
Step 1. Connect a USB drive to your PC.
Step 2. Type Create a recovery drive on the Windows search bar and open the first result.
Step 3. Once the "Create a recovery drive" window opens, check the option for "backup system files to the recovery drive".
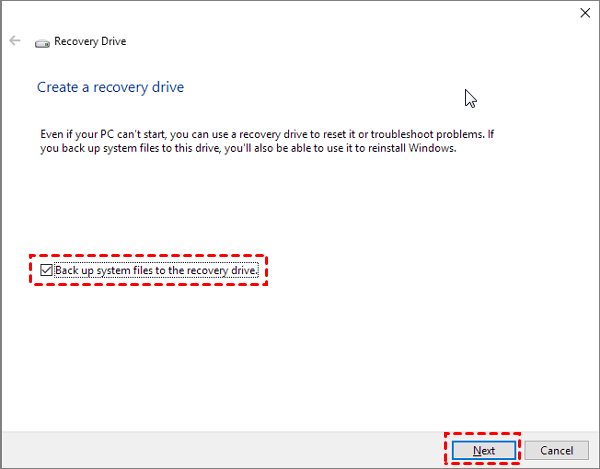
Step 4. Click "Next".
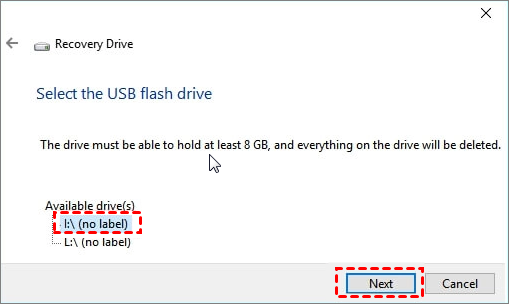
Step 5. Select the USB device to use as a recovery drive and click "Next".
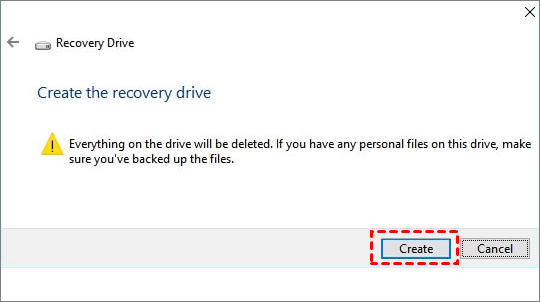
Step 6. Once you confirm the warning message, click "Create".
Step 7. When the message "The Recovery drive is ready" displays, click the "Finish" button. Your system will then create a recovery drive using a recovery USB.
#️⃣How to Restore Windows 10 from a Recovery USB Drive
The System Restore feature will help recover Windows 10 from a recovery USB drive. Connect the recovery USB drive to your computer, then follow the steps below:
Step 1. Boot your computer from the USB recovery drive.
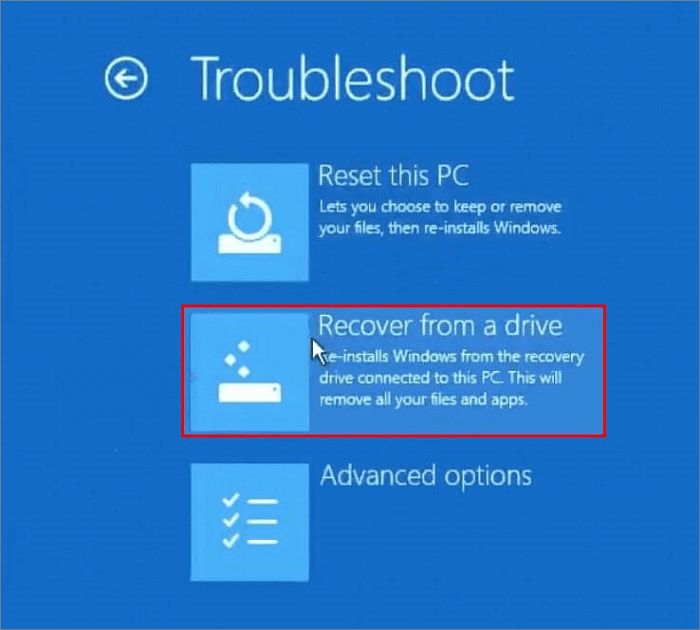
Step 2. Under the "Choose an option" window, select "Troubleshoot".
Step 3. Click on "Recover from a drive".
Step 4. You'll then have to select either "Just remove my files" or "Clean the drive fully".
Step 5. Next, click on "Recover". The system will start recovering from the USB drive. The process will take some time, after which your computer will restart automatically.
Step 6. Lastly, set up your computer with the on-screen instructions, and you're ready.
System Restore: How to Create a System Restore Point
System Restore is an important Windows 10 that helps you backup to restore important settings and programs on your computer if it fails or experiences a malware attack. System Restore works by automatically or manually creating restore points that will play a significant role in reverting to an earlier working version of your system.
Windows 10 disables System Restore by default, so you'll need to enable it first. Below are steps to enable and create system restore points:
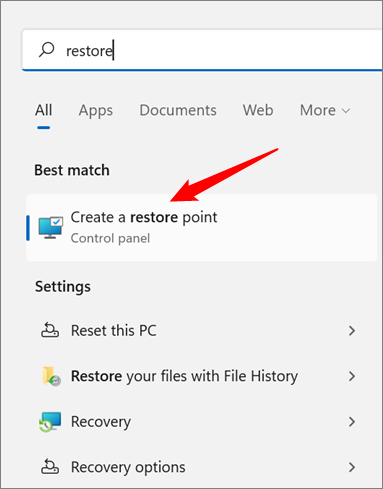
Step 1. Navigate to the search bar and type System Restore.
Step 2. Once the results display, click on "Create a restore point".
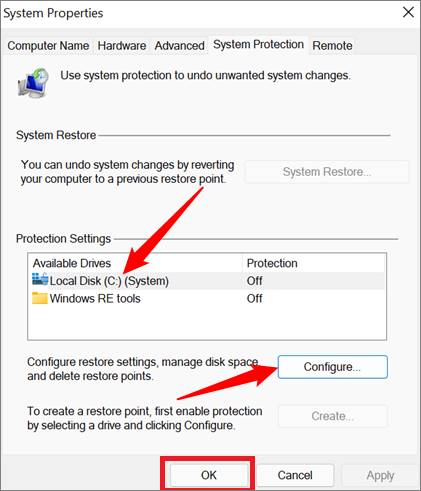
Step 3. When the System Properties window opens, click on the "System Protection" tab. Next, select the drive you want to configure under "Protection Settings" and click "Configure".
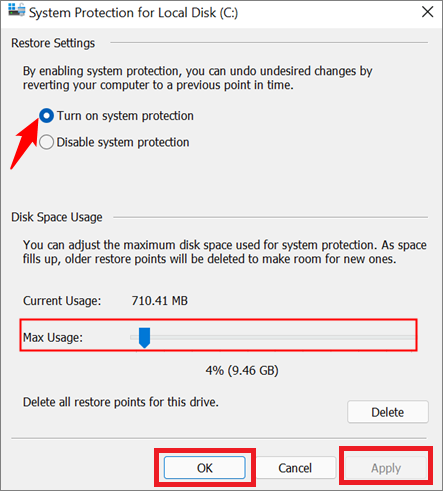
Step 4. Under "Restore Settings", select "Turn on system restore". Under "Disk Usage", pick your preferred disk space for the restore points the system will create.
Step 5. Next, click on "OK" and then "Apply". Your computer will now activate System Restore and automatically create restore points.
You can repeat steps 3 and 4 above for other drives. If you want to create restore points manually, click on the "Create" button under the "System Protection" tab and follow the next steps.
However, there are some circumstances in which restore points do not work. We've got five solutions here to get your Windows 10/8/7 System Restore works. Check this out:
#️⃣How to Restore Your Computer Using System Restore Point
A restore point helps you to revert to the old system if the current one stops working as expected. When you restore the system, you'll recover all the settings and programs saved on your computer. Below are steps to use this feature:
Step 1. Navigate to your Windows search bar and type System Restore.
Step 2. Click on "Create a restore point".
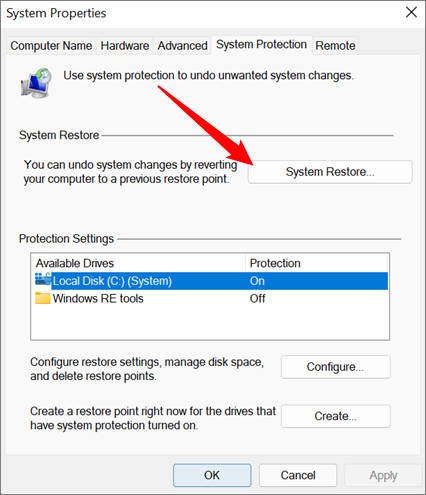
Step 3. Open the "System Protection" tab and click "Restore".
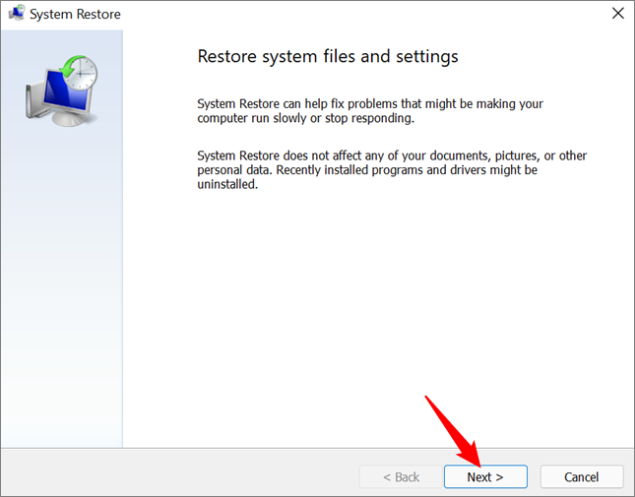
Step 4. Read through the instructions on the System Restore window and click "Next".
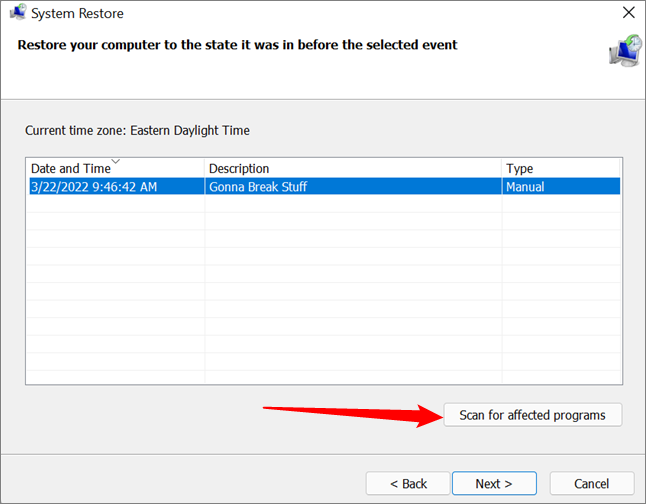
Step 5. Choose the restore point you want to revert to. To know the programs and drivers affected by this process, click "Scan for affected programs".
Step 6. If everything is okay, click "Next".
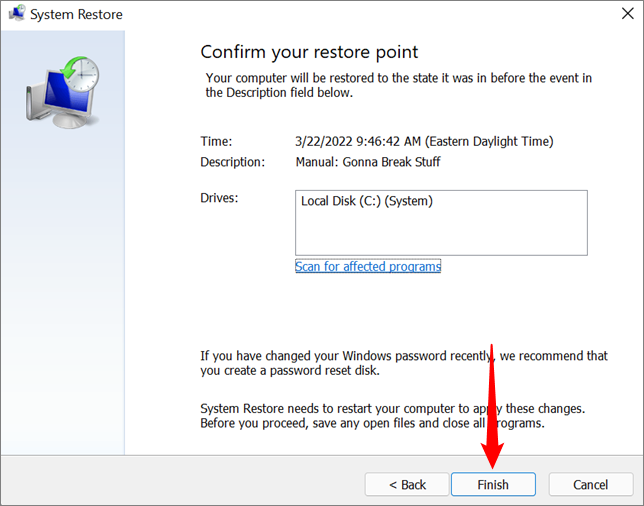
Step 7. Confirm the restore point you selected and click "Finish" to start the recovery process. This process may take time, so you should be patient until it completes.
More system restore software is provided below the article:
Free System Restore Software Windows 10 to Create Windows Recovery Disk
Download the best free system restore software Windows 10 to restore the Windows system, files, and installed applications when a disaster happens.

4-in-1 Backup Software: How to Create Full Windows 10 Backup
You can use backup software if you want to create a full Windows 10 backup and combine the four techniques mentioned in the sections above. EaseUS Todo Backup Free combines the four techniques and makes it easy for you to back up and restore personal files, system settings, and programs.
This software comes with top-notch backup features that guarantee the safety of your files and settings in case of a malware attack or system failure. It allows you to back up your files to a local drive, the cloud, an external drive, NAS, or the network. You can also make incremental and differential backups.
Features of EaseUS Todo Backup Free
- Allows you to make a scheduled backup daily, weekly, or monthly.
- Allows bootable backup and recovery for your system if it fails.
- Allows you to perform multi-path backup storage for data safety.
- Has password-enabled protection for all backup files.
- Allows you to perform disk and file cloning on your hard drive.
Since Windows 10 built-in tools for system Backup and Restore (Windows 7) may sometimes fail, we recommend using EaseUS Todo Backup Free. This software comes with a trial version that is free to use. Download and install the software to your computer today to get started. The steps to using EaseUS Todo Backup Free are easy to follow.
Secure Download
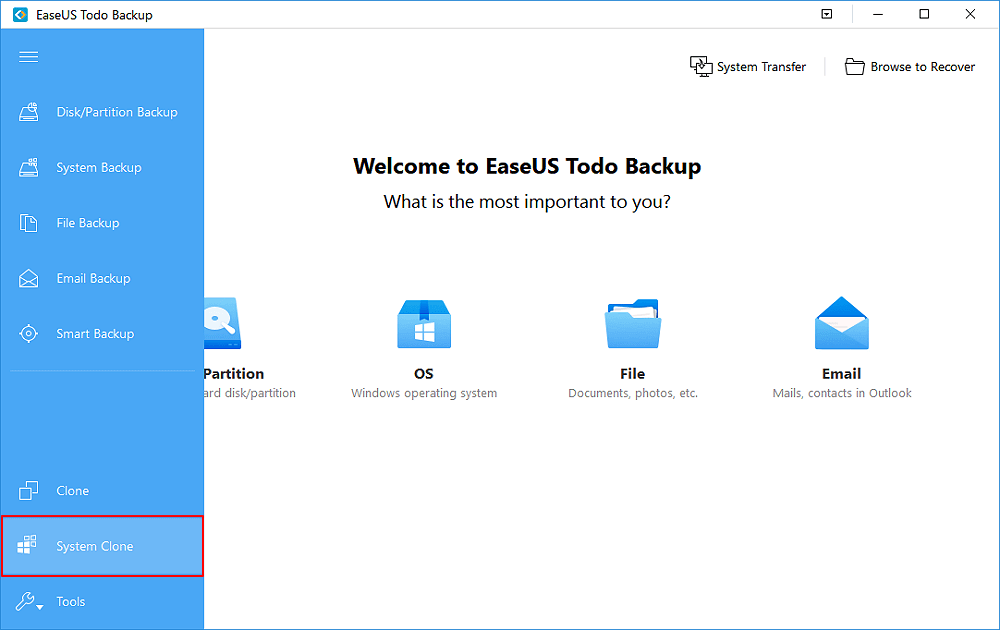
Step 1. Launch EaseUS Todo Backup on your computer, and click Create Backup on the home screen and then hit the big question mark to select backup contents.

Step 2. To back up your Windows operating system, click "OS" to begin the backup task.

Step 3. Your Windows operating system information and all system related files and partitions will be automatically selected so you don't need to do any manual selection at this step. Next, you'll need to choose a location to save the system image backup by clicking the illustrated area.

Step 4. The backup location can be another local drive on your computer, an external hard drive, network, cloud or NAS. Generally, we recommend you use an external physical drive or cloud to preserve the system backup files.

Step 5. Customiztion settings like enabling an automatic backup schedule in daily, weekly, monthly, or upon an event, and making a differential and incremental backup are available in the Options button if you're interested. Click "Backup Now", and the Windows system backup process will begin. The completed backup task will display on the left side in a card style.

Windows 10 Backup and Restore FAQs
Other questions about how to backup and restore Windows 10 you may be interested in:
1. Does Windows 10 have Backup and Restore?
Yes. Microsoft decided to include the Backup and Restore feature on Windows 10 since most users got accustomed to it in the previous versions of Windows. Although File History was also introduced, the Backup and Restore feature is another good option.
2. How Do I Backup Entire Computer on Windows 10?
The best way to back up your entire computer, including personal files, system settings, and programs, is using a third-party tool like EaseUs Todo Backup Free. This tool combines the functions of the other backup techniques, including File History, Backup and Restore (Windows 7), System Restore, and Recovery USB. You can download the trial version here to get started with EaseUS Todo Backup Free.
3. How do I view Windows backups?
To check if File History is running on your computer, go to Control Panel, select "System and Security", click on "File History" and check the backup status.
Was this page helpful? Your support is truly important to us!

EaseUS Todo Backup
EaseUS Todo Backup is a dependable and professional data backup solution capable of backing up files, folders, drives, APP data and creating a system image. It also makes it easy to clone HDD/SSD, transfer the system to different hardware, and create bootable WinPE bootable disks.
Secure Download
-
Updated by
![]()
Larissa
Larissa has rich experience in writing technical articles and is now a professional editor at EaseUS. She is good at writing articles about data recovery, disk cloning, disk partitioning, data backup, and other related knowledge. Her detailed and ultimate guides help users find effective solutions to their problems. She is fond of traveling, reading, and riding in her spare time.…Read full bio -
Written by
![]()
Jean
Jean is recognized as one of the most professional writers in EaseUS. She has kept improving her writing skills over the past 10 years and helped millions of her readers solve their tech problems on PC, Mac, and iOS devices. …Read full bio
Related Articles
![]() How to Restore Disk Image to a Larger Drive in 2 Ways
How to Restore Disk Image to a Larger Drive in 2 Ways![]() Windows 11 Backup Options are Missing? Your Ultimate Guide Is Here
Windows 11 Backup Options are Missing? Your Ultimate Guide Is Here![]() Backup HDD with Bad Sectors [Detailed Guides]
Backup HDD with Bad Sectors [Detailed Guides]![]() Toshiba External Hard Drive Backup Software for Windows 11/10/8/7
Toshiba External Hard Drive Backup Software for Windows 11/10/8/7![]() I Cloned a Windows 7 PC in 2026, It Was More Complicated Than Expected
I Cloned a Windows 7 PC in 2026, It Was More Complicated Than Expected![]() How to Backup Sims 4 Saves in 2026 (Fully Protect Game Data)
How to Backup Sims 4 Saves in 2026 (Fully Protect Game Data)


Topic Clusters


Interesting Topics