Page Table of Contents
Updated on Jan 21, 2026
Are you looking forward to backup quick access of Windows 10 but don't know how to do it? If yes, stay connected with us with this guide to get the right answer to all of your queries.
What Is Quick Access in Windows 10
Quick Access is an option in the Windows File Explorer that helps to quickly access the recent and frequently visited files and folders. One doesn't need to wait too long to search for their last accessed or frequently researched files as it is available as soon the user opens Windows Explorer. This feature also allows you to pin favorite folders to that location manually.
📖Read also: How to Fix File Explorer Won't Open in Windows 10 or Windows 11
The integration of Quick Access in the Windows 10 has added an extra view to File Explorer, which is Frequent folders. You can quickly get this option under the navigation pane on the left of File Explorer. In short, we can also say that Quick access is the shortest route to access the files you are working on and the folders you often use.
Having a backup for Quick Access of Windows 10 PC helps you restore your frequently visited files and folders even if your computer crashes or is attacked by viruses. In the following content, we'll discuss two methods to back up Quick Access. One is using a professional file backup software, EaseUS Todo Backup, to save your files automatically. The other is manually backing up files within the Quick Access folder. W compared two ways in aspects of their difficulty and effectiveness.
| Methods | Effectiveness | Difficulty |
|---|---|---|
| High - Automatically save Quick Access files and folders to the backup location without any data loss. Suitable for bulk files. | ⭐ | |
| Medium - Manually copy and paste Quick Access files and folders, you may lose data during the process, and it is very time-consuming for a large number of files. | ⭐⭐⭐ |
Tip 1. Backup Quick Access on Windows PC Automatically
You will lose access to all quick-access folders and files if you ever have to reinstall Windows. But there is a simple remedy. EaseUS Todo Backup is one of the most effective methods for safeguarding data in Quick Access. One of EaseUS Todo Backup's most appealing features is its scheduled backup, which will automatically backup files in Quick Access to an external hard drive or other destinations. It is the finest option for individuals who need to manage and save multiple and various files.
Secure Download
It is free-of-cost backup software, offering users 250GB of cloud storage without hassle. Users here can easily store and access their preferred data with only a few clicks. It offers a one-click backup solution that billions of customers use globally. Not only backup, but the tool also provides instant recovery of the data with higher efficiency. It is a perfect backup solution that keeps your backup safe under different conditions. The tool also offers a disk imaging system for cloning particular data anytime.
The main features of EaseUS Todo Backup are listed here:
- Good for Beginners
- User-friendly interface
- Automatic backup
- Lossless transmission
- Partition/disk backup
Steps to Backup Quick Access with EaseUS Todo Backup
Backing up Quick Access with EaseUS Todo Backup is a straightforward and easy process that one can easily enable within a few clicks. The backup makes it convenient for the users to use their data even in different critical scenarios.
| ⏰Time Duration | 5-10 minutes |
| 📑What to prepare |
|
Step 1. To begin the backup process, click the Select backup contents button.

Step 2. Four data backup categories are listed: File, Disk, OS, and Mail.

Step 3. Lists of both local and network files are shown on the left-hand side of the screen. Expanding the directory so that you can choose the files to back up.

Step 4. Follow the guidance on the screen and choose the place where you want to store the back up.

Make sure that the backup is encrypted and set the backup schedule by clicking Options in Backup Options. You can also choose to start the backup at a certain time in Backup Scheme by clicking Options. There are many other customizable options that you can look into.

Step 5. You can store the backup file either on your computer, in EaseUS's cloud service, or on a network-attached storage device (NAS).

Step 6. EaseUS Todo Backup enables customers store backup copies of their files on a third-party cloud drive or on the company's own cloud storage.
If you want to back up your data on a third-party cloud drive, select Local Drive and scroll down to add Cloud Device. Then fill in your account information.

Click EaseUS Cloud, then sign up and log in with your EaseUS account if you wish to store backup files to EaseUS' own cloud storage service.

Step 7. Click on Backup Now to start a backup. When the backup process is done, it will display as a card on the left-hand side of the screen. A right-click will let you see more about how to handle the backup job in more depth.

📖You may be interested in 5 Best Free Windows 11 Backup Software | Backup Data for Free
Tip 2. Backup And Restore Quick Access in Windows 10 Manually
Backing up data or Quick Access in Windows 10 is not a big deal. You need to take care of a few things to let things quickly happen. If you don't want to download third-party software, we are sharing here an easy method for backing up Quick Access in Windows 10 manually, which is Copy and Paste. This way is applied to a small number of files, and is suitable for those who have certain computer knowledge.
| ⏰Time Duration | 10-15 minutes |
| 📑What to prepare |
|
Backup Quick Access Folder in Windows 11/10
Follow these easy steps to quickly backup the Quick Access on Windows 10:
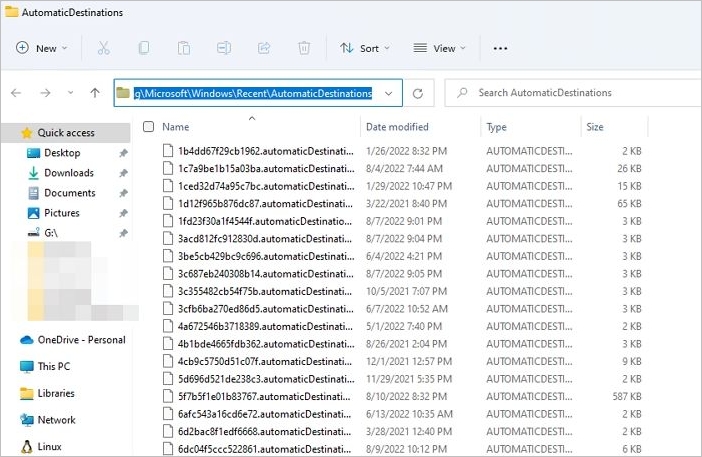
Step 1. Launch File Explorer on your Windows 10. Then tap the address bar option and press Ctrl + L in the given section.
Step 2. Once done with the above process, you must type the following in the address bar:
%AppData%\Microsoft\Windows\Recent\AutomaticDestinations
Press the enter key.
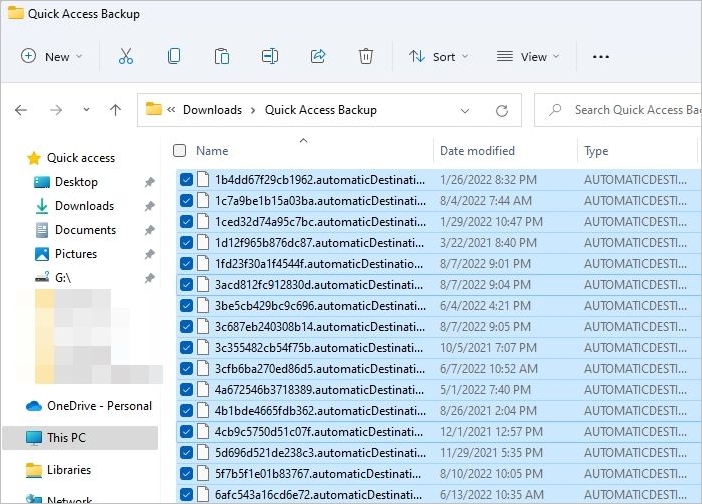
Step 3. You next must copy all the files to another folder. Ensure the folder is in a location where you do not delete the files. To complete the above process perfectly, you must close the File Explorer App on your device.
Bingo! You have successfully backup Quick Access in Windows 10 now.
Restore Quick Access Folder in Windows 11/10
You can now quickly restore the Quick Access folder using the files we copied to another folder. File Explorer can read these files and automatically add them to the left column.
Step 1. Launch File Explorer on your device. Once done, you now have to navigate to the folder %AppData%\Microsoft\Windows\Recent\AutomaticDestinations. You can easily paste this location into your search bar for convenient access.
Step 2. Copy and paste the files you have backed up earlier into the AutomaticDestinations folder you have opened in the above step.
Step 3. Once you complete the above process, close all the File Explorer windows.
Step 4. Now launch the new Explorer Window on your device to check whether the settings you have made recently are working correctly or not.
Bingo! You have successfully restored the Quick Access Folder in windows 11/10.
See also:
Bonus: How to Add or Remove a Folder from Quick Access
It's not only about backing up and restoring Quick Access folders or files; adding or removing folders from the menu is also one of the most common things users do regularly. As a bonus tip, we are adding the detailed processes for adding or removing the folder from Quick Access here.
How to Add a Folder to Quick Access
Step 1. Launch File Explorer on your device and search for the folder you want to pin to Quick Access.
Step 2. Select the preferable folder and then make right-click on it.
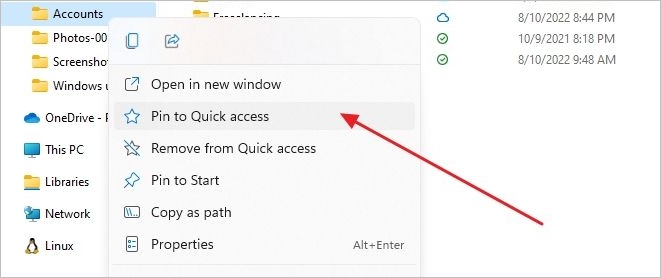
Step 3. Select Pin to Quick Access from the given popup menu.
Upon completing the above process, the selected folder will be added to Quick Access.
How to Remove a Folder From Quick Access
Step 1. Open File Explorer on Windows 11/10 and go to Quick Access.
Step 2. Right-click on the preferable folder in Windows 11/10 Quick Access.
Step 3. Select Unpin from the Quick Access option.
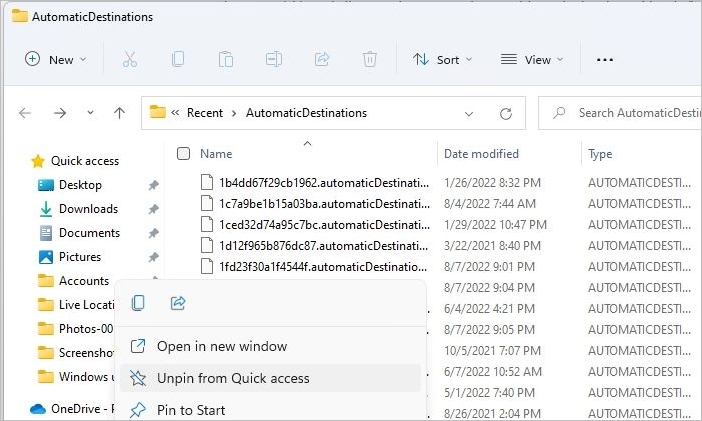
Once done with it, the preferable folder will be deleted from the Quick Access menu.
Conclusion
So, guys! Hopefully, you have now learned how to back up Quick Access in Windows 10. The integration of Quick Access in the Windows 10 has made it effortless for the users to find their recently used or frequently used files. We have tried to provide you with the detailed processes for accessing Quick Access conveniently. Make sure to be careful while following these processes.
Secure Download
Please share the post on your social platforms and help your fans and friends to back up Quick Access easily.
Backup Quick Access FAQs
We have tried to resolve your different queries related to the Backup Quick Access here in this guide. If you still have some, hopefully, the given FAQs will solve those perfectly.
How do I export quick access?
To enable seamless transfer of the Quick Access Files to another computer, you must copy the Recent folder and paste it into another computer system's C drive. You can use the command prompt to restore the Quick Access folder on your device.
Where is Quick Access data stored?
Quick Access data is stored in the Recent folder of Windows, which is specific to the user. One such location is
C:\Users\AppData\Roaming\Microsoft\Windows\Recent\AutomaticDestinations
Does removing a file from Quick Access delete it?
No. It will only remove from the Quick Access, but not the file. To delete the folder or file, you must go to the folder location and open it.
Was this page helpful? Your support is truly important to us!

EaseUS Todo Backup
EaseUS Todo Backup is a dependable and professional data backup solution capable of backing up files, folders, drives, APP data and creating a system image. It also makes it easy to clone HDD/SSD, transfer the system to different hardware, and create bootable WinPE bootable disks.
Secure Download
-
Updated by
![]()
Larissa
Larissa has rich experience in writing technical articles and is now a professional editor at EaseUS. She is good at writing articles about data recovery, disk cloning, disk partitioning, data backup, and other related knowledge. Her detailed and ultimate guides help users find effective solutions to their problems. She is fond of traveling, reading, and riding in her spare time.…Read full bio -
Written by
![]()
Tracy King
Tracy became a member of the EaseUS content team in 2013. Being a technical writer for over 10 years, she is enthusiastic about sharing tips to assist readers in resolving complex issues in disk management, file transfer, PC & Mac performance optimization, etc., like an expert.…Read full bio
Related Articles
![]() Best Disk Cloning Software for Windows 7
Best Disk Cloning Software for Windows 7![]() Top 7 Best SSD Imaging Software for Windows 11/10/8/7
Top 7 Best SSD Imaging Software for Windows 11/10/8/7![]() 5 Best Outlook Backup Software for Windows Free Download: 2026 Update
5 Best Outlook Backup Software for Windows Free Download: 2026 Update![]() Top 6 Open Source Imaging Software Recommended in 2026
Top 6 Open Source Imaging Software Recommended in 2026![]() How to Create a System Image Backup on Windows 11/10
How to Create a System Image Backup on Windows 11/10![]() How to Install Windows Without USB on a New SSD
How to Install Windows Without USB on a New SSD
EaseUS Todo Backup

Smart backup tool for your files, disks, APPs and entire computer.
Topic Clusters


Interesting Topics