
Content
Page Table of Contents
About the Author
Hot Topics
Are you searching for a way to create partitions on USB drive? This page can help you. This page provides three ways to create partitions on a USB drive to manage your USB drive well. First, let's learn the benefits of partitioning your USB drive.
Can I Create Partitions on USB Drive
Sure, you can. Starting from Windows 10 version 1703, Windows supports multiple partitions on removable media such as USB drives. In this case, we can create multiple partitions to make the most of them. But what are the benefits of doing so? Read on.
Mixed OS Environment Available:
If your USB is in exFAT format and you can use it on Windows 10, but one day you only have a Linux computer around. Due to file system incompatibility, you cannot access the USB files on this new computer. But if you have an EXT4 format partition on your USB, this problem is solved.
Better Management:
Creating multiple partitions is good for you to categorize your files, to be able to access the files you want as soon as possible, and break the limits of different file system types.
However, do you know how to create partitions on a USB drive? Don't worry. In the next part, you can learn three ways to partition your USB drive, including a professional USB partition tool. Share this article on your social media and let more people know how to create partitions on a USB drive.
How Do I Create Partitions on USB Drive
If you are new to USB partitioning, you may find it difficult. However, in this tutorial, we will explain everything in detail. So just follow the tutorial step by step. First, let's see what the three ways are.
Way 1. Create Partitions on USB Drive via EaseUS Partition Master
Way 2. Create Partitions on USB Drive via Disk Management
Way 3. Create Partitions on USB Drive via Diskpart Commands
Are you feeling difficult to choose a suitable way? Don't worry. We will prepare a table for you. You can see that EaseUS Partition Master Free is the best choice since it can finish the whole process within four steps.
| Features | EaseUS Partition Master | Disk Management | Diskpart |
|---|---|---|---|
| Operation Difficulty | Easy | Medium | Difficult |
| Suitable Users | All users | Beginners | Experienced users |
| Steps | 3 | At least 6 | At least 6 commands |
After choosing the best way, let's start to learn how to use these tools to create partitions on a USB drive.
Way 1. Create Partitions on USB Drive via EaseUS Partition Master
EaseUS Partition Master is a free disk manager for all Windows users, and it supports all Windows versions. Besides, with a clear interface, it is easy to use, and you can create partitions on a USB drive with simple clicks. Now, download this tool and follow this guide to try it.
Step 1. Launch EaseUS Partition Master. To to Partition Manager, right-click on the unallocated space on your hard drive or external storage device and select "Create".
Step 2. Adjust the partition size, file system (Choose the file system based on your need), label, etc. for the new partition and click "OK" to continue.
Step 3. Click on the "Execute 1 Task(s)" button and create a new partition by clicking "Apply".
Watch the following video tutorial and learn how to create a partition in NTFS, FAT, or EXT file system.
Besides creating partitions on a USB drive, EaseUS Partition Master has many other features. Let's learn more about this disk utility.
Other features of EaseUS Partition Master:
- Format USB to boot
- Run USB flash drive test
- Merge partitions on a USB drive
- Fix USB has two partitions error
- Copy OS and data to another HDD/SSD
- Resize, delete, move, and extend partitions
Now, click the button below and download this tool to quickly solve your disk partition problems.
Way 2. Create Partitions on USB Drive via Disk Management
What is Disk Management? It is a built-in utility tool in Windows and can help you manage your disk partitions. In this part, we will guide you on how to use disk management to create partitions on USB drives.
- Notice:
- Before we start, make sure you have connected your USB drive to a Windows PC.
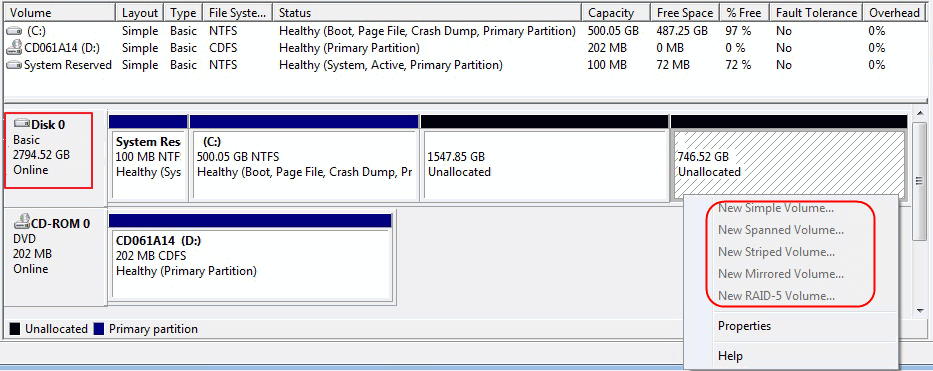
Step 1. Type "Create and format hard disk partitions" to open Disk Management.
Step 2. Right-click on the unallocated space on the targeted USB drive and select "New Simple Volume."
Step 3. Follow the New Simple Volume Wizard to determine the Volume Size.
Step 4. Assign a Drive letter to your new partition.
Step 5. Determine the file system format you want and click "Next."
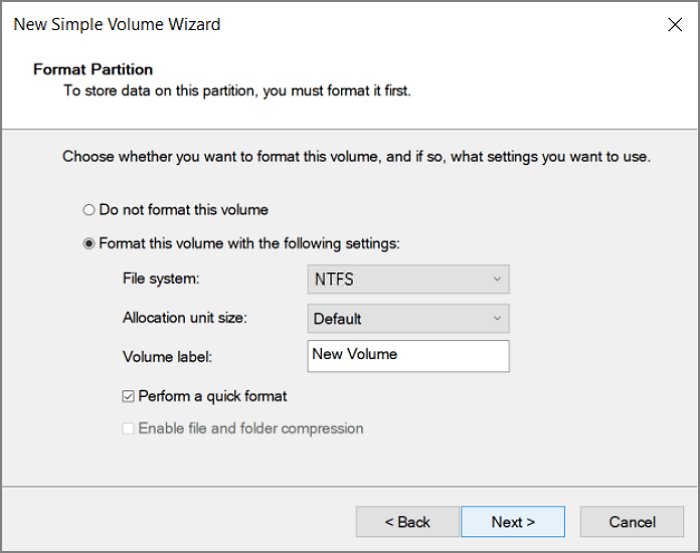
Step 6. Click "Next", then "Finish" to finish this process.
By the way, if you find your "New Simple Volume" grayed out during the process, there is a link to help.
How to Fix New Simple Volume Greyed Out Error in Windows Disk Management
There are times when you cannot select the "New Simple Volume" option in Disk Management when you try to create a new partition.
Way 3. Create Partitions on USB Drive via Diskpart Commands
You can learn how to use Diskpart commands to create partitions on a USB drive in this part. Diskpart is also a good tool for managing your disk partition using commands. You need to be careful when you type the commands since an error may cause severe data loss.
Step 1. Right-click the Windows icon and choose "Run," type "cmd," and press Enter.
Step 2. Type "diskpart" to launch Diskpart.exe.
Step 3. Hit "Enter" every time you finish typing a command below:
- list disk
- select disk 1
- create partition primary size=20480
- assign letter=H
- format fs=ntfs
- exit
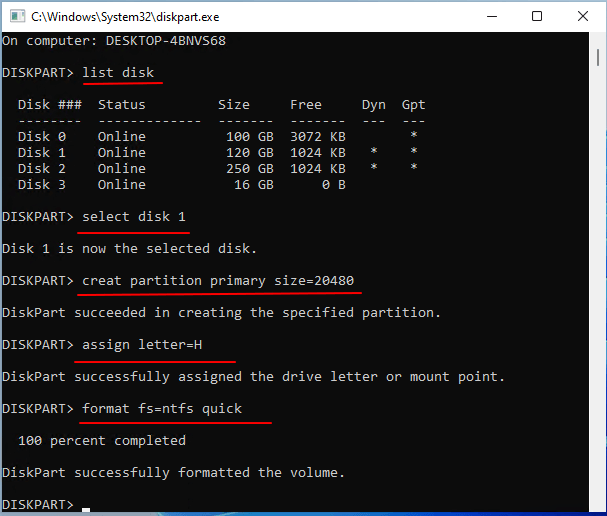
- Notice:
- You need to replace "1" with the correct disk number, replace "H" with a new letter you like, replace "20480" with the proper size, and replace "ntfs" with the proper file system format you like.
By the way, if you want to delete a partition with diskpart, we also prepare a link to help you:
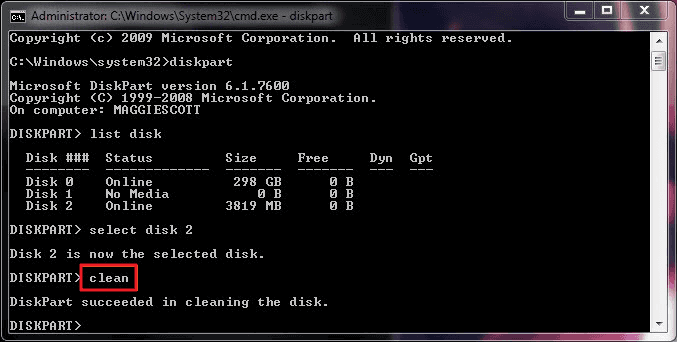
How Do I Use DiskPart to Delete All Partitions in Windows?
There are two commands in DiskPart that can be used to delete all partitions on a Windows computer. And each command is designed for different purposes that are listed here.
Conclusion
This article describes three ways to create multiple partitions on a USB drive. Each method is suitable for a different user. But if you are new to computers or if you are not familiar with computer operations, EaseUS Partition Master is more suitable for you because it is easy to use.
Also, if you have more questions, please continue reading the next paragraph.
You may also like:
FAQs About How to Create Partitions on USB Drive
It may be difficult to create a partition on a USB drive if you are new to computing. Hence, we list three other questions and hope they can help you.
1. How do I create multiple partitions on a flash drive?
Commonly, there are three ways to create multiple partitions on a USB flash drive. You can use Disk Management or Diskpart to do so. However, if you are not a computing professional, you can use EaseUS Partition Master to help.
2. Can I have two partitions on a USB?
Sure, you can. You can partition your USB drive and create partitions on it based on your needs.
3. How do I partition a USB drive in Windows 10?
You can use Diskpart to partition your USB drive. Follow these commands:
- list disk
- select disk G
- create partition primary size=10240
- assign letter=N
- format fs=ntfs
- exit
You can replace "G, 10240, N, and ntfs" with the correct letter, volume, and file system format you want.
How Can We Help You
About the Author
Updated by Tracy King
Tracy became a member of the EaseUS content team in 2013. Being a technical writer for over 10 years, she is enthusiastic about sharing tips to assist readers in resolving complex issues in disk management, file transfer, PC & Mac performance optimization, etc., like an expert.
Sherly joined EaseUS in 2022 and she has always loved writing articles and enjoys the fun they bring. She receives professional training here, focusing on product performance and other relative knowledge. She has written over 200 articles to help people overcome computing issues.
Product Reviews
-
I love that the changes you make with EaseUS Partition Master Free aren't immediately applied to the disks. It makes it way easier to play out what will happen after you've made all the changes. I also think the overall look and feel of EaseUS Partition Master Free makes whatever you're doing with your computer's partitions easy.
Read More -
Partition Master Free can Resize, Move, Merge, Migrate, and Copy disks or partitions; convert to local, change label, defragment, check and explore partition; and much more. A premium upgrade adds free tech support and the ability to resize dynamic volumes.
Read More -
It won't hot image your drives or align them, but since it's coupled with a partition manager, it allows you do perform many tasks at once, instead of just cloning drives. You can move partitions around, resize them, defragment, and more, along with the other tools you'd expect from a cloning tool.
Read More
Related Articles
-
Top 5 Best OS Migration Software/Tools Free Download 2026
![author icon]() Tracy King/2026/06/17
Tracy King/2026/06/17 -
5 Best FAT32 Format Tools Free Download for Windows🔥
![author icon]() Jean/2026/07/01
Jean/2026/07/01 -
3 Safe Ways to Format SSD With No Harm to It
![author icon]() Sherly/2026/06/17
Sherly/2026/06/17 -
Your Easiest Guide for Running USB Flash Drive Speed Test Online
![author icon]() Tracy King/2026/06/29
Tracy King/2026/06/29


