To move Windows to another drive, you can clone your existing drive using EaseUS Partition Master or create a system image backup using the Windows System Image tool and restore it to the new HDD or SSD.
For OS migration/cloning, connect both drives and use EaseUS Partition Master to copy the OS, then set the new drive as the bootable one. For System Image, you can back up the System Image to a portable drive, then restart the PC with a recovery disk to restore the image to the new drive.
Method 1. Use EaseUS Partition Master: This approach transfers an exact copy of your current drive, including Windows, applications, and data, to the new drive.
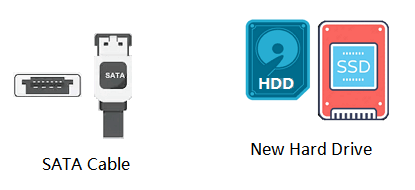
- Step 1. Connect the new HDD or SSD to your PC internally or via a USB to SATA adapter.
- Step 2. Install and launch an OS migration tool like EaseUS Partition Master > select the Clone tab > click Next.
- Step 3. Choose the C drive as your source drive > choose your new connected HDD or SSD as the destination drive > click Next.
- Step 4. Click Yes to check the warning message > click Start.
Method 2. Use the Windows System Image tool: Utilize the built-in Windows backup and restore features to move Windows.
- Step 1. Create a System Image: type control panel in the search bar > click it to open it > go to Backup and Restore (Windows 7) > select Create a system image.
- Step 2. Select a destination: Select an external hard drive or another linked drive as the place to save the images.
- Step 3. Start the backup: Follow the prompts to generate the image, which will include the operating system and any other disks you have selected.
- Step 4. Prepare for restore: Once the image has been produced, you will need a Windows recovery drive or a bootable USB to boot the computer and access the recovery environment.
- Step 5. Restore the image: In the recovery environment, choose the option to restore your computer from the system image you saved to your new disk.
Migrating Windows to another drive can be difficult, but with professional tools, it's quick and easy without reinstalling. EaseUS Software offers a step-by-step guide to move Windows to a new HDD or SSD.
Preparations: Make Everything Ready for Moving Windows
Before transferring Windows OS, here are some preparation jobs you should have done in advance. First, connect or install a new hard drive and initialize this hard drive. Thus, prepare a new HDD/SSD and a SATA cable.
- Notice:
- 1. The operation will overwrite all data on the destination disk. You should back up your disk/partition.
- 2. Space on the new drive(HDD/SSD) must be larger than the space on the source disk used by the C drive.
Solution 1. Using the Professional Windows Migration Tool
Duration: 25 minutes - 1 hour or so.
Support: OS migration on Windows 11/10/8/7/XP/Vista and Windows servers, significant to small or small to big HDD/SSD.
EaseUS Partition Master Professional can successfully transfer Windows and all the files from the C drive to another new disk without losing data. Also, Windows and program reinstallations are not needed during this operation.
#Phase 1. Move Windows to a New Hard Drive (HDD/SSD)
Note: The operation of migrating the Operating System to SSD or HDD will delete and remove existing partitions and data on your target disk when there is not enough unallocated space on the target disk. If you saved important data there, back up them to an external hard drive in advance.
Step 1. Select "Clone" from the left menu. Select the "Migrate OS" and click "Next" to continue.
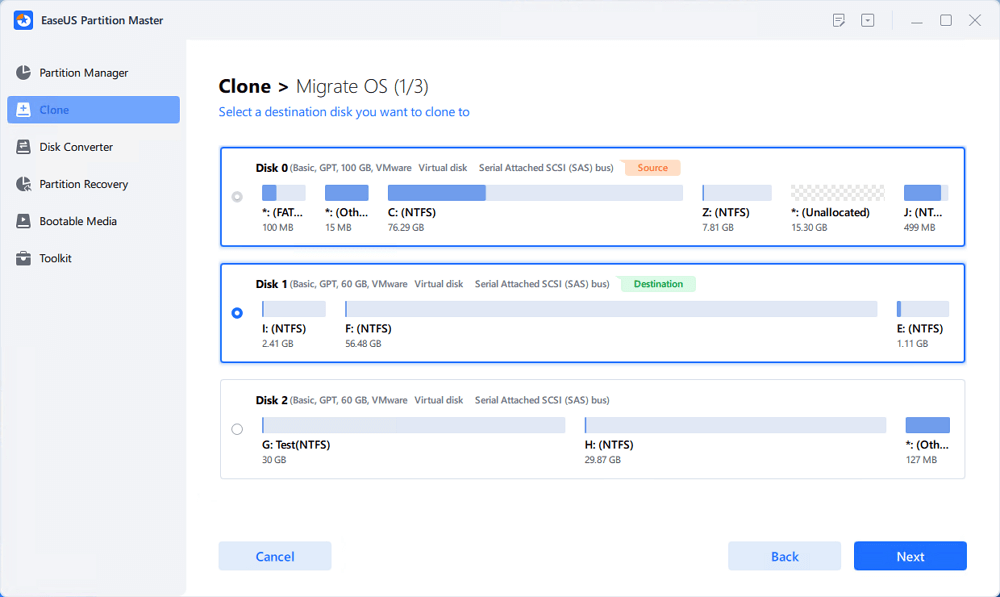
Step 2. Select the target disk you want to move Windows to. Click "Next".
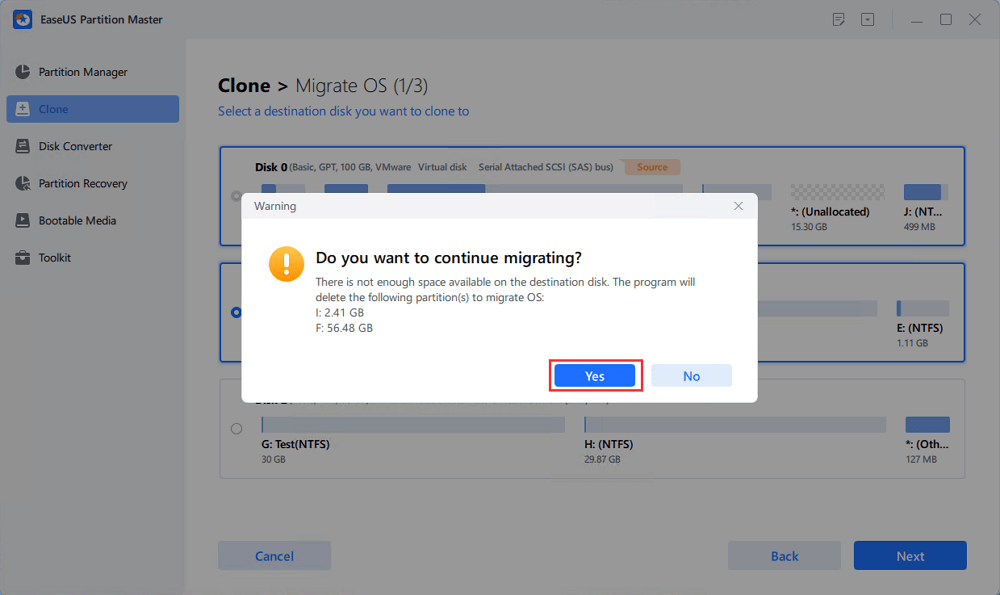
Step 3. Click "Yes" after checking the warning message. The data and partitions on the target disk will be deleted. Make sure that you've backed up important data in advance. If not, do it now.
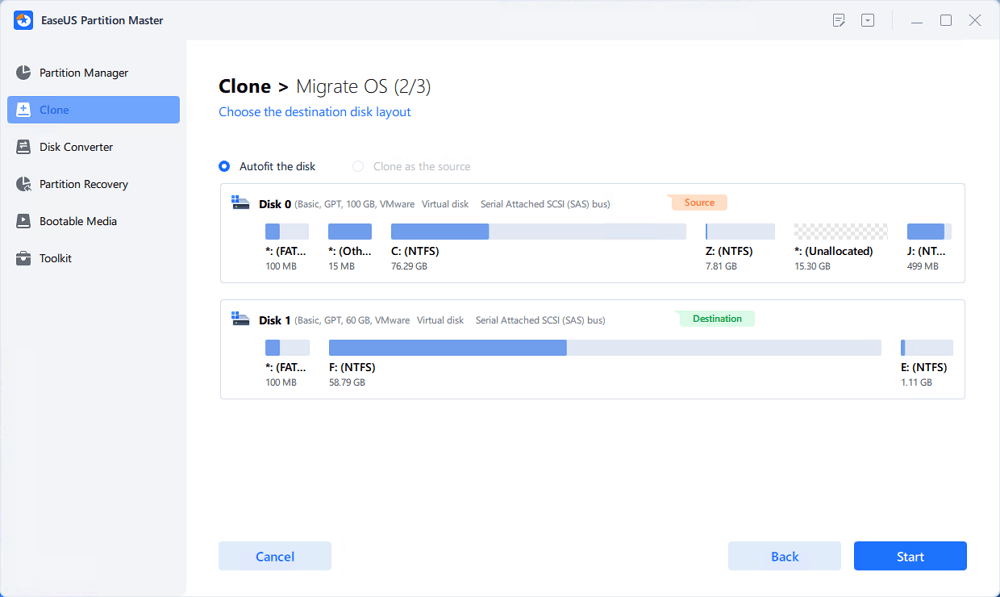
Step 4. Preview the layout of your target disk. Then click "Start" to start migrating OS to a new disk.
Video Tutorial to Migrate Windows to Another New Hard Drive:
When the OS migration process finishes, you can move to the next phase to set Windows 10 boot from the new disk. Before that, you may be interested in the following article if you also have a Windows 11 computer:
How to Move Windows 11 to Another Drive [100% Secure]
This post can lead you through how to move Windows 11 to another drive in two effective ways with simple clicks.
#Phase 2. Set Up Windows 10 to Boot from New Hard Drive
After the Operating System migration, you must set up the computer to boot Windows 10 from the new hard drive. If you forget, your computer will continue booting up from the old system disk.
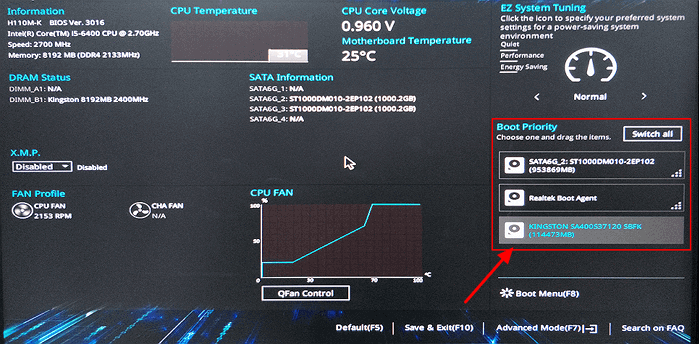
Here are the steps to set the OS to boot from the new disk by changing its boot priority from BIOS:
Step 1. Restart the PC and press F2/F12/Del to enter BIOS.
Step 2. Go to the Boot section and set the PC to boot from the new hard drive.
Step 3. Save changes, exit BIOS, and restart the PC.
After this, you can successfully log in to your account and use Windows 10 on the new hard drive or SSD. Note that the above steps also migrate Windows 11 to a new SSD.
1. Will the Windows 10 license be transferred to a new hard drive?
2. What to do with the old OS drive?
1️⃣ Reset the disk drive as fresh as new for data storage. You can delete the OS drive and data volumes and repartition the disk.
2️⃣ Erase the disk for selling. You can wipe the entire disk and clean up all data completely.
EaseUS Partition Master, with its Wipe Disk and Partition Hard Drive features, can help.
Feel free to share this solution online and help more of your friends upgrade their OS disk without reinstalling the Windows:
Solution 2. Using the Windows System Image Tool
Duration: 30 minutes - 1 and a half an hour or so.
Support: Operating System migration on Windows 10, small disk to big SSD/HDD only.
Limites: The new disk must be more significant than the original system disk space.
Some experienced Windows users may feel like running the Windows system image tool to move Windows to another drive. Although free, it's still not a handy solution for most average Windows users.
If you insist on doing so, follow the step-by-step operations in the below 3 phases to move Windows 10 to another drive:
#Phase 1. Create Windows 10 System Image
Step 1. Connect an empty external hard drive to your PC.
Step 2. Type Control Panel in the Search box and select to open it. Click Backup and Restore (Windows 7).
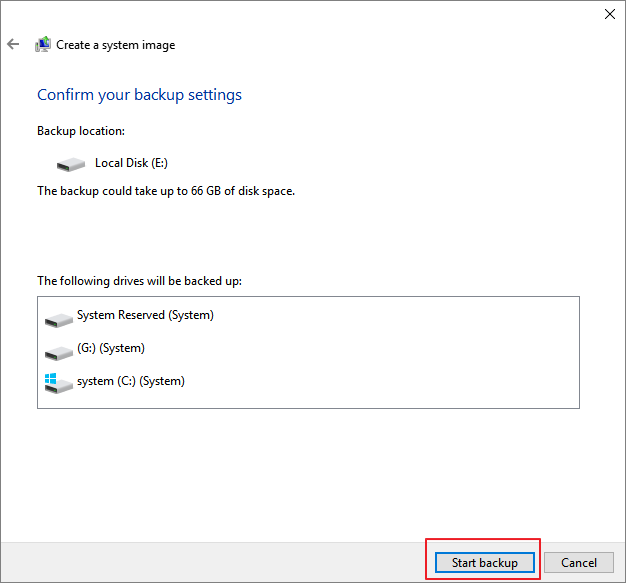
Step 3. Click Create a system image, select the external USB drive as the destination to save the Windows 10 system image, and click Next.
Step 4. The System and System Reserved partitions will be selected by default. Click Next.
Step 5. Click Start backup to create the system image on the USB drive.
🚩Read Also: How to Migrate Windows 10 to SSD
#Phase 2. Create Windows Media Creation Tool
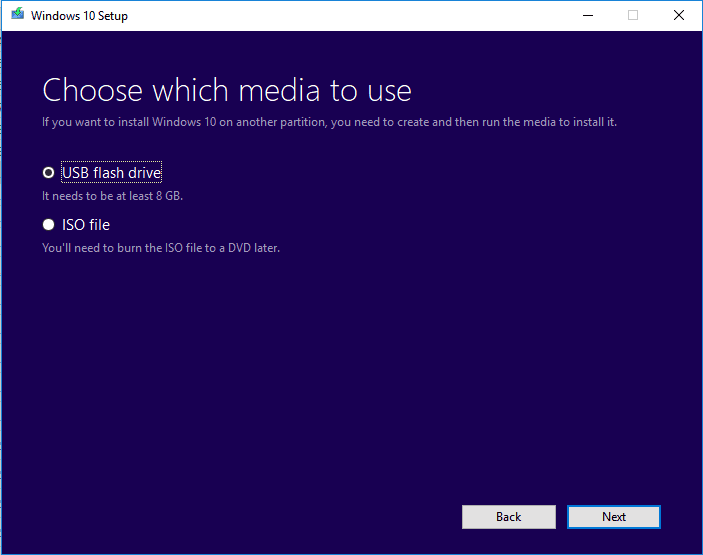
Step 1. Connect an empty USB flash drive (min 8GB) to the PC.
Step 2. Download Windows 10 installation media and run it as an administrator.
Step 3. On the "What do you want to do?" interface, select "Create installation media for another PC," and select "Next."
Step 4. Choose the language, edition, and architecture (64-bit or 32-bit) for Windows 10.
Step 5. Select the USB flash drive to use:
Do the two solutions remove your issue? If you have solved your problem, share the article to help more people.
#Phase 3. Restore and Move the Windows System Image to Another New Disk
Step 1. Connect both Windows 10 installation media and Windows image backup disk to your PC and reboot it.
Step 2. Press F1/F2/Del to enter BIOS and set the installation media as the boot drive.
Step 3. Reboot the PC from Windows Installation Media, and click "Repair your computer" on the Install Now window.
Step 4. Enter the Advanced options, click "Troubleshoot," and then select "System Image Recovery".
Step 5. Check "Select a system image" to bring up your Windows 10 system image disk and select it. Click "Next" to continue.
Step 6. Click "Exclude disks..." to exclude the original system disk, leaving only the new HDD/SSD. Click "OK" to confirm.
Step 7. Click "Next" to start the restoration process and wait for the restoration process to complete.

Once you finish system image recovery to the new disk, Windows 10 will restart and boot up.
If Windows 10 doesn't boot up, revert to Phase 2 in Solution 1 to set the new disk as a boot drive. You will be able to run Windows 10 on the new disk without any issues anymore.
You May Also Like:
If you are a business owner or love wondering on Linkedin, feel free to follow our guide on LinkedIn and grab the skills for moving OS to a new drive by clicking the following links:
If any part of these instructions seems unclear, our support team is on standby to provide detailed explanations and guidance.
EaseUS Windows Configuration Services
Click here to contact EaseUS Partition Master experts for free
EaseUS experts are available to provide you with 1-on-1 manual services (24*7) and help fix different Windows configuration issues. Our experts will offer you FREE evaluation services and efficiently diagnose and resolve Windows update errors, Windows installation, or daily OS issues using their decades of experience.
- 1. Fix Windows update errors, such as update failure, unable to upgrade Windows, etc.
- 2. Serve to download and install the latest Windows operating system on PC with success.
- 3. Provide fixes for daily Windows system errors with drivers, permission, account settings, etc., issues.
Conclusion
This page covers a full guide to help you move Windows to another drive without losing any data or boot issues. As for Windows beginners, we would like to suggest you run a reliable EaseUS Partition Master to move Windows 10 to a new HDD/SSD with ease. It can also migrate OS from HDD to SSD while keeping files on HDD.
If you have more questions about migrating Windows 10 or transferring Windows OS to another drive - HDD/SSD, check the Further Readings below, and you'll find satisfying answers.
Further Readings - FAQs about Move Windows to Another Drive
Here, we collect some related questions that are frequently asked in the Windows forum. If you have the same questions, check and find answers here.
1. How do I clone Windows 10 to a new SSD?
As the full guide provided on this page, to clone Windows to a new drive, follow the guide steps below:
- 1. Connect the new SSD to the PC via SATA cable and initialize it (in the same partition style as your OS disk).
- 2. Download, install, and run EaseUS Partition Master on your PC.
- 3. Select Migrate OS to HDD/SSD, and select the new SSD as your target disk to move Windows 10.
- 4. Confirm and execute the operation.
- 5. Insert the new SSD into the computer, restart it, and set the computer to boot from the new SSD in BIOS.
2. How do I transfer Windows 10 to a USB flash drive?
Transferring Windows 10 to a USB drive and taking your OS anywhere now is possible. Here are the steps for you to follow:
- 1. Prepare an empty USB flash drive or external USB drive (external hard drive) with a bigger space than your system drives.
- 2. Download and run reliable system migration software. Here, we recommend you try EaseUS Todo Backup.
- 3. Run EaseUS Todo Backup and select System Clone > Create a Windows portable USB.
Wait for the process to finish. After this, you can take the USB to any computer and boot your Windows 10 OS on the new computer. For more detailed steps, refer to Transfer Windows 10 to a USB flash drive for help.
3. How do I install Windows OS, like Windows 10, to SSD fresh?
There are two ways that you can install OS, like Windows 10 and SSD. As recommended on this page, one can migrate or transfer Windows 10 to SSD using the Migrate OS feature in EaseUS Partition Master.
The other way is to fresh install Windows 10 on SSD with the following steps:
- Download the media creation tool from Microsoft.
- Run the downloaded tool, choose "Create installations media for another PC," and click "Next."
- Select "Language, Edition, and Architecture for Windows 10" and click "Next."
- Choose the USB Flash drive.
- Insert the USB drive into the PC and click "Next."
- After the drive is selected, the tool will start downloading Windows 10, and it will take a few minutes to finish downloading.
- Connect the USB drive with Windows 7/8 and run it in Explorer; click Setup.
- When you reach the Ready to Install dialog, click "Change" to keep and choose Nothing. Click "Next."
Follow the on-screen tutorial to complete the Windows 10 installation process.
4. How do you move installed programs to another drive, Windows 7?
To move installed programs and apps to another drive in Windows 7, you have two options to try:
- 1. Transfer programs and program data to another drive via PC Transfer software.
- 2. Manually copy and move installed program files like .exe to another drive.
For more detailed steps, you can follow Transfer Installed Programs to New Hard Drive for help.
Was This Page Helpful?
"I hope my articles can help solve your technical problems. If you are interested in other articles, you can check the articles at the bottom of this page. Similarly, you can also check my Twitter to get additional help."
Jean is recognized as one of the most professional writers in EaseUS. She has kept improving her writing skills over the past 10 years and helped millions of her readers solve their tech problems on PC, Mac, and iOS devices.
Related Articles
-
Delete Partition with Windows Partition Delete Tool & Free Partition Manager
![author icon]() Daisy/Jun 17, 2026
Daisy/Jun 17, 2026 -
How to Format Raw Micro SD Card [Quick Guide]
![author icon]() Sherly/Jul 01, 2026
Sherly/Jul 01, 2026 -
FIXED: DISM /Online/Cleanup-Image/Restorehealth Stuck🔥
![author icon]() Cici/Jun 29, 2026
Cici/Jun 29, 2026 -
Top 7 Best Free SSD Cloning Software 2026 [Pros & Cons]🔥
![author icon]() Tracy King/Jun 30, 2026
Tracy King/Jun 30, 2026