Featured Articles
- 01 Use Diskpart to Create Volume (Boot, System, RAID, etc.)
- 02 Use DiskPart to Delete All Partitions in Windows
- 03 Use Diskpart to Convert GPT Disk to MBR
- 04 Use Diskpart to Merge Partitions
- 05 Best Diskpart Alternatives for Windows 11/10/8/7
- 06 Use Diskpart to Fix Device Read Only Issue
- 07 Troubleshooting 1: Fix DiskPart I/O Device Error in Windows 10/8/7
- 08 Troubleshooting 2: Fix Diskpart Has Encountered an Error Access Is Denied
- 09 Troubleshooting 3: Fix Diskpart Failed to Clear Disk Attributes
- 10 Troubleshooting 4: 8 Fixes to Remove System Cannot Find the File Specified Error
- 11 Troubleshooting 5: How to Fix DiskPart Virtual Disk Service Errors
- 12 Diskpart Delete Partition Override Not Working
- 13 Diskpart Clean Not Working on Disk/USB/SD Card
Most Windows beginners might know that the Diskpart is a free disk utility that helps take control of some disk partitions on the computer. However, what command should you use to process specific orders to the Operating Systems, and do you know how to protect your data from being removed from these Diskpart commands? Following this guide, you'll further learn what exactly Diskpart does, what Diskpart commands you can apply to manage disk drives, and you can even follow some tips to fix Diskpart errors like a professional.
- Price: Free
- Reading Duration: 3-5 minutes.
- Target Users: Windows beginners and mature users.
- Supported OS: Windows 11/10/8.1/8/7/XP and Windows Servers.
Let's see how to use Diskpart on your computer now.
In this article, you'll learn:
- What Is Diskpart
- Learn About Most Common Diskpart Commands
- How to Open Diskpart Utility in Windows
- How to Use Diskpart to Manage Hard Drive Partitions
What Is Diskpart
- by Wikipedia
Definition of Diskpart
From Wikipedia, Diskpart is a newer command-line disk partitioning tool to replace the older fdisk, and it supports all Windows users to run Diskpart syntax parameters to manage disk partitions on desktop computers, laptops, and even external storage devices.
Here is a list of basic information about Diskpart that you may feel like knowing:
- Initial Release: February 17, 2000
- Developers:Microsoft, Lee Schroeder
- Predecessor: fdisk, also known as Fdisk.
- Operating Systems: Windows, Windows Servers, and ReactOS
How Does Diskpart Work?
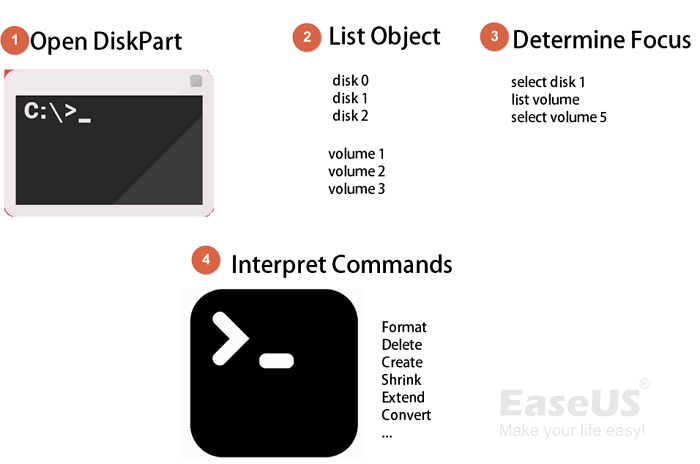
Do you know how the operating system processes the command parameters and applies the executions on the target hard drive partitions? Here is the working procedure of Diskpart, and you may follow it to learn how this utility works:
Step 1. Open the Diskpart.
Step 2. Input available object, such as a disk, partition, or even a virtual disk, with commands:
- list disk
- list volume
- list partition
- list vdisk
Step 3. Focus on an object - the disk, volume, or partition:
- select disk * (* presents the number of selected disk)
- select volume * (* presents the number of selected volume)
- select partition * (* presents the number of selected partition)
Step 4. Process operation orders to the OS via specific Diskpart syntax parameters.
What Does Diskpart Do - Benefits of DiskPart [Pros & Cons]
"The diskpart command interpreter helps you manage your computer's drives (disks, partitions, volumes, or virtual hard disks)." - by Microsoft.
"The diskpart is a utility used for partitioning hard drives but can also format removable media such as flash drives." - by Wikipedia.
Briefly, Diskpart could be applied to execute the following tasks:
- Manage disk partitions
- Fix device issues
- Programming
- Developing
- Testing, etc.
So why is Diskpart so popular? Here is a list of Pros and Cons of Diskpart, and you may follow to learn the benefits of this tool:
Pros of Diskpart:
- 1. Free
- 2. Cross-platform: Windows & ReactOS
- 3. Applicable to all levels of users.
- 4. Support more operational features than Disk Management.
- 5. Rapid to process orders to the OS.
Cons of Diskpart:
- 1. Complex
- 2. No confirm option, and no undo option.
- 3. Hard to remember all syntax parameters.
- 4. Easy to type false commands and cause serious problems.
Learn About the Most Common Diskpart Commands
So which command is for formatting a volume, and which is for creating a new partition? First, check the listed Diskpart commands here in the below table, and you'll understand what each Diskpart command does:
| Diskpart Commands | Function |
|---|---|
|
Get information about all disks on your computer. |
|
Get information about all partitions/volumes on a disk. |
|
Focus on a specific disk, partition, or volume. (* means the number of selected disks or partitions.) |
|
Display detailed information about the selected disk, partition, or volume. |
|
Create a new primary or logical partition. (* means the volume size that you want to create in MB.) |
|
Delete a specific disk, partition, or volume. (* means the disk or partition number.) |
|
Convert a disk between basic and dynamic, MBR and GPT. |
|
Assign a drive letter to a new volume. |
|
Delete all partitions on a disk and remove all existing data. Or completely erase a hard drive or SSD, and wipe out all existing data. |
|
Format a partition or a volume, change its file system to NTFS, FAT32, exFAT, etc. |
|
Set a selected partition active. |
Note that we only listed some common Diskpart commands here. If you need to learn more advanced Diskpart commands, you can follow this link provided by Microsoft for help: https://docs.microsoft.com/en-us/windows-server/administration/windows-commands/diskpart.
How to Open Diskpart Utility in Windows
So how do I access the Diskpart utility on a Windows computer? Here we list 4 paths that you can follow the respective one to open Diskpart based on your operating system:
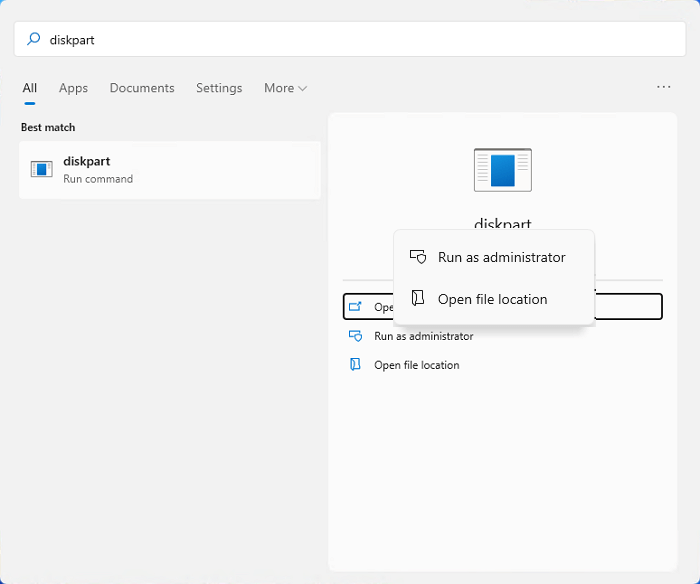
1. Open Diskpart in Windows 11:
- Press the Windows + S keys, and type diskpart in the Search box.
- Right-click diskpart and select "Run as administrator".
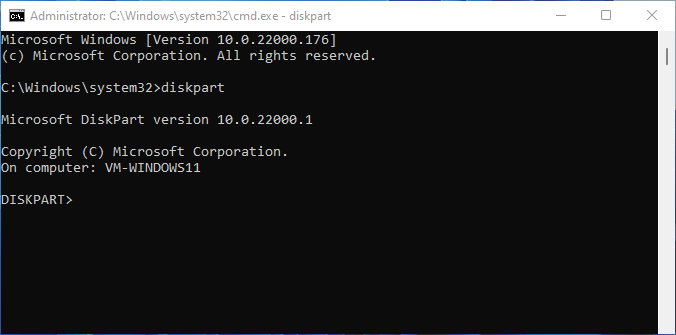
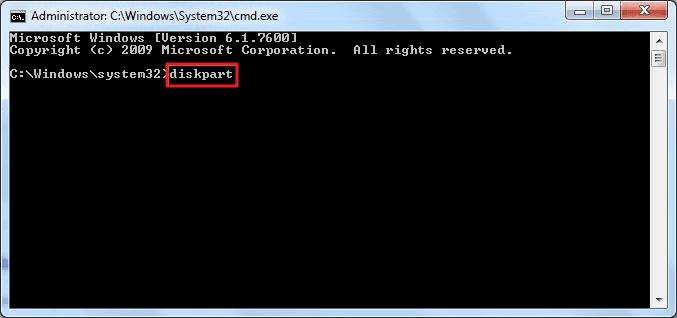
2. Open Diskpart in Windows 10:
- Press Windows + R keys and type cmd in the Run dialog.
- Click "OK" to run Command Prompt.
- Type diskpart and hit Enter in the command prompt window.
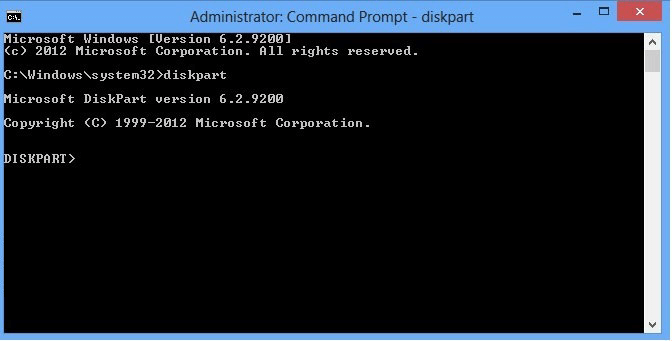
3. Open Diskpart in Windows 8:
- Click the Start menu, select Search, and type cmd in the Search box.
- Right-click on Command Prompt from the result list and select "Run as Administrator".
- Type diskpart and hit Enter to open it.
4. Open Diskpart in Windows 7:
- Click the Start menu, select Search, and type cmd.
- Find and right-click Command Prompt from the result list, and select "Run as an Administrator".
- Type diskpart in Command Prompt and hit Enter.
After you open the Diskpart, it's your turn to follow the full guide below to manage your hard disk partitions or external storage devices with respective Diskpart commands as introduced above.
How to Use Diskpart to Manage Hard Drive Partitions
Here in this part, you'll get a respective guide as listed below to apply the Diskpart command to manage disk partitions for different purposes:
- #1. Create partition
- #2. Format Hard Drive Partition
- #3. Delete Partition, Clean or Erase a Hard Drive
- #4. Convert Disk to MBR/GPT
- More...
- Notice:
- Note that formatting, deleting, cleaning, erasing, or converting disks with Diskpart command lines may all cause serious data loss issues. So please make sure you create a backup of all existing essentials before trying the next tutorials.
#1. Use Diskpart to Create Partition (Primary or Logical)
This applies to creating a new simple volume, primary partition, or logical partition.
Step 1. Open Diskpart.
Step 2. Type list disk and hit Enter.
Step 3. Type select disk * and hit Enter. (Replace * with the number of the target disk you want to create a partition on it.)
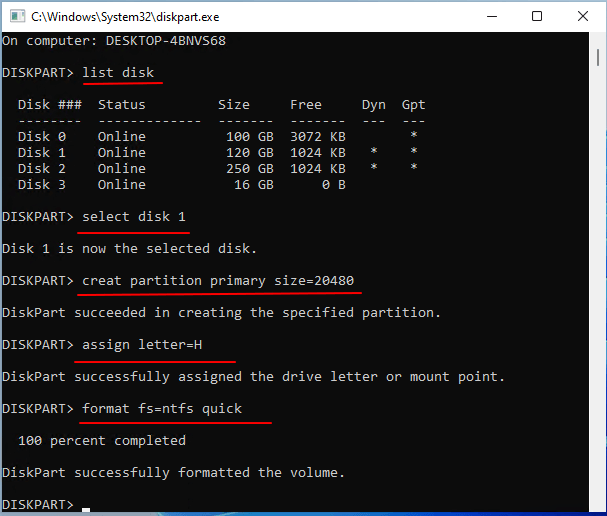
Step 4. Type the respective command to create a partition on the selected disk:
- create partition primary size=* (* stands for the partition size in MB.) or create partition logical =*
- assign drive letter=* (Replace * with the drive letter you want to add to the new volume.)
- format fs=ntfs quick (you can also replace NTFS with other desired formats like FAT32, or exFAT, etc.)
LEARN MORE
Aside from creating a primary or logical partition, you can also use Diskpart commands to create boot volume, dynamic volume, RAID-5, mirrored volume, and more. Follow this link and learn How to Create Volume by Using Diskpart.
#2. Use Diskpart to Format or Quick Format Hard Drive/SSD or USB
Applies to: Format hard drive/SSD, quick format USB, or external disks using Diskpart/CMD.
Step 1. Open Diskpart.
Skip Step 2 if you need to format an internal hard drive.
Step 2. Connect a removable external hard disk or USB to your PC.
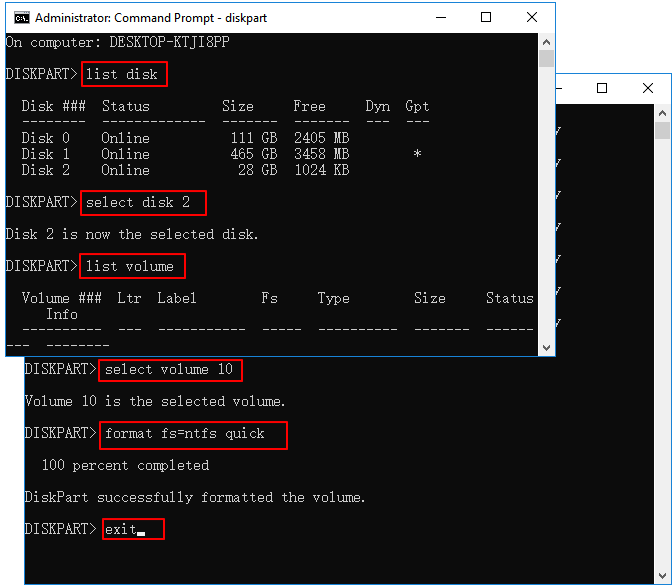
Step 3. Type the following command lines one by one and hit Enter each time:
- list disk
- select disk * (Replace * with the number of the target disk.)
- list volume
- select volume * (Replace * with the volume number on your disk that you need to format.)
- format fs=ntfs quick, or format fs=fat32/exfat quick.
Note that you need to repeat the process if you need to format multiple partitions on your computer.
Step 4. Type exit and close Diskpart when the process completes.
#3. Use Diskpart to Delete Partition, Cleanup, or Erase Disk
Applies to: Delete volumes, remove recovery partition, clean disk, or erase HDD/SSD using Diskpart.
To Delete Partitions from Hard Drive:
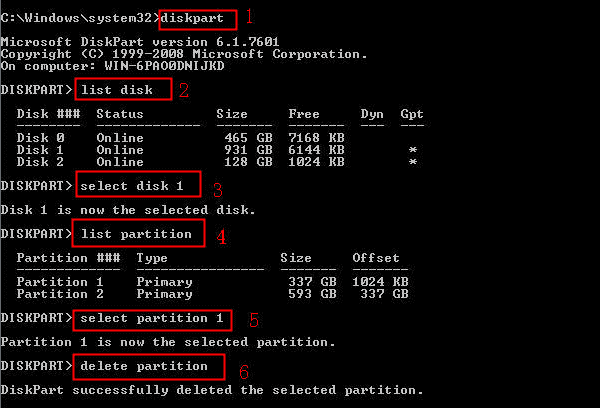
- Open Diskpart.
- Type list disk and hit Enter.
- Type list partition and hit Enter.
- Type select partition * and hit Enter. (Replace * with the number of target volumes you want to delete.)
- Type delete partition and hit Enter.
Note that if you need to delete a recovery partition, replace delete partition with delete partition override.
Bonus Tip:
If you want to delete all existing partitions on a disk quickly, you can follow this link for help: How to Use Diskpart to Delete All Partitions.
To Cleanup or Erase Disk:
If you are about to get rid of everything from your hard drive or SSD, Diskpart Clean command is exactly what you need. Here is how to do so:
- Open Diskpart.
- Type the following commands to wipe a disk completely:
- list disk
- select disk * (Replace * with the number of target disks you wish to erase.)
- clean all
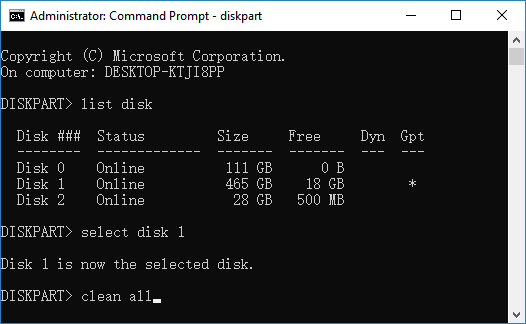
- Type exit to close Diskpart.
If you need to continue using the disk for other purposes, you can revert to the first guide to Create Partition with Diskpart on the disk.
#4. Use Diskpart to Convert Disk from MBR to GPT or GPT to MBR
Applies to: Change disk type, convert MBR to GPT or GPT to MBR using Diskpart.
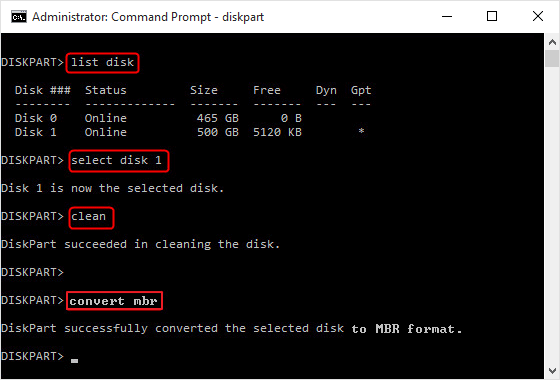
- Open Diskpart.
- Type list disk and hit Enter.
- Type select disk * and hit Enter.
- Type clean and hit Enter.
- Type convert mbr or convert gpt and hit enter.
Bonus Tip:
Note that Diskpart will remove all existing partitions on a disk before converting its disk type to another one. For a seamless solution, you may try a third-party disk conversion tool. Follow this link, and you can successfully Convert GPT Disk to MBR without losing data.
#5. Other Hot Commands to Manage Partitions with Diskpart
Alongside creating, formatting, cleaning, or converting disk partitions, you can also apply Diskpart commands to execute other partitioning tasks, such as extending, shrinking, and active partitions.
To Extend Partition with Diskpart:
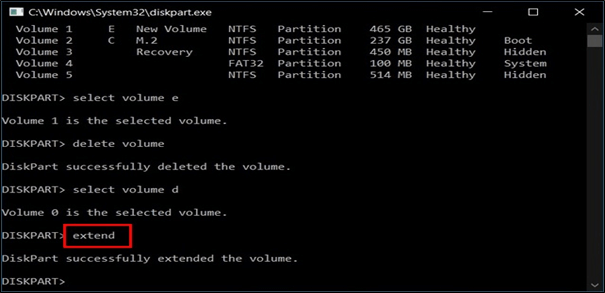
- Open Diskpart and type list volume. Hit Enter.
- Type select volume * and hit Enter.
- Type extend or extend size=* (Replace * with the volume size you want to add to the selected partition.)
To Shrink Partition with Diskpart:
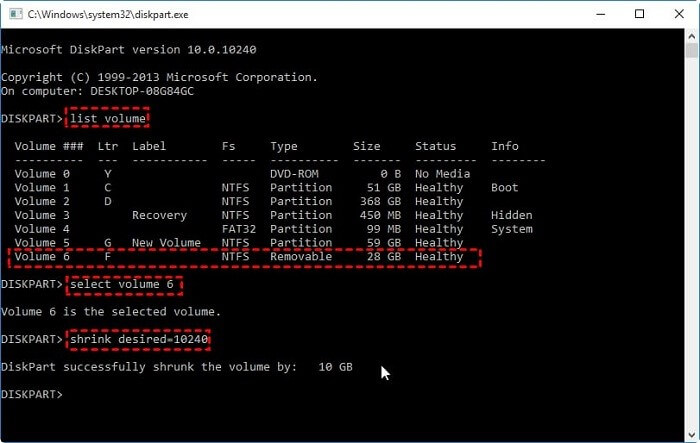
- Open Diskpart and type list volume, hit Enter.
- Type select volume * and hit Enter. (Replace * with the number of target volume you want to shrink.)
- Type shrink desired=* and hit Enter. (Replace * with the volume size you want to shrink from the selected partition.)
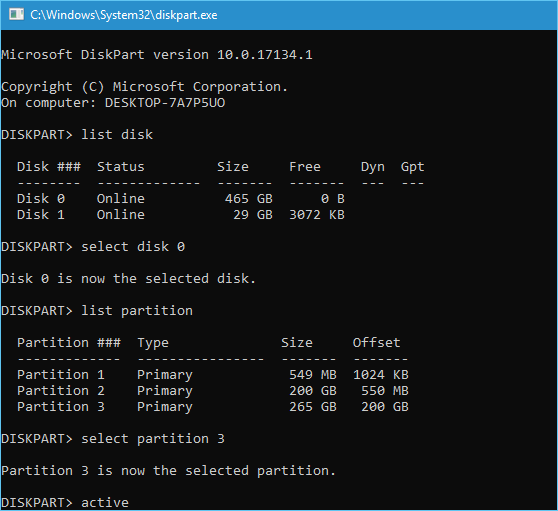
To Mark Partition as Active with Diskpart:
- Open Diskpart type list disk, and hit Enter.
- Type select disk * and hit Enter. (Replace * with the number of target disks.)
- Type list partition and hit Enter.
- Type select partition * and hit Enter. (Replace * with the number of desired partitions you want to set as active.)
- Type active and hit Enter.
Aside from this, you can also use Diskpart command lines to merge partitions, hide partitions, and even show hidden partitions.
Diskpart Alternative Free Download
Though Diskpart is free for all Windows users to apply and resolve some daily disk management issues, however, it's still a bit complex for some Windows users who have no computing skills. EaseUS Partition Master Free, with its reliable disk partition features, is entirely qualified to replace Diskpart and assist all of you in fulfilling all types of disk partition requests with simple clicks.
Conclusion
On this page, we thoroughly discussed that is Diskpart, what Diskpat can do for you, the benefits of using Diskpart, and displayed some common Diskpart commands.
Following this page, you will learn how to master these Diskpart commands to manage your hard drive partitions and external storage devices.
Also, you can apply some troubleshooting fixes to eliminate normal device errors like Read-only, or the device becomes RAW and makes your device function normally again.
For beginners, if you are reluctant to use Diskpart as it's complex to remember all the commands, your best shot is to turn to EaseUS Partition Master Free for help. It will always save your device from deathly errors and bring life back to your disk partitions.
Was This Page Helpful?
Daisy is the Senior editor of the writing team for EaseUS. She has been working at EaseUS for over ten years, starting as a technical writer and moving on to being a team leader of the content group. As a professional author for over ten years, she writes a lot to help people overcome their tech troubles.
Written by Tracy King
Tracy became a member of the EaseUS content team in 2013. Being a technical writer for over 10 years, she is enthusiastic about sharing tips to assist readers in resolving complex issues in disk management, file transfer, PC & Mac performance optimization, etc., like an expert.
Related Articles
-
Disk Partition: How to Partition A Hard Drive You Must Know in 2024
![author icon]() Tracy King/Jan 05, 2026
Tracy King/Jan 05, 2026 -
File System Comparison: NTFS, FAT32, exFAT, and EXT, Which File System Should I Use
![author icon]() Tracy King/Mar 08, 2026
Tracy King/Mar 08, 2026 -
Overall Guide to Learn What Is BIOS [Save Up to 99% of Your Time]
![author icon]() Tracy King/Jan 05, 2026
Tracy King/Jan 05, 2026 -
The Beginner's Guide on How to Remove Write Protection
![author icon]() Tracy King/Jan 05, 2026
Tracy King/Jan 05, 2026