Featured Articles
- 01 Use Diskpart to Create Volume (Boot, System, RAID, etc.)
- 02 Use DiskPart to Delete All Partitions in Windows
- 03 Use Diskpart to Convert GPT Disk to MBR
- 04 Use Diskpart to Merge Partitions
- 05 Best Diskpart Alternatives for Windows 11/10/8/7
- 06 Use Diskpart to Fix Device Read Only Issue
- 07 Troubleshooting 1: Fix DiskPart I/O Device Error in Windows 10/8/7
- 08 Troubleshooting 2: Fix Diskpart Has Encountered an Error Access Is Denied
- 09 Troubleshooting 3: Fix Diskpart Failed to Clear Disk Attributes
- 10 Troubleshooting 4: 8 Fixes to Remove System Cannot Find the File Specified Error
- 11 Troubleshooting 5: How to Fix DiskPart Virtual Disk Service Errors
- 12 Diskpart Delete Partition Override Not Working
- 13 Diskpart Clean Not Working on Disk/USB/SD Card
Read-only is a file system permission that only allows a user to read or copy stored data, but not write new information or edit the data. A file, folder, or an entire disk may be set as read-only to prevent accidentally changing the file's contents. A read-only object may also be referred to as write-protected.
On this page, we'll focus on the disk read-only fix. To change a hard drive from ready only, i.e., to make a hard drive not read-only, the troubleshooting methods are quite the same as that of removing write protection from a hard drive, USB flash drive, pen drive or SD card.
- 1. Format Read-Only Drive to a Recognized File System
- 2. Clear Read-Only with Diskpart
- 3. Remove Read-Only with Software
- 4. Change Read-Only permission in Property
- 5. Fix Disk Read-Only in Registry
Drive Is Read Only
"I'm trying to figure out why my D drive is read-only after updating to Windows 10. It is a separate hard drive and not a partition of another hard drive. I can open everything but just can't modify them."
What's the Biggest Challenge When a Disk Becomes Read-only on Your PC?
Which issue is the biggest problem you face when a disk becomes read-only?
-
Can't copy files to the drive
-
Can't delete files on the disk drive
-
Can't format the drive
-
Drive is not accessible at all
If you are not on the list, but belong to the "not sure what read-only means" group, follow and find the exact definition here.
The hard drive comes with a read-only status, suggesting that you can't change what is on it. i.e., once the data is written on it, you can read it, but can't do any other operation on it. This happens to HDDs a lot, and it's also commonly seen on removable disks like SD memory cards and USB flash drives.
In conclusion, if data is truly read-only, you can read it with a device, but you can't modify, erase, append to, concatenate, copy, or move it. The main purpose of read-only is to control how you use the data.
Method 1. Format Read-only Disk to a Recognized File System
When USB hard drives, pen drives, floppy disks, SD cards, and external hard disks contain unsupported file system types on a Windows computer or a Mac, the device will also show read-only. So in this case, you can fix such read-only problem on a disk by converting the incompatible file system to a recognized file system by Windows, Steam, or a certain device.
Here, you can download EaseUS Partition Master, a reliable free partition manager, to reformat the disk to the desired file system like NTFS, FAT16/32, EXT2/3/4 and so on.
Note: Back up the important information on your disk before doing the format, because formatting a disk will erase all data on it.
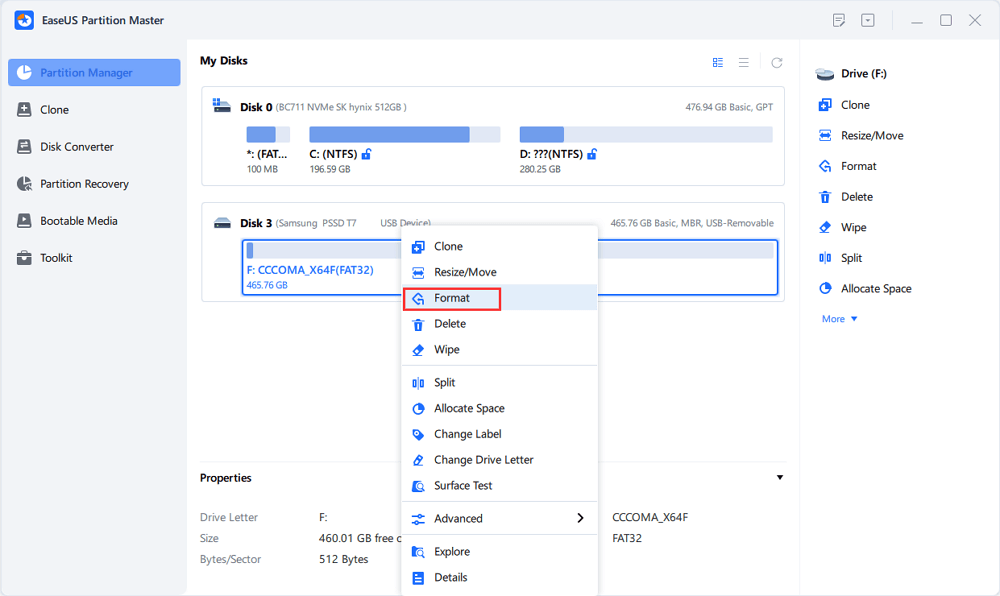
Step 1. Launch EaseUS Partition Master, right-click the partition on your external hard drive/USB/SD card which you want to format and choose the "Format" option.
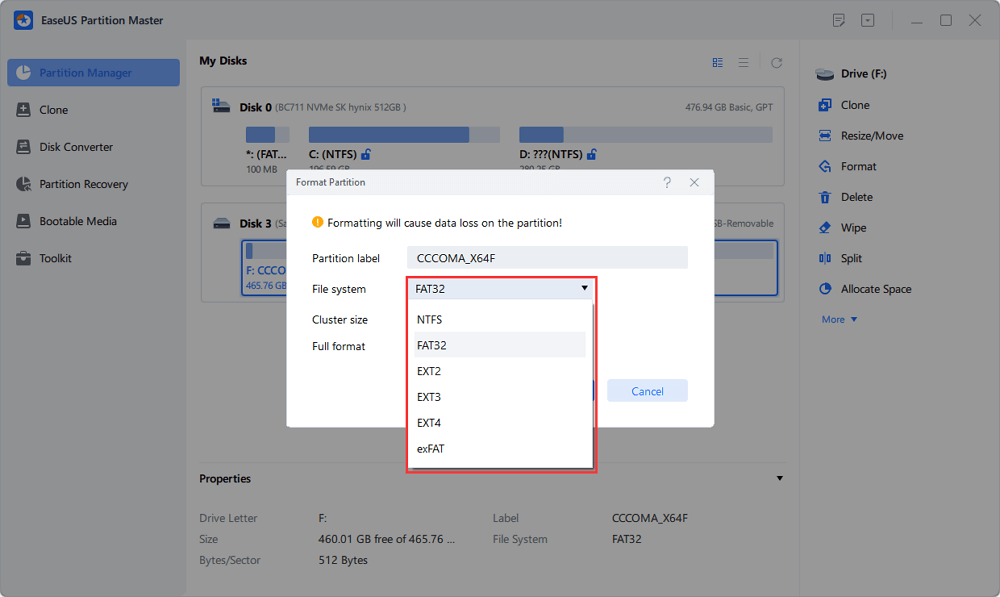
Step 2. Assign a new partition label, file system (NTFS/FAT32/EXT2/EXT3/EXT4/exFAT), and cluster size to the selected partition, then click "OK".
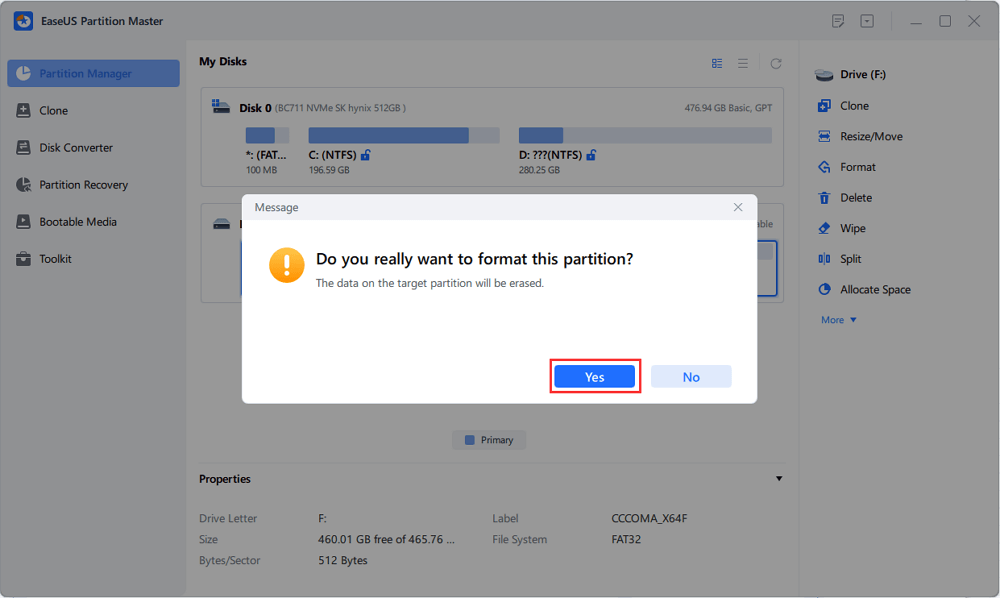
Step 3. In the Warning window, click "Yes" to continue.
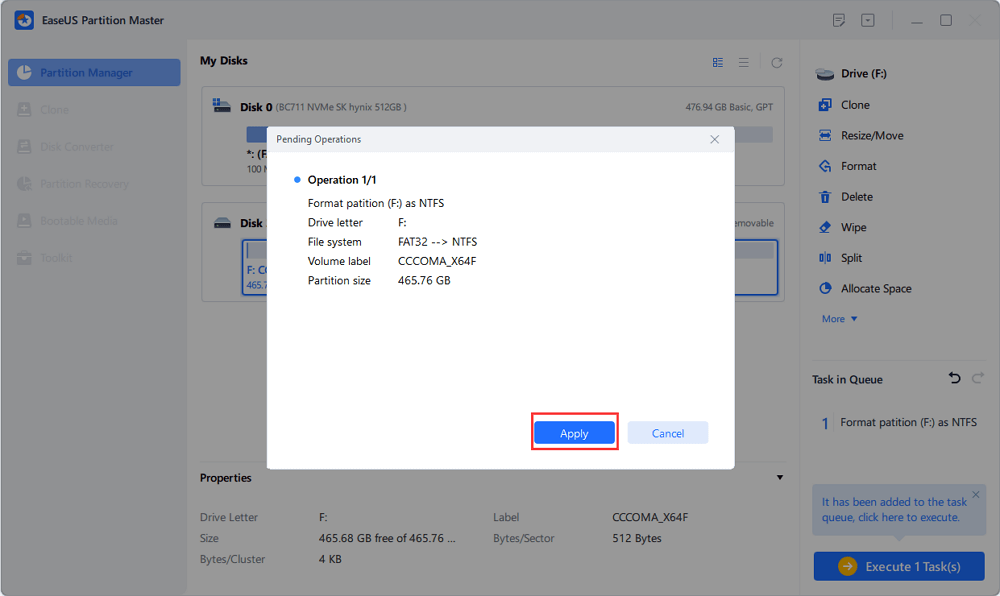
Step 4. Click the "Execute 1 Task(s)" button in the top-left corner to review the changes, then click "Apply" to start formatting your external hard drive/USB/SD card.
Smaller cluster size makes less wasting of disk space. The smaller cluster size is, the bigger file allocation table (FAT) will be. The bigger the FAT is, the slower the operating system works with the disk.
Method 2. Manually Remove Read-only with DiskPart CMD
Devices and media are often characterized as read-only mode, which actually can be changed to read-write by the user for further usage. When a drive has become locked in a read-only state, try to fix the read-only error using the Diskpart cmd with the following simple instruction.
Step 1. Click on your "Start Menu", type cmd in the search bar, then hit "Enter".
Step 2. Type command diskpart and hit "Enter". A new command line window will open.
Step 3. Type list disk and hit "Enter". (make sure your devices has been listed out, for example, it is listed as disk 0)
Step 4. Type the command select disk 0 and hit "Enter".
Step 5. Type attributes disk clear readonly and hit "Enter".
Now you've removed the read-only attribute from the storage devices. Type exit and hit "Enter" to leave the DiskPart utility.
- cmd
- command diskpart
- list disk
- select disk 0 (Replace 0 with the disk number on your device which shows read-only on computer.)
- attributes disk clear readonly
- exit
Diskpart can be difficult to use especially when the user doesn't have much experience in computing. Hence, share this article to provide guidelines for others.
Method 3. Automatically Clear Read-only with Third-party Write Protection Removal Software
If you don't consider yourself a pro-computer user and you're not familiar with command-lines, don't worry. There are graphical-based solutions to help you remove write-protection from your hard drives, USB drives, and even SD cards.
EaseUS CleanGenius is one of these tools that helps you fix aforementioned issues on your drives without knowing a thing about command-line.
Here's an easy-to-follow guide on how to use this tool to get your issues sorted:
Step 1: DOWNLOAD and install EaseUS CleanGenius (free) on your computer.
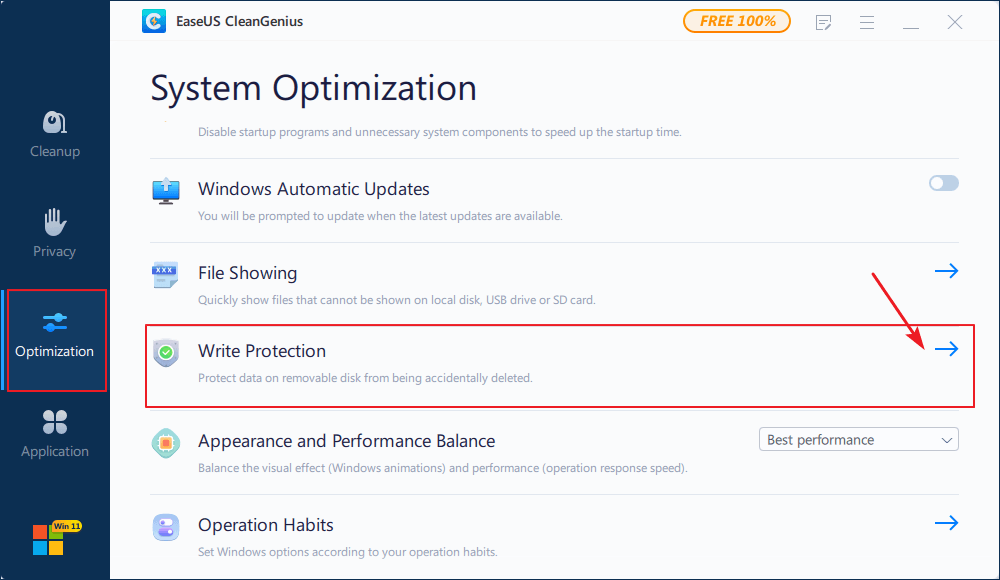
Step 2: Run EaseUS CleanGenius on your PC, select Optimization and choose the Write Protection mode.
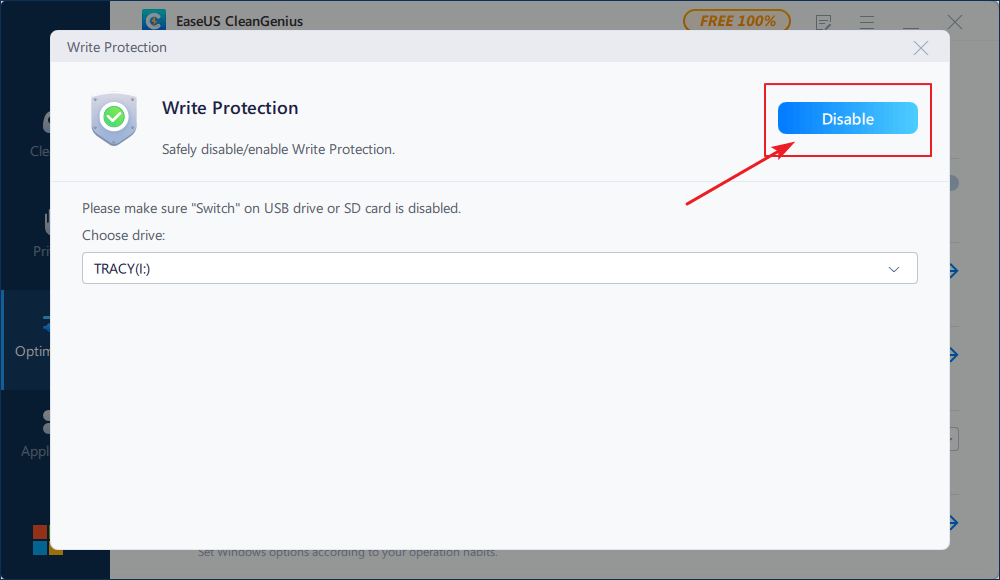
Step 3: Select the device that is write-protected and click Disable to remove the protection.
Method 4. Change the Read-only Permission in Windows 10/8/7
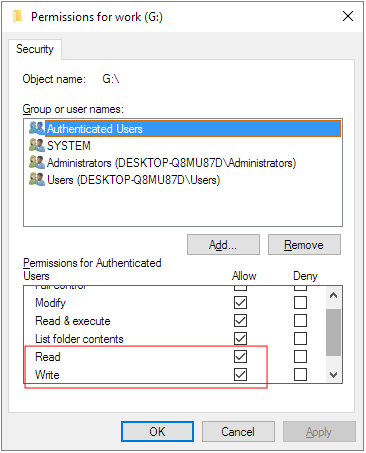
Chances are that your device or specific file/folder permission has changed to read-only with the write permission, for example, after doing a Windows upgrade or update. To solve this kind of problem, you can go to the Windows Property settings to get both the read & write permission.
Step 1. Go to My Computer (in Windows 7)/This PC (in Windows 10).
Step 2. Right-click on the drive that is currently read-only and then click Properties.
Step 3. Under the Security tab, tick the option of Read and Write in the Allow column. Click Apply.
Method 5. Change Hard Drive Read-only Status in Registry Editor
Windows Registry for disk read-only fix is the most advanced method, and it's also the most sophisticated. Therefore, we only suggest experienced users try this way. Backup is important before making any change in the Registry.
*Editing Windows Registry indeed helps remove write protection and read-only from your storage device. However, we found that it's usually effective on earlier Windows operating systems, including Windows XP and Windows Vista.
Step 1. Connect your pen drive to your computer.
Step 2. Press Windows + R keys and bring up the Run box. Type "regedit" in the empty box and hit Enter.
Step 3. Hit "HKEY_LOCAL_MACHINE" to expand "System".
Step 4. Find the "Current Control Set" in the "System" list to click "Control".
Step 5. Check whether there is a key named "Storage Device Policies" to change the digit in the "DWORD value" box into "0" and press "OK" to save the change.
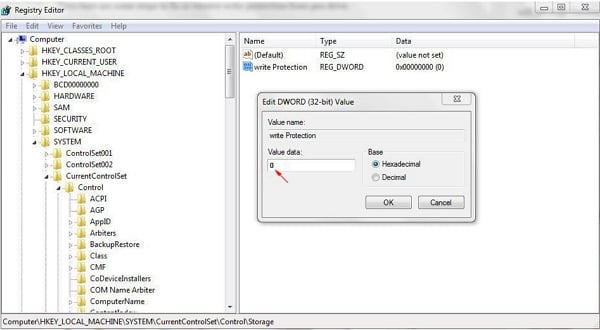
Note: if you cannot find the key named "Storage Device Policies", you are supposed to create one: right-click "Control" to create a new key and name it as "Storage Device Policies"=> right-click this new key to open "DWORD Value" and name it as "write protect"=> Double click it to change the number.
Disk Read-Only Is Fixable with Correct Methods
On this page, we collected 5 ways to helps you fix hard disk drives, SSD or external hard drives, USB, SD card, etc., with read-only issue successfully:
- Use Diskpart + attribues disk clear readonly command
- Write protection removal tool - EaseUS Windows CleanGenius
- Change Read-only permission
- Use Registry Editor to change write-protecte value
- Format unsupported device to a supported file system with EaseUS Partition Master
If your device write protected, try Method 1 and Method 2 to fix this issue quickly. If your device is read-only due to permission issue, try Method 3.
More over, if your device contains unsupported file system, your best option is to format it to a supported file system with EaseUS Partition Master.
FAQs About Fix Disk Read-Only Error
If you have further questions on disk read only issue, follow questions listed here and find answers here below:
1. How do I remove read only?
When your drive gets read only, you may trun to the methods as recommended on this page to fix this issue and make device readable and writable again.
When your files or single document file become read-only, you can use File Explorer to remove its read-only state:
- Open File Explorer, open the drive where your file or document is read only.
- Right-click on the read-only file and select "Properties".
- Uncheck the "Read-only" box.
2. How to you remove read only attribute from all files of a drive?
- Open Windows File Explorer, right-click on the read-only drive and select "Properties".
- Go to the Security tab, and select the User name.
- Click "Edit", and check "full control" under permission to Authenticated user.
- Click "Apply" and "OK".
3. Why does my drive say read-only?
There are many reasons could cause your drive read-only, and mostly they are:
- Drive gets locked or write protected.
- Computer or user account doesn't have read-and-write permission to the drive.
- Target drive has an unsupported file system that is not compatible with your operating system.
- Virus or malware infection.
Was This Page Helpful?
"I hope my articles can help solve your technical problems. If you are interested in other articles, you can check the articles at the bottom of this page. Similarly, you can also check my Twitter to get additional help."
Daisy is the Senior editor of the writing team for EaseUS. She has been working at EaseUS for over ten years, starting as a technical writer and moving on to being a team leader of the content group. As a professional author for over ten years, she writes a lot to help people overcome their tech troubles.
Related Articles
-
How to Partition Hard Drive without Formatting in Windows
![author icon]() Jean/Jan 29, 2026
Jean/Jan 29, 2026 -
Best Free PC Cache Cleaner: Top 7 [Proven Checklist]
![author icon]() Sherly/Jan 29, 2026
Sherly/Jan 29, 2026 -
Best USB Format Tools | Top 9 USB Formatter Free Download
![author icon]() Daisy/Jan 29, 2026
Daisy/Jan 29, 2026 -
This Sign-In Option Is Disabled Windows 10/11 (Solved)
![author icon]() Oliver/Jan 29, 2026
Oliver/Jan 29, 2026