
Content
Page Table of Contents
About the Author
Hot Topics
Updated on Jul 01, 2026
- How to use DiskPart to create partition:
- To create a partition using DiskPart, here are the quick steps: open Command Prompt as an administrator, type diskpart, then use commands: list disk, select disk, create partition primary, and format to define the newly created partition.
This page covers multiple Diskpart commands, you can apply to create partitions and volumes using Diskpart as shown here:
| Workable Solutions | Step-by-step Troubleshooting |
|---|---|
| #1. Use Diskpart to Create Partition/Volume | 1. Create System Volume...Full steps 2. Create Boot Volume...Full steps 3. Create Dynamic Volume...Full steps 4. Create RAID-5 Volume...Full steps 5. Create Mirrored System Volume...Full steps 6. Create UEFI System Volume...Full steps |
| #2. Run EaseUS Partition Master | Step 1. Launch EaseUS Partition Master. On the main window, right-click on the unallocated space on your hard drive...Full steps |
How Do I Create a New Volume in Diskpart
Diskpart, also known as Windows' built-in free disk utility, presents Windows users with multiple features in managing disk partitions, fixing device errors, programming, developing, and testing, etc. Due to its high accessibility, free-to-use, and flexibility, Diskpart is popular among Windows users for managing hard drive partitions.
If your partitions are not well managed, your system may have a lot of free unallocated space. Therefore, Windows users often use the Diskpart create partition command to manage their system drives and storage devices.
There are different types of partitions that you can create in Windows. You can do it all using Diskpart to create partitions in Windows 11/10 with different commands, no matter the partition type.
Here, our article will show you an in-depth step-by-step guide to using the Windows diskpart command to create partitions.
There are detailed guides on how to use Diskpart to create different volumes. Share this article to help other users having the same issues.
#1. Use Diskpart to Create Partition/Volume
Diskpart create partition is a built-in command in the Windows operating system. Using this command, you can manage, create, and edit your partitions in Windows OS. Let's see below how to create different partition volumes using the diskpart command.
1. How to Create a Partition with DiskPart - System Volume, Primary Partition
The Diskpart command also allows you to create a system volume. System volume, also known as the primary partition, is the place where your operating system and programs are installed.
Take the following steps to create a partition using the diskpart command:
Step 1: Open CMD on your Windows computer.
Step 2: Enter diskpart at the Command Prompt and hit Enter.
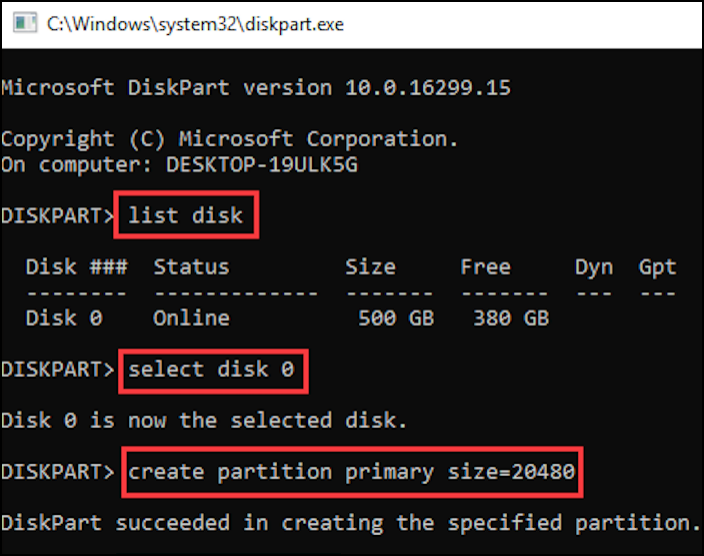
Step 3. Type list disk in the DiskPart window, and hit Enter.
Step 3: Type select disk x in the DiskPart window and hit Enter. (Replace x with the number of the disk you wish to select)
Step 4: Type create partition primary size=20480 in the DiskPart window to initialize a new partition with a size. (Replace 20480 with the desired partition size in MB.)
Note: By entering the above will create a primary system volume partition. If you need to create a logical partition, replace create partition primary with create partition logical. Also, you can change the size to fit your needs.
Step 5. Type exit to close Diskpart when the process completes.
After creating a system volume partition, you can clean install Windows or applications in it.
2. Create Boot Volume Using Diskpart
Boot volume is the primary partition of your operating system. It's also known as a bootable partition. All your operating system files are stored in this partition. In simple terms, your operating system resides in the boot volume portion.
To allow the computer to load the boot information, you'll also need to mark the boot volume active. Follow the steps below to create a boot volume using the diskpart command in the Windows operating system:
Step 1: Open CMD on your Windows computer.
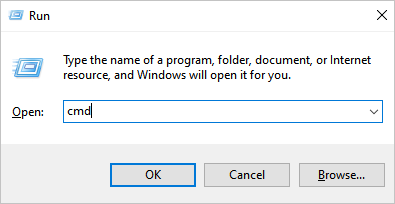
You can do that by pressing the "Windows + R" key, which will open a Run box. Type cmd and hit OK.
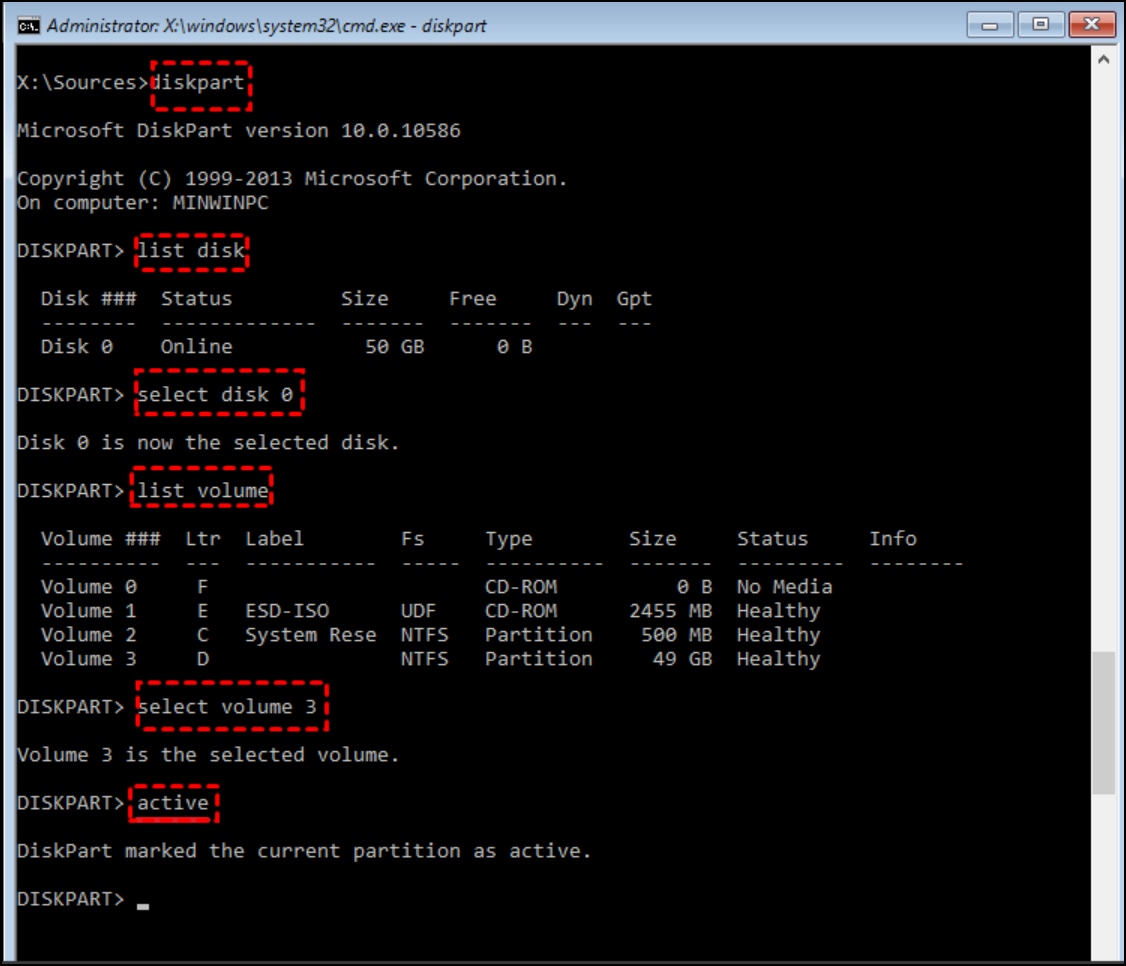
Step 2: In CMD, enter the diskpart command and open the diskpart utility.
Step 3: Type list disk and press enter to list all your disks.
Step 4: Select a disk using the select disk x command. (Replace x with the number of the disk you wish to select)
Step 5: Enter the list volume command to see available volumes for your disk.
Step 6: Enter the select volume n command to select the volume you wish to make as a boot partition. (n is the number for your volume)
Step 7: Enter the active command, and you will have the specified volume as a boot partition.
Now, exit CMD, and restart your system to see the changes.
3. Create Dynamic Volume Using Diskpart
Dynamic volume disk allows you to manage your disks with more flexibility.
You don't have to specify a size while creating a dynamic partition disk. Your disk can evolve and grow over time.
Follow the below steps to create a dynamic volume using the diskpart command:
Step 1: Open CMD on your Windows computer.
Step 2: Type diskpart.
Step 3: Type list disk.
Step 4: Type list volume.
Step 5: Select a disk using the select disk x command. (Replace x with the number of the disk you wish to select)
Step 6: Type the convert dynamic command to convert your selected volume to a dynamic volume.

4. Create RAID-5 Volume via Diskpart Commands
RAID-5 (A redundant array of independent disks) is a type of disk volume that efficiently utilizes your storage. Along with better storage management, it gives you good security and disk performance.
Follow the below steps to create RAID-5 volume using the diskpart command:
Step 1: Open CMD on your Windows computer.
Step 2: Type diskpart.
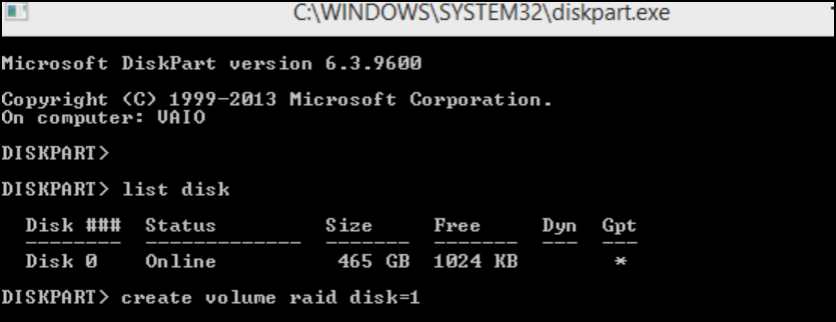
Step 3: Type list disk to see your current disk numbers.
Step 4: Enter create volume raid disk=1 (Here 1 is the disk number that you are creating as a RAID-5 volume. You can change this number to other disk numbers).
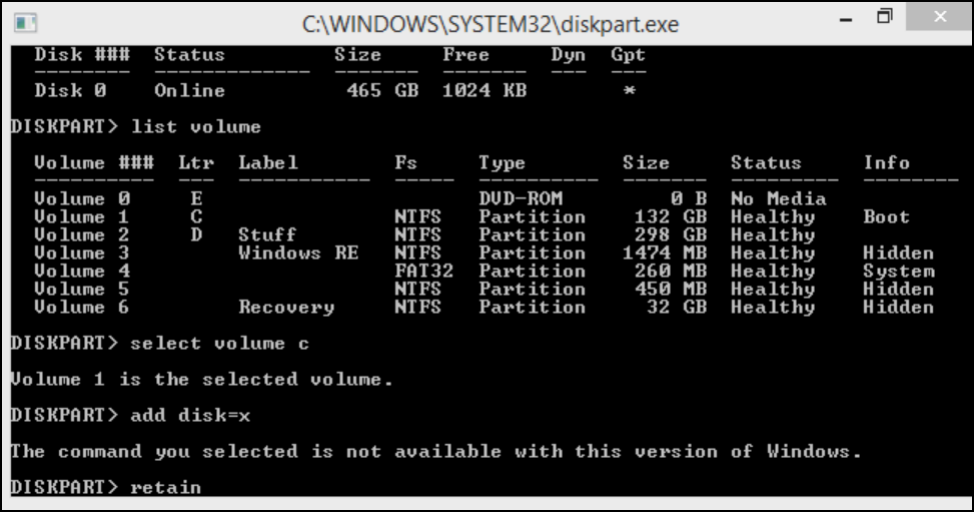
5. Create Mirrored System Volume
The mirrored system partition allows you to create a clone of data from another volume. Primarily, users need it for creating backup device data. Follow the steps below to create a mirrored system volume using diskpart:
Step 1: Open CMD on your Windows computer.
Step 2: Type diskpart.
Step 3: Type list disk and then select the disk whose volume you want to mirror by selecting the disk x command.
Step 4: Type list volume to list the volume of the selected disk.
Step 5: Now, type the select volume c command to choose the volume you want to mirror to a disk. (Replace c with the volume alphabet of your choice)
Step 6: Enter the command add disk=x (replace x with the disk where you want a backup of the selected volume).
Step 7: Enter the retain command, and you will be able to create a mirrored system volume successfully.
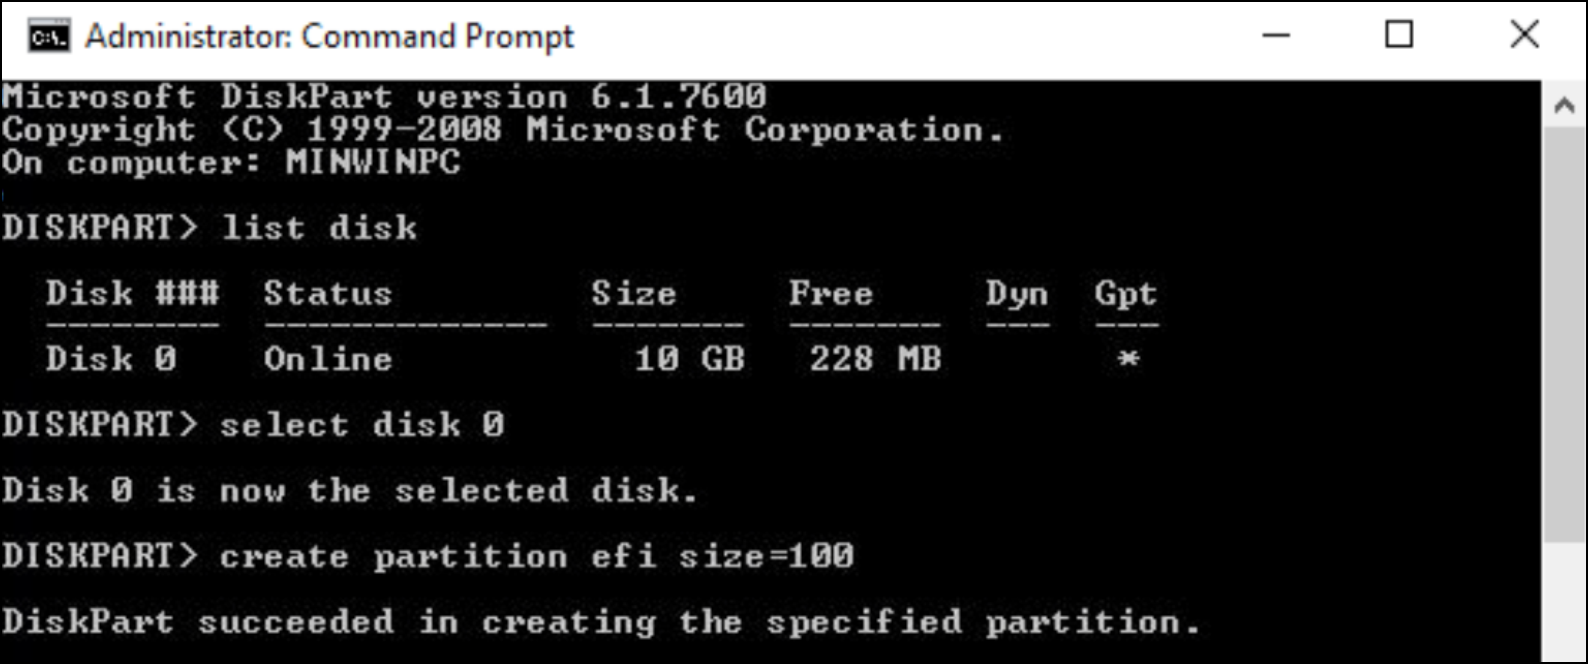
6. Create UEFI System Volume
UEFI (Unified Extensible Firmware Interface) system volume holds your system initialization and startup information. You can create a UEFI system volume using diskpart by following the commands below:
Step 1: Open CMD on your Windows computer.
Step 2: Type diskpart in CMD and press Enter.
Step 3: Enter the list disk command and select disk x to select the disk.
Step 4: Convert your selected disk to GPT using the convert gpt command.
Step 5: Now create the UEFI system partition using create partition efi size=100
That's it, entering this command will create a UEFI system volume on your selected disk.
#2. Diskpart Alternative Software Free Download - EaseUS Partition Master
Using the diskpart create partition commands, you can create partition volumes of any type. However, this method is not suited for beginners and people who have not interacted with command-line interfaces.
An alternate solution is to use EaseUS Partition Master Free, which is a reliable disk partition software that perfectly replaces Diskpart.
EaseUS Partition Master Free edition helps you convert your partitions, manage the partitions, and create new partitions. It is a GUI-based tool, which means you do not have to remember or enter any commands.
Using simple clicks, you can easily create a partitioned volume of your choice. It is highly recommended because a user with any computer expertise can smoothly use this software.
Steps to use EaseUS Partition Master
Step 1. Launch EaseUS Partition Master. To to Partition Manager, right-click on the unallocated space on your hard drive or external storage device and select "Create".
Step 2. Adjust the partition size, file system (Choose the file system based on your need), label, etc. for the new partition and click "OK" to continue.
Step 3. Click on the "Execute 1 Task(s)" button and create a new partition by clicking "Apply".
Watch the following video tutorial and learn how to create a partition in NTFS, FAT, or EXT file system.
Conclusion
There are various types of partitions in the Windows computer system. Such as boot volume, system volume, dynamic volume, RAID-5 volume, mirrored system volume, and UEFI system volume.
Diskpart create partition command helps you to create these partitions in Windows. The diskpart utility is built-in, and you can access it through CMD without needing any software installation.
Unfortunately, entering commands to create partitions is not everyone's cup of tea. There is another easy way to create partitions in the Windows operating system for people who struggle with commands.
The alternate method is to use EaseUS Partition Master Free edition software. It does everything that the diskpart command does, but with just a few clicks.
FAQs about Creating Partitions Using Diskpart
Aside from the above tutorials, some of you may also have questions about creating other types of partitions by using Diskpart. Check the questions here, and hope you find desired answers ans solutions here.
1. How do I create a GPT Partition Using Diskpart?
- Press Windows + R keys, type cmd in the Run dialog, and hit Enter.
- Type diskpart and hit Enter.
- Type list disk and hit Enter. Confirm if your target disk is GPT or not.
If yes, continue with the steps here:
- Type select disk * and hit Enter.
- Type create partition primary =* and hit Enter.
- Then type assign letter=* and hit Enter.
- Type format fs=NTFS quick and hit Enter.
If not, back up all data to another drive, then continue with the steps here:
- Type select disk * and hit Enter.
- Type clean in diskpart and hit Enter.
- Type convert GPT and hit Enter.
- Type create partition primary =* and hit Enter.
- Then type assign letter=* and hit Enter.
- Type format fs=NTFS quick and hit Enter.
2. How do I create an MBR partition using Diskpart?
- Open Diskpart and type list disk to confirm if your target disk is MBR or not.
If yes, follow the steps below:
- Type create partition primary =* and hit Enter.
- Then type assign letter=* and hit Enter.
- Type format fs=NTFS quick and hit Enter.
If not, back up all valuable data to another drive, then follow the steps here:
- Type select disk * and hit Enter.
- Type clean in Diskpart and hit Enter.
- Type convert mbr and hit Enter.
- Type create partition primary =* and hit Enter.
- Then type assign letter=* and hit Enter.
- Type format fs=NTFS quick and hit Enter.
3. How to create multiple partitions using Diskpart
- Press Windows + R keys and type diskpart in the Run dialog, and hit Enter.
- Type list disk and hit Enter.
- Type select disk * and hit Enter.
- Type create partition primary size=* and hit Enter.
- Type assign letter=* and hit Enter.
- Type format fs=NTFS quick and hit Enter.
- Type select disk * and hit Enter
- Type create partition primary size=* and hit Enter.
- Type assign letter=** and hit Enter.
- Type format fs=NTFS quick and hit Enter.
Repeat the process until you create multiple partitions on the target disk. Note that the MBR disk only allows creating up to 4 primary partitions. If you want more than 4 primary partitions on the disk, you'll need to convert the MBR disk to GPT first.
How Can We Help You
About the Author
Updated by Tracy King
Tracy became a member of the EaseUS content team in 2013. Being a technical writer for over 10 years, she is enthusiastic about sharing tips to assist readers in resolving complex issues in disk management, file transfer, PC & Mac performance optimization, etc., like an expert.
Product Reviews
-
I love that the changes you make with EaseUS Partition Master Free aren't immediately applied to the disks. It makes it way easier to play out what will happen after you've made all the changes. I also think the overall look and feel of EaseUS Partition Master Free makes whatever you're doing with your computer's partitions easy.
Read More -
Partition Master Free can Resize, Move, Merge, Migrate, and Copy disks or partitions; convert to local, change label, defragment, check and explore partition; and much more. A premium upgrade adds free tech support and the ability to resize dynamic volumes.
Read More -
It won't hot image your drives or align them, but since it's coupled with a partition manager, it allows you do perform many tasks at once, instead of just cloning drives. You can move partitions around, resize them, defragment, and more, along with the other tools you'd expect from a cloning tool.
Read More
Related Articles
-
How to Partition SSD Safely in 2026 | Complete Guide
![author icon]() Jean/2026/07/01
Jean/2026/07/01 -
How to Create EXT2/EXT3 Based Linux Partition from Windows
![author icon]() Daisy/2026/06/17
Daisy/2026/06/17 -
How to Free Up Space on Hard Drive - 7 Methods for Windows
![author icon]() Joey Albert/2026/06/17
Joey Albert/2026/06/17 -
Fix 'Not Enough Space on the Disk to Complete This Operation'
![author icon]() Brithny/2026/06/29
Brithny/2026/06/29


