
Content
Page Table of Contents
About the Author
Hot Topics
- Important
- Windows 10 support has ended on October 14, 2025, according to Microsoft. After this date, the system will no longer receive security updates, bug fixes, or technical support. It's wise of you to convert a disk from MBR to GPT and upgrade your PC to Windows 11 if you prefer further updates and support to secure your data and privacy.
Can I convert MBR to GPT without data loss? Yes, you can convert a disk from MBR (Master Boot Record) to GPT (GUID Partition Table) in Windows 10 or Windows 11 without data loss using the MBR to GPT converter tool, MBR2GPT.exe, DiskPart, PowerShell, and Disk Management by creating a backup in advance. Which tool shall you select to convert MBR to GPT?
Take this quick guide here, you'll learn which tool suits you the most:
- 1️⃣EaseUS Partition Master - MBR to GPT Converter (No Data Loss, For Beginners)
- 2️⃣MBR2GPT.exe - Windows Built-in Tool (No data loss, for OS Disk Conversion)
- 3️⃣Diskpart - Windows Built-in Tool (Need to Delete Partitions)
- 4️⃣Disk Management - Windows Built-in Tool (Need to Delete Partitions)
For a seamless tool to change a disk from MBR to GPT, a third-party secure MBR to GPT or GPT to MBR conversion software like EaseUS Partition Master is exactly what you need.
If you prefer a Windows solution, the MBR2GPT.exe, DiskPar/PowerShell, and Disk Management options can execute the conversion between MBR and GPT, though all require you to delete partitions.
Follow this how-to tutorial to learn how to convert MBR to GPT without data loss. Reading for 3-4 minutes, you'll get the best way to accomplish this task.
Why Convert MBR to GPT?
No matter whether you know MBR and GPT, you must have encountered such a situation. Your disk has 4TB of space, but you can only use 2TB of space. Why does a 4TB hard drive only show 2TB? This is because MBR only supports up to 2TB volume size and 4GB file size. Unlike an MBR disk, a GPT disk doesn't have such limitations. You can see the difference in this table:
| Factors | MBR | GPT |
|---|---|---|
| Maximum Partition Capacity | 2TB | 9.4ZB (1ZB=1 billion terabytes) |
| Maxium Partition Number |
|
128 Primary Partitions |
| Firmware Interface Support | BIOS (Legacy) | UEFI |
| Operating System Support | Windows 7, Windows XP 32-bit, Windows 95/98, Windows 2000, Windows 2003 32-bit | Windows 11 or later, Windows 10 64-bit, Windows 8/8.1 64-bit |
Converting from MBR (Master Boot Record) to GPT (GUID Partition Table) can offer several significant advantages, particularly for modern computing environments. Here are the key reasons why one might consider converting MBR to GPT:
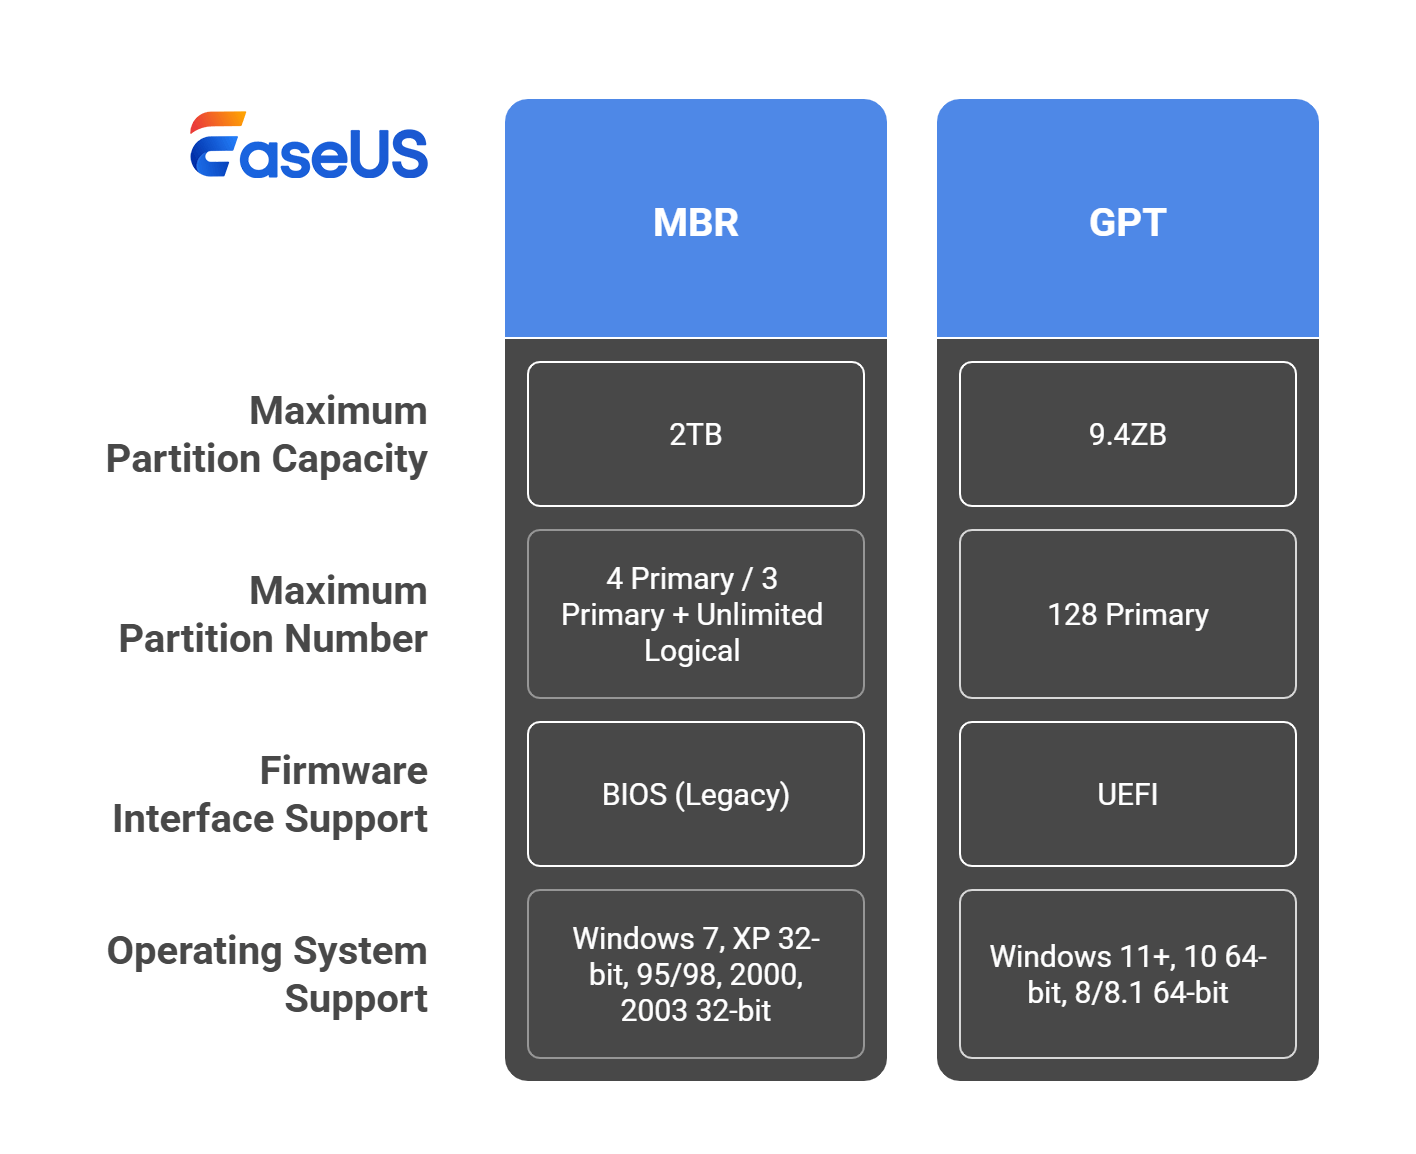
- 📌Storage Limitations: GPT supports up to 9.4 zettabytes (ZB), which is much larger compared to MBR's 2TB limit. This makes GPT more suitable for modern high-capacity drives.
- 📌Number of partitions: GPT allows up to 128 primary partitions, while MBR is limited to 4 primary partitions, or 3 primary and 1 extended partition (with unlimited logical partitions).
- 📌Compatibility with modern systems: GPT works with UEFI (Unified Extensible Firmware Interface), which is the modern replacement for BIOS. This enables faster boot times and better security features.
🚩For more detailed information about the difference between MBR and GPT, check this infographic.
After learning why GPT exceeds MBR, let's explore how to convert MBR to GPT without losing data. Also, don't forget to share this tutorial online to help more of your friends master the skill to change their disk drives between MBR and GPT:

Guide 1: Convert MBR to GPT Without Data Loss via Disk Converter Tool
- Difficulty: Easy
- Data loss: No, it works to safely convert MBR to GPT without losing data
- Tool: MBR to GPT Converter Tool - EaseUS Partition Master
As for Windows beginners, the easiest disk conversion tool - EaseUS Partition Master perfectly meets your demands of changing MBR to GPT without data loss. Whether you want to convert MBR to GPT or convert GPT to MBR, you can apply this software to get it done without deleting the volumes on your disk.
Whether you're a computer novice or an expert, this tool makes it easy to change the partition style in Windows 11/10/8/7 now.
How to Change MBR to GPT Without Losing Data
Step 1. Download and launch EaseUS Partition Master on your computer.
Step 2. Go to Disk Converter, select "MBR => GPT" and click "Next" to continue.

Step 3. Select the target MBR disk that you tend to convert to GPT, and click "Convert" to start the conversion.

‼️Important: If the disk you want to convert is the system disk, make sure the computer's motherboard supports the UEFI boot mode. Remember that MBR requires BIOS, while GPT requires UEFI. EaseUS Partition Master will guide you to change the boot mode after conversion.
Alongside turning to a disk conversion software, you can also learn three other ways to convert MBR to GPT or GPT to MBR in this article. Note that these three solutions will cause data loss if you forget to back up partitions.
- Notice:
- If you prefer a non-software option in converting MBR to GPT, MBR2GPT.exe, DiskPart, or Disk Management can help. So we strongly recommend that you back up your files in advance and then perform data restoration after the conversion. If there are lots of files on your disk, you are recommended to back up your data effectively using reliable free backup software.
Guide 2: Convert OS Disk from MBR to GPT Using MBR2GPT
- Difficulty: Medium
- Data loss: No, it works without deleting partitions
- Tool: MBR2GPT.exe
- Limitation: Requires Windows 10 or later; it converts the system disk from MBR to GPT only
To convert a disk from MBR to GPT using the command prompt in Windows, MBR2GPT.exe is a Windows built-in tool you can try. The advantage of this tool is that it won't destroy the files on your disk during the conversion.
🔖Highlight: This cmd conversion tool - MBR2GPT.exe is only available in Windows 10 version 1703 and later editions. Also, make sure you'll be very cautious while trying these command lines.
Way 1. Convert MBR to GPT in MBR2GPT.exe Offline
Step 1. Click the Start button > click the Power button > hold the Shift Key and click Restart to access the Advanced Startup screen.
Step 2. Navigate to "Troubleshoot > Advanced options > Command Prompt."
Step 3. In Command Prompt, input these commands orderly, and press Enter after each command line.
- mbr2gpt /validate
- mbr2gpt /convert

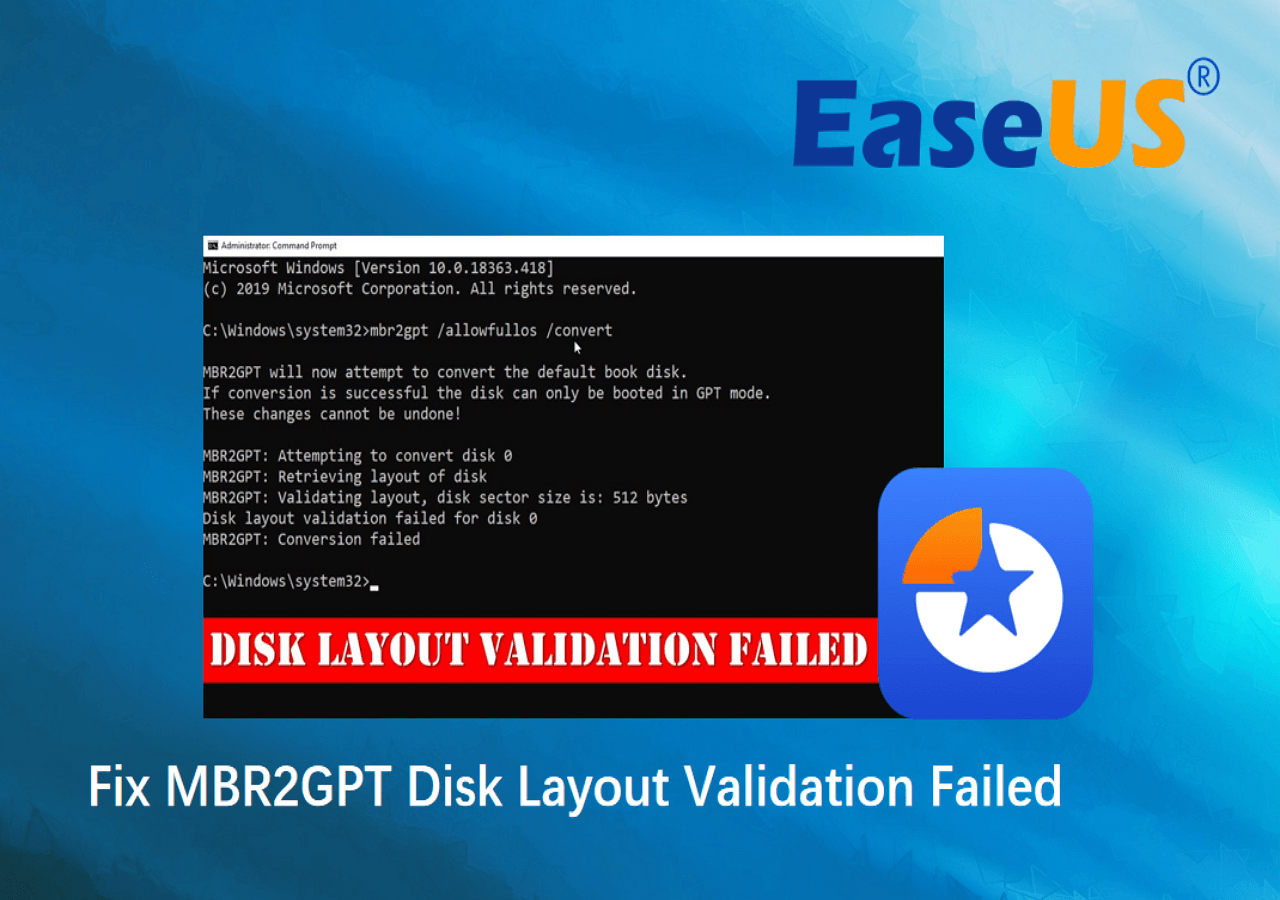
🔖BONUS Tip: If MBR2GPT.exe failed to convert your target disk to GPT and prompted you with a failure message, saying "Disk layout validation failed for disk 0" or similar, relax. You can refer to this guide for a furtuer resolution:
MBR2GPT Disk Layout Validation Failed
After running these commands, your disk will be converted from MBR to GPT without data loss.
Way 2. Convert MBR to GPT in MBR2GPT.exe Online
The MBR2GPT tool is designed to be run in a Windows Preinstallation Environment (Windows PE) environment command prompt, but can also be run from the full Windows 10 operating system (OS) by using the /allowFullOS option online.
Step 1. Run Command Prompt (Admin) on your Windows 10.
Step 2. Type the command lines below and press Enter after each line.
- mbr2gpt /validate /allowFullOS
- mbr2gpt /convert /allowFullOS
You can check the details of MBR2GPT.EXE in the related Microsoft documents.
If you are still not sure about the conversion process. You can check this tutorial video for more detailed information:
Guide 3. Convert MBR to GPT Using CMD - DiskPart Tool
- Difficulty: Medium
- Data loss: Yes, it requires deleting all partitions
- Tool: DiskPart Utility
The Diskpart tool can convert MBR to GPT in CMD. However, when changing the disk to GPT, Diskpart will delete all files and folders from your hard drive. So, make sure you'll back up all your vital files, then follow the steps below to use Diskpart in CMD to convert MBR to GPT.
Step 1. Type CMD in the Search box. Right-click Command Prompt and choose "Run as administrator". If CMD isn't available, you can use PowerShell instead.
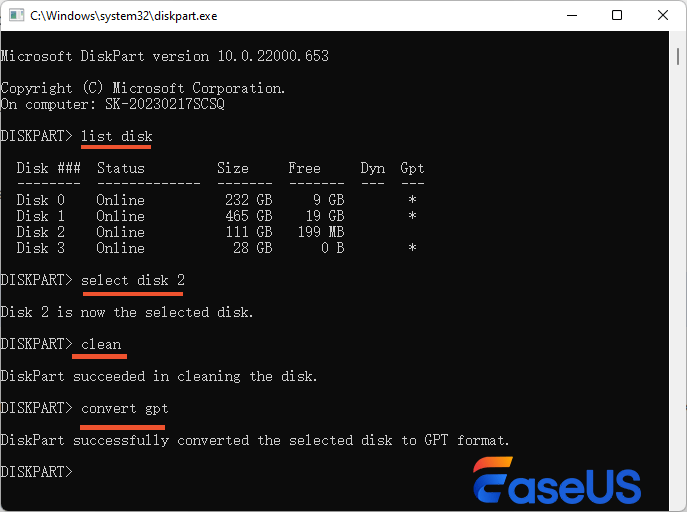
Step 2. Open Command Prompt, type DiskPart, and press Enter.
Step 3. Type list disk and press Enter. (Note down the number of the disk you want to convert to GPT)
Step 4. Type select disk X. (Replace the X with the correct number of your hard drive)
Step 5. Now type clean and press Enter. This command will remove all the files and partitions from your hard drive, so back up all important files in advance.
Step 6. Type convert gpt and press Enter.
This method is not suitable for computer beginners. If you mistakenly cleaned a partition using DiskPart, you can undo DiskPart clean to retrieve your files.
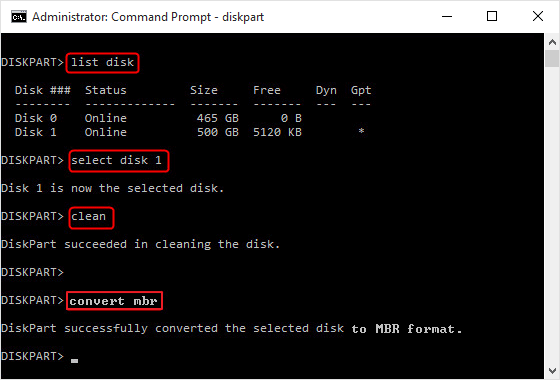
To Convert GPT to MBR Using Command Prompt:
- list disk
- select disk *
- clean
- convert mbr
- exit
🔖BONIS Tip: If your computer currently doesn't have an OS installed and you wish to switch the disk partition style from MBR to GPT, you can follow this guide for help:
How to Convert MBR to GPT Without Operating System

Guide 4: Convert MBR to GPT Disk with Disk Management
- Difficulty: Easy
- Data loss: Yes, it requires deleting all partitions
- Tool: Disk Management
Similar to using CMD, using Disk Management also requires you to delete all partitions on your MBR disk. Before you convert the disk from MBR to GPT or from GPT to MBR, you should back up your disk. Then, follow the steps here to change your source MBR disk to GPT:
To Convert MBR to GPT in Disk Management:
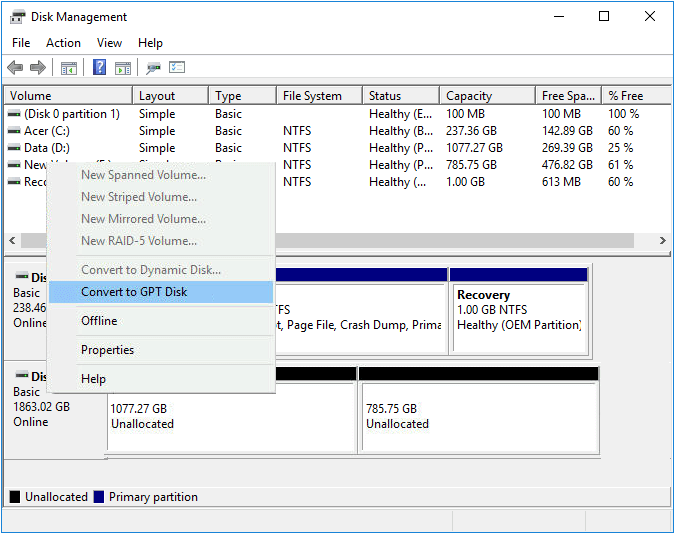
Step 1. Right-click on "This PC", choose "Manage", then head to "Disk Management". Or, right-click on the Windows icon at the taskbar, and click "Disk Management" to open it.
Step 2. Right-click the volumes on your target MBR disk and choose "Delete Volume..."
Step 3. Repeat Step 2 to delete all existing partitions.
Step 4. When your disk becomes empty (shows as unallocated space), right-click your disk and choose "Convert to GPT Disk".
To Convert GPT to MBR in Disk Management:
- Right-click on a volume and select Delete Volume. Delete all volumes.
- Right-click on the disk and select Convert to MBR Disk.
Do you like the ways mentioned in this article? If you do, share it with your friends by clicking the buttons below:
BONUS: Enable UEFI Mode After Converting System Disk to GPT
Some users are concerned about whether the system can boot normally after MBR to GPT conversion (Superuser/Microsoft). If the conversion is done correctly using tools like MBR2GPT or EaseUS Partition Master, the system should boot normally—as long as your PC supports UEFI boot mode. After converting, you must go into the BIOS and switch the boot mode from Legacy to UEFI to make the OS bootable. Here are the steps:
Step 1. Restart the PC and press F2, F8, F12, and Del to enter the BIOS boot menu.
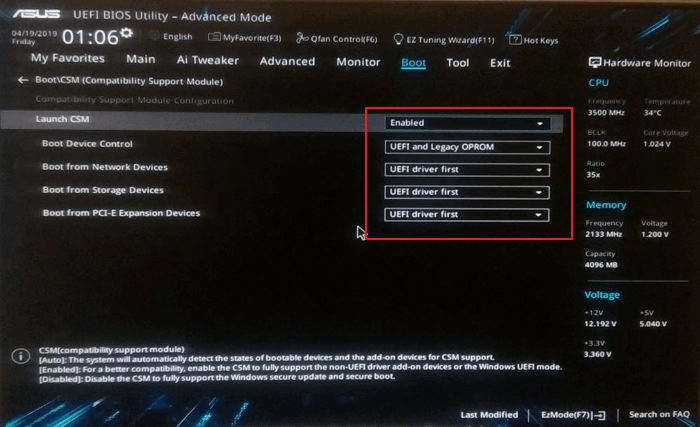
Step 2. Locate the "Boot" options menu and enable the UEFI mode.
- Set Launch CSM to Enabled.
- Set Boot Device Control to UEFI Only
- Set Boot from Storage Devices to UEFI driver first
Step 3. Set the UEFI OS Boot option at the top of the Boot Priority List.
Step 4. Save the changes and exit BIOS, reboot PC from the GPT disk
After this, wait patiently. Your computer will automatically boot from the GPT disk.
Extended: Troubleshooting MBR to GPT Conversion Failure
If MBR to GPT conversion fails, or you can't convert MBR to GPT, stay here and take these tips to troubleshoot this issue:
✅1. Don't panic. Your data in the source disk could still be intact if you didn't apply non-destructive tools.
✅2. Use EaseUS Partition Master to try the conversion with safer UI steps.
✅3. Check if your disk or system is having these issues, then refer to the respective tips to resolve them:
- The disk is not encrypted by BitLocker or anything else - decrypt or remove BitLocker encryption from your disk.
- You're not allowed to convert MBR to GPT as your PC is running from a guest account - reboot the PC and log in to your administrator account.
- Your PC's motherboard doesn't support UEFI firmware - stop converting your OS disk from MBR to GPT, stay with MBR.
✅4. If PC doesn't boot after converting MBR to GPT, reboot your PC and press F2/F8/F10/Del to enter BIOS and configure the Boot Mode to UEFI, then restart the computer.
✅5. As a last resort, back up your data, delete partitions, and clean-install Windows in GPT mode (such as Install Windows 10 on GPT Partition).
If the above-listed tips and solutions work for you, please help share this guide online to help more of your friends master the skill and change their disk drives from MBR to GPT like an expert.
The Bottom Line
After reading this guide, you will find that using EaseUS Partition Master is the easiest way to convert MBR to GPT without data loss among the four solutions. With this tool, you can convert MBR to GPT or convert GPT to MBR directly without deleting any partitions.
If you prefer using Disk Management or DiskPart to convert MBR to GPT, remember to back up your disk in advance. If you attempt to use MBR2GPT.exe, make sure your disk meets Microsoft's requirements; otherwise, the conversion will not procee,d and an error will occur.
Convert MBR to GPT CMD FAQs
1. How to convert MBR to GPT using PowerShell?
Make sure to back up data from your MBR disk to another secure disk before you convert partition styles via PowerShell. Here is how to do it:
Step 1. Right-click on the Windows icon in the taskbar and select "Windows PowerShell".
Step 2. Type the following command lines one by one and hit Enter each time:
- Get-Disk
- Clear-Disk -Number
-RemoveData -Confirm:$false - Initialize-Disk -Number
-PartitionStyle GPT - If you prefer to convert GPT to MBR, type: Initialize-Disk -Number
-PartitionStyle MBR
Step 3. After this, type "Get-Disk" again to check if your disk is now converted to GPT partition style.
2. How do I change from GPT to MBR for free?
- Download, install, and open EaseUS Partition Master Free for all users.
- Click "Disk Converter" and select "Convert GPT to MBR".
Follow the instructions: How to Convert GPT disk to MBR.
3. Can I convert MBR to GPT without formatting?
Yes, the way to convert MBR to GPT without formatting is to run a third-party MBR to GPT converter, EaseUS Partition Master.
4. How do I create a GPT partition in CMD?
Open Command Prompt and type the following commands:
- diskpart
- list disk
- select disk X
- clean
- convert gpt
How Can We Help You
About the Author
Sherly joined EaseUS in 2022 and she has always loved writing articles and enjoys the fun they bring. She receives professional training here, focusing on product performance and other relative knowledge. She has written over 200 articles to help people overcome computing issues.
Written by Tracy King
Tracy became a member of the EaseUS content team in 2013. Being a technical writer for over 10 years, she is enthusiastic about sharing tips to assist readers in resolving complex issues in disk management, file transfer, PC & Mac performance optimization, etc., like an expert.
Product Reviews
-
I love that the changes you make with EaseUS Partition Master Free aren't immediately applied to the disks. It makes it way easier to play out what will happen after you've made all the changes. I also think the overall look and feel of EaseUS Partition Master Free makes whatever you're doing with your computer's partitions easy.
Read More -
Partition Master Free can Resize, Move, Merge, Migrate, and Copy disks or partitions; convert to local, change label, defragment, check and explore partition; and much more. A premium upgrade adds free tech support and the ability to resize dynamic volumes.
Read More -
It won't hot image your drives or align them, but since it's coupled with a partition manager, it allows you do perform many tasks at once, instead of just cloning drives. You can move partitions around, resize them, defragment, and more, along with the other tools you'd expect from a cloning tool.
Read More
Related Articles
-
What Is exFAT Format: Everything You Need to Know
![author icon]() Brithny/2026/06/30
Brithny/2026/06/30 -
How to Upgrade Xbox One X to SSD - Guide with Pictures
![author icon]() Sherly/2026/06/29
Sherly/2026/06/29 -
How to Burn ISO to DVD on Windows 10/11 (Step-by-Step Tutorial)
![author icon]() Cedric/2026/06/30
Cedric/2026/06/30 -
How to Fix The Media Is Write-Protected | Newest Guide
![author icon]() Tracy King/2026/07/01
Tracy King/2026/07/01


