
Content
Page Table of Contents
About the Author
Hot Topics
On this page, you will learn what is GPT protective partition, the causes toward this issue, and how to remove GPT protective partition without losing any data on Windows 10/8/7/XP, etc. Check out and learn to make your GPT protective partition accessible and regain the saved data again.
What Is GPT Protective Partition
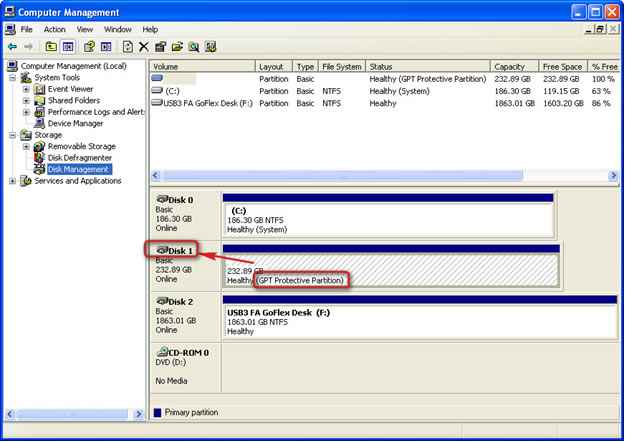
GPT protective partition is basically a hard drive partition protected by the GUID partition table. When a GPT Protective Partition shows up, owners can neither open this specified disk partition nor make other operations on it via Disk Management.
For example, you won't be unable to partition, format, delete or simply access data inside the GPT protective partition. Usually, it could be a single partition or a whole disk that displays or shows up as Healthy (GPT Protective Partition) in Disk Management as the image listed below:
What Causes or Makes Your Disk Show Up as GPT Protective Partition?
Before working out a way to remove the "GPT protective" partition from your Windows computer, first of all, you need to know what causes GPT protective partition.
Here is a list of reasons and one of them may be the cause that makes your disk partition displaying Healthy (GPT Protective Partition):
- 1. Windows couldn't read or support a GPT Protective Partition
For example, Windows XP doesn't support GPT disk and when you connect a GPT disk into the computer, the disk partitions will show up as "GPT protective partition"
- 2. GPT disk errors that cause GPT partitions protective
- 3. Manually create one or multiple GPT protective partitions for some specific reasons
People mainly use GPT protective partitions on Servers for preventing others from manipulating confidential information or providing redundancy for critical data. Some personal users also use it to maximize the partition size or to remove restrictions placed on the partition size.
In a word, no matter how you get a GPT protective partition, even though Windows recognizes it as a healthy "GPT Protective Partition", you will not be able to read or boot from it. As a result, data becomes inaccessible.
So how do you access the GPT protective partition data and get rid of this error? Check and follow the provided solutions to make your GPT protective partition work again.
Part 1. Access GPT Protective Partition and Restore Data
Applies to: Access and restore precious data from the GPT protective partition in advance.
When the GPT disk partitions become protective, you can't access, delete, or even format the GPT protective partition. To secure your data, we suggest you find a reliable data recovery solution to restore the saved data from the GPT protective partition in advnce.
Here, you can take EaseUS Data Recovery Wizard for help. As long as your disk can be detected by Windows Disk Management, it will recognize your GPT protective partition and effectively scan and find all your data.
Follow the steps to access and restore the GPT protective partition data:
Step 1. Run EaseUS Data Recovery Wizard, select the drive with the "GPT Protective" error, and click "Search for Lost Data".
Step 2. Use "Filter" or "Search" to find the lost files when the scan completes.
Step 3. Select all the files you want and click "Recover". Then, browse another secure location to save them.

💡Tip: You can restore data on the local disks, external hard drives, and also the cloud storage.
Remember to save the restored data to another secure location on your computer or an external hard drive. Then, continue with the solutions in the next two parts.
Part 2. Remove and Clear The "GPT Protective Partition" Error
Applies to: Resolve the "protective" issue on a GPT partition so as to make it usable again.
The provided solution in this part is applicable to Windows 10/8/7/XP and Windows Servers, such as Windows Server 2003.
According to professional IT service providers and geek websites, the most efficient way to remove GPT protective partition is to apply Diskpart command-line utility for help.
- Important
- Diskpart command allows you to clean the GPT Protective Partition. Of course, all data will be completely erased.
- Therefore, remove and access the GPT protective partition without losing data, remember to follow steps in Part 1 and restore your precious data in advance.
Learn how to remove GPT protective partition using Diskpart clean command:
Step 1: Type cmd and hit Enter to bring up Command Prompt. Run as administrator.
Step 2: In the command prompt, enter the command diskpart.
Step 3: Enter the command list disk.
Step 4: Enter the command select disk x. (x represents the drive letter of the GPT Protective Partition, so replace x with the exact letter)
Step 5: Enter the command clean.
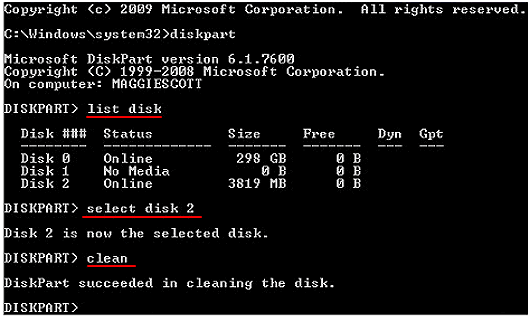
In the end, type exit to close the Command Prompt. Once you complete the process, you have successfully removed the GPT protective partition on your Windows PC.
Now, you can follow Part 3 and apply the provided methods to convert the GPT disk to MBR or create new partitions on the disk.
Part 3. Convert GPT to MBR after Removing GPT Protective Partition Error
Applies to: Make use of the cleaned GPT disk on new Windows 10, older Windows XP, and Windows Server 2003, etc.
After removing the GPT protective partition style, you'll then be left with an "Unknown, Not initialize and unallocated' disk. All you have to do is to initialize the disk or convert the disk to MBR so as to let Windows recognize the disk again.
Here in the below, we collected three methods and you can pick up anyone for help. The earlier the method is presented, the easier it will be.
Method 1. Convert GPT to MBR using EaseUS Partition Master
The reason why we first recommend you try a third-party partition manager software is that it can simplify the operating process for you.
EaseUS Partition Master provides you with a secure way to thoroughly fix GPT Protective Partition error on the mentioned Windows operating systems.
You can also use this software to convert a healthy GPT to MBR without destroying data in only a few clicks. Follow the guide to work the problem out:
- Click "Disk Converter" on the left menu. Select "GPT=>MBR" and click "Next" to continue.
- Select the GPT disk that you want to convert and click "Convert".
- Wait for the process completes.
Method 2. Initialize and Convert GPT to MBR using Disk Management
The other efficient way to help you quickly convert a disk to MBR is to use Disk Management for help. It's a Windows built-in method that makes your disk conversion process free:
Step 1. Right-click "My Computer" or "This PC", click "Manage," and select Disk Management.
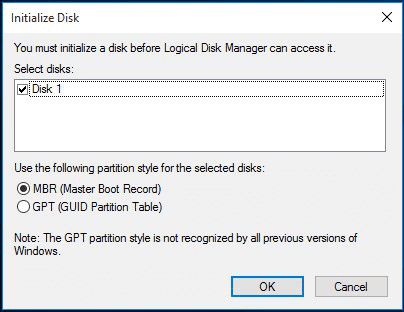
Step 2. Here, right-click the unallocated hard drive and click "Initialize Disk".
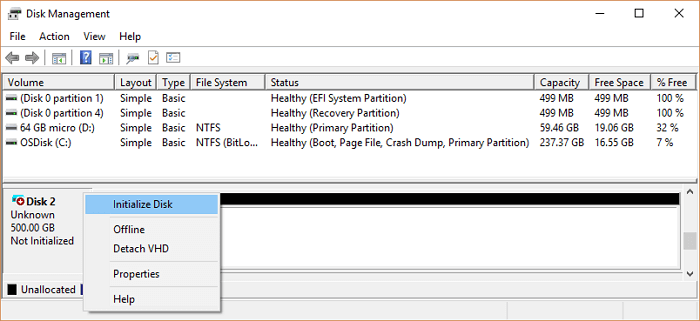
Step 3. In the dialog box, select the disk(s) to initialize and choose MBR or GPT partition style.
Method 3. Convert GPT to MBR using Diskpart Command
The other practical resolution that you can try is to run the Diskpart command and convert GPT to MBR. Be careful while you are following the disk conversion steps as listed below:
Step 1. Open Command Prompt on your computer, and type diskpart in the CMD and hit Enter.
Step 2. Click "Yes" to open Diskpart.
Step 3. Type the following command and hit Enter each time:
- list disk
- select disk 1 (Replace 1 with the disk number of the disk you need to convert).
- clean (It will delete all partitions and data on the disk. Make sure you have restored all the data in Part 1.)
- convert mbr (This command will convert the GPT disk to MBR.)
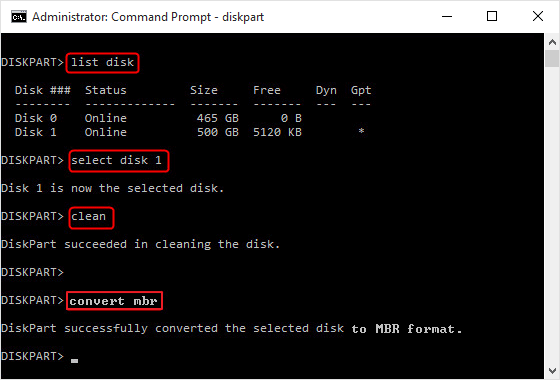
Step 4. Type exit when the conversion completes.
When you finish all the operations listed in Part 1, Part 2, and Part 3, congratulations. You have completely get rid of the GPT protective partition on your disk. And the whole disk is available for you to create new partitions now. We have learned 3 methods to help GPT to MBR, don't hesitate to share this article to let more users know about these ways.
Extra Tips: Re-partition Disk After Removing GPT Protective Partition
Note that when you finish the whole process with provided solutions on this page, you have thoroughly removed the GPT protective partition from your disk. But now, the disk is an unallocated drive.
To make use of the disk, you will need to re-partition it, creating new partitions on it. We will list two workable tools with tutorial steps to guide creating volumes on Windows PC. Pick up either one to make your disk available to save data again:
#1. Create Volumes on Disk using EaseUS Partition Master
Works for: All Windows beginners.
Step 1. Launch EaseUS Partition Master. To to Partition Manager, right-click on the unallocated space on your hard drive or external storage device and select "Create".
Step 2. Adjust the partition size, file system (Choose the file system based on your need), label, etc. for the new partition and click "OK" to continue.
Step 3. Click on the "Execute 1 Task(s)" button and create a new partition by clicking "Apply".
Watch the following video tutorial and learn how to create a partition in NTFS, FAT, or EXT file system.
#2. Create Partitions on Disk using Disk Management
Works for: Experienced and advanced Windows users.
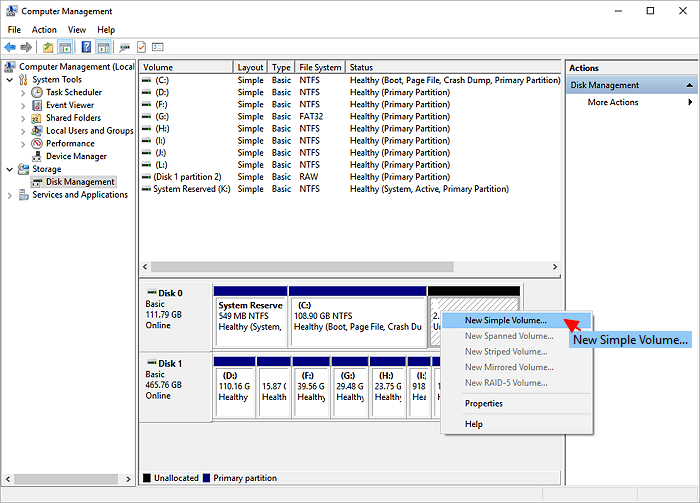
Step 1. Open Disk Management by right-clicking "This PC" and select "Manage".
Step 2. Click Disk Management, locate the empty disk which was inaccessible, displaying as "Healthy (GPT Protective Partition).
Step 3. Right-click on the unallocated space on the disk, select "New Simple Volume".
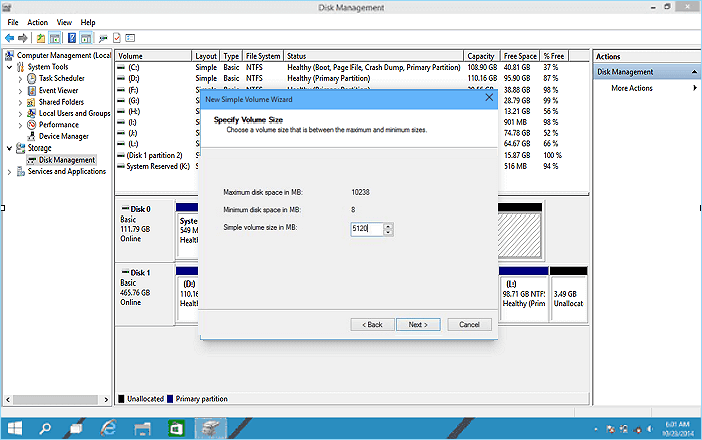
Step 4. Set the partition size, drive letter, file system, etc.
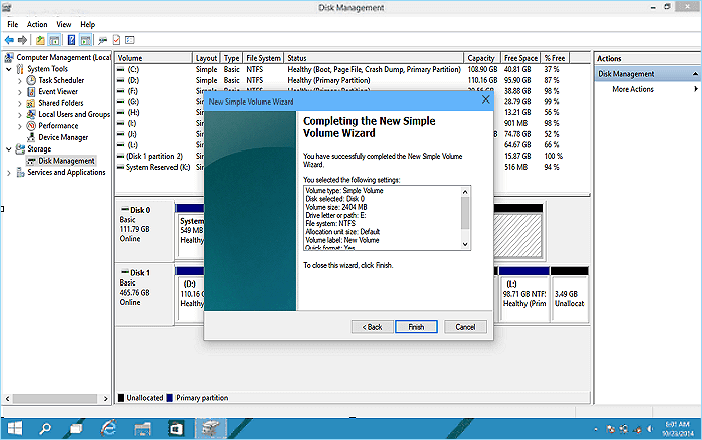
Step 5. When you finish all the processes, click "Finish" to end the process.
Note that if you need to create more than partitions on the disk, repeat the above steps again to create as many partitions as you want.
Conclusion
On this page, we explained what is a GPT protective partition and what reasons may cause this issue on Windows PC.
For most Windows users, in order to get rid of this issue, you need first access data and restore them from the GPT protective partition with a reliable data recovery software such as EaseUS Data Recovery Wizard.
Then remove this error from your GPT disk by running the Diskpart clean command. To thoroughly get rid of this issue, we recommend you to continue converting the GPT disk to MBR by using EaseUS Partition Master, Disk Management, or Diskpart.
Last, to make the disk usable for saving data again, remember to create new partitions on it.
People Also Ask
1. How do I get rid of GPT protective partition?
How to delete GPT Protective Partition:
- Type in "DiskPart" in command line.
- Type in "list disk" in command line to show all disks on the interface.
- Use "select disk*" to set the focus to the specified partition. For example "select disk 1".
- Use "clean" command.
2. What causes GPT protective partition?
- 1. Windows couldn't read or support a GPT Protective Partition.
- 2. GPT disk errors that cause GPT partitions protective.
- 3. Manually create one or multiple GPT protective partitions for some specific reasons.
3. How do I access data from GPT protective partition?
How to Access GPT Protective Partition Data:
Step 1: get the software and launch it. Download EaseUS Partition Master and install it properly.
Step 2: scan the GPT disk with protective partition. You should select the GPT disk under Hard Disk.
Step 3: choose the needed files to recover.
How Can We Help You
About the Author
Updated by Joey Albert
Joey is an enthusiast of science and technology. With a passion for uncovering the latest tech innovations, she creates clear, engaging how-to guides that make technology accessible and enjoyable for all.
Jean is recognized as one of the most professional writers in EaseUS. She has kept improving her writing skills over the past 10 years and helped millions of her readers solve their tech problems on PC, Mac, and iOS devices.
Product Reviews
-
I love that the changes you make with EaseUS Partition Master Free aren't immediately applied to the disks. It makes it way easier to play out what will happen after you've made all the changes. I also think the overall look and feel of EaseUS Partition Master Free makes whatever you're doing with your computer's partitions easy.
Read More -
Partition Master Free can Resize, Move, Merge, Migrate, and Copy disks or partitions; convert to local, change label, defragment, check and explore partition; and much more. A premium upgrade adds free tech support and the ability to resize dynamic volumes.
Read More -
It won't hot image your drives or align them, but since it's coupled with a partition manager, it allows you do perform many tasks at once, instead of just cloning drives. You can move partitions around, resize them, defragment, and more, along with the other tools you'd expect from a cloning tool.
Read More
Related Articles
-
8 Fixes: Can't Install Windows on GPT or Windows Cannot Be Installed to This Disk Error
![author icon]() Daisy/2026/06/30
Daisy/2026/06/30 -
5 Blackmagic Disk Speed Test Alternatives for Mac
![author icon]() Oliver/2026/06/30
Oliver/2026/06/30 -
How to Bypass Bitlocker on Lenovo | 5 Easy Ways
![author icon]() Sherly/2026/06/17
Sherly/2026/06/17 -
Windows Was Unable to Complete the Format? Fixed!🔥
![author icon]() Tracy King/2026/07/01
Tracy King/2026/07/01


