Page Table of Contents
About the Author
Hot Topics
Updated on Jan 29, 2026
| Workable Solutions | Step-by-step Troubleshooting |
|---|---|
| Run Fdisk on Windows 10/11 | #1. Open Fdisk via Command Prompt...Full steps #2. Open Fdisk via Run Prompt...Full steps |
| Fdisk a Drive on Windows 10/11? | #1. Create a Primary Partition...Full steps #2. Format a Hard Drive Partition...Full steps #3. Extend a Partition...Full steps #4. Delete All Volumes...Full steps |
| Beginners' Choice: Use EaseUS Partition Master for Disk Partitioning | Step 1. Check for free space. To divide a disk partition into multiple ones, you must ensure that there...Full steps |
Do you want to learn how to run fdisk on Windows 10/11? If yes, then you are landed on the right page. Today, we will give you detailed information regarding fdisk, its uses, and other relevant information. Before going to the in-depth guide, it's necessary to know why fdisk is essential for Windows users? The answer is pretty simple! As fdisk is a utility, this is especially useful for formatting or preparing a hard disk drive to hold data. It helps partition the disk to separately install your OS on one drive and other necessary things on different drives.
What Is Fdisk?
When it comes to fdisk, it's a simple command-line utility that offers a disk-partitioning feature on Windows. The tool was launched in the early days of Windows to manage partitions from the command line and was mainly aimed at IT admins. The tool allowed users to create partitions, add or remove spaces from it, organize storage space on new drives, format, re-organize old drives, etc.
However, one of the most significant drawbacks of the tool was it can't manage storage sizes more than 64-GB storage. That was a huge problem, especially for server-side management and the backup servers. It forced users to split their backup files into smaller chunks or have a smaller partition size.
Most people now have a terabyte of storage space on their PC in modern times. That is where the DISKPART tool comes into the picture.
Diskpart is the perfect successor, which replaces the fdisk in serving Windows users to partition disks and creating use of disk space on Windows 10 and even the latest Windows 11. It can manage not only larger disk sizes but also offers more features and stability.
Fdisk is outdated and unavailable for modern platforms such as Windows 10 and Windows 11. Instead, you can use the diskpart tool to achieve the same and even more than fdisk.
Next we will share several ways to run Fdisk on Windows 10/11, if you think this passage is helpful, you can share it to other people in need.
How to Run Fdisk on Windows 10/11?
Since fdisk has drawbacks and is not available for Windows 10/11, we will have to use the diskpart tool. Here is our step-by-step guide to help you o if you are new to this.
If you want to learn how to open fdisk on Windows 10/11, you can do it in two different ways, via Command Prompt and Run Prompt. Follow the steps below to open fdisk on Windows 10/11 in two other methods.
#1. Open Fdisk via Command Prompt
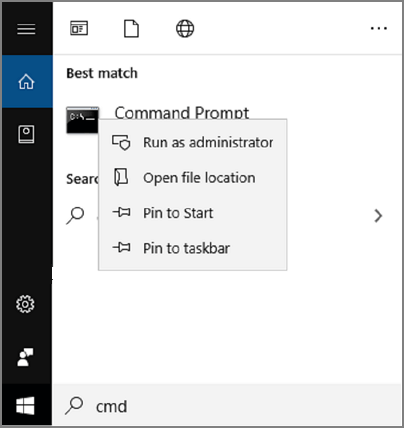
Step 1: Type Command Prompt near the Windows Start button search bar and run as administrator; this will open the Command prompt window.
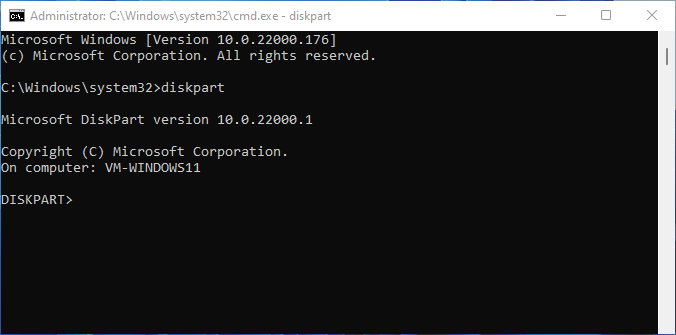
Step 2: Now type diskpart on the Command Prompt window and press Enter. It will open the diskpart window.
#2. Open Fdisk via Run Prompt
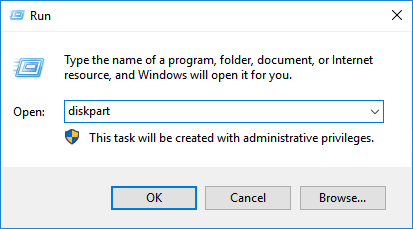
Step 1: Near the Windows Start button search bar, type Run and press the Enter button. You can also use Windows + R to open the Run prompt.
Step 2: Type diskpart and press Enter. You will be prompted by the UAC. Click on the Yes button to open Diskpart directly into the command prompt
How Do I Fdisk a Drive on Windows 10/11?
When managing a hard drive on Windows 10/11 using diskpart commands, we will provide the four best methods to guide you, so follow all the steps perfectly.
Let's discuss more on those four methods
#1. Create a Primary Partition
To create a primary partition with the help of diskpart, follow the exact steps given below.
Step 1: Press Windows + R simultaneously, and type cmd. Then use Shift + Enter key to launch with admin permission.
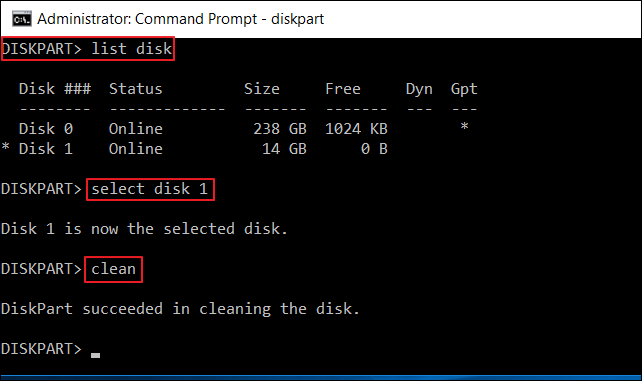
Step 2: On the Command Prompt window, type diskpart and press Enter. It will open the diskpart window, where you have to type list disk to see all the partitions of your system.
Step 3: Now type select disk (number) to select the desired drive. If you have any existing partitions, you can use the command clean to remove all the partitions and data from the drive. If it's a fresh drive, then you can skip. It comes in handy if you need to re-set up an old drive.
Step 4: Now type create partition primary size=*and press Enter. Next, type format override fs=NTFS and press the Enter key.
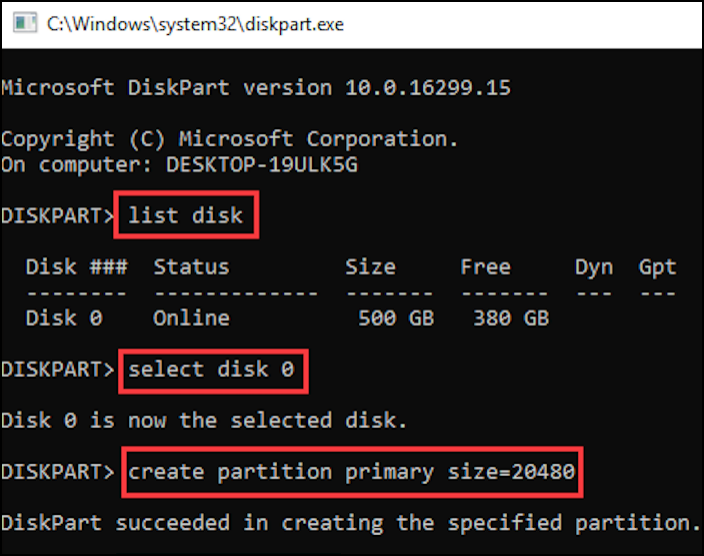
Note:
- Replace * with the size of the primary partition you have in mind.
- Format override helps to remove any permission error that might show up. You can also use format.
- The label option allows you to add the name of the primary partition. It's optional.
Step 5: Now type list volume, which will show you all volumes available in the storage device. Now type select volume (number) to select the newly labeled volume.
Replace (number) with the digit shown in the list volume.
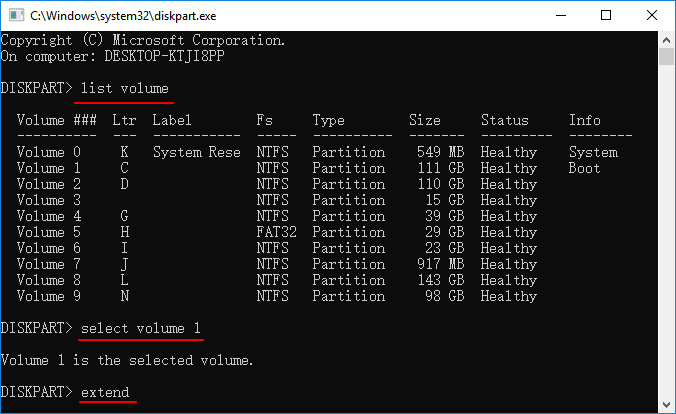
Step 6: Now type assign letter=X to assign the new letter to the volume. For example, assign letter=D, again type list volume, now you can see the new assigned or newly created partition.
#2. Format a Hard Drive Partition to NTFS/FAT32
To format a hard drive partition to NTFS/FAT32 with the help of diskpart, follow the steps given below.
Step 1:Press Windows + R simultaneously and type cmd, right-click Command Prompt, and click Run as Administrator; now type dispart and press the Enter button. Click yes to allow diskpart to run on Windows as Admin. Now it will open the diskpart window.
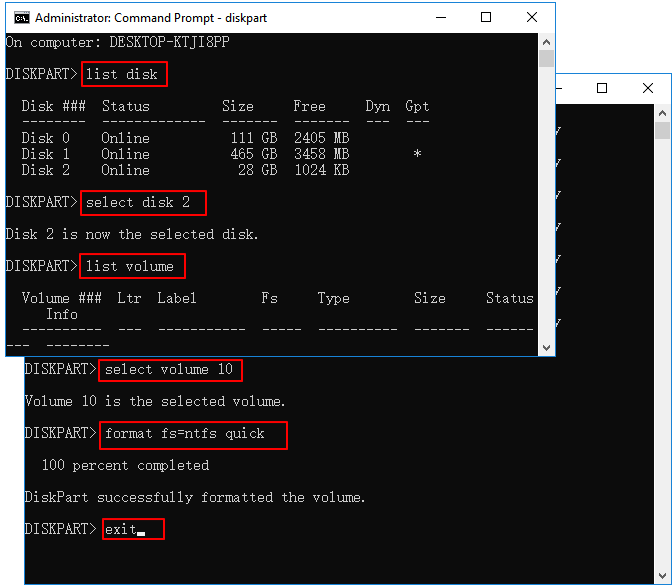
Step 2: Now type the following commands in sequence and press the Enter key after each.
- diskpart
- list disk
- select disk number (the number represents the disk number)
- list partition (to get how many partitions are on the chosen disk)
- select partition number (number the represents the partition number)
- format fs=ntfs quick
Step 3: After completing the process, type exit to close the diskpart window.
#3. Extend a Partition
To extend a partition with the help of diskpart, follow the exact steps given below.
Step 1: Right-click on the Windows icon and select Search; now type cmd and press the Enter key. Now type diskpart and press Enter. Click Yes to open diskpart.
Step 2: Now follow the given command below and press Enter each time.
- list volume
- select volume 1 (replace the disk number of your system accordingly)
- extend

#4. Run Windows 10/11 Fdisk to Delete All Volumes
You can use diskpart to delete all partitions from your system or reset the hard drive, follow the exact steps given below.
Step 1: Press Windows + R keys simultaneously and type cmd, right-click Command Prompt and click Run as Administrator; now type dispart and press the Enter button. Click yes to allow diskpart to run on Windows as Admin. Now it will open the diskpart window.
Step 2: On the diskpart window, now type list disk and press the Enter button. It will show all the disks number.
Step 3: Select disks one by one and hit the Enter button; it will show you the disk number is now the selected disk; then type clean all and press the Enter button.
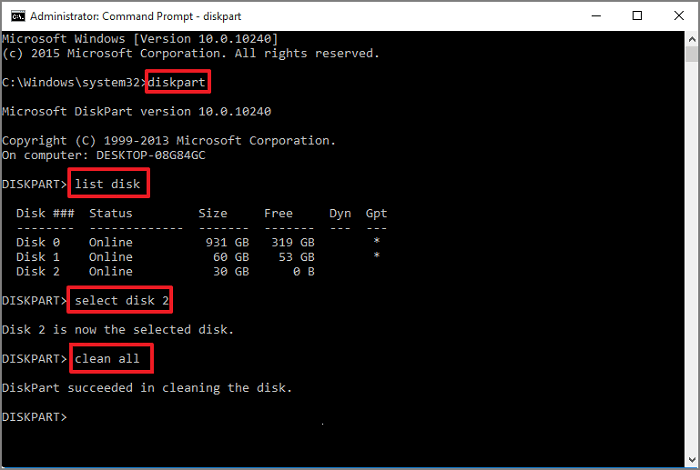
Step 4: When the process finishes, type exit to close the diskpart window.
Beginners' Choice: Use Fdisk Alternative Tool for Disk Partitioning on Windows 11/10
Suppose you are a beginner and don't have computer technical knowledge. In that case, we recommend that you use the EaseUS Partition Master as a perfect fdisk alternative software that can quickly and safely replace fdisk and diskpart in managing disk partitions. Let's know more about the features and functions of this tool.
Step 1. Launch EaseUS Partition Master to check for free space at the Partition Manager section.
- If your hard drive has unallocated space, jump to Step 3 to create partition.
- If the hard drive has no unallocated space, continue with Step 2.
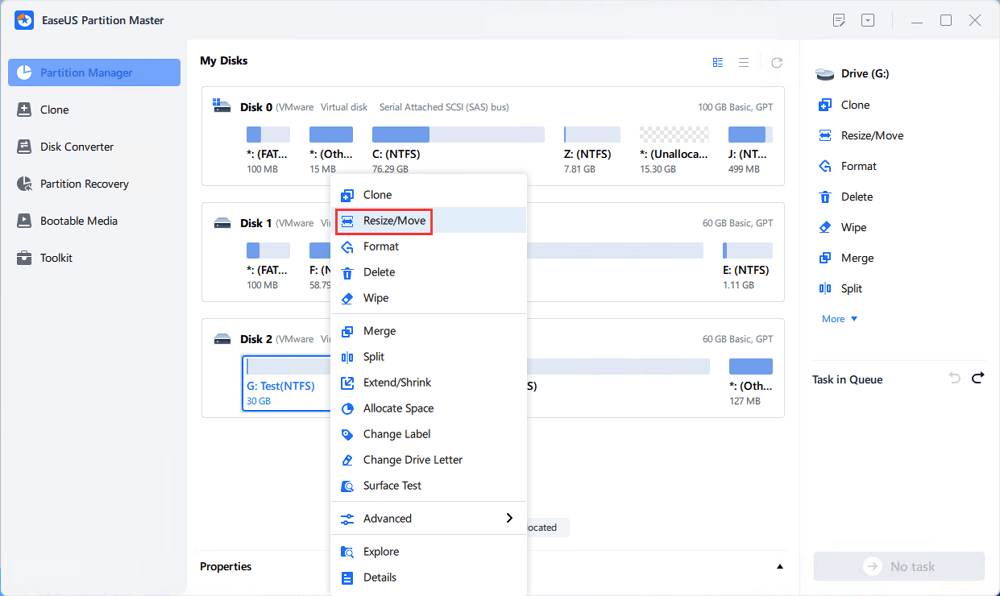
Step 2. Shrink a disk partition to create unallocated space.
Right-click on the target drive partition with a lot free space and select "Resize/Move".
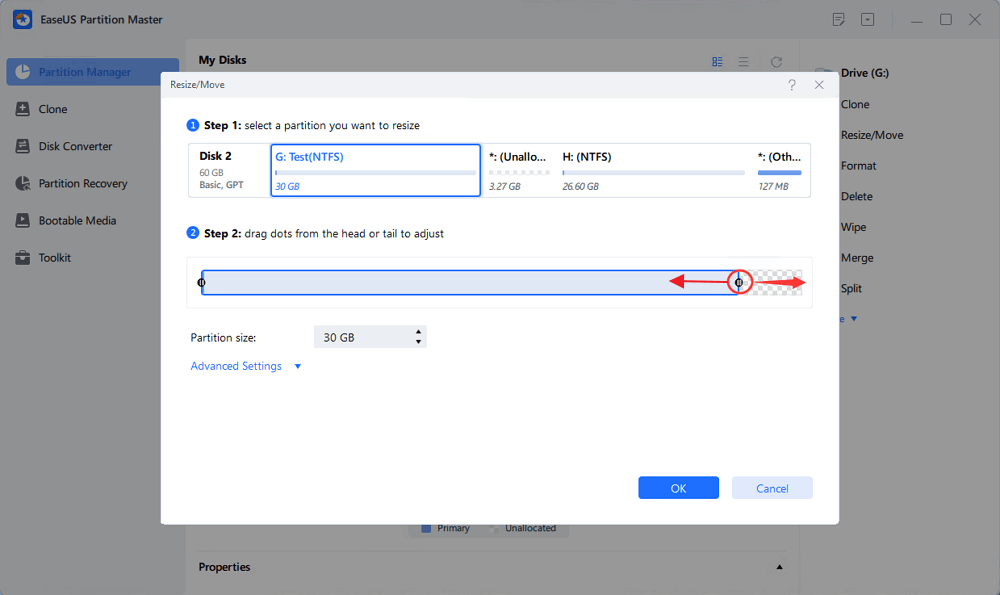
Drag either end of the partition rightwards or leftwards to shrink the partition size so as to get ample unallocated space. You can visually know how much space you've decreased in the "Size of partition" area. Click "OK".
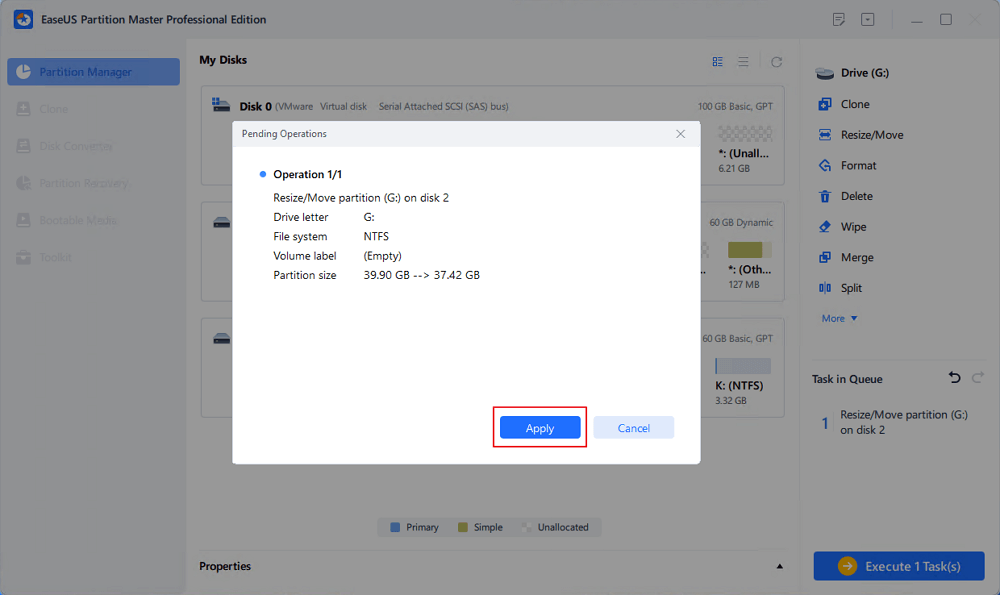
Click "Execute xx Task" and then "Apply" to save all the changes.
Go back to Partition Manager, there should be unallocated space appearing on the same disk and you can continue with the next step to create new partition on your hard drive.
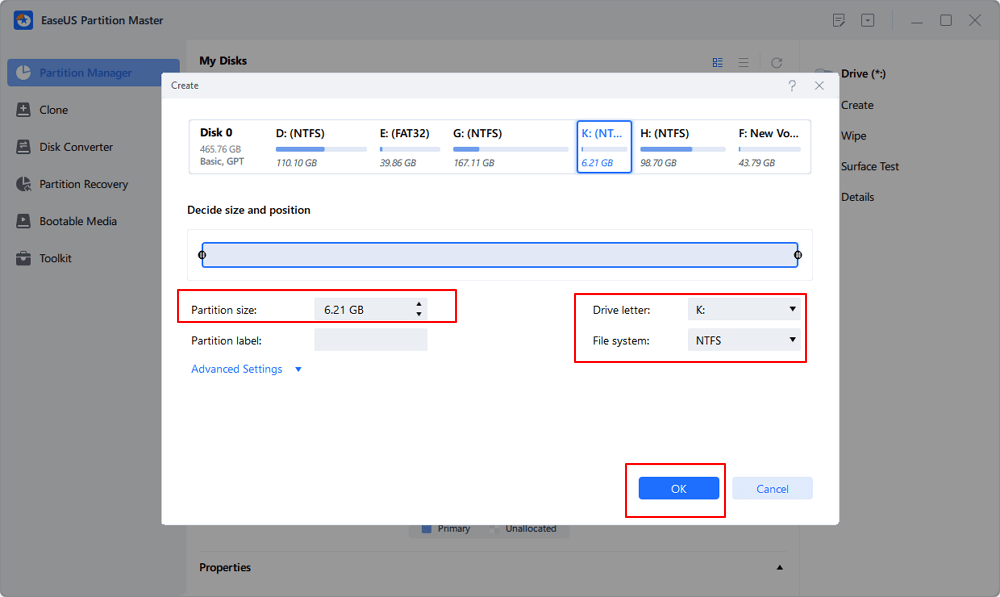
Step 3. Create a new partition with unallocated space on the target hard drive.
Right-click on the unallocated space and choose "Create".
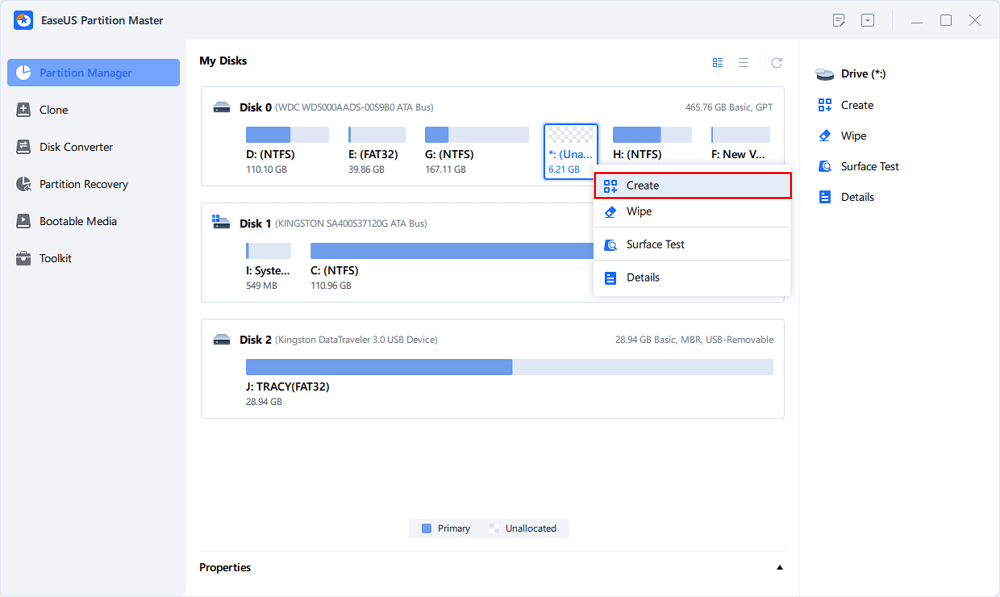
Customize the partition size, partition drive letter, partition label, file system (NTFS, FAT32, EXT2/3/4, exFAT) and more in the Advanced Settings. Click "OK".
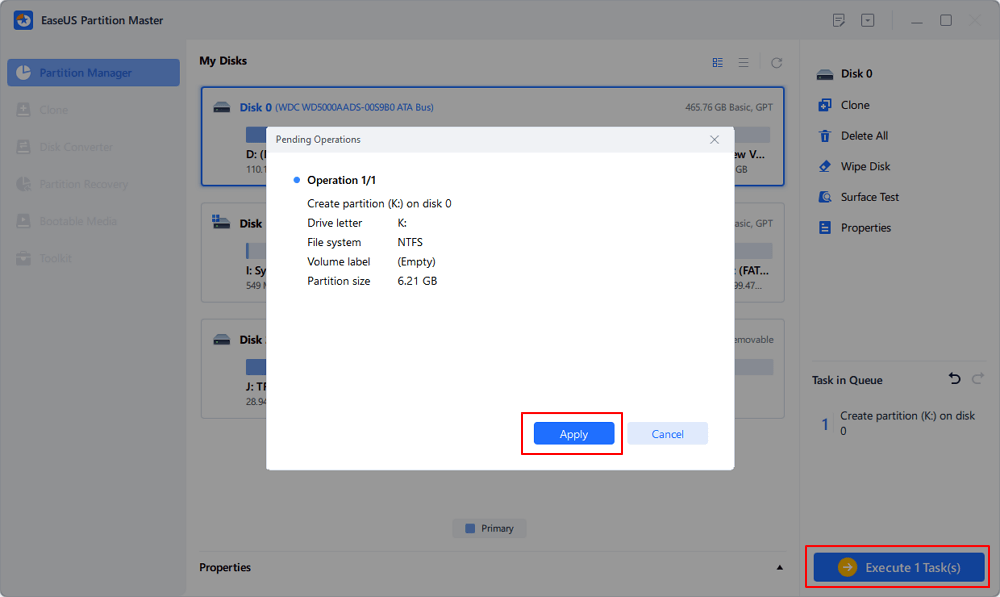
Finally, click "Execute * Task" and "Apply" to complete creating partition with the unallocated space on your disk. Repeat the steps to partition a hard drive and get many more partitions.
EaseUS Partition Master tool is one of the top-rated professional partitioning tools, which comes with several unique features like
- Migrate Windows 10/11 to a new SSD in just one click.
- Handy to extend or manage partitions in Windows 10/11.
- Combine two SSD into one without any data loss.
Some of the advanced features of EaseUS Partition Master
- Resize/Move Partitions
- Clone/Create/Format/Delete Partitions
- Copy Disk/Partition
- Migrate OS to SSD
- Dynamic Volume Management
- Partition Recovery
Fdisk Is No Longer An Efficient Way for Disk Partitioning | You Have a Better Choice
If you have been following the post till now, no doubt you have in-depth knowledge about the fdisk/diskpart and its uses. Diskpart is the ultimate alternative tool for every Windows user to replace fdisk on Windows 10/11. However, this is not the best and safest way of disk partitioning for beginners with no technical knowledge. We recommend you use the most reliable third-party tool, none other than EaseUS Partition Master, as it is safer and easier to manage with the slightest chance of any data loss.
How Can We Help You
About the Author
"I hope my articles can help solve your technical problems. If you are interested in other articles, you can check the articles at the bottom of this page. Similarly, you can also check my Twitter to get additional help."
Written by Tracy King
Tracy became a member of the EaseUS content team in 2013. Being a technical writer for over 10 years, she is enthusiastic about sharing tips to assist readers in resolving complex issues in disk management, file transfer, PC & Mac performance optimization, etc., like an expert.
Product Reviews
-
I love that the changes you make with EaseUS Partition Master Free aren't immediately applied to the disks. It makes it way easier to play out what will happen after you've made all the changes. I also think the overall look and feel of EaseUS Partition Master Free makes whatever you're doing with your computer's partitions easy.
Read More -
Partition Master Free can Resize, Move, Merge, Migrate, and Copy disks or partitions; convert to local, change label, defragment, check and explore partition; and much more. A premium upgrade adds free tech support and the ability to resize dynamic volumes.
Read More -
It won't hot image your drives or align them, but since it's coupled with a partition manager, it allows you do perform many tasks at once, instead of just cloning drives. You can move partitions around, resize them, defragment, and more, along with the other tools you'd expect from a cloning tool.
Read More
Related Articles
-
How to Combine Two SSD Drives [Complete Guide in 2026]
![author icon]() Brithny/2026/01/29
Brithny/2026/01/29 -
How to Repair C Drive [5 Proven Ways]
![author icon]() Cici/2026/01/29
Cici/2026/01/29 -
How to Convert FAT32 to NTFS Windows 10 Without Losing Data in 3 Ways
![author icon]() Tracy King/2026/01/29
Tracy King/2026/01/29 -
Windows 10 Booting From Wrong Drive - Fix Easily
![author icon]() Sherly/2026/01/29
Sherly/2026/01/29
Hot Topics
EaseUS Partition Master

Version 20.0 is here - full exFAT support, easier disk partitioning, and PC performance optimization.


