Featured Articles
- 01 UEFI VS BIOS: What is difference between BIOS and UEFI
- 02 How to Tell If Windows Is Using UEFI or Legacy
- 03 How to Convert MBR to GPT for Windows 11
- 04 Tips to Enable or Disable UEFI Mode
- 05 Troubleshooting 1: Remove UEFI NTFS Partition (EFI Partition)
- 06 Troubleshooting 2: Fix UEFI Boot on Windows 11/10
- 07 Troubleshooting 3: Repair UEFI Bootloader for Windows 11
- 08 Troubleshooting 4: Create UEFI Bootable USB
- 09 Bonus Tip: Clone UEFI Disk to SSD without Boot Issue
- Important
- Microsoft has officially announced that Windows 10 support will end on October 14, 2025. After this date, the system will no longer receive security updates, bug fixes, or technical support.
How to delete EFI system partition? Deleting the EFI system partition (ESP) is generally not recommended since it's crucial for the boot process in UEFI-based systems. Deleting it can lead to the system being unbootable. However, if you have an extra, unused EFI partition on a secondary drive and want to free up space, you can delete it using Diskpart.
Usually, you can easily delete a partition in Disk Management. But you can't delete the EFI system partition in Disk Management because Windows protects it from being deleted by accident and the "Delete Volume" option is grayed out. Luckily, this post covers two other tools to help you remove the EFI system partition, including DiskPart and EaseUS Partition Master.
- DiskPart is a powerful tool that can delete EFI efficiently. However, it requires a computing background, or during the deletion, you are apt to lose data since there is no undo option or preview feature.
- For beginners, EaseUS Partition Master is an easier option with a clear interface and timely prompts.
Can I Delete EFI Partition?
So, can I delete the EFI partition? Things will be different depending on where the EFI partition is: EFI on a USB installation drive: Yes, it can be deleted after installation is complete.
- EFI on a second hard drive (not the boot disk): Yes, if your system boots from another EFI on the main drive.
- EFI on the system disk (the one used to boot Windows): No, deleting this will make your system unbootable.
- EFI used by dual-boot system (Windows + Linux): No, unless you've removed the second OS and confirmed it's unused.
- Leftover EFI from a previous OS after clean install: Yes, if another valid EFI handles your current boot.
What happens if I delete the EFI partition? If you delete an in-use EFI partition, your system won't boot. If unused (like on a USB or second drive), it's safe. Check the notice below to learn how to verify if the EFI partition is in use.
Share this post and let more users learn how to verify if they can delete an EFI partition.
- Notice:
- Open Command Prompt as Administrator, and type the command: bcdedit /enum firmware; then, look at the "device" and "path" fields, and you can see which EFI partition you are using.
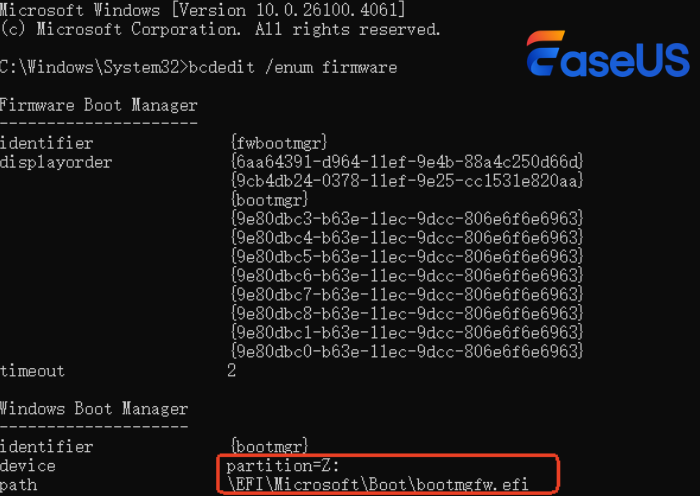
Before deleting the EFI system partition, make sure you have backed up important data and confirmed it's not in use.
- Back up important data: Deleting a partition is a destructive process. Back up any important data on the drive before proceeding.
- Confirm it's not in use: Ensure the ESP is not used by other operating systems or applications. (As the picture shows)
PAGE CONTENT:
How to Remove/Delete EFI Partition
What Is EFI System Partition (ESP)
Why Need to Delete EFI System Partition (ESP)
How to Delete EFI Partition [2 Methods]
There are two methods available for users who want to delete the EFI system. One is to delete it with the Windows built-in tool, Diskpart, and the other is to apply a simple third-party tool, EaseUS Partition Master. To delete EFI partition without losing data, make sure you have backed up the ESP files in advance.
Method 1. Remove EFI Partition with Diskpart
Deleting the EFI partition on a Windows system is generally not recommended and can render your computer unbootable. The EFI partition contains the boot files necessary for your computer to start up. If you really need to delete it, you can use diskpart in Windows, but be very careful and ensure you have a backup or recovery plan in place. As a command-line utility, DiskPart is sort of complex for average users to apply. Please be very careful while following the below command lines:
Step 1. Open DiskPart on your PC.
- 1. Hit "Windows Key + R" to open the run dialogue box.
- 2. Enter diskpart and click "OK" to open a black command prompt window.
Step 2. Delete the EFI partition using the command line.
Type the below command lines and hit Enter each time:
- "list disk" (It displays all the disks of your computer. )
- "sel disk 0" (It identifies which disk you need to work with. Here, 0 stands for the disk letter.)
- "list partition" (It displays all partitions and EFI system partitions on the selected disk.)
- "sel partition 1" (Select the EFI partition that you want to delete. Here, 1 stands for the volume number of EFI.)
- "list partition" (It displays all the volumes on the hard drive.)
- "sel partition 1" (It identifies which partition you want to remove. Here, 1 stands for the volume letter.)
- "delete partition override" (It removes the EFI partition from the Windows disk.)
Step 3. Complete the EFI partition deletion process.
Finally, type "exit" to close the windows when you receive the message that says, 'DiskPart successfully deleted the selected partition'. And you can also use Diskpart force delete partitions.
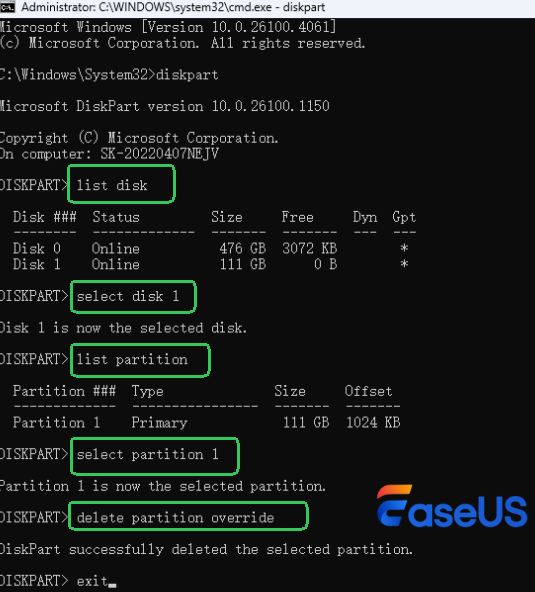
This is how to delete EFI partition using the command line. If you run into any boot error after deleting the EFI partition, create a bootable USB and recover the EFI partition.
Diskpart commands can be helpful in dealing with disk partition issues, so share this way to help those facing the same issues.
Video Tutorial: How to Delete EFI System Partition (ESP) on Windows 10
- This tutorial explains how to remove EFI system partition on your hard drive with Command Prompt.
- How to use Command Prompt to remove EFI partition - 01:15~03:12
Method 2. Delete EFI Partition Using EaseUS Partition Manager
Besides DiskPart, third-party partition manager software works more flexibly and reliably in dealing with this issue. Professional partition manager software - EaseUS Partition Master simplifies the process of deleting EFI partitions in Windows as easily as 1-2-3.
- ✔️Support Windows 11/10/8/7
- ✔️Easier to use with a clear interface
- ✔️Doesn't require any command line during the process
Now download EaseUS Partition Master and learn the detailed guide.
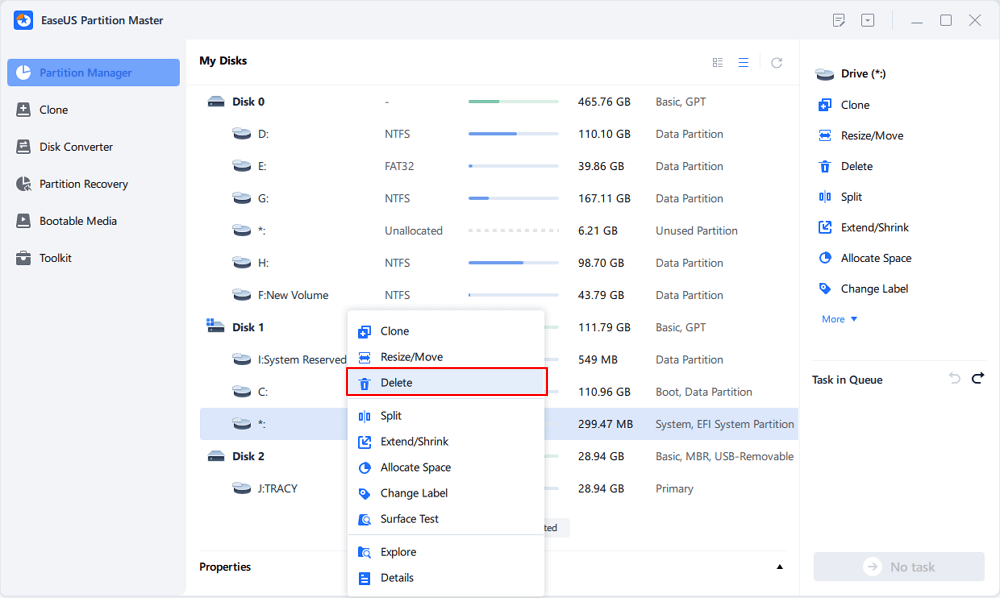
Step 1. Launch EaseUS Partition Master, on the Partition Manager section, right-click on the EFI system partition and choose "Delete".
Step 2. Click "Yes" to confirm the message "Do you want to delete the selected partition?".
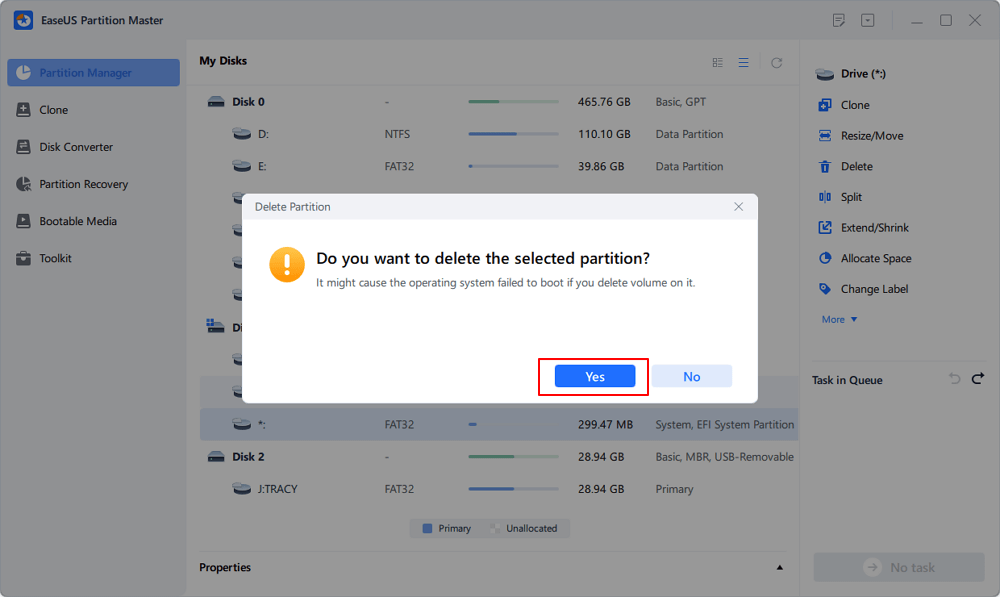
Note that this opertion will delete the EFI/UEFI partition, which may cause OS boot issue. Make sure you want to execute the operation.
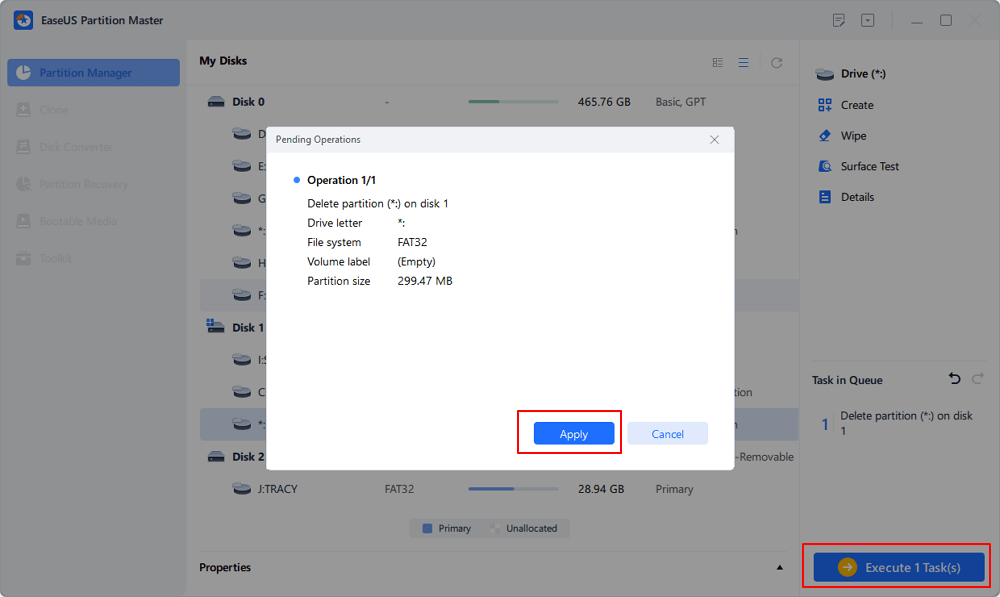
Step 3. Click "Execute 1 Task" and then "Apply" in the new window to completely remove the EFI system partition.
What Is EFI System Partition (ESP)
Let us figure out what is EFI. EFI partition, also known as EFI system partition, short for ESP, is automatically generated when you successfully install Windows OS on a GPT disk in your computer. It takes about 100M or 200MB or so with no drive letter. Normally, you may see more EFI system partition on Windows 10.
According to Wikipedia, "EFI system partition (ESP) is a partition on a data storage device which is used computers adhering to UEFI (Unified Extensible Firmware Interface). When a computer is booted, UEFI firmware loads files stored on the ESP(EFI system partition) to start installed operating system and various utilities."
It includes 4 main components:
- Boot loaders
- Device drivers
- System utilities
- Data files

Why Need to Delete EFI System Partition (ESP)
According to Part 1, the EFI partition is like an interface for the computer to boot Windows off. It's a pre-step that must be taken before running the Windows partition. Without the EFI partition, your computer won't be able to boot into Windows.
In a word, EFI system partition deletion will cause the installed system unbootable. Therefore, EFI system partition is usually protected and locked by the Windows operating systems to prevent and avoid accidental deletion. That's why you can't see the EFI partition in Windows File Explorer nor delete it using Windows Disk Management.
- Important
- 1. If you want to keep your Windows OS running smoothly, don't do anything to the EFI system partition.
- 2. If your hard drive is getting full, follow to learn what is taking up space on the hard drive and use the right ways to free up disk space.
- 3. If you installed two Windows systems on your PC and want to delete the ESP, freeing up disk space and just keeping one OS, follow methods in Part 3 for help.
- 4. If you want to delete the EFI partition and install a new Windows OS, you can directly reinstall the OS. The ESP will be automatically removed.
Final Word
When you've successfully deleted the EFI partition on your PC, you can create a new partition with the unallocated space to use as a data partition or add the free space to other existing partitions.
The following video tutorial shows how to partition a hard drive with EaseUS Partition Master. You can learn how to resize a partition, create a partition, and delete the partition.
If you are having some more questions about EFI partitions, you may refer to the below links for help:
Delete EFI System Partition FAQs
Check this part to learn more about EFI system partition and how to remove it safely.
1. Should I delete the EFI partition using third-party software?
Deleting an EFI partition with DiskPart is risky due to its command-line complexity and lack of visual guidance. Tools like EaseUS Partition Master offer a safer, easier solution with a straightforward interface, system protection alerts, and one-click operations—ideal for beginners and advanced users.
2. Why is the Delete option greyed out in Disk Management?
Windows protects system-critical partitions, such as the EFI System Partition (ESP) and Recovery partitions. These partitions are essential for booting or system recovery, so Disk Management intentionally prevents accidental deletion.
3. How to delete the EFI partition with DiskPart?
Here is how to delete EFI partition with DiskPart:
Step 1. Open Command Prompt as administrator: Search for "cmd" in the Windows search box, right-click on "Command Prompt," and select "Run as administrator".
Step 2. Run Diskpart: Type diskpart and press Enter.
Step 3. List Disks: Type list disk and press Enter to see a list of all disks.
Step 4. Select the Disk: Type sel disk
Step 5. List Partitions: Type list par and press Enter to see a list of partitions on the selected disk.
Step 6. Select the Partition: Type sel par partition number (replace partition number with the number of the EFI partition, e.g., sel part 1) and press Enter.
Step 7. Delete the Partition: Type delete partition override and press Enter.
Step 8. Exit Diskpart: Type exit and press Enter.
Was This Page Helpful?
Sherly joined EaseUS in 2022 and she has always loved writing articles and enjoys the fun they bring. She receives professional training here, focusing on product performance and other relative knowledge. She has written over 200 articles to help people overcome computing issues.
Brithny is a technology enthusiast, aiming to make readers' tech lives easy and enjoyable. She loves exploring new technologies and writing technical how-to tips. In her spare time, she loves sharing things about her game experience on Facebook or Twitter.
Related Articles
-
How to Fix RAW External Hard Drive Without Formatting ✔️
![author icon]() Sherly/Jan 29, 2026
Sherly/Jan 29, 2026 -
How to Install MacOS on a New SSD | 3 New Ways
![author icon]() Sherly/Jan 29, 2026
Sherly/Jan 29, 2026 -
Beginner's Guide - Install A New Hard Drive/SSD in Windows 10/8/7
![author icon]() Tracy King/Jan 29, 2026
Tracy King/Jan 29, 2026 -
Solved: Please Wait While We Install a System Update
![author icon]() Cici/Jan 29, 2026
Cici/Jan 29, 2026
