
Content
Page Table of Contents
About the Author
Hot Topics
What is the Unified Extensible Firmware Interface, and what role does UEFI in Windows? On this page, we'll clearly explain to you what UEFI is, what's the difference between UEFI and BIOS boot modes, and how to set up a computer and enable UEFI mode on your own on Windows computers. Don't worry about having UEFI boot issues, and you can also follow the troubleshooting tutorials to fix UEFI errors like an expert.
Go and follow to set up UEFI on your PC now.
In this article, you'll learn:
- What Is UEFI?
- UEFI vs. Legacy BIOS, Which Is Better and What's The Difference?
- How to Set Up UEFI and Use It on Windows 10/11? [Full Guide]
- Troubleshooting: Fix and Get Rid of UEFI Errors
What Is UEFI?
Definition of UEFI
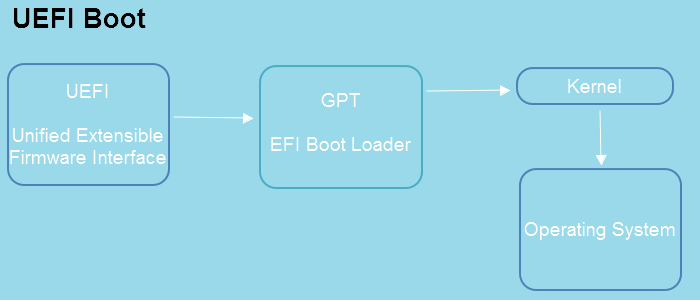
According to Wikipedia, UEFI is a specification that connects the computer's firmware to its operating system. And UEFI is regarded as a successor to replace the traditional BIOS Legacy. UEFI works on the computer's motherboard via a specific firmware, and it's pre-installed while manufacturing.
Why Is UEFI Important and How Does It Work
In a word, UEFI runs first when you try to boot up the computer, and it connects hardware with OS so to allow your operating system to boot up and load hard drive information successfully.
Here is a list that explains how does Operating System process UEFI:
- UEFI is the first program that runs while booting a computer.
- UEFI checks if hardware components are attached.
- UEFI wakes up the components and connects them to the Operating System.
Operating Systems that Support UEFI:
- Windows 11 (Requires UEFI & Secure Boot Only)
- Windows 10 (x64)
- Windows 8.1 (x64)
- Windows 7 (x64)
- Windows Vista SP1 (x64)
- Windows Server 2022 (x64)
- Windows Server 2019 (x64)
- Windows Server 2016 (x64)
- Windows Server 2012 (x64)
- Windows Server 2008 R2 (x64)
- Windows Server 2008 (x64)
Note: Microsoft introduced UEFI for x64 Windows operating systems. So if your computer OS is x86 or 32 bit, you'll need to set the BIOS Legacy boot mode on your computer instead of using UEFI.
History of UEFI:
- Mid-1990: Original EFI came out.
- 1998: EFI was renamed Extensible Firmware Interface.
- July 2005: EFI version 1.10 was contributed to the United EFI Forum, then developed as Unified Extensible Firmware Interface (UEFI).
- January 31st, 2006: UEFI 2.0
- January 7th, 2007: UEFI 2.1
- March 2021: UEFI 2.9 (The latest version)
How Do I Access UEFI Firmware Settings
Note that the UEFI firmware settings are only available on computers with motherboards that support UEFI boot. So how do you access the UEFI firmware settings?
You have two options here:
Option 1: Use F2/F10 or F12 Keys to Access UEFI Settings
- Turn on the computer, press the F2/F10/F12 or Del/Esc key when the Windows logo shows.
- Let the computer enters BIOS settings, and then go to the Boot tab.
There you'll get a clear view of the UEFI firmware settings on your PC. Note that the hotkeys could be different on brands of computers. Here is at a list of hotkeys that you can apply to quickly enter UEFI settings:
- Dell: F2 or F12.
- HP: ESC or F10.
- Acer: F2 or Delete.
- ASUS: F2 or Delete.
- Lenovo: F1 or F2.
- MSI: Delete.
- Toshiba: F2.
- Samsung: F2.
- Surface: Press and hold the volume up button.
Option 2. Access UEFI from Settings
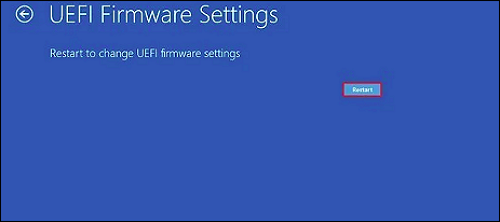
- Open Settings, click "Update & security > Recovery > Advanced startup" and click "Restart now".
- Click "Troubleshoot > UEFI Firmware Settings >Restart".
From the UEFI firmware settings, you can either switch UEFI boot mode to BIOS Legacy or configure the computer to better support UEFI. But what's the difference between UEFI and BIOS, and which is better for you?
Move forward to the next part, and you'll get the answers.
UEFI vs. Legacy BIOS, Which Is Better and What's The Difference?
As you know that BIOS is also called Legacy BIOS, which was older than the UEFI, and now UEFI has surpassed BIOS in many aspects. In this part, we'll show you the difference between these two firmware settings and which is better for you. Also, you'll learn when to use UEFI and when to use Legacy BIOS on your PC.
UEFI VS BIOS, What's the Difference
Similarity:
UEFI does the same job as BIOS. Both of them start up first and connect the operating systems and firmware hardware before loading the OS.
Differences:
From this comparison table, you'll get to learn the major differences between UEFI and BIOS:
| Comparison | UEFI | (Legacy) BIOS |
|---|---|---|
| Boot Procedure | UEFI -> EFI Boot Loader -> Kernel -> Operating System | BIOS -> MBR -> Bootloader -> Kernel -> Operating System |
| Disk Device Compatibility | GPT Disk | MBR Disk |
| Support Drive Size | 8ZB | 2TB |
| Secure Boot | Yes | No |
| Supported Bit Mode |
|
|
| Location of Initialization and Startup Information | In a .efi file on an EFI System Partition | On the firmware |
| Boot Speed | Faster | Slower |
Video Comparison: UEFI VS BIOS
When to Use UEFI? And When to Use BIOS?
Some of you may have a basic idea about whether your computer is suitable to use UEFI boot. Also, it doesn't matter if you don't know when to use UEFI. Here are two lists of situations that help you to understand when to use UEFI and when to use BIOS:
When to Use UEFI:
- OS hard drive is 3TB or larger
- Update OS to the latest Windows 11
- The operating system is 32-bit or 64-bit
- The computer motherboard supports both UEFI and BIOS
When to Use BIOS:
- The hard drive is 2TB or smaller
- The computer motherboard only supports BIOS.
UEFI or Legacy, which is suitable for SSD?
- When you need to install the latest Windows OS on SSD, use UEFI.
- If SSD is less than 2TB, and doesn't for new OS installation, use BIOS for older operating systems.
LEARN MORE
For more details about UEFI and BIOS, you can refer to this page: UEFI VS BIOS: Difference between BIOS and UEFI.
How to Set Up UEFI and Use It on Windows 10/11? [Full Guide]
So how do I set up my computer with UEFI to install Windows 11? Or, can I configure my computer with UEFI mode? Follow the full guide here, and you'll be able to set up UEFI and configure your computer ready for installing the latest Windows operating system or specific purposes:
Guide 1. Confirm If I Need UEFI for Windows 10/11
Before getting started to set up UEFI, it's essential to confirm that you need UEFI for your PC. Let's get started here:
First, Confirm If I Need UEFI
Note that UEFI only supports 64-bit operating systems. So please make sure that your computer is 64-bit. And if you're trying to install the latest Windows 11, you'll need to enable UEFI.
Second, Tell If Windows Is Using UEFI
You can either follow the guide above to access UEFI settings or check system information as shown here to confirm if your computer is using UEFI or BIOS:
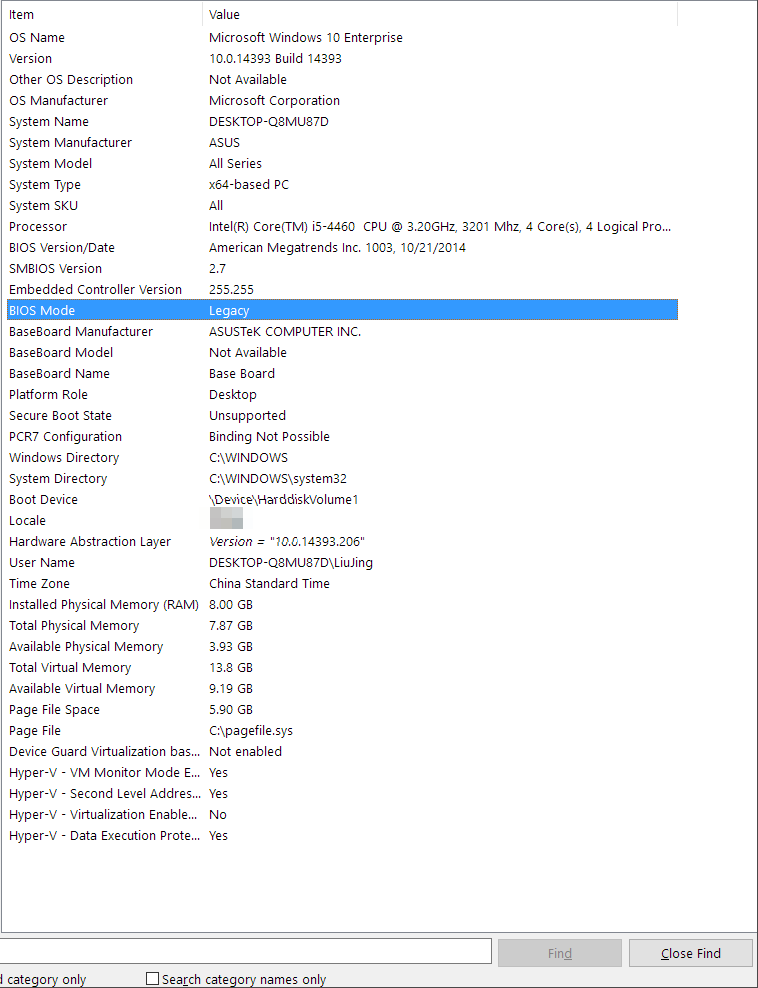
Step 1. Press Windows + R keys, type MSInfo32, and click "OK".
Step 2. Find the BIOS Mode, and you'll see if your operating system is using Legacy or UEFI.
LEARN MORE
Aside from this, the most common way to check Windows boot mode is to reboot the PC and use hotkeys such as F2/F10/F11, etc., to enter the BIOS settings. You can follow this link to learn if Windows Is Using UEFI or Legacy on your PC.
Guide 2. Convert OS Disk to GPT for UEFI Boot
After getting to know your boot mode in Windows, it's time that you take action to check the disk type in Windows. Note that the UEFI boot mode is only compatible with GPT disk type.
It's necessary that you check and configure your OS disk to GPT. Here is how to do so:
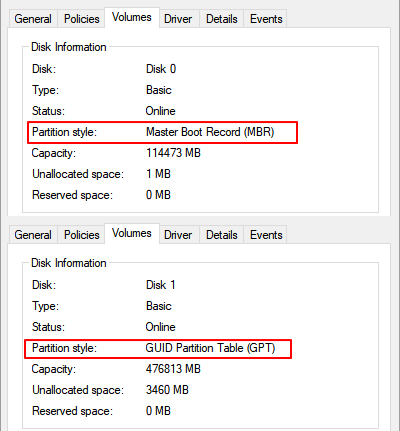
First, Confirm if Windows Is MBR or GPT
You can simply go to Windows Disk Management, right-click the OS disk and select "Properties", then go to the Volumes tab and check the disk type in:
You May Also Like:
Aside from checking disk type in Disk Management, you can also apply EaseUS Partition Master or CMD for help. Follow to learn How to Tell if Windows is MBR or GPT with the other two ways.
If your Windows disk is with MBR, you'll need to convert it to GPT with the next guide here.
Next, Convert MBR Disk to GPT with Third-Party Disk Conversion Software, No Data Loss
Experienced Windows users may know how to convert a disk from MBR to GPT by using Disk Management or CMD command. Though workable, these two methods require deleting all partitions, which will cause serious data loss.
To take care of all your disk data, you can apply third-party disk conversion software – EaseUS Partition Master for help.
Step 1. Install and launch EaseUS Partition Master on your computer.
Step 2. Open the Disk Converter tab, select "MBR => GPT" and click "Next" to continue.
Step 3. Choose the target MBR disk, and click "Convert" to start the conversion.
LEARN MORE
If you prefer a step-by-step guide, follow this link, and you'll learn how to successfully Convert MBR to GPT for Windows 11.
Guide 3. Change BIOS Mode from Legacy to UEFI Windows 10/11
After configuring your OS disk to GPT, it's time that you switch the BIOS mode from Legacy to UEFI. Here are the steps:
Step 1. Restart the PC and press the F2 key to enter the BIOS setup utility.
Step 2. Go to the Boot or System configuration tab, and click "Boot".
Step 3. Under the Boot tab, select "UEFI/BIOS Boot Mode" and hit Enter.
Step 4. Use the up or down arrow to switch the boot mode from Legacy to "UEFI".
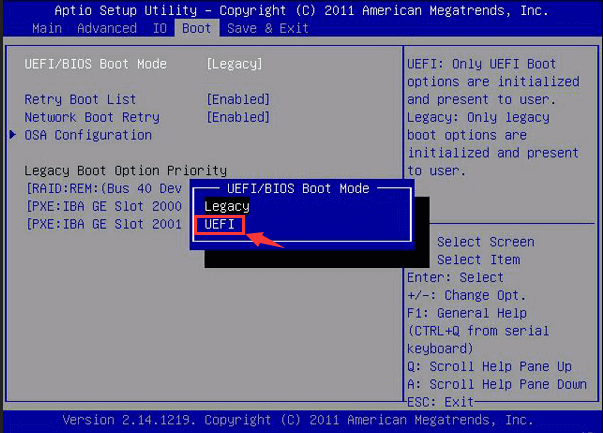
Step 5. Save the changes by pressing F10 and closing BIOS settings.
Bonus Tip:
If you need a full guide to turning on or turning off UEFI boot mode, you may follow this page to learn How to Enable or Disable UEFI Mode.
Note that if you are about to install Windows 11 on your disk, it's also necessary that you turn on the Secure Boot for UEFI Boot Mode.
Step-by-Step Guide:
Bonus Tip: Install Windows 11 on GPT with UEFI
Suppose that you have followed the above 3 guides to complete setting up UEFI mode, it's time that you start installing Windows 11 on your PC. Here are the steps:
Step 1. Download Windows 11 ISO and create a Windows installation media on an empty USB.
Step 2. Reboot the PC and, press F2 to enter BIOS settings, set the computer to boot from the installation USB.
Step 3. Configure Language, Time and currency format, Keyboard or input method, and click "Next".
Step 4. Click "Install Now" and select "I don't have a product key" to continue.
Step 5. Select Windows 11 edition and click "Next".
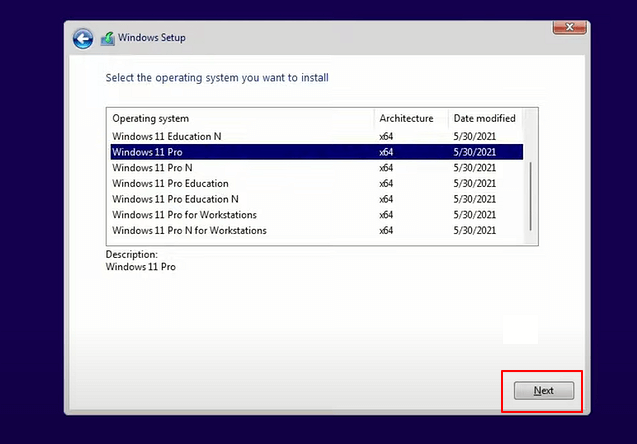
Follow the on-screen guidelines to complete the process.
Complete GUIDE:
If you prefer an even more detailed guide that can assist you in completing Windows 11 installation on the converted GPT disk, please follow this link to learn How to Install Windows 11 on GPT.
Troubleshooting: Fix and Get Rid of UEFI Errors
During the process of setting up UEFI for new Windows operating systems, you may encounter multiple types of UEFI errors happening to your computer. If you are having one of the following listed errors, follow the respective solution to fix them now:
Error 1: Can't Delete EFI Partition
Cause: "Delete Volume" option is greyed out due to the Windows protection mechanism.
Fix: Full Guide to Remove UEFI NTFS Partition (EFI Partition)
Error 2: Windows 11/10 Fails to Boot Because There Is a Problem with the Master Boot Record
Cause: MBR corrupted, UEFI Boot mode is not enabled, more.
Fix: See How to Fix UEFI Boot on Windows 11/10.
Error 3: UEFI Bootloader Gets Corrupted, Windows Won't Be Able to Boot Up
Cause: EFI/UEFI boot loader gets corrupted or damaged.
Fix: Repair UEFI Bootloader for Windows 11
Error 4: Want to Restart Unbootable or Dead Computer with UEFI Bootable Disk
Cause: Computer can't boot due to virus attack, MBR damage, bad sector, or corrupted system files.
Fix: Create UEFI Bootable USB and Fix PC Unbootable Error
If you have further computer boot issues caused by UEFI or other reasons, relax. You can directly customize tech support service to help you fix computer not booting or computer not turning on issues with success.
How Can We Help You
About the Author
Updated by Joey Albert
Joey is an enthusiast of science and technology. With a passion for uncovering the latest tech innovations, she creates clear, engaging how-to guides that make technology accessible and enjoyable for all.
Written by Tracy King
Tracy became a member of the EaseUS content team in 2013. Being a technical writer for over 10 years, she is enthusiastic about sharing tips to assist readers in resolving complex issues in disk management, file transfer, PC & Mac performance optimization, etc., like an expert.
Product Reviews
-
I love that the changes you make with EaseUS Partition Master Free aren't immediately applied to the disks. It makes it way easier to play out what will happen after you've made all the changes. I also think the overall look and feel of EaseUS Partition Master Free makes whatever you're doing with your computer's partitions easy.
Read More -
Partition Master Free can Resize, Move, Merge, Migrate, and Copy disks or partitions; convert to local, change label, defragment, check and explore partition; and much more. A premium upgrade adds free tech support and the ability to resize dynamic volumes.
Read More -
It won't hot image your drives or align them, but since it's coupled with a partition manager, it allows you do perform many tasks at once, instead of just cloning drives. You can move partitions around, resize them, defragment, and more, along with the other tools you'd expect from a cloning tool.
Read More
Related Articles
-
Best Disk Benchmark Software for Mac | Free Download
![author icon]() Sherly/2026/06/17
Sherly/2026/06/17 -
How to Format A USB Drive That Doesn't Show Up
![author icon]() Cici/2026/06/30
Cici/2026/06/30 -
How to Delete FAT32 Partition [Step-by-Step Guide]
![author icon]() Sherly/2026/07/01
Sherly/2026/07/01 -
How to Format Bitlocker Encrypted Drive Using CMD
![author icon]() Cici/2026/06/29
Cici/2026/06/29


