
Content
Page Table of Contents
About the Author
Hot Topics
Quick Fix:
How to fix boot error on Windows 11? To fix a boot issue in Windows 11, you can try booting into the Recovery Environment and running Startup Repair, or using System File Checker (SFC) or Command Prompt commands to fix errors. If those methods don't work, you might need to boot from Windows installation media and use Automatic Repair or attempt a system reset.
UEFI or Unified Extensible Firmware Interface is an extension of firmware that can read from entries from disk partitions and boot Windows, i.e., an interface between the operating system (OS) and the platform firmware. Windows UEFI boot loader is responsible for loading the Windows OS and initializing other devices on the laptop. If the UEFI boot loader gets corrupted or damaged, you will not be able to boot into Windows unless restored.
To fix this problem, all one needs to point to the EFI boot file and copy it to the EFI/ Microsoft/Boot directory. This post looks at various methods that can fix the issue.
| Workable Solutions | Step-by-step Troubleshooting |
|---|---|
| Fix 1. Use Diskpart to Fix UEFI Boot Error in Windows 11 | Navigate to Troubleshoot > Advanced Options > Command Prompt and boot into Recovery Mode...Full steps |
| Fix 2. Repair the computer with Windows install disk/USB | Download the Windows Media Creation Tool and use it to create a bootable USB drive...Full steps |
| Fix 3. Change Boot Mode to UEFI for Windows 11 | Step 1: Open Settings (Win + I), and navigate to Options > Update and Security > Recovery...Full steps |
| Fix 4. Convert from MBR to GPT with EaseUS Partition Master | Step 1. Prepare a disc or drive, like a USB drive, flash drive, or a CD/DVD disc...Full steps |
For those who are not aware of and running an old PC, UEFI is the modern form of BIOS. It offers more security and features. Let's go learn how to rebuild the boot partition on Windows 11.
How to Rebuild Boot Partition on Windows 11
This part introduces four fixes to fix the boot partition in Windows 11. Before getting started, make sure you've read the notice below:
- Boot Order: Ensure your PC boots from the correct drive (usually your system drive).
- Windows Installation Media: You may need a Windows installation USB drive or DVD to access Advanced options.
- Backup: Consider backing up important data before attempting any advanced repairs.
- Hardware Issues: If none of these methods work, there might be a hardware problem (such as a faulty hard drive).
Fix 1. Use Diskpart to Fix UEFI Boot Error in Windows 11
As you cannot boot into Windows, the only way to fix the problem is using Advanced Recovery. You will need a bootable USB drive which you can create on another Windows PC. You can download the Windows Media Creation Tool and use it. Once done, make sure to set the first boot device as a USB drive in your UEFI or BIOS.
Boot into Recovery
Once you boot from the USB drive, it will look like a regular Windows installation. You need to click on the Repair PC option available at the bottom left of the install screen. It will take you the Advanced Recovery. Navigate to Troubleshoot > Advanced Options > Command Prompt
Locate EFI Partition
In the command prompt, type the following commands.
- diskpart
- select disk 0
- list vol
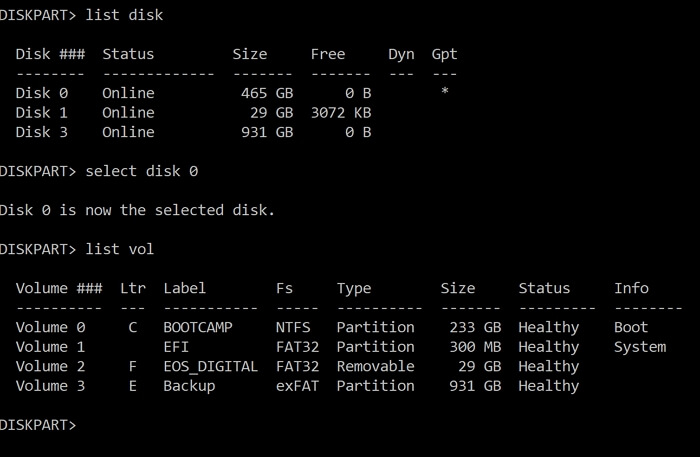
Usually, the EFI partition is available in the first disk, hence the Select Disk 0 command, followed by a list of partitions or volume in the list vol command.
It will display the list of partitions include those which are hidden in the File Explorer. Locate the volume which has EFI labeled on it.
Assign Drive Letter to EFI Partition
The EFI partition is hidden because it doesn't have a drive letter. Further, if you need to perform any operation, a drive letter needs to be assigned. Execute the following to do so.
Assign Drive letter to EFI Partition Select an Image
- select vol
- assign letter
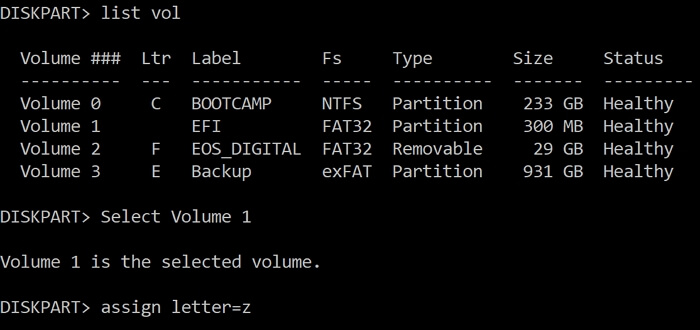
First, select the volume or partition. In this case, the EFI partition or volume number is 2. Next, assign a drive letter that is not already assigned. The best is to choose a random alphabet such as Q or R or anything not on the list.
Type exit, and press the Enter key to close Diskpart tool, and return to Command Prompt.
Fix Boot Record
The next step is to go to the EFI partition and fix the boot record with the help of these commands.
- cd /d
- bootrec /FixBoot
- ren BCD BCD.bak
- bcdboot C:\Windows /l en-us /s x: /f ALL
- bootrec /rebuildbcd
Now that we have replaced the corrupted BCD file with a new one using the BCDBoot command and then rebuilt it using the bootrec command, everything is in place.
All you need to do now is restart the computer, remove the USB, and let Windows boot normally. As you see, Diskpart is a little difficult to use, so share this tutorial to help users without much computing experience.
Fix 2. Repair the computer with Windows install disk/USB
The Windows Advanced Recovery mode offers an automatic repair option that can also fix problems like this.
Create Bootable Media
You can download the Windows Media Creation Tool and use it to create a bootable USB drive. This contains a set of tools that can help you recover PC in case of crashes. Next, plug in the device, and boot your computer using the USB.
Advanced Recovery—Automatic Repair
When the computer boots using the USB, it will look like a Windows installation. When it appears, choose to Repair the PC to boot into Advanced Recovery.
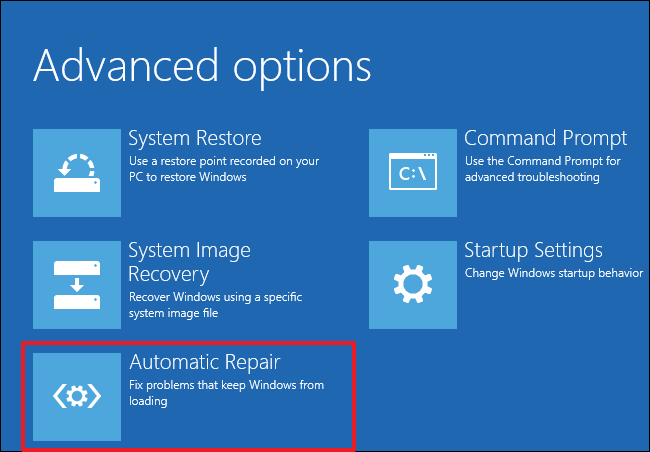
Click on Troubleshoot > Advanced Options > Automatic Repair. It should be able to fix the corrupted EFI Bootloader issue.
Fix 3. How to Change Boot Mode to UEFI for Windows 11
It is possible that you have a UEFI-supported motherboard, but you are still running on Legacy BIOS mode. Windows 11 will not run on older firmware and needs UEFI. That said, it is rather easy to change the boot mode to UEFI.
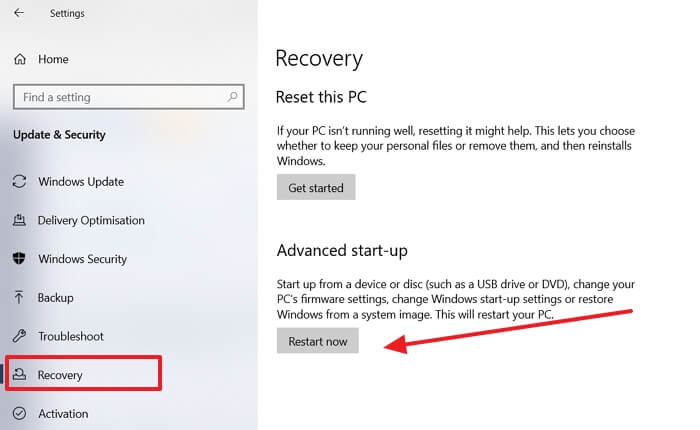
Step 1: Open Settings (Win + I), and navigate to Options > Update and Security > Recovery >Advaned Startup. Click on Restart button.
Step 2: Once you are in Advanced Recovery, click on Troubleshoot > Advanced Options > UEFI Firmware settings.
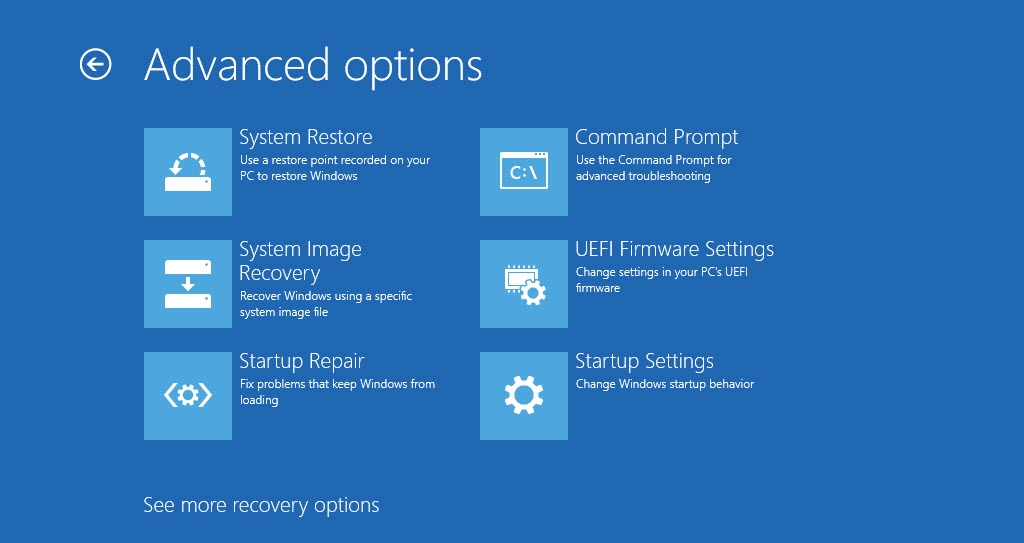
Step 3: Click on the Restart button, and it will take you to the UEFI settings of your motherboard. Make sure to enable recommended settings, and then restart the computer.
Fix 4. Convert from MBR to GPT with EaseUS Partition Master
When using Windows 11, you need to make sure you have GPT based partition instead of an MBR. When upgrading, you will be warned about it. However, the biggest disadvantage of converting using the built-in tool is that it formats all the data. That is where you need to use third-party software.
EaseUS Partition Master is professional software that helps you manage all operations related to Disk management. It can also help you convert an MBR partition to GPT without data loss. Here are the steps:
Step 1. Connect an empty USB flash drive, or a CD/DVD disc to a healthy computer, launch EaseUS Partition Master, click "Bootable Media" and select "Create bootable media". Click "Next" to continue.

Step 2. Choose the USB or CD/DVD and click "Create" to start create the bootable media.

Step 3. Connect the USB with bootable media to your PC and restart the computer from EaseUS bootable media.
Press F2/Del to enter BIOS and set the computer to boot the PC from "Removable Devices" (bootable USB disk) or "CD-ROM Drive" (bootable CD/DVD). Press "F10" to save and exit to restart PC into EaseUS bootable media.
Step 4. Once your PC enter EaseUS Partition Master, go to Disk Converter and select "Convert MBR to GPT". Click "Next" to continue.

Step 5. Select the target MBR disk you tend to convert to GPT and click "Convert" to start the conversion.

Conclusion
The Windows 11 requirements are way different from its predecessors. You may have a PC that you bought recently, and supports UEFI and GPT, but do not know how to enable and convert without data loss. Using professional software such as EaseUS Partition Master, you can do it in few clicks. However, always make sure you take backup.
FAQs About Rebuilding Boot Partition Windows 11
1. How to fix boot errors on Windows 11?
To fix boot in Windows 11, follow the common methods and detailed instructions:
1. Startup Repair:
- Restart your computer 3-5 times to force it into the Recovery Environment.
- Navigate to Troubleshoot > Advanced options > Startup Repair. Follow the prompts to let Windows scan and fix any problems.
2. SFC/DISM (Recovery Environment):
Access the Command Prompt from the Recovery Environment.
Run sfc /scannow /offbootdir=c:\\ /offwindir=c:\\windows to scan and repair system files offline.
3. CHKDSK:
In the Recovery Environment, open Command Prompt:
Run chkdsk C: /f to check and repair errors on the C drive (or your primary drive).
4. Automatic Repair:
- Boot from your Windows installation media.
- On the Windows Setup screen, select "Repair your computer".
- Navigate to Troubleshoot > Advanced options > Automatic Repair.
5. System Reset: If other methods fail, try a system reset from the Recovery Environment.
6. Bootrec (Advanced):
Boot from your Windows installation media and access Command Prompt.
Run commands:
- bootrec /fixmbr
- bootrec /fixboot
- bootrec /rebuildbcd
7. BIOS/UEFI Settings: Check your BIOS/UEFI settings for any issues related to boot order or security settings.
2. What is the Recovery Environment?
The Recovery Environment (often referred to as Windows Recovery Environment or Windows RE) is a special, lightweight version of Windows that includes tools to help diagnose and repair common issues with your operating system.
3. What is the boot partition on Windows?
The boot partition in Windows holds the operating system files, usually on the C: drive. It's where Windows runs from. Separate from this is the system partition, which contains boot files needed to start Windows. It’s typically hidden and created automatically during Windows installation to manage startup processes.
How Can We Help You
About the Author
Sherly joined EaseUS in 2022 and she has always loved writing articles and enjoys the fun they bring. She receives professional training here, focusing on product performance and other relative knowledge. She has written over 200 articles to help people overcome computing issues.
Written by Tracy King
Tracy became a member of the EaseUS content team in 2013. Being a technical writer for over 10 years, she is enthusiastic about sharing tips to assist readers in resolving complex issues in disk management, file transfer, PC & Mac performance optimization, etc., like an expert.
Product Reviews
-
I love that the changes you make with EaseUS Partition Master Free aren't immediately applied to the disks. It makes it way easier to play out what will happen after you've made all the changes. I also think the overall look and feel of EaseUS Partition Master Free makes whatever you're doing with your computer's partitions easy.
Read More -
Partition Master Free can Resize, Move, Merge, Migrate, and Copy disks or partitions; convert to local, change label, defragment, check and explore partition; and much more. A premium upgrade adds free tech support and the ability to resize dynamic volumes.
Read More -
It won't hot image your drives or align them, but since it's coupled with a partition manager, it allows you do perform many tasks at once, instead of just cloning drives. You can move partitions around, resize them, defragment, and more, along with the other tools you'd expect from a cloning tool.
Read More
Related Articles
-
How to Shrink Volume with Unmovable Files - 2 Ways
![author icon]() Sherly/2026/06/17
Sherly/2026/06/17 -
How to Check Disk Read/Write Speed on Mac | SSD/HDD
![author icon]() Sherly/2026/06/30
Sherly/2026/06/30 -
How to Fix Kingston SSD Not Detected
![author icon]() Cici/2026/06/29
Cici/2026/06/29 -
How to Format to FAT32 in Windows 10 [Step by Step Guides]
![author icon]() Daisy/2026/06/30
Daisy/2026/06/30


