
Content
Page Table of Contents
About the Author
Hot Topics
Updated on Jun 30, 2026
UEFI (Unified Extensible Firmware Interface) is a modern method of BIOS, which allows a system to boot up faster while enabling advanced capabilities and better hardware support. However, some operating systems do not support UEFI and require Legacy Boots instead. For such instances, you need to Disable UEFI Mode. Configuring UEFI Mode can be done via Command Prompt in the Boot Manager screen.
Secure Boot is a security feature in UEFI systems to prevent unauthorized software from running when your PC boots up. Secure Boot is an important security feature, and without it, malware could be potentially injected into your machine. If that happened, it could pose a real threat to you or your company. The problem is that some graphics cards, hardware, and operating systems refuse to play nicely with Secure Boot. If you're having trouble booting Windows under Secure Boot, here's how you can disable it from within Windows.
What Is UEFI?
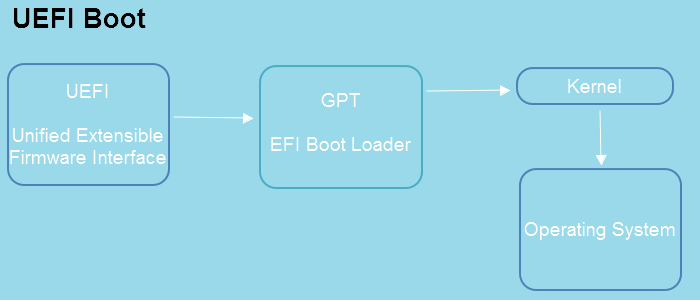
UEFI (Unified Extensible Firmware Interface) is a standard firmware interface for newer PCs - and is primarily responsible for initializing and starting an x86 computer. UEFI takes care of all input/output-related operations. It also offers a program interface, called EFI Application Programming Interface (EAPI), primarily intended to improve software development by promoting hardware independence and reuse. UEFI replaces the Basic Input/Output System firmware interface used in older PCs, which only supports 16-bit computers with BIOS.
UEFI mode provides you with expanded options to control how your computer boots up. With UEFI, you can choose which devices are activated when you start your computer. For example, you can disable the USB ports if you do not want them active at startup.
It provides a Graphical User Interface (GUI) that allows users to "mouse" or navigate easily through the hardware configuration. Providing various graphics and text mode capabilities and unique features that make it easier to manage computers in large-scale computing environments such as network management, resetting, or updating firmware on thousands of devices in seconds.
Compared to the formerly-used BIOS systems, UEFI systems present several enhancements intended to increase performance, reduce boot times, and open support for additional hardware such as solid-state drives.
UEFI-enabled PCs can boot more quickly and resume faster. UEFI is more secure as it requires a password and other features that help block malware. However, due to the standardization, UEFI brings changes to how you access configuration settings. On old BIOS-enabled PCs, you could enter system setup by pressing "Delete" during system boot. On new UEFI-enabled PCs, this option has turned into "F2".
When Should UEFI Boot be Enabled or Disabled
By default, UEFI mode should be enabled until specific issues arise.
It provides better security, simpler interfaces, better performance, and many other enhancements compared to legacy BIOS. When enabled, UEFI enables computers to use larger random access memory partitions for more advanced and more improved performance.
It optimizes system performance and saves battery life with its intelligent power management tools. This has made it the standard for notebooks and ultrabooks used in corporate settings, government agencies, and educational institutions.
UEFI or BIOS, which to use may seem like a confusing question? But it is usually easy to decide. If you want to dual-boot your machine and switch between multiple OS with a mouse (Windows, Linux, Mac) then choose UEFI. If you are someone who prefers a keyboard and text-based UI over navigation with a mouse and GUI, then BIOS is for you.
UEFI mode is a required setting for new motherboards since it supports a GPT disk partitioning scheme. Typically you should not disable this mode and change it into legacy mode. If you have set up your computer to boot from UEFI, you should not change it. However, if you have made several changes in the BIOS configuration, maybe by accident, or are unsure how to configure settings correctly, it's better to switch over into legacy mode to not damage your data.
How to Enable UEFI Boot Mode
UEFI Mode aims to make it simple and easy to upgrade to Windows 11. Windows 11 offers many more features than previous versions, of course. Windows 11 supports all of the earlier OS features and some exciting new upcoming features that make it very user-friendly. With UEFI Mode, upgrading Windows will be faster and easier than ever before. features
If you are planning to upgrade to the upcoming Windows 11, UEFI mode will likely be mandatory. Microsoft has showcased a glimpse of Windows 11 a while back. According to the displays, UEFI mode is now mandated to run all Windows 11 OS.
1. Convert OS Disk to GPT First
GPT (GUID Partition Table) is the newest partition style. MBR (Master Boot Record) is the oldest partition style. Usually, computers using Windows XP, Vista, and Windows 7 are MBR-based, and as a result, their disk is MBR. If you want to upgrade your computer to Windows 11, you need to create a GPT-based disk.
For UEFI boot mode to work, Windows 11 must be installed on a GPT (GUID Partition Table) partition style.
If you are not sure whether your disk is GPT or MBR, you can follow the steps below to check the partition style.
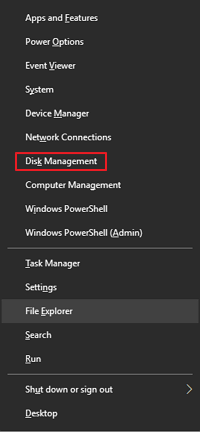
Step 1. Right-click on the Windows icon and Open Disk Management.
Step 2. Under the Disk Management window, right-click on the disk you want to check the partition style and select Properties.
Step 3. Now Click on the Volumes tab and check for Partition Style under Disk Information.
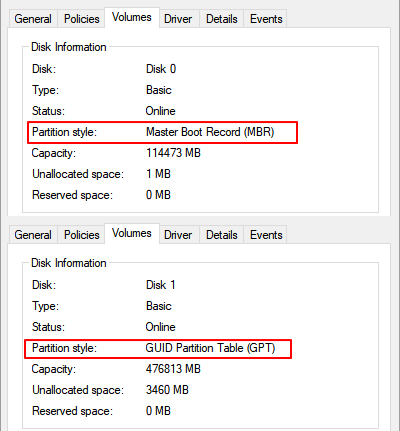
If the partition style is GUID Partition Table, it means you can upgrade to Windows 11 directly.
But if the partition style is Master Boot Record, you must convert your MBR disk to GPT before upgrading to Windows 11. If you are preparing to upgrade Windows OS, you can use EaseUS Partition Master to convert the MBR OS disk to GPT.
EaseUS Partition Master is one of the best partition software to help you manage hard disk partitions without data loss.
Step 1. Connect an empty USB flash drive, or a CD/DVD disc to a healthy computer, launch EaseUS Partition Master, click "Bootable Media" and select "Create bootable media". Click "Next" to continue.

Step 2. Choose the USB or CD/DVD and click "Create" to start create the bootable media.

Step 3. Connect the USB with bootable media to your PC and restart the computer from EaseUS bootable media.
Press F2/Del to enter BIOS and set the computer to boot the PC from "Removable Devices" (bootable USB disk) or "CD-ROM Drive" (bootable CD/DVD). Press "F10" to save and exit to restart PC into EaseUS bootable media.
Step 4. Once your PC enter EaseUS Partition Master, go to Disk Converter and select "Convert MBR to GPT". Click "Next" to continue.

Step 5. Select the target MBR disk you tend to convert to GPT and click "Convert" to start the conversion.

What Else Can You Do With EaseUS Partition Master?
- It is designed for users to easily modify existing disk partitions. You can also use this tool to:
- Create new disk partitions without losing data.
- Maximize disk usage without going over the maximum limit.
- Convert logical drives from MBR to GPT.
- Expand system partitions.
- Merge two adjacent disk partitions into a bigger one.
This is a great utility tool for everyone to deal with dual boot, complicated partition state, or dynamic disks. EaseUS Partition Master is designed for the average user. It's easy to use, and the method is amazingly effortless with a single click! Anyone can use it without any technical experience and resolve data loss due to MBR to GPT conversion.
2. Enable UEFI
Here are the steps to Enable UEFI:
Step 1. Right Click on the Windows icon and click on Shut down and restart.
Step 2. Press the F2 key right after your computer is restarting. This will take you to the BIOS Setup Utility screen.
Step 3. Look for the Boot or System Configuration tab and Click on Boot.
Select Boot, under the Boot tab, use the up and down arrows to and press Enter.
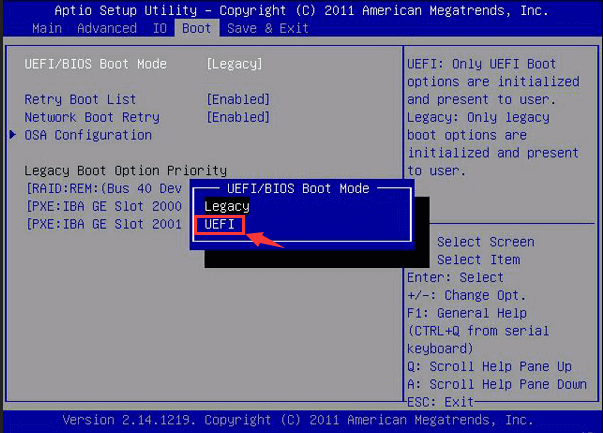
Step 4. Under the Boot screen, go to UEFI/BIOS Boot Mode and press Enter.
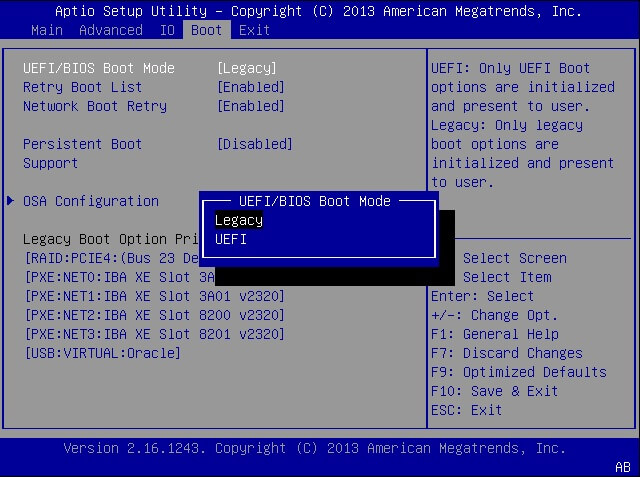
Step 5. Using up and down arrows keys, choose UEFI mode, and then press Enter.
Press F10 to save the changes and exit the screen.
How to Disable UEFI Mode
Most computers that support UEFI boot firmware will also have an option in the UEFI firmware to switch to a CSM/Legacy boot mode. Using it is simple and can help you run operating systems that aren't UEFI-aware. This includes Windows 7, Ubuntu, Linux, and many other operating systems.
Find out how to disable UEFI firmware and enable a legacy BIOS compatibility mode instead.
Step 1. Restart your Windows PC
Step 2. Press the F2 key until you see the BIOS Setup screen.
Step 3. Under Boot, click on UEFI/BIOS Boot Mode and press Enter.
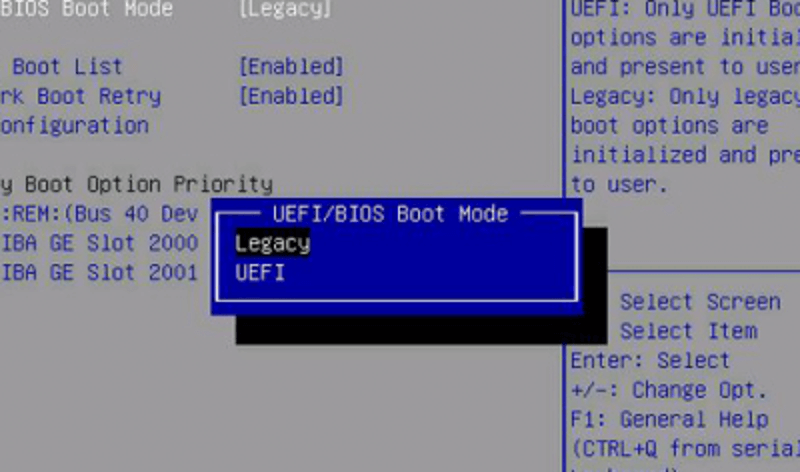
Step 4. Now, Choose Legacy and press enter.
Select "Legacy" and Press "Enter" Select an Image
Press F10 to save the changes and exit the BIOS screen.
Enabling or Disabling UEFI Mode Is Not Complex, Choosing a Correct Mode for PC
Simply put, BIOS and UEFI are just two different types of firmware used to power the PC platform. BIOS has been around for quite some time, and it is the way to go:
- If you are a total newbie and demand simple firmware. BIOS is more efficient at accessing small storage hard disks than UEFI.
- If you have less than 2 TB of space, or only one partition drive, then BIOS is for you.
So when to use UEFI mode? Answer: You should use UEFI over BIOS to configure and boot from multiple partitions on large hard disks and partitions.
- In other words, you should use UEFI for large hard disk support.
- UEFI is also recommended for discrete graphics card support and it also supports drivers for new devices that are loaded after the PC start-up.
- If you need support for loading more than a few-dozen modules and external devices, UEFI is a requirement.
- Last, Windows 11 installation requires UEFI boot mode as a must.
All in all, I prefer to go by this simple rule: if there's no pressing reason that you need BIOS over UEFI, stick with the latter.
The use of UEFI has increased drastically over the past few years, in part, due to some security issues associated with BIOS. Some new computers do not have legacy BIOS and only use UEFI to boot the operating system.
In general, to use UEFI mode on a computer, you should first convert the OS disk into GPT that disk conversion software - EaseUS Partition Master can help, then enable UEFI in Boot mode via BIOS settings. For Windows 11 installation, enabling the Secure Boot mode is also necessary.
How Can We Help You
About the Author
Updated by Tracy King
Tracy became a member of the EaseUS content team in 2013. Being a technical writer for over 10 years, she is enthusiastic about sharing tips to assist readers in resolving complex issues in disk management, file transfer, PC & Mac performance optimization, etc., like an expert.
Product Reviews
-
I love that the changes you make with EaseUS Partition Master Free aren't immediately applied to the disks. It makes it way easier to play out what will happen after you've made all the changes. I also think the overall look and feel of EaseUS Partition Master Free makes whatever you're doing with your computer's partitions easy.
Read More -
Partition Master Free can Resize, Move, Merge, Migrate, and Copy disks or partitions; convert to local, change label, defragment, check and explore partition; and much more. A premium upgrade adds free tech support and the ability to resize dynamic volumes.
Read More -
It won't hot image your drives or align them, but since it's coupled with a partition manager, it allows you do perform many tasks at once, instead of just cloning drives. You can move partitions around, resize them, defragment, and more, along with the other tools you'd expect from a cloning tool.
Read More
Related Articles
-
How to Merge Unallocated Partition Windows 11/10/7
![author icon]() Jean/2026/06/17
Jean/2026/06/17 -
How to Check USB Read and Write Speed on Mac - Full Guide
![author icon]() Sherly/2026/06/17
Sherly/2026/06/17 -
How to Install APK on Windows 11 to Sideload Android Apps
![author icon]() Tracy King/2026/06/29
Tracy King/2026/06/29 -
How to Bypass PIN Windows 11 (Simple Guide)
![author icon]() Oliver/2026/06/30
Oliver/2026/06/30


