
Content
Page Table of Contents
About the Author
Hot Topics
- Important
- Microsoft has officially announced that Windows 10 support will end on October 14, 2025. After this date, the system will no longer receive security updates, bug fixes, or technical support.
How to do Windows 11/10 boot repair? What are the most useful ways? Read this tutorial and see how to troubleshoot.
| Workable Solutions | Step-by-step Troubleshooting |
|---|---|
| Fix 1. Use Startup Repair | You can fix most Windows 11/10 UEFI boot problems using the Startup Repair tool. Boot Up Windows...Full steps |
| Fix 2. Run Boot Repair Software | Start EaseUS Partition Master after connecting the external drive/USB to your computer...Full steps |
| Fix 3. Use Command Prompt | If you are unable to perform a startup repair, then you can try using Windows 11/10 installation...Full steps |
| Fix 4. Change BIOS Settings | Windows 8, 8.1, 10 and 11 were designed to install on the UEFI BIOS using the EFI bootloader and GPT...Full steps |
| Fix 5. Add Disk Driver | Manually installing and adding the driver to the restored Windows image can repair UEFI boot...Full steps |
| Fix 6. Change the SATA Mode | You can change different SATA modes in different cases for Windows 11/10 boot repair...Full steps |
Sometimes, Windows 11/10 fails to boot because there is a problem with the master boot record. In these cases, the master boot record needs to be repaired to restart and run. When you want to do Windows 11/10 startup repair, you can use the Windows 11/10 recovery environment, which includes an automatic option to accomplish this task. If this does not work, you can do it manually with the Diskpart command prompt and other effective solutions. In this article, you'll find step-by-step methods to guide you to fix computer UEFI boot errors in Windows 11/10/8/7. Read on to find out how. Before you start, you can clone your boot drive to another drive with EaseUS Partition Master. Then, follow these steps to fix Windows 11/10 boot repair.
- EaseUS Partition Master -
Your Smart Windows 11 Update Disk Manager
- MBR to GPT Converter, Make Disk Ready for Windows 11.
- Boot Repair for a variety of startup issues.
- Handy to Extend or Combine Partitions in Windows 11.
- Clone and Upgrade Disks without Data Loss.
You may also read the article below:
Windows 10 Boot Repair: Fix Windows Startup Issues Now!
This post will go over six helpful techniques that users can utilize Windows 10 boot repair to resolve starting issues.
Method 1. Use Startup Repair for Windows 11/10 Boot Repair
Windows provides some built-in boot repair tools. Windows Automatic Repair is a for users to apply and try to fix some normal errors on Windows PCs. You may also try this method to repair Windows 11, 10, 8, or 7 UEFI/EFI boot errors:
1. Boot Up Windows from Installation Media
Step 1. Insert Windows 11/10/8/7 installation disk or USB to your PC.
Step 2. Restart the PC and boot from the disk or USB.
2. Enable Automatic Repair Option
Step 1. Click "Repair your computer" on the "Install now" screen.
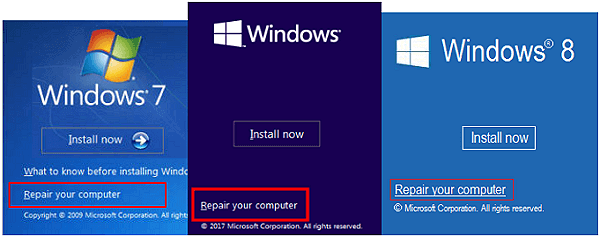
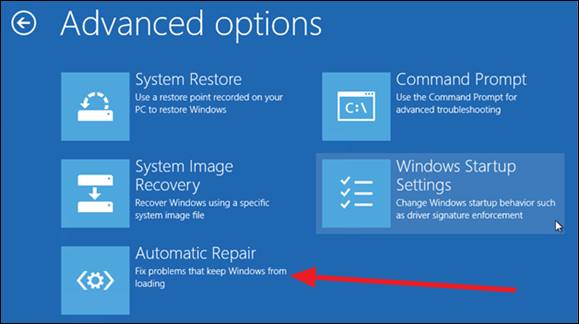
Step 2. Click "Troubleshoot" by choosing an option screen > click "Automatic repair".
Step 3. Choose an account from the list to continue at the Automatic Repair screen and wait for the process to finish.
When the process is complete, you can restart your PC, and then you should be able to use your computer without any problems again. This way has helped a lot of users facing the UEFI boot error; share this article to help more people.
Method 2. Run Boot Repair Software to Fix UEFI Boot Error
Although it is convenient to have a built-in tool for error repairing, sometimes it doesn't do well in boot issue troubleshooting. Therefore, you can download a boot issue troubleshooting tool to automatically detect and analyze the problems in your system and fix them without manual operation.
One of the most well-known tools is EaseUS Partition Master, which offers the Boot Repair feature and advanced algorithm that can examine and repair errors on your Windows computer in a few seconds.
If your computer is unbootable now, start with Step 1 here. If it's bootable, move to Step 3 and start the process.
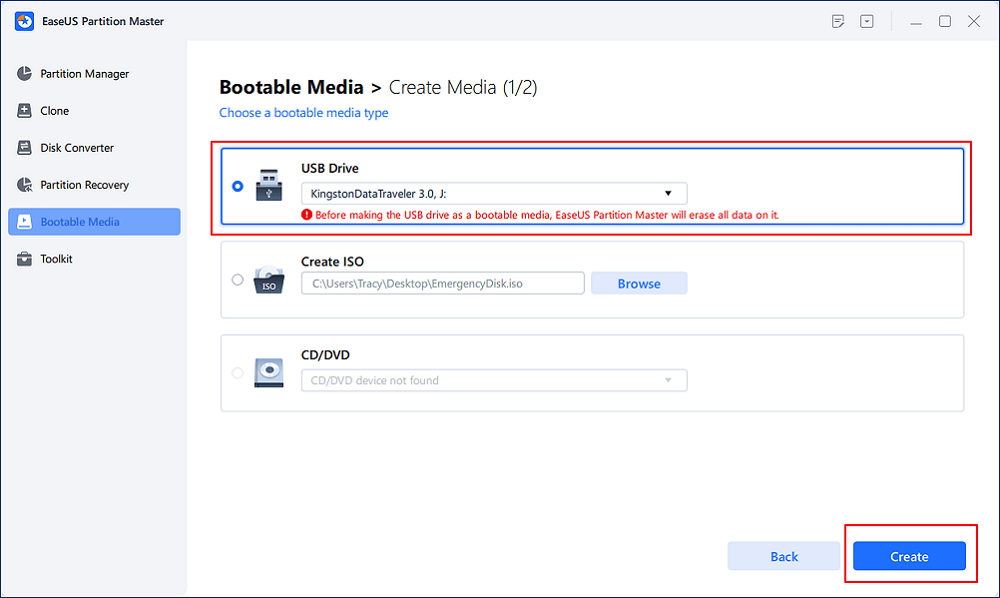
Step 1. Prepare a new PC and create a bootable media with EaseUS Partition Master
- On a new computer, connect an empty USB to your PC.
- Install and launch EaseUS Partition Master, go to the Bootable Media section, select "Create bootable media" and click "Next".
- Select the empty USB or external disk as target disk to create the bootable media for creating a Blue Screen error check tool.
Step 2. Boot PC from EaseUS bootable USB
Then, connect the bootable USB to your PC with Blue screen error, and reboot PC from the USB by configuring it as a boot drive. The process is: restart PC, press F2/F8/F11/Del key to enter BIOS, go to boot menu and configure the USB as boot drive, save changes and restart the PC.
Step 3. Enable EaseUS Partition Master with its Boot Repair feature, and open "Blue Screen" tool.
When EaseUS Partition Master launches, go to the Toolkit section and click "Boot Repair".
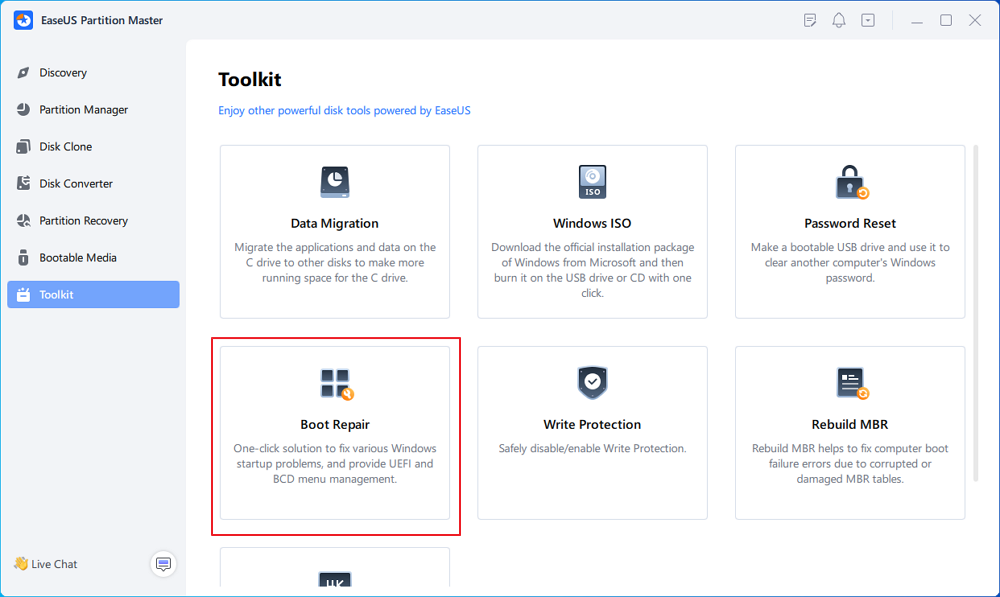
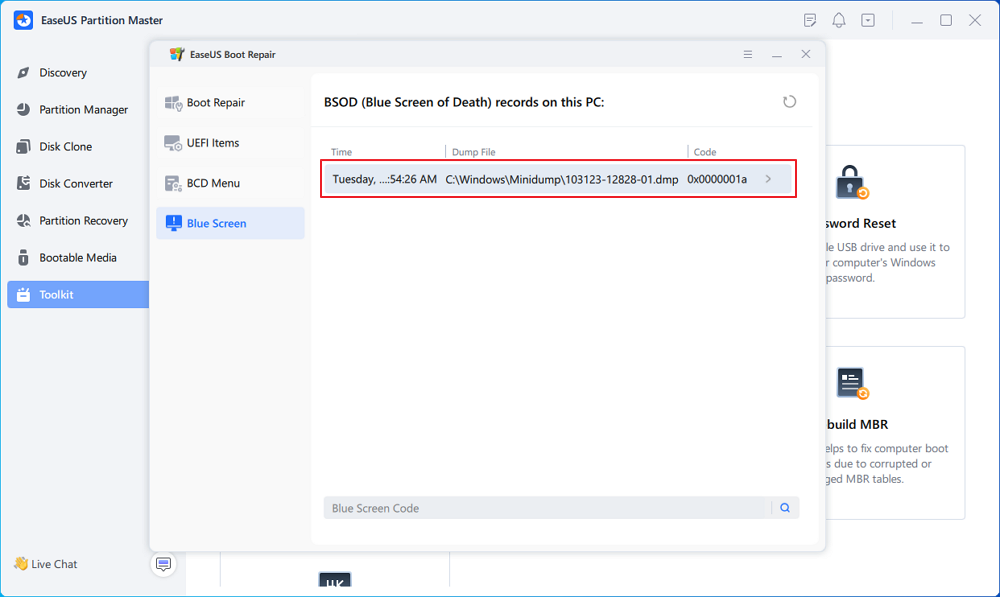
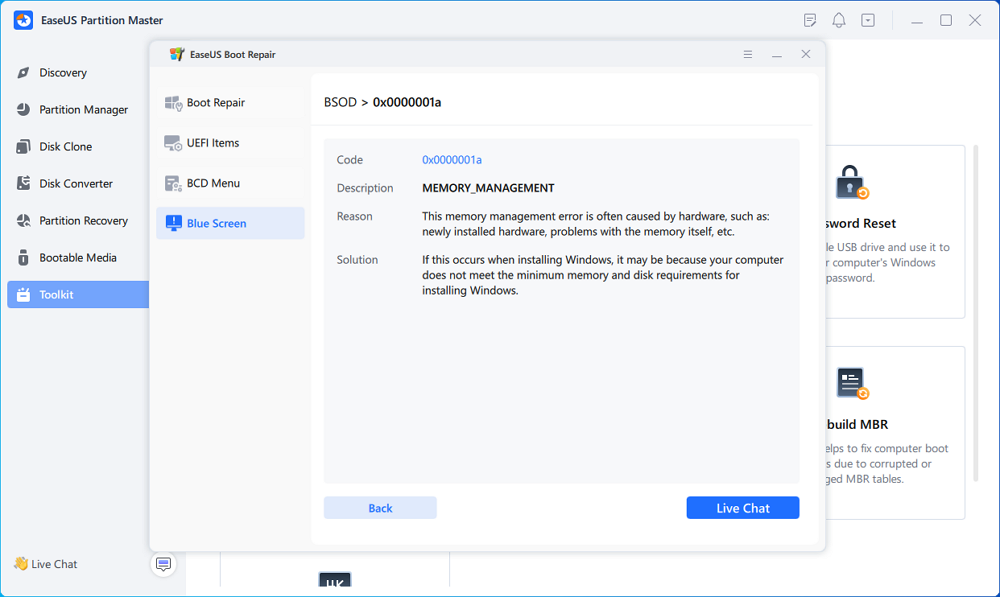
Then, click "Blue Screen" and click the listed Blue Screen error to check it's details. Or, you can type in a specific blue screen code or description to find the respective answer for fixing it.
Step 4. Fix blue screen error
- Now, you can follow the solution guide to get rid of the respective BSOD or blue screen issue from your PC.
- If it doesn't work, you can also click the "Live Chat" button to request a remote assistance for fixing this issue with the help of EaseUS tech support team.
Method 3. Use Diskpart to Fix UEFI Boot Error in Windows 11/10
If you are a Windows 11/10 or 8 user and you prefer free methods to fix UEFI boot errors, you may follow the two solutions below to solve this issue now:
1. Enter Command Prompt from Advanced Options
Step 1. Insert Windows 11/10/8/7 installation disk or installation USB into PC > boot from the disk or USB.
Step 2. Click "Repair your computer" or hit "F8" on the "Install now" screen.
Step 3. Click "Troubleshoot" in Advanced options, and click "Command Prompt".
2. Run Diskpart to Set Partition ID and Assign a Drive Letter
Step 1. Type the below command and hit Enter each time:
- diskpart
- list disk
- sel disk 0
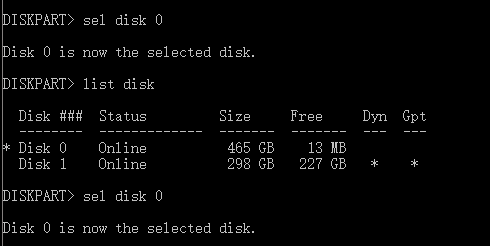
Step 2. When the message "Disk 0 is now the selected disk" shows up, type list vol and hit Enter.
![]()
Diskpart will now show the full list of volumes on your PC, find UEFI volume from the list: UEFI partition will be on Volume 2.
Step 3. Type below command and hit Enter each time:
- sel vol 2
- set id=c12a7328-f81f-11d2-ba4b-00a0c93ec93b
- Or SET ID=ebd0a0a2-b9e5-4433-87c0-68b6b72699c7
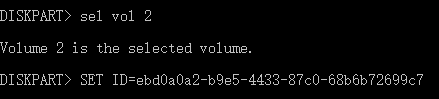
Step 4. Assign the drive letter by typing below command and click Enter:
- assign letter=G: (Note: G shall be a unique drive letter which cannot be already used.)
![]()
3. Repair the Boot Record
- Step 1. Open Command Prompt as an administrator, enter below command:
- cd /d G:\EFI\Microsoft\Boot\ (Note: G is the drive letter you signed to UEFI partition and remember to replace G with UEFI's partition letter)

- Enter exit when the process completes.
- Step 2. To repair the Boot Record, open CMD and enter below command line:
- bootrec /fixboot
![]()
- Enter exit when the repair process completes.
Sometimes, you may come across 'bootrec /fixboot' with an access denied error. Relax and you may follow this guide for help:
4. Rebuild the BCD Store
Quick steps for rebuilding BCD:
Step 1. Type each command line and hit Enter each time:
- ren BCD BCD.old
- bcdboot C:\Windows /1 en-us /s G: /f ALL (Note: c:\ is the drive where Windows 11/10/8.1/8 is installed on.)
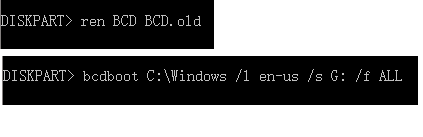
Step 2. Type exit in Command Prompt when the process completes and then restart your PC.
Now UEFI boot is fixed, and Windows 11/10/8/7 can be boot up on your PC again.
Method 4. Change BIOS Settings
You need to select the boot mode according to the type of disk on your system. If you want to start an MBR system disk, you can select Legacy support instead of UEFI in boot mode. To start a GPT system disk, you need to select UEFI.
How to access BIOS: Common keys to enter the BIOS are "F1," "F2," "F10," "Delete," "Esc," as well as key combinations like "Ctrl" + "Alt" + "Esc" or "Ctrl" + "Alt" + "Delete," which are more common on older machines. You can enter the BIOS interface by holding down any of these keys while booting up on your computer.
Method 5. Add Disk Driver to Repair Windows 11/10 Boot
When you replace the RAID with a different machine or replace the original SATA or IDE disk with a newer NVMe SSD, you may encounter problems starting up. You can use the following Windows command line to manually add the driver to the restored Windows image.
Dism /Image:X: /Add-Driver /Driver:"y:\z.inf"
(X is the disk character of the restored Windows boot partition, and in double quotes is the location of the driver. Inf file.)
If you find this article helpful in fixing UEFI boot, don't forget to share it on your social media so that more users can get the help.
Method 6. Change the SATA Mode for Windows 11/10 Startup Repair
After the older XP system is restored, a blue screen or cycle start may occur. You can change to IDE mode to try to start.
If you run into boot problems after upgrading from an older HDD to a newer SSD, check to see if the BIOS is set to boot for AHCI. If you set it up for RAID mode, make sure the correct RAID driver is added to the cloned system.
Extended Reading: UEFI vs. BIOS: What's the Difference and How to Check
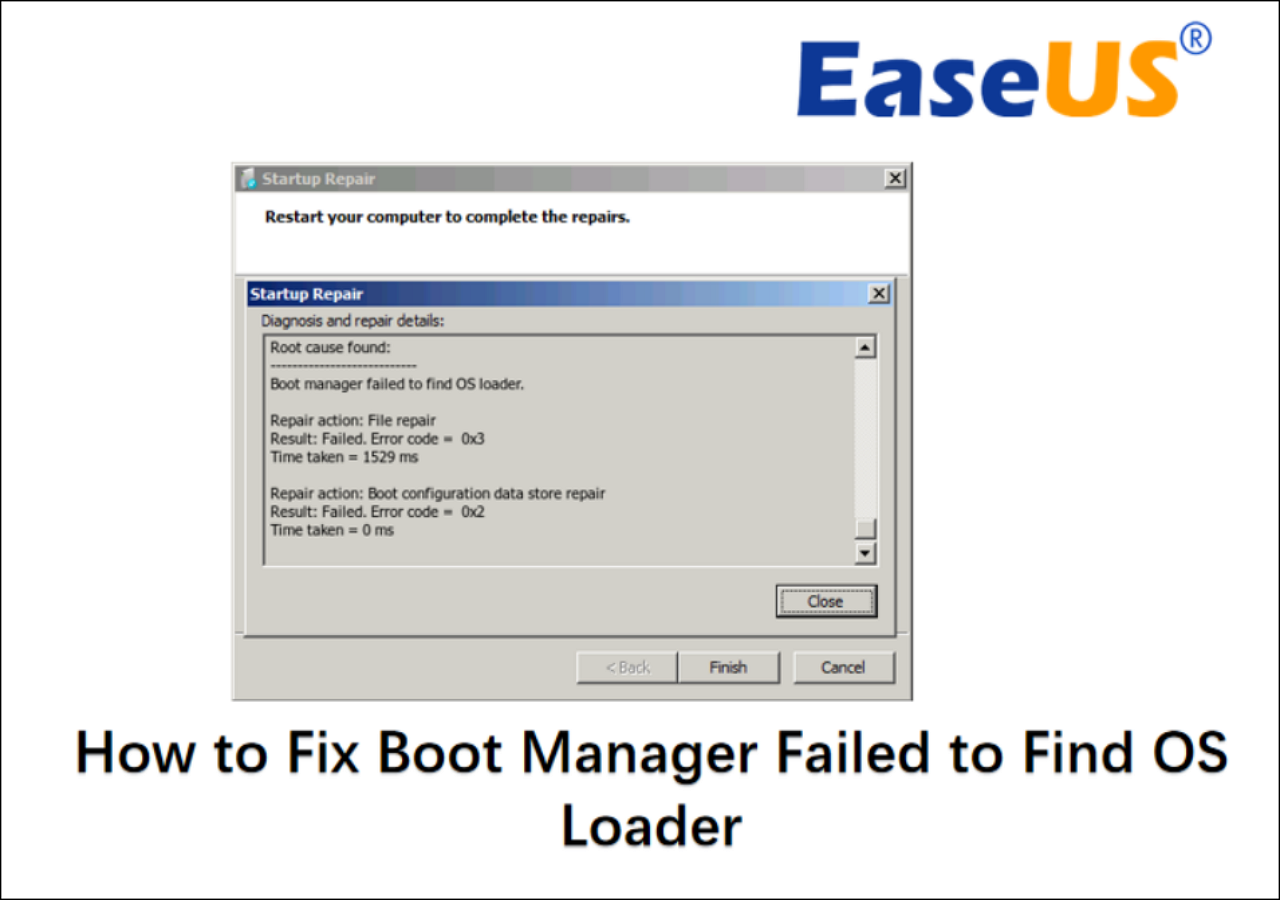
How to Fix Boot Manager Failed to Find OS Loader [100% Working]
Resolve the "Boot Manager Failed to Find OS Loader" problem effortlessly by exploring our expert-backed solutions. Follow step-by-step instructions to troubleshoot and resolve this issue.
To Sum Up
Windows 11/10 boot repair is a rather complicated problem. There are different solutions for different causes and problems. The above approaches only apply to common UEFI boot issues. If none of them can repair the UEFI boot error in Windows 10, you can contact our technical support team to get specialized services for system boot issues.
- 1. Unformat the drive
- 2. Repair the RAID, RAW disk, or operating system.
- 3. Recover lost partition (the one that cannot be recovered by software)
If you don't want to risk losing or overwriting your important data during the fixes for Windows 11/10 boot repair, you can recover data from a PC/laptop hard drive that won't boot with EaseUS Data Recovery Wizard, a renowned data recovery tool on the market.
To configure and optimize disk performance, you can also turn to EaseUS Partition Master for help.
⭐Consultation Entrance
If you want to ask for any help, feel free to contact us and EaseUS experts will help you find the answer:

EaseUS experts are available to provide you with 1-on-1 manual services (24*7) and help fix Windows boot error, BSOD or computer boot loop issues. Our experts will offer you FREE evaluation services and efficiently diagnose and resolve system boot failure, Windows stop codes and OS lagging issues using their decades of experiences.
- 1. Fix BSOD - blue/black screen of death error due to Windows update or other reasons.
- 2. Get rid of Windows boot error such as no bootable device found, or BCD file corruption.
- 3. Serve to fix 0X000_error codes on Windows system or OS boot loop issues.
Windows 11/10 Boot Repair FAQs
The following four questions are highly relevant to UEFI boot repair. Check the answers to get you through.
1. How do you repair Windows 11/10 if it does not boot?
For Windows 11/10 UEFI boot repair, you can perform an automatic startup repair or use the command prompt to complete it. The step-by-step instructions are given each part, check the guides carefully.
2. How do I repair Windows 11/10?
To repair the Windows 11/10 boot, you can use the Startup Repair tool. To access the Windows 11/10 recovery environment, turn your computer on and off three times. While booting, ensure you turn off the computer when you see the Windows logo. After the third time, Windows 10 will boot into diagnostics mode. Click "Advanced options" when the recovery screen appears. Then, choose "Startup Repair" and follow the on-screen instructions to do it.
3. How can I repair the Windows 11/10 UEFI bootloader?
To fix the Windows 11/10 UEFI boot problem:
- Insert the Media (DVD/USB) into your PC and restart
- Boot from the media
- Select Repair Your Computer
- Select "Troubleshoot" in "Advanced Options"
- Choose Command Prompt from the menu and use the dispart command lines: Type and run the command: diskpart. Type and run the command: sel disk 0. Type and run the command: list vol
4. How do I fix a boot startup problem?
There are many effective solutions to fix the Windows 11/10 startup issue and repair your EFI Bootloader. You can:
- Use the Startup Repair tool
- Use Diskpart in the Command Prompt
- Fix BCD errors
- Add startup item
- Change BIOS settings
- Add disk driver
- Change SATA mode
- Fix MBR
- Restore and repair system partitions
- more fixes...
How Can We Help You
About the Author
"I hope my articles can help solve your technical problems. If you are interested in other articles, you can check the articles at the bottom of this page. Similarly, you can also check my Twitter to get additional help."
Written by Tracy King
Tracy became a member of the EaseUS content team in 2013. Being a technical writer for over 10 years, she is enthusiastic about sharing tips to assist readers in resolving complex issues in disk management, file transfer, PC & Mac performance optimization, etc., like an expert.
Product Reviews
-
I love that the changes you make with EaseUS Partition Master Free aren't immediately applied to the disks. It makes it way easier to play out what will happen after you've made all the changes. I also think the overall look and feel of EaseUS Partition Master Free makes whatever you're doing with your computer's partitions easy.
Read More -
Partition Master Free can Resize, Move, Merge, Migrate, and Copy disks or partitions; convert to local, change label, defragment, check and explore partition; and much more. A premium upgrade adds free tech support and the ability to resize dynamic volumes.
Read More -
It won't hot image your drives or align them, but since it's coupled with a partition manager, it allows you do perform many tasks at once, instead of just cloning drives. You can move partitions around, resize them, defragment, and more, along with the other tools you'd expect from a cloning tool.
Read More
Related Articles
-
Solved: Black Screen After Installing Windows 10
![author icon]() Cici/2026/06/17
Cici/2026/06/17 -
Can I Clone Windows from MBR to GPT? Sure! [2026 Full Guide]
![author icon]() Tracy King/2026/06/17
Tracy King/2026/06/17 -
How to Boot Samsung Laptop From USB on Windows 10/11
![author icon]() Sherly/2026/06/30
Sherly/2026/06/30 -
Samsung Magician Clone Boot Drive | Step-by-Step Tutorial
![author icon]() Sherly/2026/06/17
Sherly/2026/06/17


