
Content
Page Table of Contents
About the Author
Hot Topics
Overview of How to Boot From USB on Windows 11:
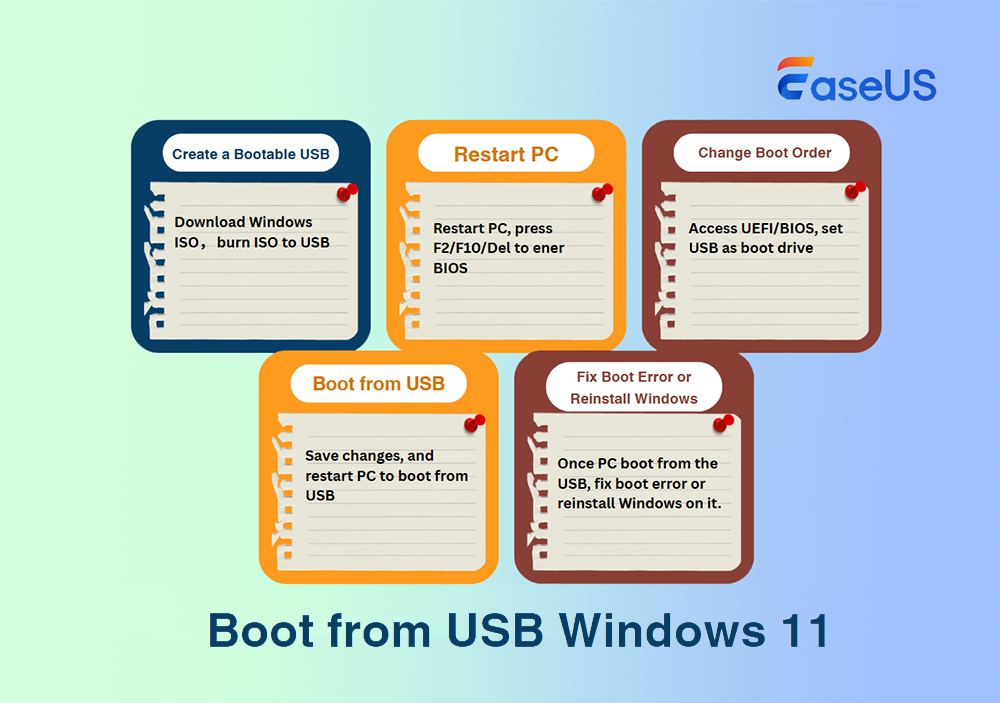
How to boot from USB Windows 11? In short, you need to download Windows 11 installation files to your prepared USB drive or use EaseUS Partition Master to create a bootable USB and set the boot order to prioritize this USB.
🚩Phase 1. Create a bootable USB drive: Download the Windows 11 Media Installation Tool or use EaseUS Partition Master to create a bootable USB > insert a USB at least 8GB in size > launch the Media Creation tool.
🚩Phase 2. Change the boot order: Restart your Windows > press F2, F10, F12, or Esc to enter the UEFI/BIOS setup > locate the boot order settings > choose the USB as the first boot device > keep your changes > exit the BIOS/UEFI setup.
🚩Phase 3. Boot from USB: Connect the bootable USB to your PC > it will automatically start from this USB.
Preparations to Boot from USB on Windows 11:
| ⚙️Complex Level | Low, Beginners |
| ⏱️Duration | 5-10 minutes |
| 💻Applies to | Boot from USB on Windows 11/10/8/8.1/7 |
| ✏️Stages | |
| 🔨Tools | USB, Windows PC, EaseUS Partition Master |
Before we go to the tutorial, you need to prepare a reliable USB and a formatting tool - EaseUS Partition Master. This tool stands out during our tests. The reason why we recommend it is that it has a clear interface and is easy to use, making it friendly to beginners.
- ✅Prepare a USB - Buy a certificated USB with enough capacity.
- ✅Download the reliable format tool - EaseUS Partition Master by clicking the blue button in advance. (This tool allows you to format a USB larger than 32 GB to FAT32, while Windows built-in tools don't.)
Click these buttons and share this detailed tutorial to help others in need.

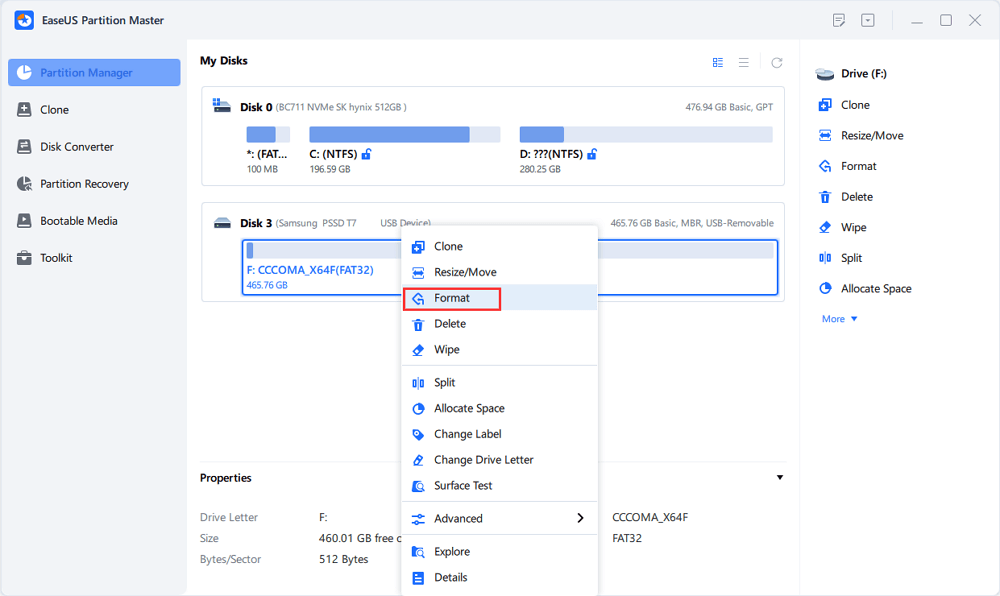
1️⃣Stage 1. Format USB as FAT32
Creating a bootable USB drive has specific file system format requirements; the USB flash drive must be set to FAT32 format first. However, Disk Management and CMD can't format a USB larger than 32 GB to FAT32. You need to turn to a third-party format tool. Our tests verify that EaseUS Partition Master Free is a stable formatting utility. It can format 64/128/256 GB USB to FAT32. Download this tool and follow the guide below to try it.
Step 1. Launch EaseUS Partition Master, right-click the partition on your external hard drive/USB/SD card which you want to format and choose the "Format" option.
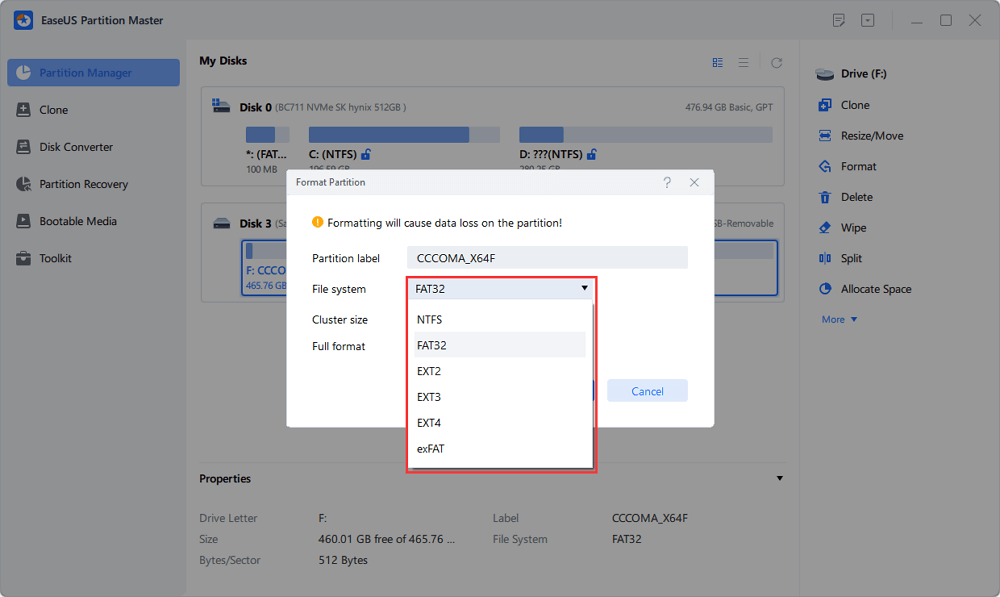
Step 2. Assign a new partition label, file system (NTFS/FAT32/EXT2/EXT3/EXT4/exFAT), and cluster size to the selected partition, then click "OK".
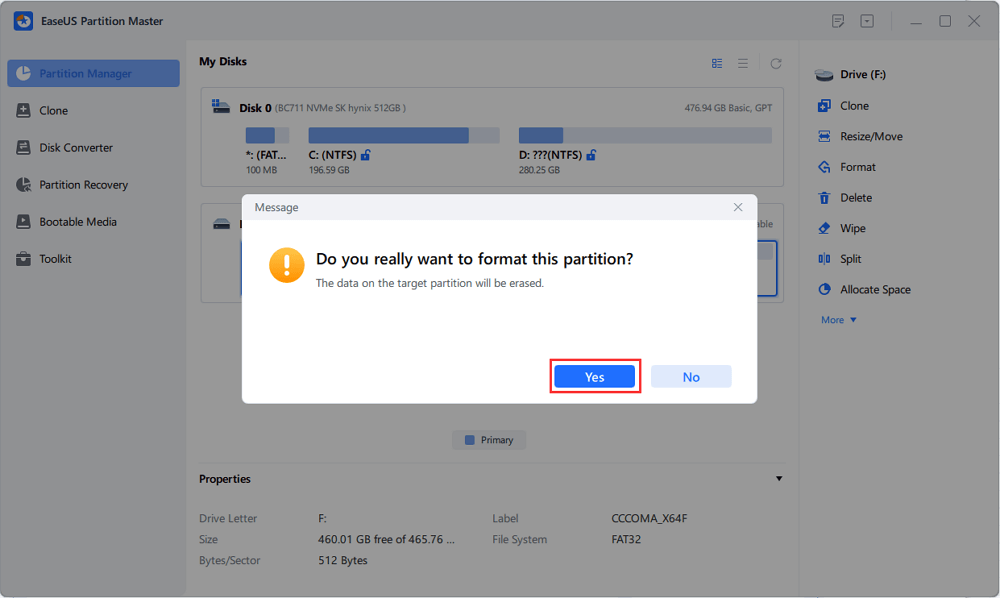
Step 3. In the Warning window, click "Yes" to continue.
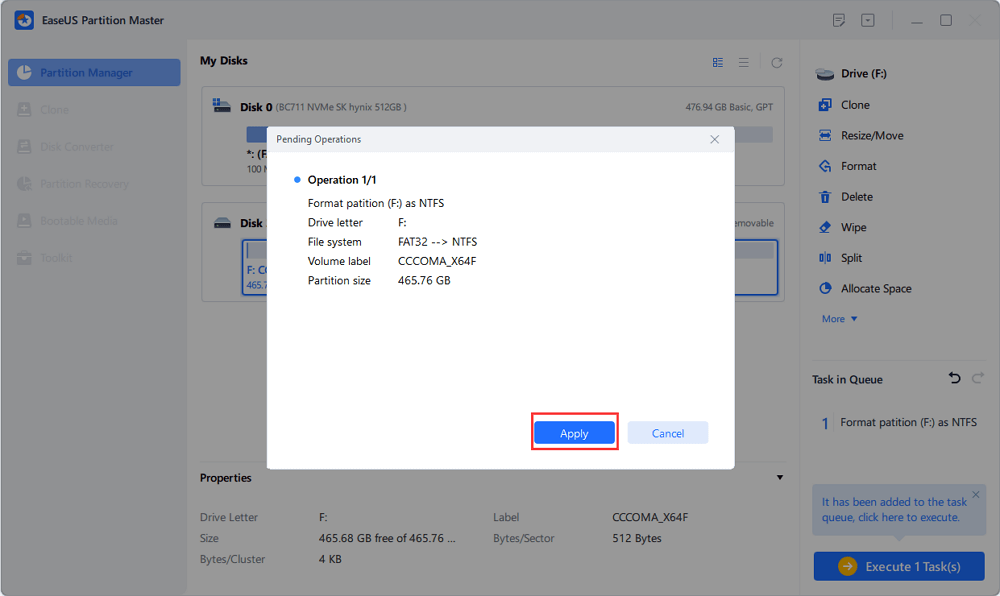
Step 4. Click the "Execute 1 Task(s)" button in the top-left corner to review the changes, then click "Apply" to start formatting your external hard drive/USB/SD card.
FAT32 is the best USB format to boot Windows 11; now, let's go to Stage 2 and learn how to create a bootable USB.
2️⃣Stage 2. Create a Bootable USB
Creating a bootable USB can be complicated if you are not a pro; we need to choose trustworthy third-party software. To create a bootable USB, you can turn to EaseUS Partition Master with its ISO burner feature for help.
The following guide can help you learn how to use it to create a bootable USB:
First, connect the USB with a FAT32 format to your PC. Then, you can download an ISO file of Windows 11 on your PC. Or, you can directly run EaseUS Partition Master, then enter its Bootable Media section to select to download the ISO of Windows 11 from Microsoft.
Next, follow the guide here to create a bootable USB with Windows 11 on it:
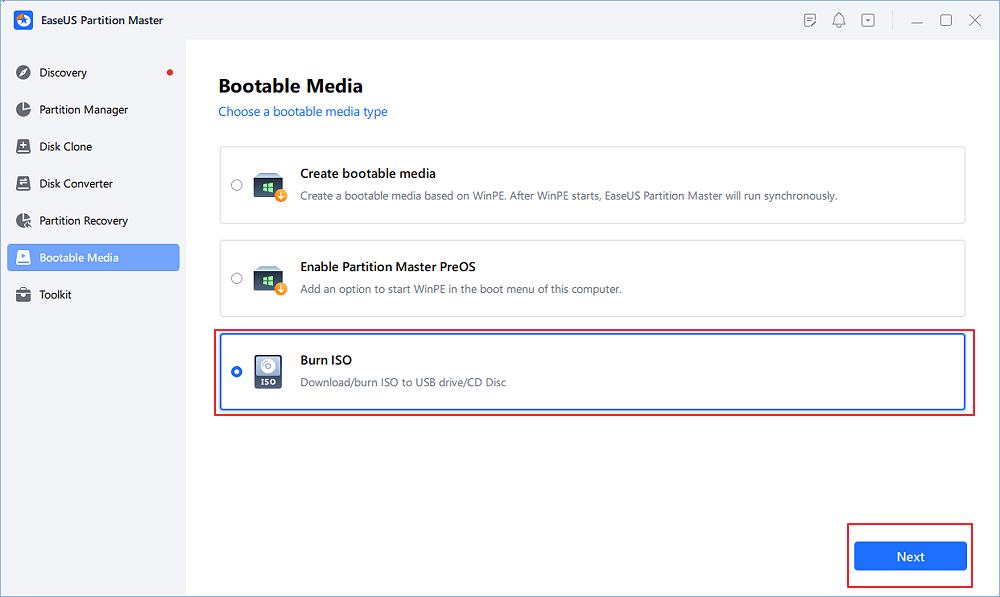
Step 1. Launch EaseUS Partition Master and go to the Bootable Media section. Click "Burn ISO" and click "Next".
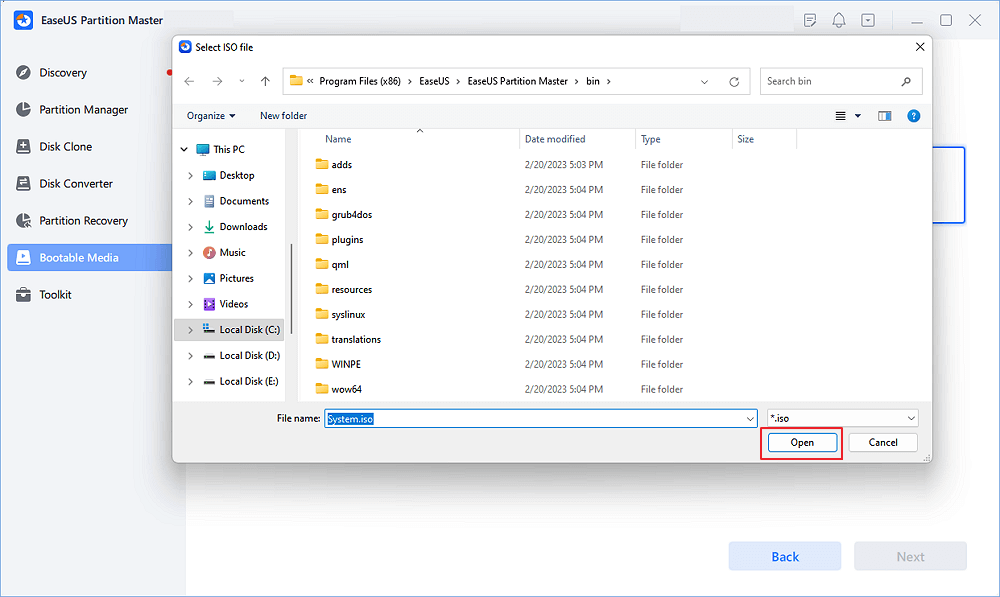
Step 2. Select the ISO image that you have downloaded on your PC, and click "Open".
Step 3. Click "Next" and select the target USB as destination and click "Burn" to execute the operation.
3️⃣Stage 3. How to Boot From USB on Windows 11 - 2 Cases
When you need to boot from USB on Windows 11, you may encounter two main situations. One situation is that your computer is working fine, and you can access the startup disk settings from the Windows Settings app portal. The other is when your computer goes wrong and crashes and doesn't work properly, at which point you need to access the boot menu and boot your computer from USB in the BIOS. Now, let's learn about each method.
Case 1. Boot from USB via Windows Settings If PC Can Start Properly
Windows Settings can help you start from a USB; follow the given tutorial below to boot Windows 11 from USB while your computer still runs smoothly.
Step 1. Insert the bootable USB drive into your Windows 11 computer.
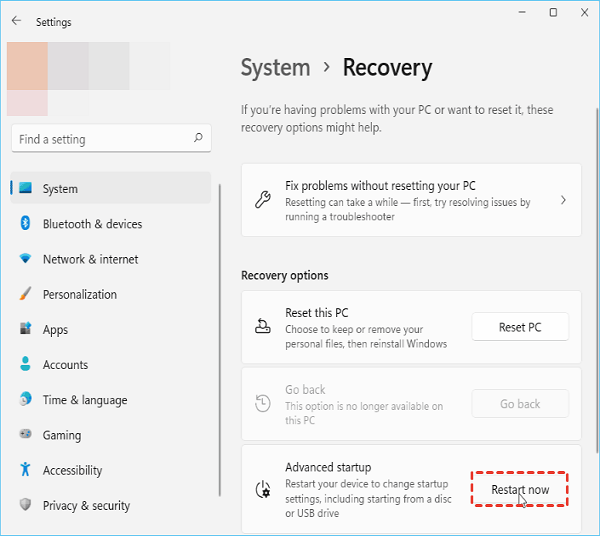
Press Windows + I to open Settings, and select the "System" > "Recovery" option.
Step 2. Click the Restart Now button to the right of Advanced Startup.
In the popup window, Windows 11 will let you know that it's going to restart your device and that you'd better save your work until then.
Step 3. Afterward, your PC will restart and load into the recovery environment.
Under the Choose an option window, select the Use a device option.
Step 4. Your PC will list the bootable devices your computer can use, including the USB drive you connected to your PC earlier.
Click and select it. Finally, your computer can reboot and boot from the USB drive you set up.
Case 2. Boot from USB Using BIOS Boot Menu When PC Fails to Start
When your computer doesn't boot, you need to access the BIOS to boot Windows 11 from the bootable USB. Attach the USB flash drive to the PC where you want to clean install Windows 11. Then, restart your PC while pressing the Shift key to boot into the Windows Recovery Environment (WinRE). Select to boot from the USB drive in the Windows Recovery Environment.
Here's the step-by-step guide:
Step 1. Connect the bootable USB drive to the correct USB port.
Then, press the Power button to boot your laptop/PC. When it starts loading, keep tapping the appropriate Boot Menu key, such as ESC, F2, F8, or F10 (The key can vary depending on the motherboard's manufacturer and model) to enter the BIOS setup.
Step 2. In the boot menu, look for the Boot order option and move the bootable USB drive that you want to boot from to the top of the list.
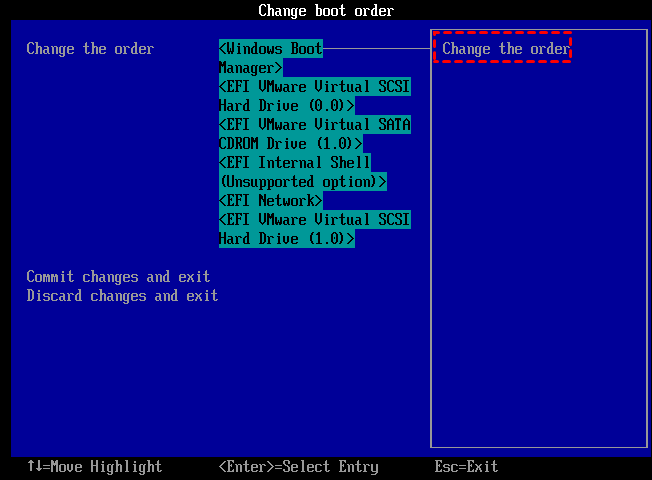
Step 3. When you confirm your changes/settings, press the F10 key to save and exit. Upon exiting, your PC will automatically boot from the USB flash drive.
BONUS TIP:
In most cases, Windows users would take a bootable USB to fix a computer that won't start up by reinstalling the operating system. Here are two tips you may try if you are experiencing a similar issue on your computer.
Conclusion
If you want to start Windows 11/10 from a USB flash drive but don't know how to do it, then you can refer to the method in this tutorial to solve this problem easily. First, prepare a qualified USB flash drive and format it into FAT32; create a bootable USB; finally, change the boot order and set the bootable USB as the boot drive. Then, you can boot Windows 11 from the USB. It's worth mentioning that you'll need to access the BIOS to boot from USB if the computer isn't working properly.
Click these buttons and share this detailed tutorial to help others in need.
How to Boot From USB on Windows 11 FAQs
There are many situations where you may wish to use a USB to boot Windows 11 on your computer, perhaps to boot a new Windows system, for troubleshooting, or to enjoy the same configuration on multiple PCs. Here are some more related questions and answers. Read on.
1. Why is Windows 11 not booting from USB?
Not all USB drives can be considered bootable USB devices. Regular USB drives are not bootable by default. So the reasons why Windows 11 cannot boot from USB are as follows:
- USB drive is not a bootable device
- Bootable USB drive not showing up in BIOS
- USB drive is too old
- USB drive is damaged by mistake
- USB drive format does not support
- Wrong boot order
2. How to boot Windows 11 from USB in BIOS?
Attach the USB flash drive to the PC on which you want to clean install Windows 11. Then, restart the PC while holding the Shift key to boot into the Windows Recovery Environment (WinRE). Choose to boot from the USB drive once in the Windows Recovery Environment.
3. When do we need to boot from a USB on Windows 11?
The reasons for booting the system from USB are as follows:
- Boot the new Windows system. Boot the new system on a USB stick to prevent it from affecting the version you are running.
- To troubleshoot. The second reason is that your computer operating system does not start properly, shows a blue screen on Windows 11, or keeps crashing due to viruses, malware, etc. At this point, you need a bootable USB disk to boot your computer properly.
- Booting the new computer from the USB boot disk with the old system will allow you to enjoy the same computer configuration.
4. How do I get to the boot menu in Windows 11?
To access the boot menu in Windows 11, you must interrupt the standard boot sequence by pressing a specific key during startup. Common keys for this include F12, F11, F2, and Del. You'll need to hit the key repeatedly after powering on your machine and before Windows begins to launch.
How Can We Help You
About the Author
Updated by Joey Albert
Joey is an enthusiast of science and technology. With a passion for uncovering the latest tech innovations, she creates clear, engaging how-to guides that make technology accessible and enjoyable for all.
Sherly joined EaseUS in 2022 and she has always loved writing articles and enjoys the fun they bring. She receives professional training here, focusing on product performance and other relative knowledge. She has written over 200 articles to help people overcome computing issues.
Product Reviews
-
I love that the changes you make with EaseUS Partition Master Free aren't immediately applied to the disks. It makes it way easier to play out what will happen after you've made all the changes. I also think the overall look and feel of EaseUS Partition Master Free makes whatever you're doing with your computer's partitions easy.
Read More -
Partition Master Free can Resize, Move, Merge, Migrate, and Copy disks or partitions; convert to local, change label, defragment, check and explore partition; and much more. A premium upgrade adds free tech support and the ability to resize dynamic volumes.
Read More -
It won't hot image your drives or align them, but since it's coupled with a partition manager, it allows you do perform many tasks at once, instead of just cloning drives. You can move partitions around, resize them, defragment, and more, along with the other tools you'd expect from a cloning tool.
Read More
Related Articles
-
How to Reset Lenovo Laptop Password on Windows 10/11
![author icon]() Cici/2026/06/30
Cici/2026/06/30 -
BSOD Repair Tool for Windows PC (with Guide)
![author icon]() Oliver/2026/06/30
Oliver/2026/06/30 -
My Laptop Keeps Crashing When Watching Videos
![author icon]() Brithny/2026/06/17
Brithny/2026/06/17 -
Fixes for Windows Stop Code Inaccessible Boot Device 💡
![author icon]() Sherly/2026/06/17
Sherly/2026/06/17


