Page Table of Contents
Updated on Mar 15, 2024
Backup Utilities in Windows 7
Windows 7 has a built-in utility named Backup and restore, formerly centered in Windows Vista. It lets you perform backups to internal or external disks on your local computer. However, on Windows 7, create a system image backup is a premium feature that helps you create a copy of the whole system. It contains everything from the device drivers, Windows installation files, settings, applications, and personal files.
On the other hand, it would always be vital to possess a complete backup of your PC as it might help you retrieve from any system failure, malware, errors, or after installing a lousy update on Windows 7. Therefore, in today's article, you will see the detailed steps to create a system image backup of Windows 7 and others.
System Image Backup vs File Backup
System images are not the best way to generate standard backups of your Windows 7 PC and their files. On a similar note, a system image backup will let you nab files, which can be redownload and reinstalled easily, along with the files you don't bother about. However, if you can't control what isn't backed up, you might end up with a picture including everything on your hard drive.
A file backup is the most common backup type as they are simple. They come down to you choosing some files and folders which you want to backup. After that, the file-level type of backups usually lets you be well-acquainted with granular options for backup and retrieve things like SQL, Exchange, System State and more.
In this System Image Backup vs File Backup, the system image backup is more beneficial as it helps eliminate the need for Windows re-installment. You can return to the actual working state before a hard-drive crash.
System State Backup & System Image Backup Windows [2022]
This topic summarizes system state backup and how to use it on Server computers. And more, we collected other solutions to do the system image backup on Windows 10.
Create System Image Backup on Windows 7
Here we will demonstrate the best ways to create a system image backup Windows 7. Follow the two methods below to get the most from backup and restoration.
Method 1. Use Backup and Restore to Create System Image
Step 1. Open system image backup
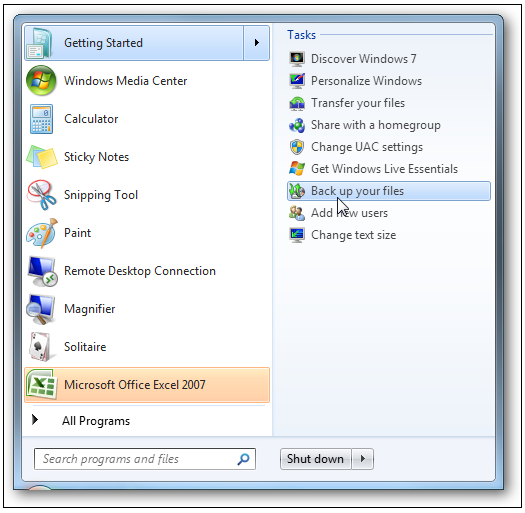
In order to get started with creating a system image backup on Windows 7, you need to open it. So, hit the Start, select the arrow to the right side of the "Getting started" item, and finally hit "backup your files."
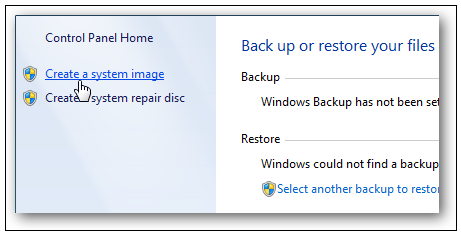
Step 2. Hit the "Create a system image" link from the backup and restore option.
Step 3. It will open up the Window for creating a system image.
*As a substitute, you might get directly to this Window from the desktop by using Win Key + R and typing the sdclt.exe / BLBBACKUPWIZARD into the Run dialogue box.
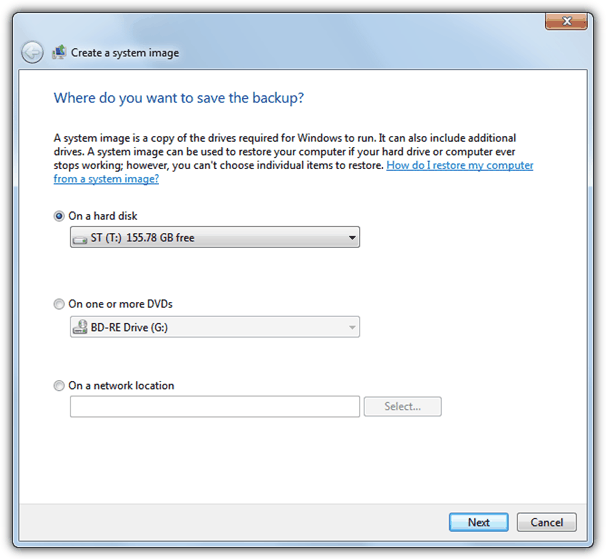
Step 4. You must backup the system image to a hard drive or multiple DVDs in case your Windows version upholds it. However, you will get a warning about the hard drive failing, which will result in both the backup and OS being lost. Therefore, when you place any value in the backups, you should use a specific physical device to save them.

Step 5. In this step, the availability of a small 100MB boot partition and the primary system partition will never allow you to select others as they will be automatically chosen.
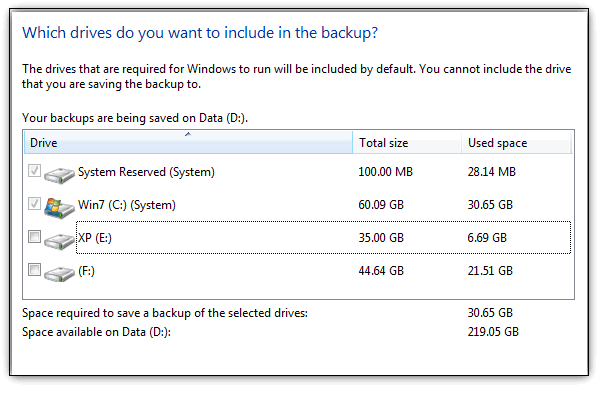
Note: You can't turn off one of the OS partitions in a multi-boot system as it will be auto-selected. It happens only when you install Windows 7 after the bootloader system files aren't located on Windows 7.
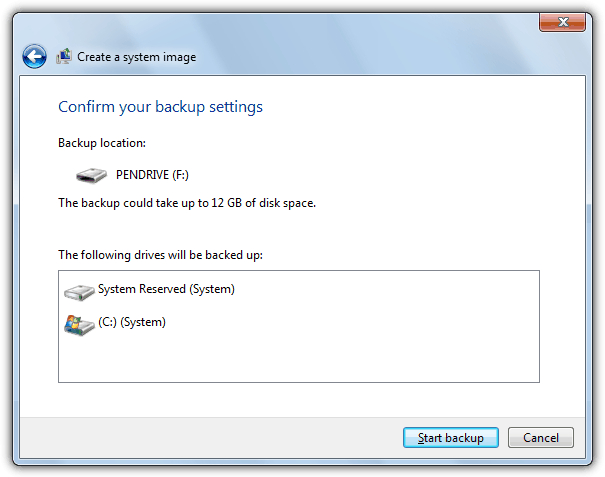
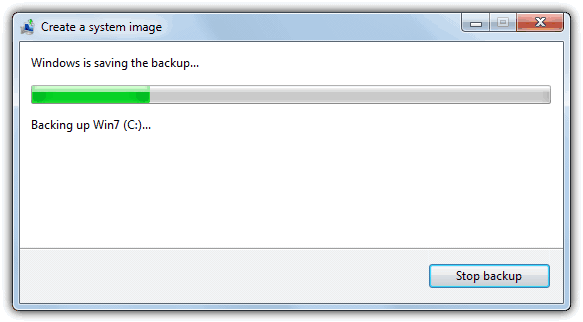
Step 6. At this final stage, the Backup and Restore tool will let you know how much space it might take to generate the Windows 7 system image backup. Hence, you need to start the process by hitting the backup button. The complete system image backup of Windows 7 will take a few minutes.
Method 2. Use EaseUS Todo Backup to Create a System Image
Are you looking for the most sophisticated and valuable version of Windows 7's system image backup? You can now work diligently with free backup software, EaseUS Todo Backup!
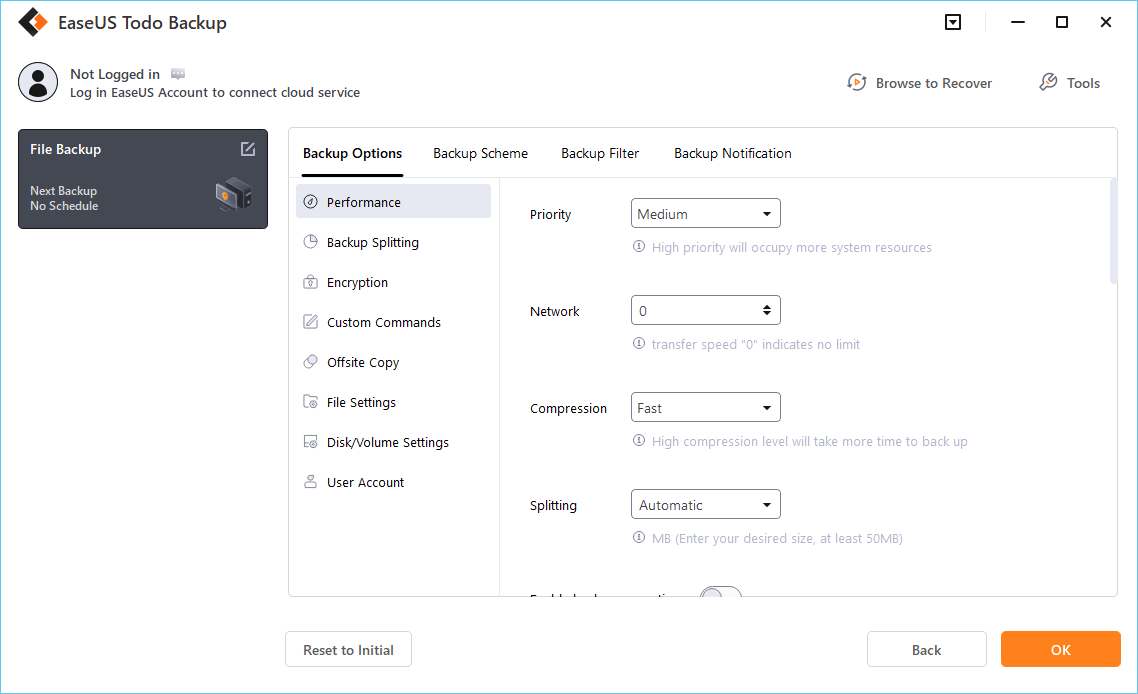
This premium tool can safeguard your data along with your future. It mainly comes with a hassle-free UI but robust capabilities to generate backups of the disk, OS, partition, and save backups to NAS, local drives, and cloud.
Although the basic version of EaseUS is free, it offers system backup or restores, quick backup recovery speed, disk backup/restore, and differential/full/incremental backup. On the other hand, its home and enterprise versions can only be bought at $39.95 and $49. In a nutshell, creating a system image with EaseUS Todo Backup is completely free!
Secure Download
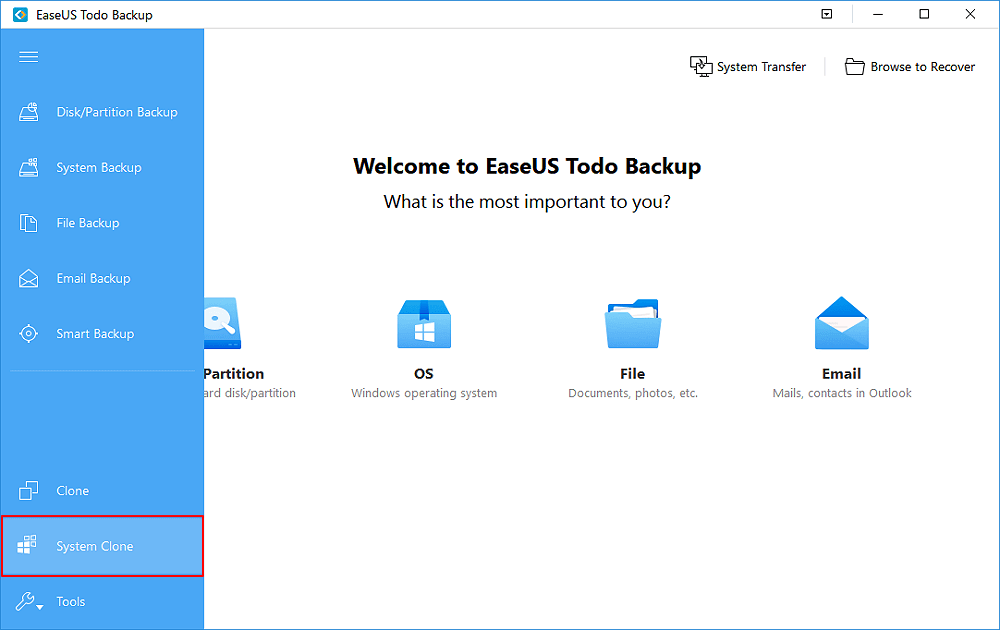
Step 1. Launch EaseUS Todo Backup and choose "Create Backup" on the home page, click "Select backup contents".

Step 2. Among the four available categories, click "OS" to start back up.

Step 3. The system partition will be automatically selected, you only need to select the location.

Step 4. Local Drive, Cloud, and NAS are available for you to save the backup file. You can also connect an external hard drive to preserve the system backup files.

Step 5. You can customize the settings in "Options" at the left bottom. After that, click "Backup Now", and the process will begin.
*After finishing the backup process, you can check the backup status, recover, open, or delete the backup by right-clicking the backup task on the left.
How to Restore Windows 7 with A System Image
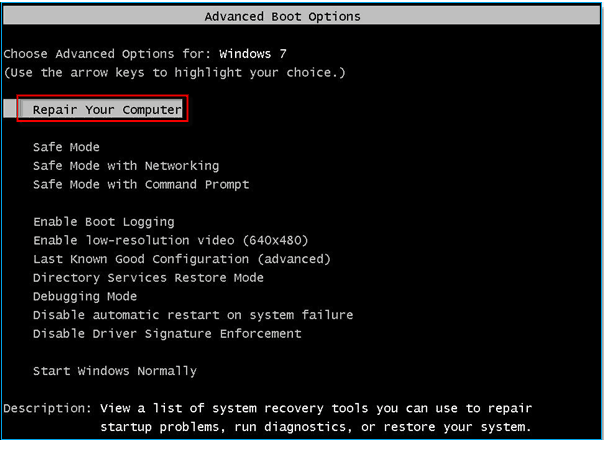
Step 1. You need to boot your Windows 7 PC and keep pressing the F8 key until you obtain the Advanced Boot Options screen. Now, opt for Repair your computer and press Enter.
Windows will take a little time to load up the system image repair boot.
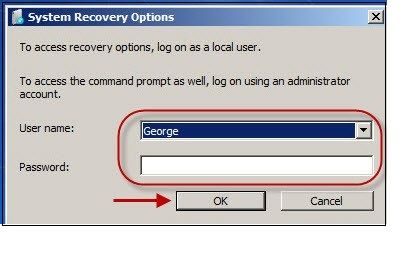
Step 2. After the repair boot loads, you must provide your username and password. Hit the OK button to proceed further.
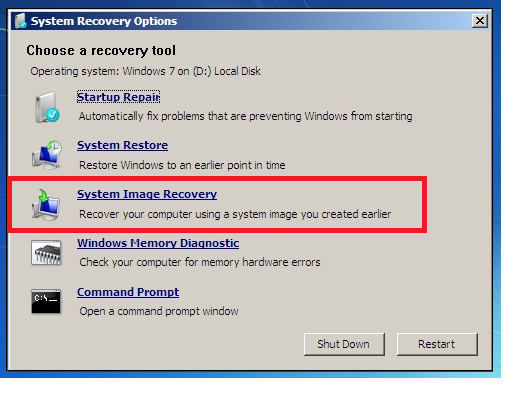
Step 3. Choose "System Image Recovery" from the available 5 options.
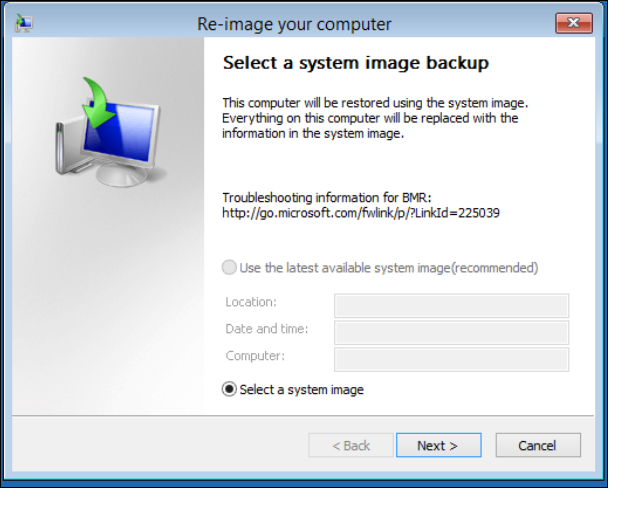
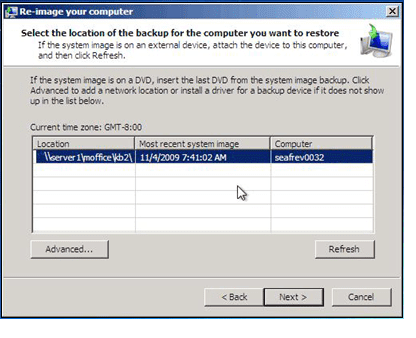
Step 4. There will be two different options while selecting a system image to retrieve from. But it would be better to use the newest system image. If it doesn't appear, hit "Select a system image."
Step 5. You can access the backup on the network in case you save it by using the Advanced tab. Now, hit "Next to continue" once you've detected your backup image.
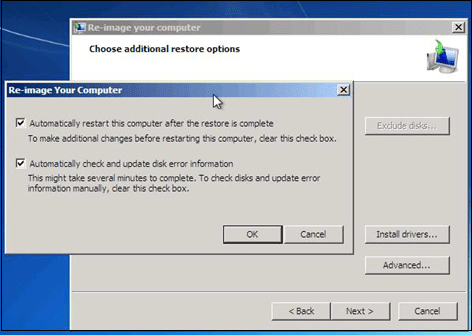
Step 6. An options screen will pop up under the "Advanced" section, where you need to make sure to check both the available boxes and select "Next."
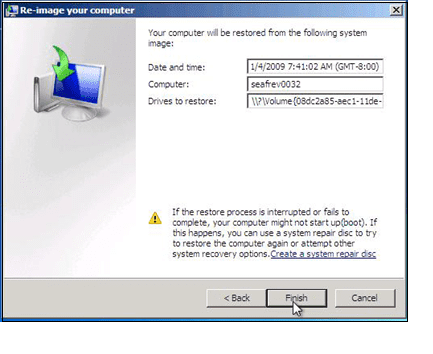
Step 7. Upon the arrival of the confirmation screen, you must confirm the restoration of the right image and hit the finish button.
Step 8. Wait until the progress bar is filled, and bypass clicking the stop or reboot the Windows 7 PC.
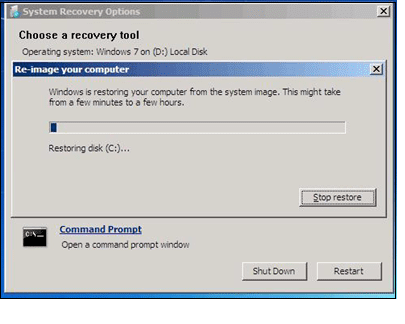
Step 9. Once done, the system will automatically reboot and restore.
FAQs
1. How Do I Restore Windows 7 from a system image?
A: All you need to do is hit the Troubleshoot title, choose Advanced options, and finally click system image recovery. You need to reboot the PC on Windows 7, and press the F8 key while it's booting. Finally, choose Repair your PC and hit Enter to boot into the retrieval mode.
2. How do I do a full system backup in Windows 7?
A: In case you're using Windows 7, you need to use File History to get started. You may find it in the system settings of your computer by finding it in the taskbar. Next, hit Add a Drive once in the menu and choose your external hard drive. Lastly, you need to follow the prompts, and Windows 7 will backup every hour.
The Bottom Line
These are the best steps to follow when you want to perform a system image backup Windows 7. If the image backup creates issues, EaseUS Todo Backup is the best solution. So, what are you worried about? Download it now!
Secure Download
Was this page helpful? Your support is truly important to us!

EaseUS Todo Backup
EaseUS Todo Backup is a dependable and professional data backup solution capable of backing up files, folders, drives, APP data and creating a system image. It also makes it easy to clone HDD/SSD, transfer the system to different hardware, and create bootable WinPE bootable disks.
Secure Download
-
Updated by
![]()
Jean
Jean is recognized as one of the most professional writers in EaseUS. She has kept improving her writing skills over the past 10 years and helped millions of her readers solve their tech problems on PC, Mac, and iOS devices. …Read full bio
Related Articles
![]() 2 Tips | How to Backup Hard Drive Before Formatting on Windows 11/10/8/7
2 Tips | How to Backup Hard Drive Before Formatting on Windows 11/10/8/7![]() How to Create Windows 10 ISO Image from Existing Installation (Windows to ISO)
How to Create Windows 10 ISO Image from Existing Installation (Windows to ISO)![]() How to Backup Windows XP to USB Drive? 2 Ways Recommended
How to Backup Windows XP to USB Drive? 2 Ways Recommended![]() Partition Backup|How to Backup Partition with Windows Partition Backup Software
Partition Backup|How to Backup Partition with Windows Partition Backup Software![]() How to Use the Best Kingston SSD Cloning Software to Clone HDD to SSD
How to Use the Best Kingston SSD Cloning Software to Clone HDD to SSD![]() 2024 Complete Guide: How to Boot from SSD After Cloning
2024 Complete Guide: How to Boot from SSD After Cloning
EaseUS Todo Backup

Smart backup tool for your files, disks, APPs and entire computer.
Topic Clusters


Interesting Topics