System image recovery and System restore are two independent ways to help restore a previous Windows operating system. Though both manners target system recovery or system rollback, they have dominant differences from each other. So, this article mainly helps users check their differences, and select a better system recovery solution according to their own needs.
- What is System Image Recovery for?
- What is System Restore for?
- How to Differentiate System Image Recovery and System Restore
- How to Determine Which Recovery Option is for Me
- Guide: How to Setup Backup for System Image Recovery in Windows 10
- Guide: How to Turn on System Restore in Windows 10
- Guide: How to Perform System Image Recovery and System Restore
- EaseUS Todo Backup: One Tool for Two Recovery Needs
What is System Image Recovery for?
Tools you need: Windows Backup and Restore (Windows 7) in Control Panel; Windows Settings
System Image Recovery is based on a system image. A system image is an exact copy of a drive. By default, Windows will create a system image of your hard drive and save it in a safe location (usually on an external hard drive or DVD). If your computer ever experiences a major failure, you can use that system image to restore the entire contents of your hard drive—including your operating system, applications, settings, user data like documents, pictures, music, and all of your files—back to the way it was when you created that system image.
What is System Restore for?
Tools you need: System Protection in System Properties
System Restore automatically creates restore points, a memory of the system files and settings on your computer at a particular point in time. When something goes wrong on your system as a result of a bad driver, unwanted changes to system settings, or malicious software activity, you can use System Restore to return your system back to the state it was in at an earlier time.
How to Differentiate System Image Recovery and System Restore
The main difference between these two methods is that a system image backup contains everything on your hard drive—including your operating system, applications, settings, and all of your files—whereas a System Restore only affects system files and settings. This means that if your computer ever experiences a major failure, you can use system image recovery to restore the entire contents of your hard drive back to the way it was when you created that system image. With system restore, however, you can only return system files and settings—not your personal files—back to an earlier point in time.
Another difference is that system image recovery requires a separate, bootable piece of media (either a CD/DVD or USB drive), whereas System Restore can be performed directly from within Windows.
Finally, system restore can be used to go back to a restore point created by Windows itself or one you've created manually, whereas system image recovery can only be used to restore a system image backup created with Windows Backup and Restore.
Check the comparison table and know each recovery option better:
| System recovery option | Description |
|---|---|
| System Image Recovery | You need to have created a system image beforehand to use this option. A system image is a personalized backup of the partition that contains Windows, and includes programs and user data, like documents, pictures, and music. |
| System Restore |
Restores your computer's system files to an earlier point in time without affecting your files, such as e‑mail, documents, or photos. If you use System Restore from the System Recovery Options menu, you cannot undo the restore operation. However, you can run System Restore again and choose a different restore point, if one exists. |
How to Determine Which System Recovery Option is for Me
System image recovery is recommended for users who want to create an identical copy of their hard drive, including the operating system, applications, settings, and all of their files. System restore is recommended for users who want to revert back to a previous point in time without affecting their personal files.
Still feel hard to make a decision? From my point of view, both are protective ways to help retain a stable Windows system, and both methods can affect our experience in doing a recovery someday in the future. If we consider the cost of time and efforts we need to put into each protection measure, we suggest users enable the system restore feature all the time on their computer, and at the same time, create a system image backup on a regular basis. Below are the final reasons for you to make a decision.
System Image Recovery's pros and cons:
- System image recovery requires a large-capacity hard drive to store the system image, the size of which is equal to the used space on your system drive, system reserved partition, and boot drive.
- The whole process of doing the system image recovery is finished in Windows Advanced Options, which is usually difficult and time-consuming to get over with it.
- System image recovery can take effect even when your computer fails to boot, due to the help of a system repair disc on CD/DVD, or a USB recovery drive.
System Restore's pros and cons:
- System Restore is easy to use and does not require any extra storage space since it only uses system restore points, which are snapshots of system files and settings. You can directly open the system restore from your system drive without the help of a system repair disc or USB recovery drive.
- System restore can be used to go back to a previous point in time without affecting your personal files.
- System restore does not affect your personal files, but it will remove any programs you have installed since the last restore point was created.
From the above discussion, we know that System Image Recovery and System Restore are two protective ways to create backups for a stable Windows system. If you want to create an identical copy of your hard drive, System Image Recovery is for you. If you only want to revert back to a previous point in time without affecting your personal files, System Restore is your choice. No matter which system recovery method you choose, enabling system protection and creating regular backups are always the best way to protect your computer from data loss.
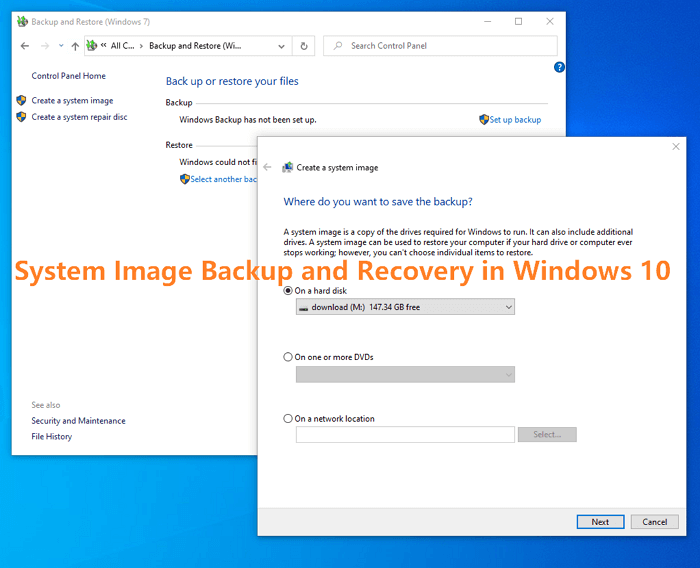
Guide: How to Setup Backups for System Image Recovery
As mentioned, a system image is required to perform system image recovery so you must ensure that you've created one or many. To make a system image backup, you can use a hard disk, external hard drive, a CD/DVD disc and a network drive to save the backup file. Here's how to access the Windows 10 system image recovery tool to set up a system backup.
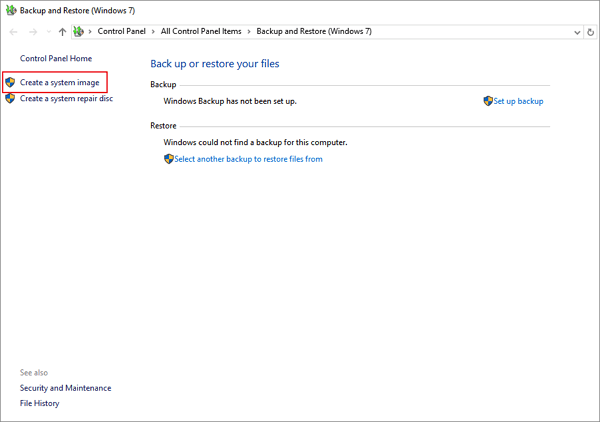
Step 1. Open Control Panel, locate the Windows Backup and Restore (Windows 7) option and click to open it.
Step 2. On the left side menu, click "Create a system image".
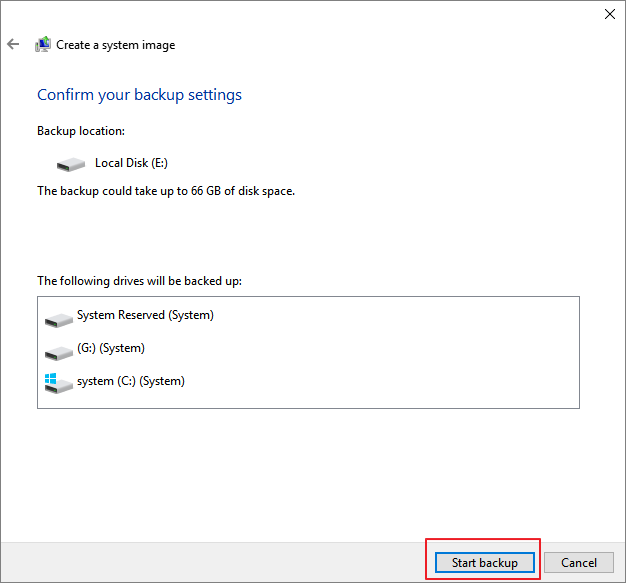
Step 3. Choose a drive that is available to you and click Next. Since the drive is used to keep the system image backup, which is the same size as the used space of your system C drive (mostly around 100GB), be sure that you use a large hard drive of no less than 128GB, especially if you want to create a system image on a USB flash drive. And, don't select the drive on the same physical disk that is being backed up.
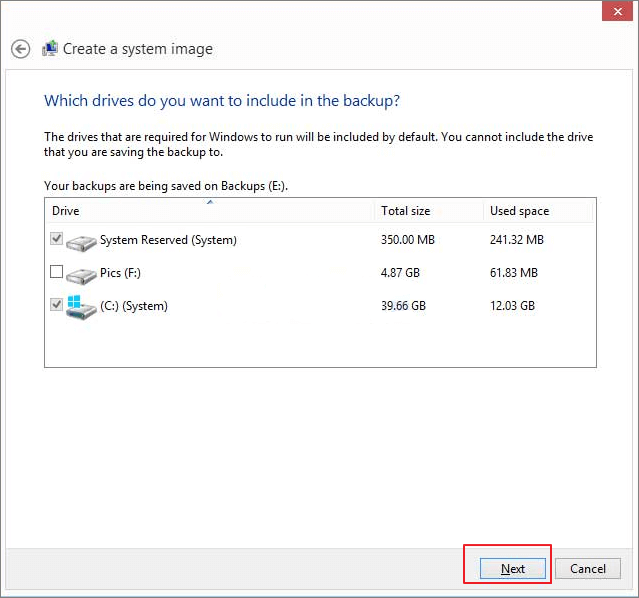
Step 4. Check the backup contents the system has chosen by default, which are all the partitions that are associated with Microsoft Windows operating system. You can include other data drives to the backup list as well at this step. After then, click Next.
Step 5. Preview the backup contents and click Start backup. You should now create a system image backup on a drive now. Do it regularly since your operating system is changing all the time by getting updates, saving new files or installing new programs.
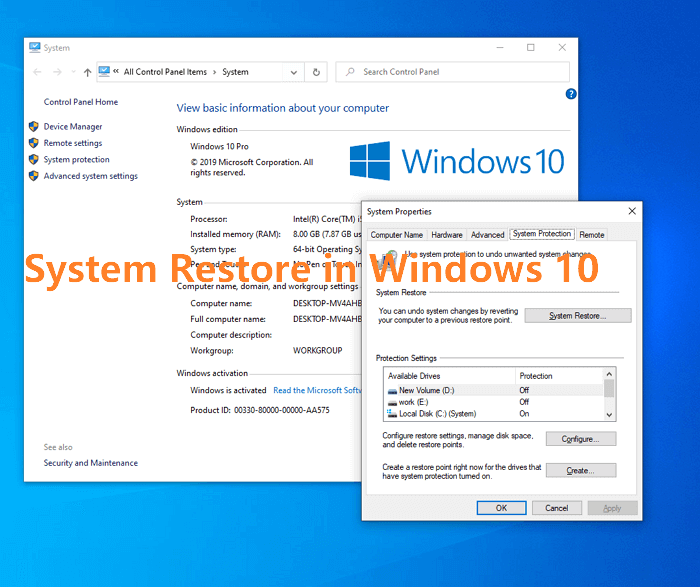
Guide: How to Turn on System Restore in Windows 10
The System Restore, however, can be set to be automatically activated in Windows 10. The whole process of setting up the System Restore feature can be faster and simpler than creating a system image backup.
Step 1. Right-click on This PC in Windows 10 and choose "Properties".
Step 2. On the left side menu, click System protection.
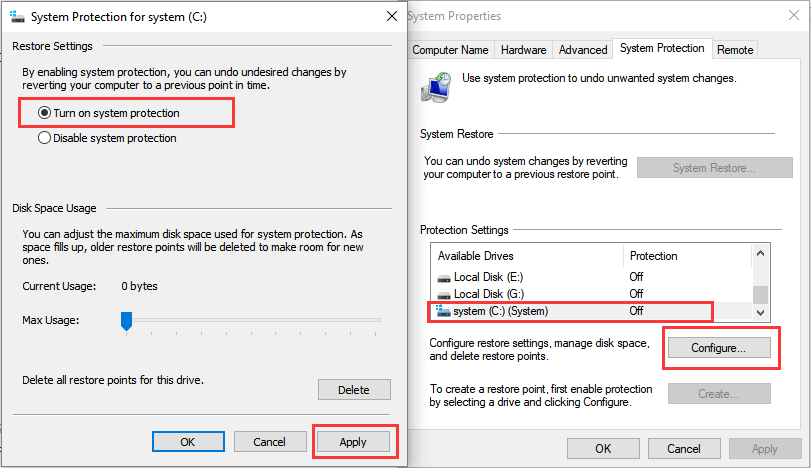
Step 3. Now the System Properties window will open. If you do not turn on the System Restore option before, you'll see the protection status of each drive partition is labeled as "off". To enable the system restore feature on the C drive, click the C drive option and then Configure.
Step 4. Under the Restore Settings, tick the option "Turn on system protection." You can set a backup reservation strategy to adjust the maximum disk space used for system protection, and it's useful to manage your backup hard drive disk space. After the changes are made, click Apply.
Tip:
1. The system restore setup is not for all partitions on a hard drive. In order to let the other drives take effect, you need to repeat all four steps to enable system restore on each drive.
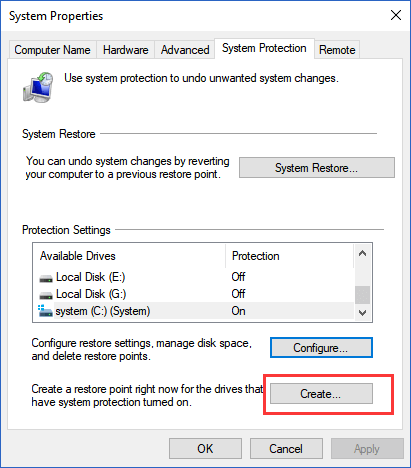
2. Once you configured the System Restore feature on a drive, Windows will automatically create important restore points for you. Nevertheless, you can still choose to manually create a significant system restore point by clicking the Create button underneath the Configure button.
Ultimate Guide: How to Perform System Image Recovery or System Restore on Your Computer
Setting up or configuring a system image or system restore point is made by different tools and options in Windows 10, and the recovery method varies, too. Here, we want to share a common way to access both recovery options in the Advanced options in Windows 10 Recovery Environment (Windows RE), and this shared method works great when you are not able to log in to access Windows operating system.
Step 1. From the login screen, click Shutdown, then hold down the Shift key while selecting Restart.
Step 2. Once the Windows RE screen loads up, click Troubleshoot under the Choose an option menu.

Step 3. Move on to the Advanced options.
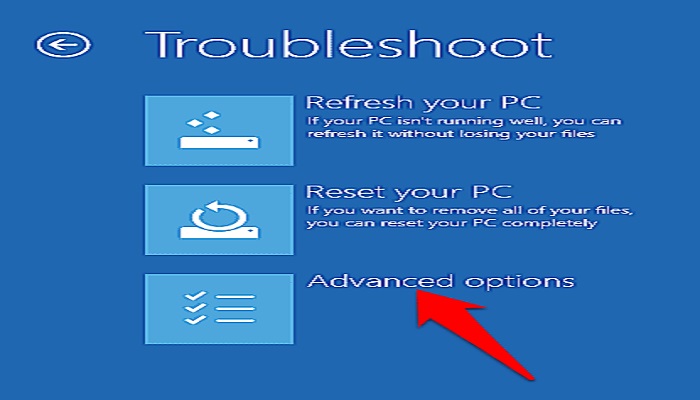
Step 4. There, you can see both the System Restore and System Image Recovery options.
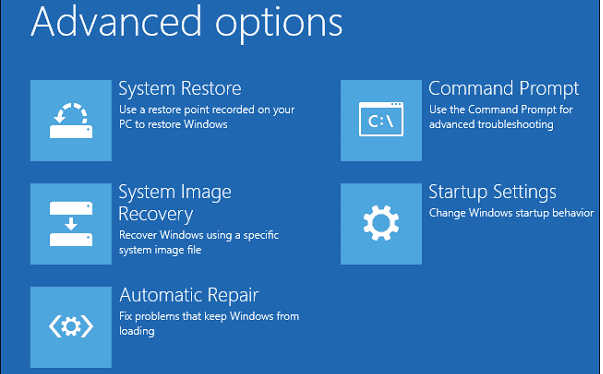
Step 5. Click either of the options you need, and follow the onscreen wizard to complete the system recovery process.
To sum up, System Image Recovery and System Restore are two of the essential Windows system recovery options which are used to restore a crashed or abnormal Windows operating system to a working state, and other recovery options we're familiar with are Startup Repair, Windows Memory Diagnostic Tool, and Command Prompt.
The main differences between the two options are related to the cost of time and energy, the ability to restore personal files and the requirement of a backup disk's storage. So, choosing System Image Recovery or System Restore is not an answer to "which system recovery option is better". According to the 3-2-1 backup strategy, the best way to protect Windows is to make at least two copies of backups at the same time. So, we suggest users to create both system image backup and system restore points to better protect the operating system, and ease of worry of not knowing how to reinstall Windows 10.
EaseUS Todo Backup: One Tool for Two Recovery Needs
Microsoft Windows indeed has backup and recovery solutions by default for users to make backups. It has File History for file backup and recovery, and System Backup and Restore (Windows 7) for system backup and recovery, and the System protection measure to create system restore points. However, they're all separate features that provide basic backup functions.
On one hand, many users don't know what backup methods are integrated into Windows. And to be frank, the whole process of backup creation and recovery is complex and takes too long to learn and follow. Booting into Windows RE requires advanced computer skills as well.
Taking the time and learning curve in using either System Image Recovery and System Restore into consideration, we think EaseUS Todo Backup is a perfect alternative solution to protect Windows operating system. In addition, it's a comprehensive backup solution to files, hard disk/partition, emails, OS and everything you kept on a computer.
Most importantly, it comes with advanced backup options that can greatly save your backup disk space, improve the backup and recovery speed, and automate a scheduled backup task.
Secure Download
Create a backup:
Step 1. Launch EaseUS Todo Backup on your computer, and click Create Backup on the home screen and then hit the big question mark to select backup contents.

Step 2. To back up your Windows operating system, click "OS" to begin the backup task.

Step 3. Your Windows operating system information and all system related files and partitions will be automatically selected so you don't need to do any manual selection at this step. Next, you'll need to choose a location to save the system image backup by clicking the illustrated area.

Step 4. The backup location can be another local drive on your computer, an external hard drive, network, cloud or NAS. Generally, we recommend you use an external physical drive or cloud to preserve the system backup files.

Step 5. Customiztion settings like enabling an automatic backup schedule in daily, weekly, monthly, or upon an event, and making a differential and incremental backup are available in the Options button if you're interested. Click "Backup Now", and the Windows system backup process will begin. The completed backup task will display on the left side in a card style.

Perform system recovery:
* To perform system recovery on a none-bootable machine, try to boot the computer through the EaseUS Todo Backup emergency disk.
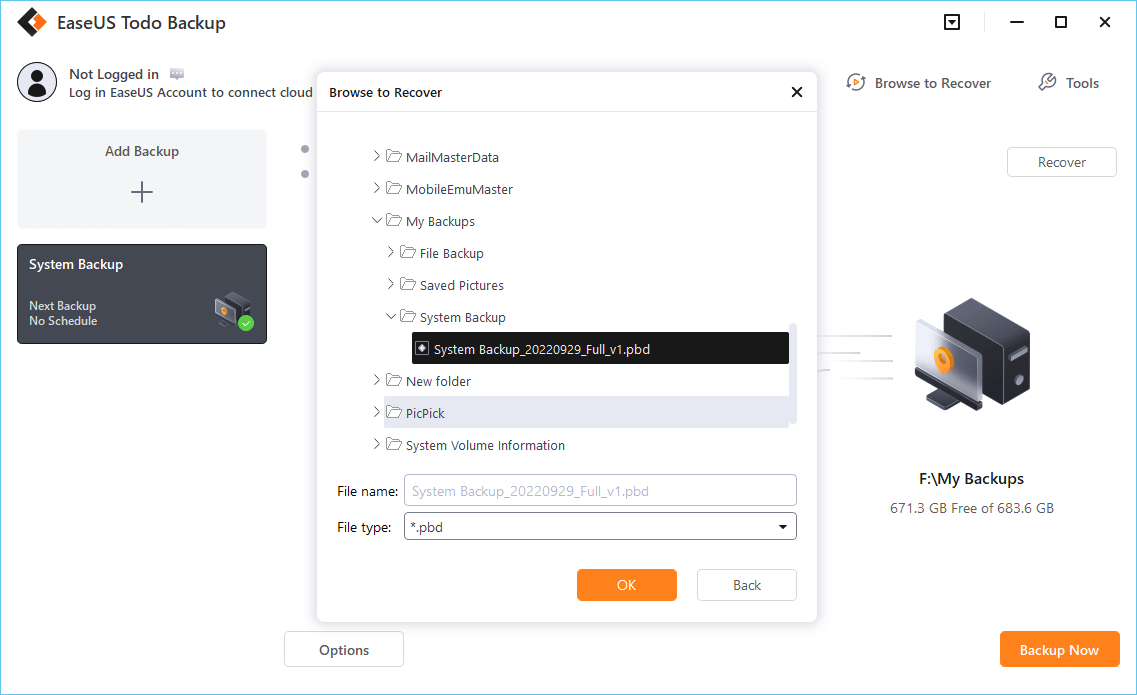
Step 1. Launch EaseUS Todo Backup, click "Browse to Recover".

Step 2. Guide to your backup destination, choose the system backup file you need. (The backup file created by EaseUS Todo Backup is a pbd file.)
Step 3. Choose the recovery disk. Make sure that the partition style of the source disk and the recovery disk are the same.
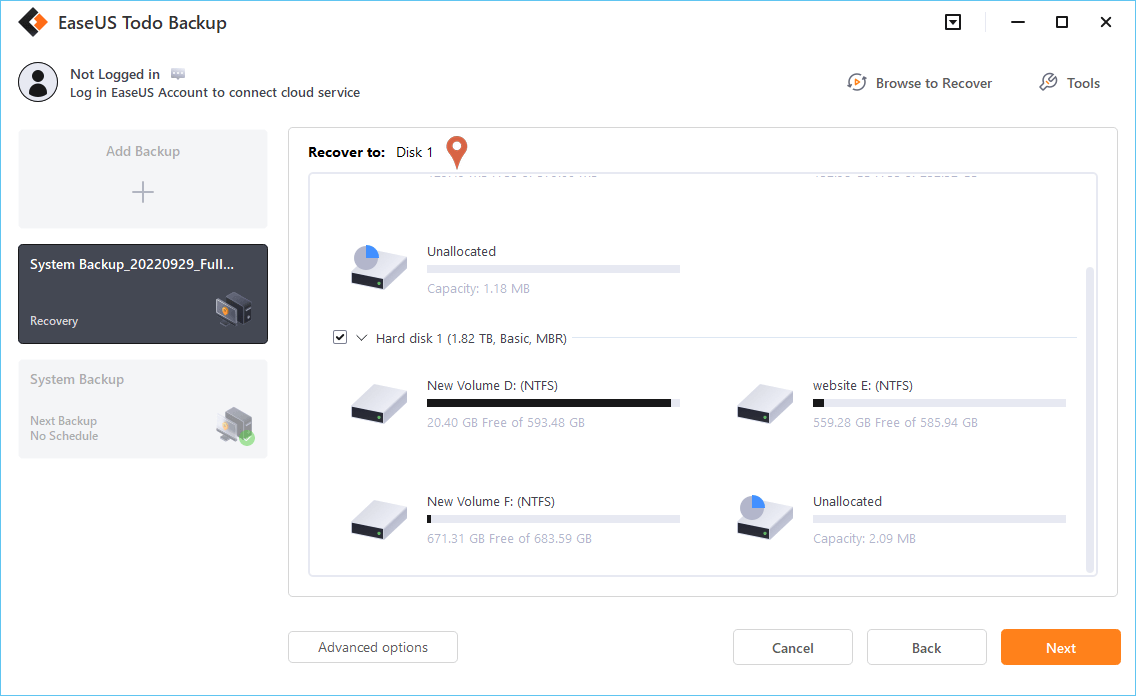
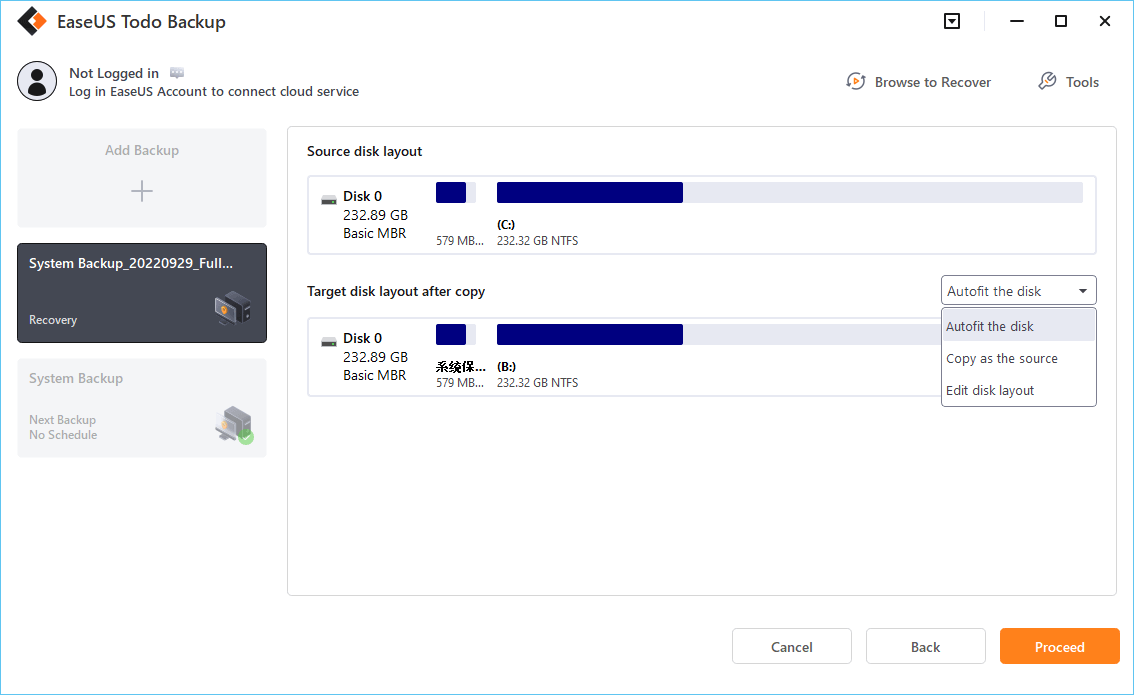
Step 4. You can customize the disk layout according to your needs. Then click "Proceed" to start system backup recovery.
Secure Download
Was This Page Helpful?
Daisy is the Senior editor of the writing team for EaseUS. She has been working at EaseUS for over ten years, starting as a technical writer and moving on to being a team leader of the content group. As a professional author for over ten years, she writes a lot to help people overcome their tech troubles.
Jean is recognized as one of the most professional writers in EaseUS. She has kept improving her writing skills over the past 10 years and helped millions of her readers solve their tech problems on PC, Mac, and iOS devices.
Related Articles
-
[Steam Tutorial] How to Backup and Restore Steam Game Files
![author icon]() Dany/Jul 01, 2026
Dany/Jul 01, 2026 -
How to Use Seagate Backup Plus Slim on Windows [2026 Tips]
![author icon]() Jean/Jul 01, 2026
Jean/Jul 01, 2026 -
Windows Backup Problem: Windows Backup Stuck at 97%
![author icon]() Jean/Jul 01, 2026
Jean/Jul 01, 2026 -
How to Repair Windows 7 Without CD in 3 Possible Ways
![author icon]() Jerry/Jul 01, 2026
Jerry/Jul 01, 2026