Page Table of Contents
Updated on Jan 21, 2026
In this post, we will see how to backup Windows 10 to QNAP NAS using two methods.
An Overview of QNAP NAS & Benefits of Saving Windows on It
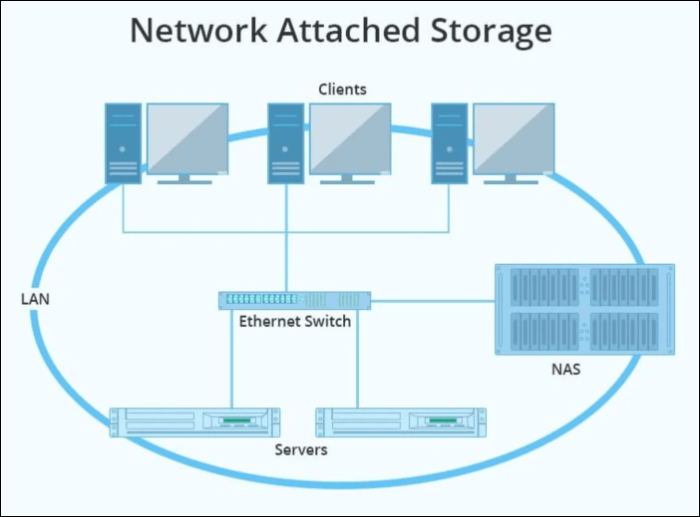
NAS stands for Network Attached Storage, and Nad devices are used to store and manage data for backups, security, and space purposes. This helps you access the data remotely from the authorized systems whenever required. Also, multiple people can access the data from anywhere and work on the same thing at a time.
QNAP stands for Quality Network Appliance Provider, it is one of the leading NAS providers in the world based out of Thailand. The company is known for providing highly flexible and scalable systems to users across various fields. Since the threats across the digital world are unannounced, it is better to create a backup of Windows 10/11 in case of any unfortunate incidents.
Benefits of Saving Windows on QNAP NAS:
- Data Storage Capacity and Backup
- Easy Remote Access
- Collaborative Environment
- Centralized Storage
- Data Redundancy and Security
What to Prepare Before Backing Windows 10 to NAS
Before you move further, preparing your system to back up Windows 10 using a QNAP Network-Attached Storage (NAS) device is important. Here are the essential things you need to do:
- Acquire and Set up your NAS: Get your NAS from QNAP and set it up using the manufacturer's instructions.
- Install NAS Management: To control and manage your storage on NAS, the service providers develop a software or web interface to connect your PC and NAS.
- Connect the system and NAS: Create the NAS account and open File Explorer. Find the Network section and connect the NAS. If your NAS device is not listed, connect using the NAS's network path (e.g., \NAS_name or \NAS_IP_address).
- Choose Backup Software: To back up your data, you need professional backup software like EaseUS Todo Backup to configure and monitor backups.
- Internet Connection: Make sure you have a reliable internet and power supply to perform the whole process smoothly.
Do remember to share it with your fans if it is useful:
Back-Up Windows 10 to QNAP NAS with Various Methods
Here in this section, we will see two ways to back up Windows 10 to QNAP NAS using professional software and the Windows built-in tool.
- Method 1. Backup Windows 10 to QNAP NAS via EaseUS Todo Backup🔥
- Method 2. Backup Windows 10 to QNAP NAS with Backup and Restore
Method 1. Backup Windows 10 to QNAP NAS via EaseUS Todo Backup
The Windows built-in tool may meet your basic requirements, but the modern requirements need advanced solutions to manage and back up Windows 10 to the QNAP server. EaseUS Todo Backup is a professional backup software with award-winning solutions to offer you complete and secure backup solutions.
With the software's advanced and intelligent backup solutions, you can safely make a backup of your Windows to the NAS backup server and recover easily. All of these features make EaseUS Todo Backup a perfect solution for all your backup needs to the QNAP NAS. Try the trial version to see all the features by yourself.
Secure Download
| 🔬Advanced Backup Solutions | The software only backs up the used storage of the system to save space and time. |
| 🌩️Fast backup and recovery | You can make backups of the entire system. And you can back up a partition or a drive to your NAS. |
| 🔑Security Zone | EaseUS allows you to create a zone on NAS to protect your files from external threats to keep all your files inaccessible. |
| 🗳️Excellent Cloning options | You can clone your entire system and hard disk with great cloning options to keep copies of your system in case of emergencies |
🪜Here is the step-by-step guide to back up Windows 10 to QNAP NAS:
Step 1. Launch EaseUS Todo Backup and choose "Create Backup" on the home page, click "Select backup contents".

Step 2. Among the four available categories, click "OS" to start back up.

Step 3. The system partition will be automatically selected, you only need to select the location.

Step 4. Local Drive, Cloud, and NAS are available for you to save the backup file. You can also connect an external hard drive to preserve the system backup files.

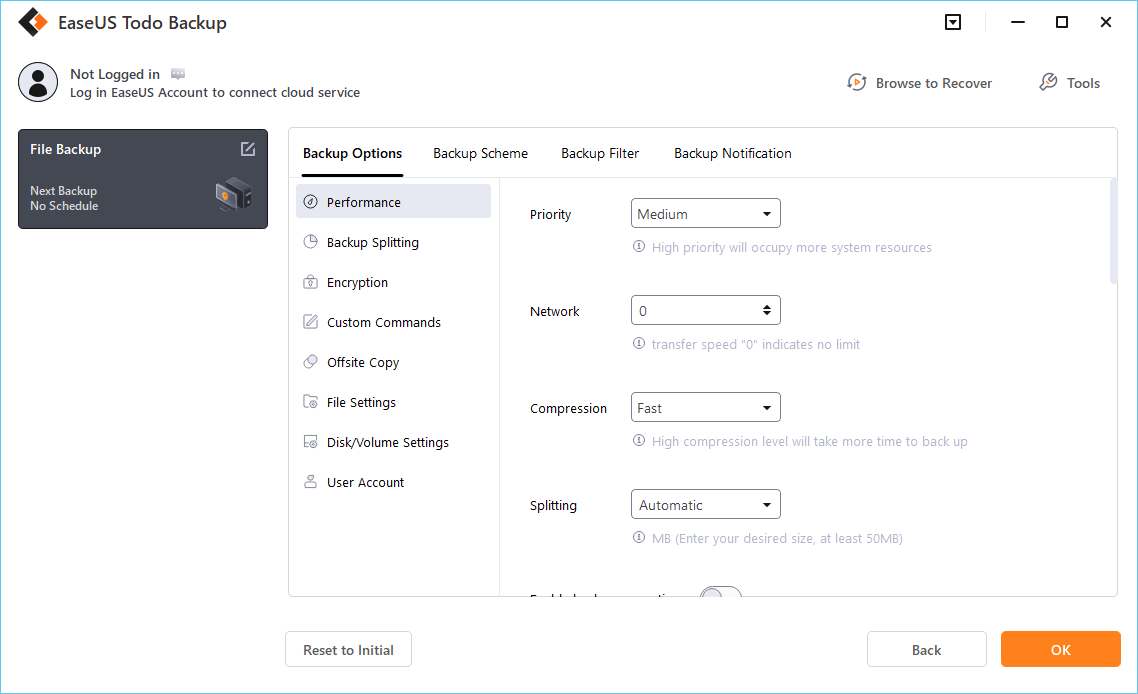
Step 5. You can customize the settings in "Options" at the left bottom. After that, click "Backup Now", and the process will begin.
*After finishing the backup process, you can check the backup status, recover, open, or delete the backup by right-clicking the backup task on the left.
Method 2. Backup Windows 10 to QNAP NAS with Backup and Restore
Windows provides a built-in tool called Backup and Restore to create backups on your PC. You can create system images and backup them on QNAP NAS.
👍Pros of Using Backup and Restore:
- The tool is built-in and free.
- You can easily make a full system image, including the operating system and complete data.
- Allows making backups for NAS devices and shared network folders.
- You can schedule backups and recover them with ease.
⛔Cons of Using Backup and Restore:
- Limited features.
- Creating a full system backup consumes a large space.
- Consume more time while creating and restoring them.
- Hardware dependency makes it an unreliable option.
Share this post on Reddit or Twitter if it is helpful:
🪜Here's how you can backup Windows 10 to QNAP NAS:
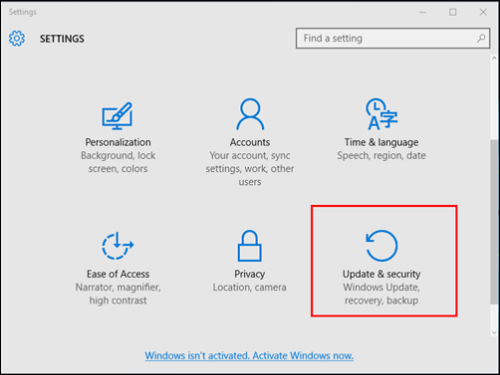
Step 1: Open Settings and click on Update & Security.
Step 2: Navigate to the Backup section and click on Go to Backup and Restore (Windows 7).

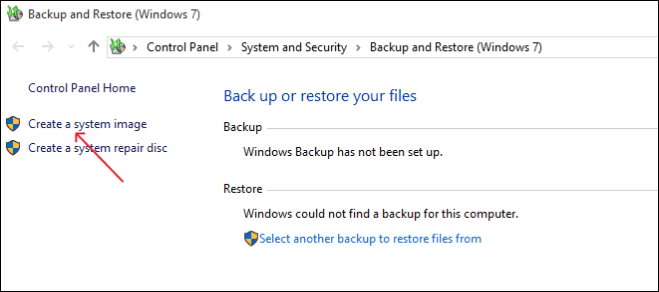
Step 3: Click on Create a system image.
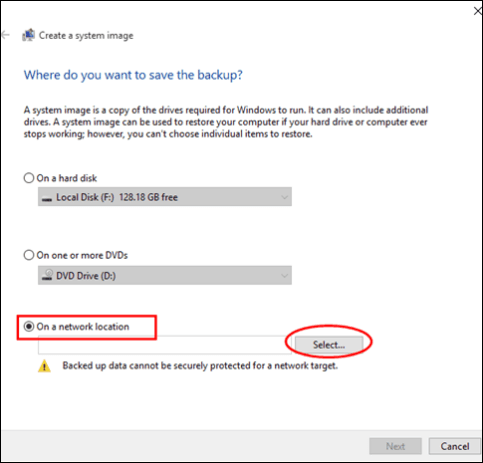
Step 4: In the next screen, select a location to save the backup. Choose On a network location and click on the Select button.
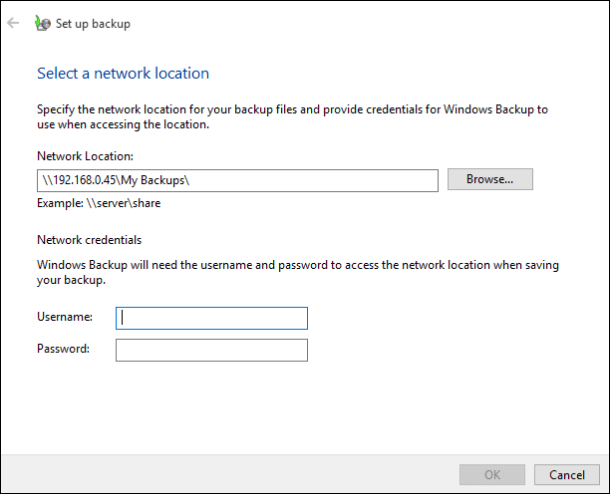
Step 5: Enter something like this: \\QNAP_NAS_IP_address\shared folder name with the help of Browse. Also, enter the Username and Password for the NAS credential and click OK.
Step 6: After this, select the system image and drive you want to backup and click Next. Click on Start Backup to initiate the process, and after completing, cross-check your files in the QNAP NAS server.
You may also be interested in:
[All-in-One] Create Windows 11 Backup to NAS (Network drive)
NAS, also known as a network hard drive, is an emerging network-based storage device. In the world of data protection, choosing a safe and secure backup location is the key to success. This article will focus on the possibility of backing up Windows 11 (including files and systems) to a NAS.
The Concluding Thoughts
If you are someone dealing with huge amounts of data, NAS devices are useful sources for storing and managing everything. And QNAP is a trusted company delivering great NAS storage solutions. Make sure you use any of the above two methods to backup Windows 10 to QNAP NAS. While the built-in tool can cater to basic requirements, it consumes a large space for full system images.
In such cases, you should use a tool like EaseUS Todo Backup to apply advanced methods to save space and recovery time. You can also create bootable media to start your system without reinstallation during emergencies.
Secure Download
FAQs on how to How to Backup Windows 10 to QNAP NAS
Here are some of the most frequent FAQs on how to back Windows 10 to QNAP NAS. I hope you find these queries helpful.
1. How do I connect my QNAP NAS to Windows 10?
- Connect your QNAP NAS to the local network using File Explorer.
- Find the NAS IP using its management interface or router's device list.
- Access the NAS Shared folders using the NAS IP Address.
- Map the network drive to access the shared folders.
- Authenticate your credentials to access the QNAP NAS on your Windows 10.
2. Can QNAP NAS read NTFS?
Yes, QNAP can read NTFS file systems. In fact, you can format the NAS device to read as many as four popular file systems: EXT3, EXT4, NTFS, and FAT32.
3. How to set up NAS on Windows 10?
- Set up the NAS device and configure your local network.
- Start your NAS and configure the security and storage options.
- Add your accounts and set up folders and volumes.
- Set up the computers on the local network, and NAS is ready to use.
Was this page helpful? Your support is truly important to us!

EaseUS Todo Backup
EaseUS Todo Backup is a dependable and professional data backup solution capable of backing up files, folders, drives, APP data and creating a system image. It also makes it easy to clone HDD/SSD, transfer the system to different hardware, and create bootable WinPE bootable disks.
Secure Download
-
Updated by
![]()
Jerry
"I hope my articles can help solve your technical problems. If you are interested in other articles, you can check the articles at the bottom of this page, and you can also check my Facebook to get additional help."…Read full bio -
Written by
![]()
Larissa
Larissa has rich experience in writing technical articles and is now a professional editor at EaseUS. She is good at writing articles about data recovery, disk cloning, disk partitioning, data backup, and other related knowledge. Her detailed and ultimate guides help users find effective solutions to their problems. She is fond of traveling, reading, and riding in her spare time.…Read full bio
Related Articles
![]() How to Backup and Restore Windows 8/8.1 System [SOLVED]
How to Backup and Restore Windows 8/8.1 System [SOLVED]![]() How to Set Automatic Backup to OneDrive in Windows 11/10/8/7[FIXED]
How to Set Automatic Backup to OneDrive in Windows 11/10/8/7[FIXED]![]() Top 5 Best Open Source Cloning Software in 2026 [100% Free & Clone Your Disk Anytime]
Top 5 Best Open Source Cloning Software in 2026 [100% Free & Clone Your Disk Anytime]![]() How to Backup/Save Favorites Mailbox in Outlook[Automatic& Manual Ways]
How to Backup/Save Favorites Mailbox in Outlook[Automatic& Manual Ways]![]() Automatically Backup Folder to Network Drive
Automatically Backup Folder to Network Drive![]() How to Backup Chrome Settings Without Sync [Step-by-Step Tutorial]
How to Backup Chrome Settings Without Sync [Step-by-Step Tutorial]


EaseUS Todo Backup

Smart backup tool for your files, disks, APPs and entire computer.
Topic Clusters


Interesting Topics