Page Table of Contents
Updated on Jul 01, 2026
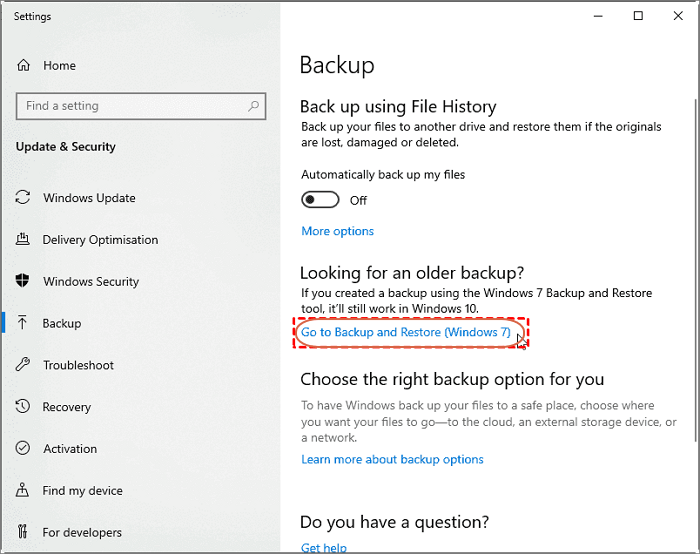
The new Windows 11 comes with many new and existing backup options that let us easily create new backups and restore old backups with ease. But many Windows 11 users are currently facing issues accessing the Windows 11 backup features. According to the affected users, some of the backup options are missing from their systems. As a result, they can't use them. For some users, the File History option isn't present under the Back up using the "File History" section, as mentioned in the image below.
According to the rumors, Microsoft has moved some backup features under other sections and tabs. The reason could be anything, but now the point is how to get the missing backup options back on your Windows 11 PC. If these options are also missing on your Windows 11 PC, I've got some possible workarounds to get them back. I've created this detail that covers all the tried and tested solutions to help you resolve the Windows 11 backup options missing issue.
Windows 11 Backup Options Missing, What'll Happen
The new Windows 11 has several backup options, allowing you to create backups and restore previous backups seamlessly. Here is the list of backup options in Windows 11. Windows 11 Backup and Restore (Windows 7) is one of the useful backup features in Windows 11 that enables you to create fresh Windows backups. You can use this feature to restore previous Windows backups.
Besides this, the "File History" option lets you store all the versions of your Windows system files and folders and restore them in the future. You can generate and keep all your Windows system backups in an external drive with the help of integrated backup features.
Microsoft has incorporated some new backup options into the latest Windows 11. You can now save all the backups in cloud storage, like OneDrive, Google Drive, etc. There are a lot of Windows backup tools that let you generate regular and automated backups of your system files and folders.
What Will Happen If Windows 11 Backup Options are Missing
You can face varied consequences because of missing backup options. For instance, without the File History option, it would be challenging to keep a record of all versions of system files and store them for later use.
You can encounter different problems in the absence of some backup options.
- Can't Create Backup Windows 11 Essentials
- Can't Quickly Restore Windows 11 Backup
- Won't Be Able To Recover From Virus Infection, System Crash, or Disk Failure Errors
- System Data Will Always Be at Risk
- Won't Be Able To Create System Image
Fret not! Just stay calm because I've got you covered. I've already found some tried and tested solutions to get missing backup options back on your Windows 11 PC. Keep following this guide to effortlessly resolve the Windows 11 backup options missing issue.
How to Fix Windows 11 Backup Options Missing on Your Own
Resolving the Windows 11 backup options missing issue is relatively simpler, and you can do it yourself. This section will help you get the missing windows 11 backup options available again. Thus, follow the below-mentioned steps to learn more.
#1. Backup Windows 11 Essentials
If some of the backups options are absent on your Windows 11 PC, I always prefer switching to a third-party backup tool. Backup tools are a much better option for creating fresh backups and keeping them for future use. It's always recommended to use third-party backup tools because of some valid reasons. Backup tools are professional yet easy to use for generating backups. They are entirely automated and come with all types of essential features.
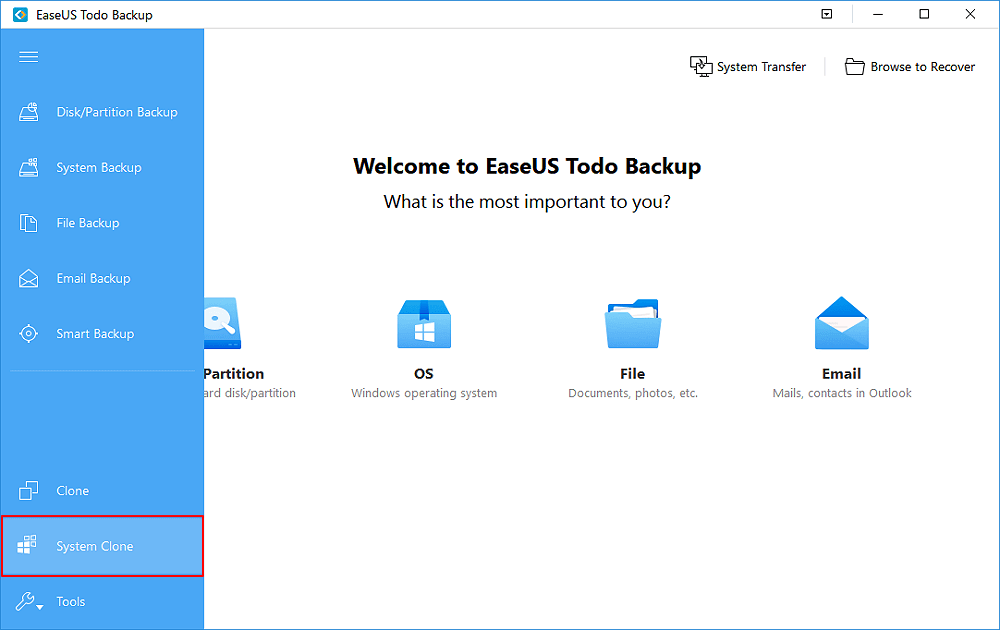
Out of all third-party backup tools, we recommend choosing the EaseUS Todo Backup Home. EaseUS Todo Backup is great for generating backups of your Windows 11 PC and restoring them anytime and anywhere. I've some valid reasons behind choosing this tool over others. For instance, it creates a Windows system image in a few minutes without any errors.
Secure Download
I really liked the EaseUS Todo Backup tool's ability to generate backups without data loss. This tool also provides 250GB worth of cloud space for free to save all your backups for decades without any storage issues. What else do you need then? You can download the EaseUS Todo Backup tool and follow the below-mentioned guide to know how to use it.
Step 1. On the main page, click "Select backup contents".

Step 2. Among the four available categories, click OS.

Step 3. EaseUS Todo Backup will automatically select your system partition, you only need to select the backup destination.

Step 4. Both Local Drive and NAS are available for you to save the backup file.

Step 5. After finishing the backup process, you can check the backup status, recover, open, or delete the backup by right-clicking the backup task on the left.

#2. Address and Fix Windows 11 Backup Options Missing Error
Before trying the below-mentioned solutions, it's essential to discover which of the backup options is missing from your Windows 11 PC. Once that's identified, start following the below-mentioned guide to fix and make the backup option work again.
1. Fix Windows 11 Backup and Restore Missing
If the Backup & Restore (Windows 7) feature is missing from your Windows 11 system, follow the below-mentioned solutions carefully to get them back.
Solution #1. Enable Volume Shadow Copy
One of the solutions to overcome the Backup and Restore missing issue is ensuring the Volume Shadow Copy is enabled. Follow the below-mentioned steps to turn on the Volume Shadow Copy service.
Step 1. Press "Win + R" to open the "Run" program. Then type Services.msc in the search bar.
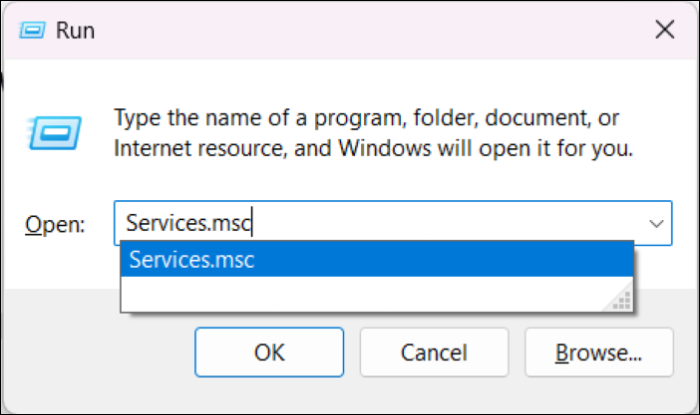
Step 2. Search for "Volume Shadow Copy" in the Services tab.
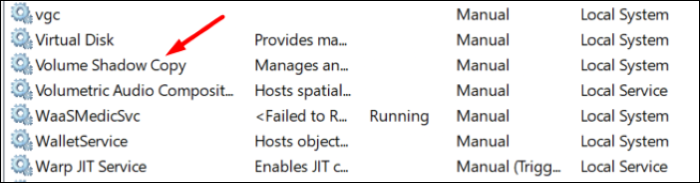
Step 3. Right-click on "Volume Shadow Copy" and select "Properties."
Step 4. If the service is running, the Start button will be unclickable. If not, click "Start" to turn on the "Volume Shadow Copy" service.
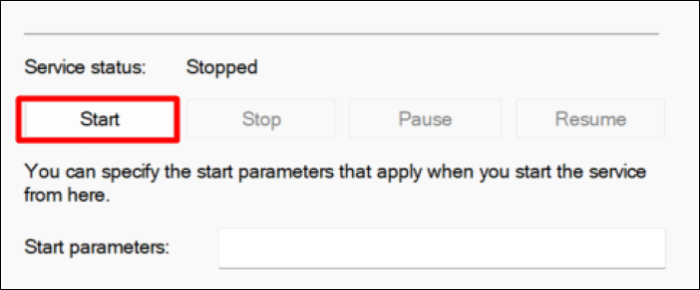
Step 5. In the end, click on "Apply" and close the window.
Solution #2. Use chkdsk Command
It's possible that your hard disk has some errors that led to this issue. You can fix all the disk errors by executing a command in the Command Prompt.
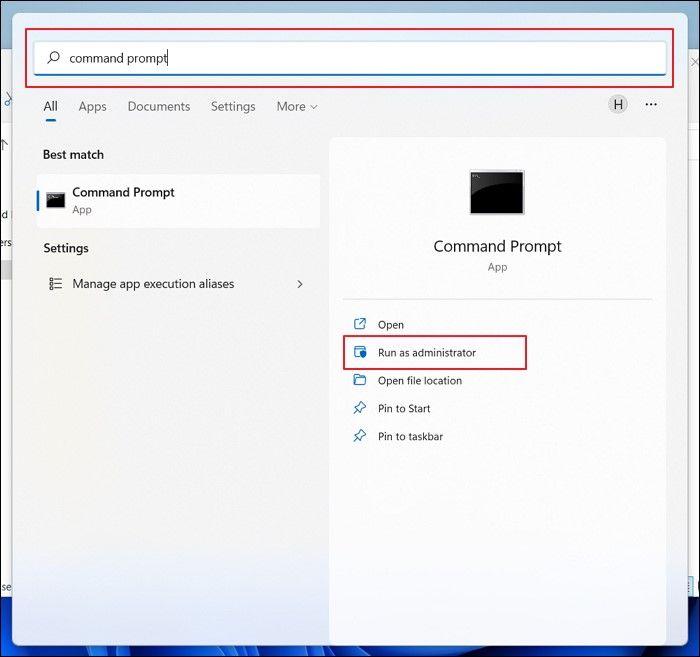
Step 1. Open the Command Prompt with admin rights.
Step 2. Copy and then paste the mentioned command in the console:
chkdsk /r X:
- Note:
- Replace X in the command with your hard drive letter.
Step 3. Hit the "Enter" key and then type Y to start the scanning process.
Step 4. Once the scanning process is completed, restart the system and check whether the "Backup and Restore" option is back again or not.
Solution #3. Disable System Protection
System Protection could also be one of the culprits of this issue. Thus, you can try disabling this option to see if the missing options are available again or not. Follow the below-mentioned steps to disable this feature.
Step 1. Open the Control Panel and move to the "System and Security" tab.
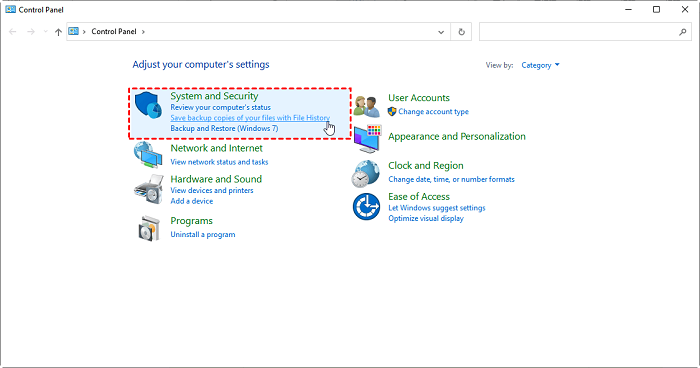
Step 2. Then, move to the "System" tab. Now, select "System Protection."
Step 3. Click on the "Configure" option. Lastly, select "Restore Settings" to "Disable system protection."
Step 4. Click on "Apply" and then "OK."
2. Fix Windows 11 File History Missing Error
Many users reported that the File History feature is missing from their Windows 11 PC. If you're also facing the same issue, you can follow the below-mentioned fixes to overcome this.
Solution #1. Enable File History Service
Windows File History service holds an integral role in the proper functioning of the File History backup feature. You need to ensure this service is enabled. Here are the steps to ensure and enable the File History service.
Step 1. Open the Services app. Search for "File History Service" in the Services tab.
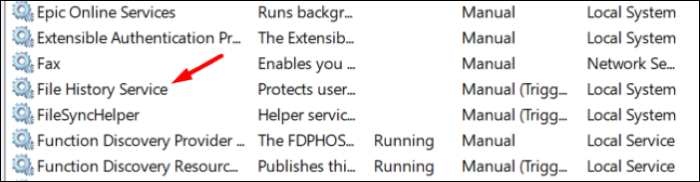
Step 2. Double-click on the "File History Service" to open its properties.
Step 3. Click on the "Start" button to start the "File History" service.
Step 4. In the end, set the "Start Type" option to "Automatic (Delayed Start)."
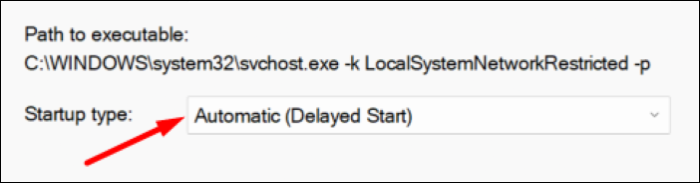
Step 5. Finally, click on "Apply" to save all the settings.
Solution #2. Turn On the File History Option
If the File History backup function is missing, there's a possibility that the File History option is disabled on your Windows 11 system. You need to enable the File History option following the mentioned steps.
Step 1. Firstly, press the "Windows" key and type File History in the Windows Search Bar.
Step 2. Now, open the File History settings from the Search Results.

Step 3. Then, click on "Turn on" to enable the "File History" option on your PC.

Step 4. Lastly, reboot the PC and check whether the File History backup option is now present at its respective place
Solution #3. Format the Drive
If there are some issues with the hard drive, that could also cause this type of issue. In that case, we suggest formatting the hard drive and resolving all the problems with your hard drive at once. Follow me doing the same.
Step 1. First, open the "This PC" app. Select the external hard drive from the left navigation pane and right-click on it.

Step 2. Now, click on the "Format" option and then select "Quick Format" from the given options.
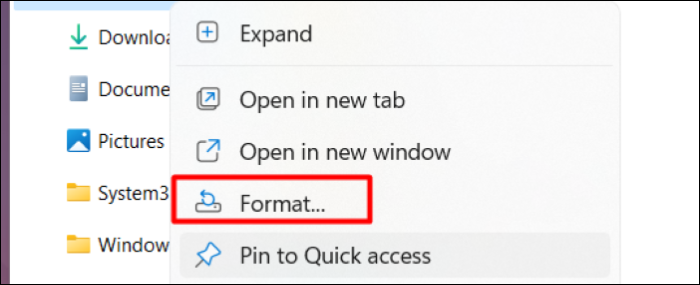
Step 3. In the end, click on the "Start" button to begin the formatting process.
Step 4. Once the process is completed, restart the PC and check the status of the issue.
Solution #4. Run SFC Scan Command
The System File Checker Scan command scans for all the system errors and fixes them immediately. You need to execute a command to repair or replace all corrupted files in a matter of seconds. Here are the steps to do the same.
Step 1. Run the Command Prompt with admin privileges.
Step 2. Copy and then paste the mentioned command in CMD:
sfc /scannow
Step 3. Hit the "Enter" key and wait a while to let the scanning process begin. Once done, reboot the system and check the status of the issue.
How Do I Automatically Backup Files to External Hard Drive on Windows 11
Using manual methods to create backups in Windows 11 is a very hectic and time-consuming process. This is the reason it's always recommended to create automated system backup plans. In this section, I’ve explained two different methods to automatically generate system backups. Follow me along to know more about it.
1. Auto Backup Files to External Hard Drive via EaseUS Todo Backup
One of the ways to automatically create backups and store them directly on an external hard drive is using a third-party backup tool. You can use the EaseUS Todo Backup tool to perform windows 11 automatic backup.
Secure Download
It comes with a Basic Backup Scheduling feature that enables you to create a backup plan per your needs. You can choose whether the new update should be generated every day, week, or month. It's pretty simple to create backups with the EaseUS Todo Backup tool. You must first select the Windows 11 content to back up and where it should be saved at first glance. At last, select whether the backup should be incremental or differential. Then, it will automatically generate backups once all the settings are confirmed.
Step 1. To start backup, click the Select backup contents.
Step 2. There are four data backup categories: File, Disk, OS, and Mail.
Step 3. On the left-hand side, you'll see a list of local and network files. Selecting the files to be backed up by expanding the directory.

Step 4. Follow the instructions on the screen and pick the location where you wish to store the backup.

In Backup Options, click Options to encrypt the backup with a password, specify the backup schedule, and choose whether or not to start the backup at a certain event in Backup Scheme. There are a variety of customizable features available for you to explore, and you may tailor the backup operation to meet your specific requirements.

Step 5. Backups can be stored on a local disk, in EaseUS's cloud service, or on a network attached storage device (NAS).
Step 6. EaseUS Todo Backup allows customers to back up data to a third-party cloud drive or the company's own cloud storage.
If you wish to back up your data to a third-party cloud drive, select Local Drive, scroll down to add Cloud Device and enter your account information.

You may also use EaseUS's own cloud storage service. Click EaseUS Cloud, create an account using your EaseUS Account, then log in to your account.

Step 7. To begin a backup, choose Backup Now. It will appear in the shape of a card on the left-hand panel when the backup process has been successfully finished. To handle the backup job in more detail, right-click on it.

2. Set Up Automatic Backup Plan of Windows 11 Data to External Hard Drive/USB
Windows 11 has plenty of backup options such as File History and Backup and Restore. You can use any of the options to set up an automatic backup plan on your Windows 11 PC. Here in this section, I've demonstrated how to set up automatic backup plans using the Backup & Restore feature.
Step 1. First, open the "Control Panel" on your PC.
Step 2. Click on "Backup and Restore (Windows 7)" under "System and Security."
Step 3. Then, click on the "Change settings" option and select the external hard disk attached to your system to store the backup content.
Step 4. Now, click on the "Next" button.
Step 5. Then, click on the "Let me choose" option and then "Next."
Step 6. On the next screen, select the files and folders that you want the system to automatically generate a backup of at a specific interval.
Step 7. Then, click on "Next."
Step 8. Click on the "Change schedule" option and select the time frame from the given options.
Step 9. Lastly, click on "OK" and then "Set settings and run backup."
Step 10. That's it. Your system will now automatically back up your Windows 11 content according to your saved settings.
To Wrap Up
Backup options are an integral part of the new Windows 11. These options contribute a lot to making the backup process much easier and smoother. Unfortunately, many users aren't lucky enough to continue using these backup features as some of the options are missing from their Windows 11 PC. Due to this, they are unable to back up their Windows 11 PC data and files from time to time. We know this is the same case with you. Therefore, in this article, we shared some of the best fixes to eliminate this issue. You must try the above-mentioned methods to get out of this irritating Windows 11 backup options missing issue. We also suggest continuing to generate backups using the EaseUS Todo Backup tool to be extra careful about the data.
Secure Download
FAQs About Backup Windows 11 to External Hard Drive
Have some doubts regarding today's topic? Fret not! I've answered some commonly asked questions about creating Windows 11 backups on an external hard drive. Clear all the queries roaming in your mind with the help of this section.
1. Does Windows 11 Have a Backup Program?
Windows 11 doesn't have a separate application to back up the Windows content. But, it has some integrated backup options like Backup & Restore (Windows 7) that are useful to create backups of your Windows 11 content easily.
2. Where Is Backup Option in Windows 11?
Follow the steps to access all the backup options on your Windows 11 PC.
- Step 1. First, open the "Settings" app and move to the "Storage" section.
- Step 2. Click on the "Advanced Backup" options in the "Storage" section.
- Step 3. You will see all the backup options in the next window. You can modify those backup options according to your requirements.
3. How To Restore Backup Files From External Hard Drive to Windows 10?
Restoring backup files from an external hard drive is pretty straightforward. Here's how to do the same in a few steps.
- Step 1. Firstly, connect the external drive which has the backup files to your Windows 11 system.
- Step 2. Then, open the Control Panel and select the "Backup and Restore (Windows 7)" option.
- Step 3. After that, choose the "Select another backup to restore files from" option and select the external hard drive connected to your system.
- Step 4. Lastly, follow the on-screen steps to complete the further process and restore the previous Windows backup.
Was this page helpful? Your support is truly important to us!

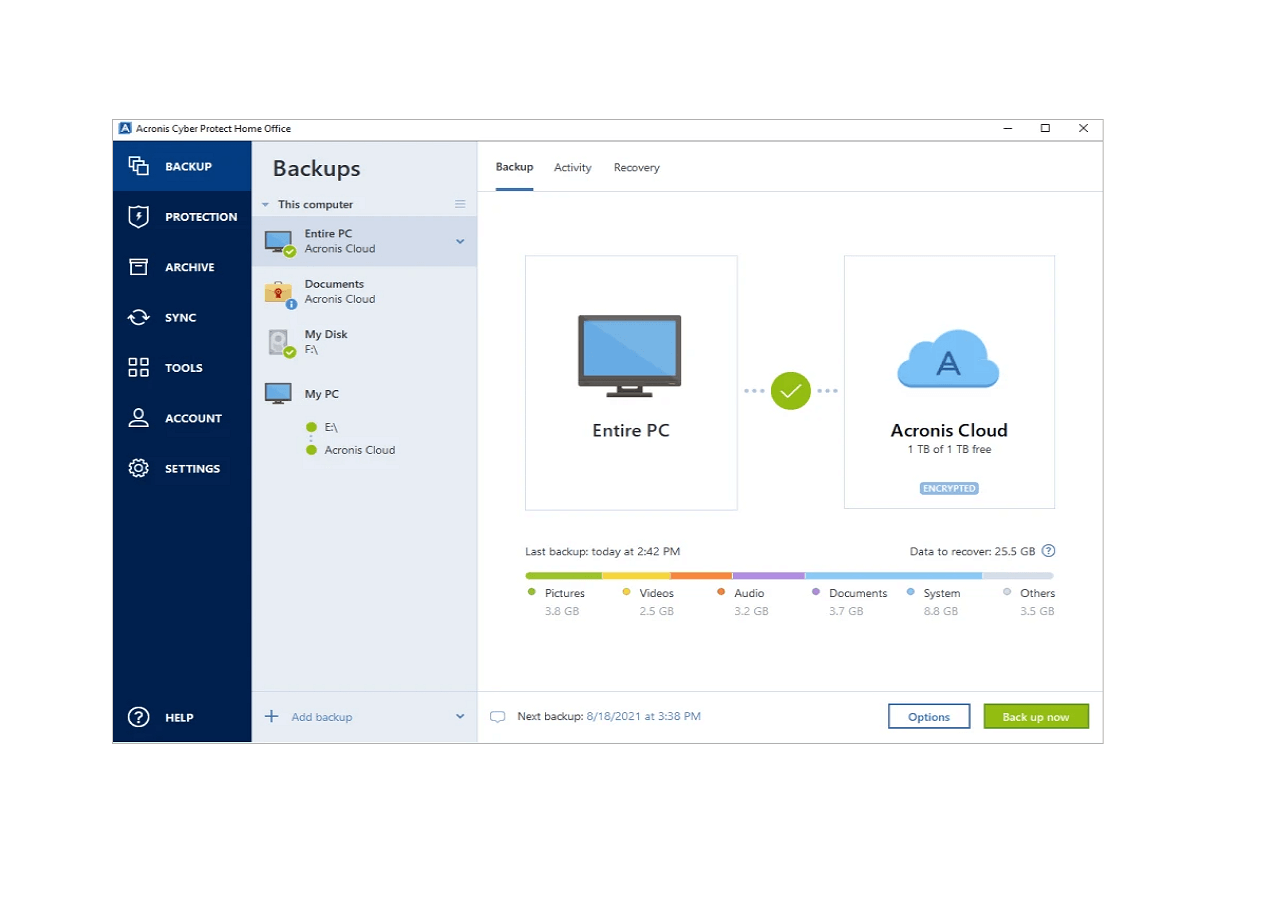
EaseUS Todo Backup
EaseUS Todo Backup is a dependable and professional data backup solution capable of backing up files, folders, drives, APP data and creating a system image. It also makes it easy to clone HDD/SSD, transfer the system to different hardware, and create bootable WinPE bootable disks.
Secure Download
-
Updated by
![]()
Larissa
Larissa has rich experience in writing technical articles and is now a professional editor at EaseUS. She is good at writing articles about data recovery, disk cloning, disk partitioning, data backup, and other related knowledge. Her detailed and ultimate guides help users find effective solutions to their problems. She is fond of traveling, reading, and riding in her spare time.…Read full bio -
Written by
![]()
Tracy King
Tracy became a member of the EaseUS content team in 2013. Being a technical writer for over 10 years, she is enthusiastic about sharing tips to assist readers in resolving complex issues in disk management, file transfer, PC & Mac performance optimization, etc., like an expert.…Read full bio
Related Articles
![]() How to Clone Windows 11/10/8/7 to Another Computer
How to Clone Windows 11/10/8/7 to Another Computer![]() How to Create Windows 10 System Image Backup (2026🔥)
How to Create Windows 10 System Image Backup (2026🔥)![]() Can You Still Find Windows 7 Clone Software? Here's What Works
Can You Still Find Windows 7 Clone Software? Here's What Works![]() Things to Backup Before Reinstalling Windows, Don't Forget!
Things to Backup Before Reinstalling Windows, Don't Forget!![]() [2026 Best Tip] How to Backup Stardew Valley Saves
[2026 Best Tip] How to Backup Stardew Valley Saves![]() 2026 Best Samsung Backup Software for PC/Phone (Free Download)
2026 Best Samsung Backup Software for PC/Phone (Free Download)

Topic Clusters


Interesting Topics