-
![]()
-
![]() Exception Processing Message 0xc0000005 - Unexpected Parameters [Fixes]
Exception Processing Message 0xc0000005 - Unexpected Parameters [Fixes] January 29,2026
 6 min read
 -
![]() How to Repair Windows 10 Using Command Prompt [SFC and DISM Commands]
How to Repair Windows 10 Using Command Prompt [SFC and DISM Commands] January 29,2026
 6 min read
 -
![]() Solved: The Volume Does Not Contain a Recognized File System
Solved: The Volume Does Not Contain a Recognized File System February 12,2026
 6 min read
 -
![]() RAID 0 Recovery: Here to Fix Failed Raid 0 Array [Updated]
RAID 0 Recovery: Here to Fix Failed Raid 0 Array [Updated] January 29,2026
 6 min read
 -
![]() 4 Methods | How to Convert RAW to FAT32 for Micro SD Card/USB
4 Methods | How to Convert RAW to FAT32 for Micro SD Card/USB February 12,2026
 6 min read
 -
![]() Solve Windows Stuck on Please Wait with Top 6 Methods
Solve Windows Stuck on Please Wait with Top 6 Methods February 12,2026
 6 min read
 -
![]()
-
![]()
-
![]()
Page Table of Contents
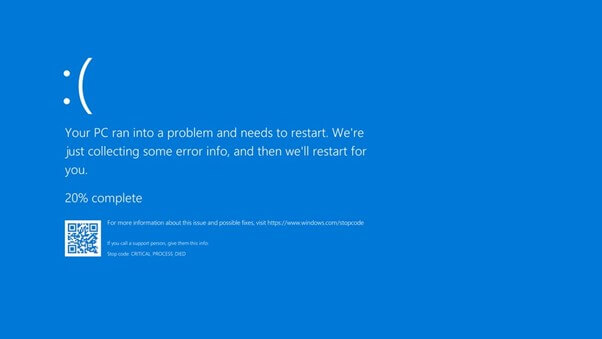
The memory management blue screen error is a common and challenging problem for Windows users, ruining their seamless computing experiences. You can get solutions quickly by clicking the "Steps" button in the following chart:
| Workable Solutions | Step-by-step Troubleshooting |
|---|---|
| Solve MEMORY_MANAGEMENT BSOD (7 Fixes) |
|
| Memory Management Blue Screen Data Recovery | When you see the memory management blue screen on your PC, data loss might...Full steps |
| What Causes Memory Management BSOD Error | Memory Management Blue Screen of Death (BSOD) issues may be baffling, forcing users to...Full steps |
The prevalent cause of MEMORY_MANAGEMENT BSOD error includes the sudden crashing of Windows or unequal division of memory resources among different running tasks on the PC.
From basic restarts to complex diagnostic tools, we'll look at how to diagnose and resolve the memory management blue screen of death problem. Keep reading for step-by-step instructions that will equip you to fix this memory resources error and have Windows running smoothly again. Prepare to go through troubleshooting steps and better understand the memory management blue screen error.
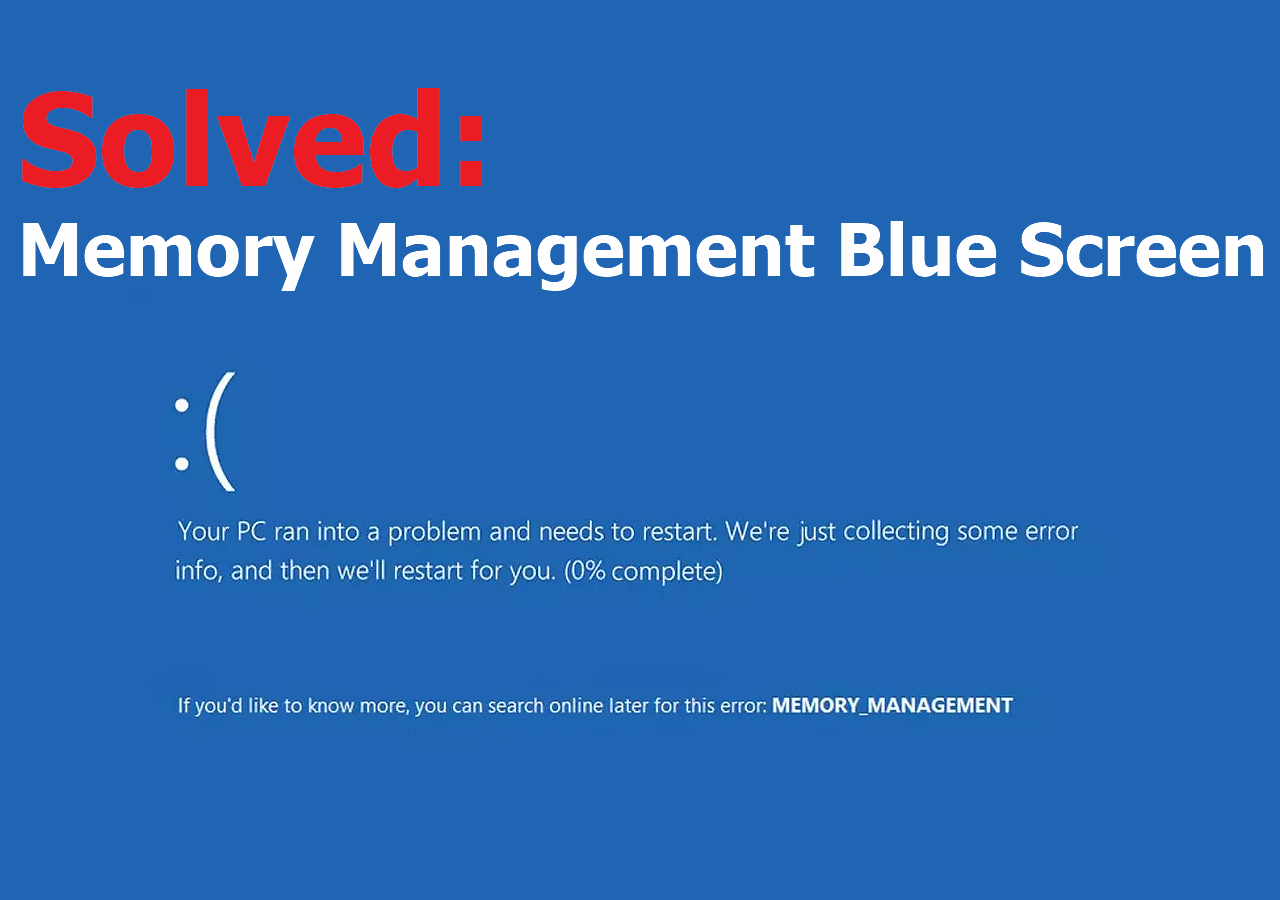
How to Solve MEMORY_MANAGEMENT BSOD (7 Fixes)
Getting the blue screen of memory management issues can be irritating and disturb your computer experience. Fear not; we have detailed solutions to this problem. Let us go into detail about how to troubleshoot and fix the problem.
1. Restart Your Windows PC
A quick restart may fix the problem if you get a memory management error due to a momentary malfunction, a quick restart may fix the problem. Restart your PC with the keyboard by clicking the Restart button to give your machine a fresh start and perhaps resolve the issue.

2. Update Windows 10/11/7
A Windows update may resolve several problems and improve the overall stability of your Windows 10 device. Under Settings, choose Update & Security, and then click Check for updates to initiate a manual update check. To avoid memory management difficulties, ensure that your operating system is up to date.

✅ You may need to recover files after Windows update. Go to the recovery part to get back lost data with the EaseUS Data Recovery Wizard.
3. Run the Windows Memory Diagnostic Tool
Follow these simple steps to launch the Windows Memory Diagnostic Tool and handle any possible memory-related issues.
Step 1. To open the Search menu, first press Windows + S.
Step 2. Enter "Windows Memory Diagnostic" into the search bar and open the tool.
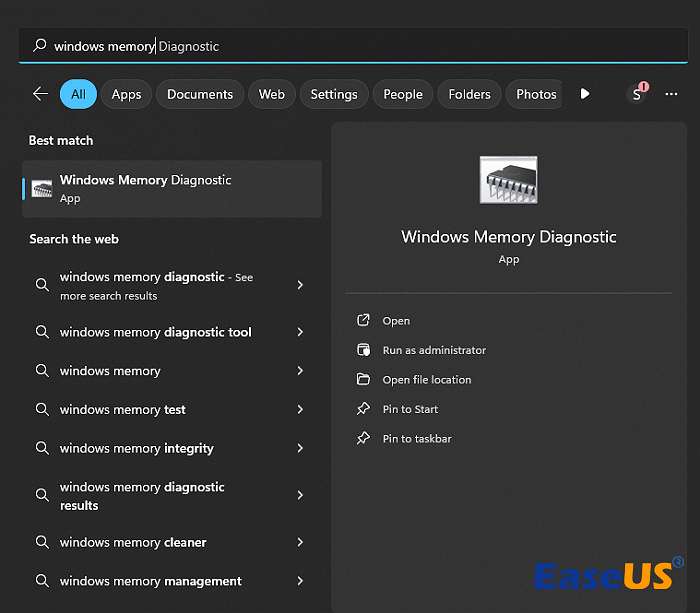
Step 3. Once the tool is launched, choose the "Restart now and check for problems" option to fix this stop code memory management.
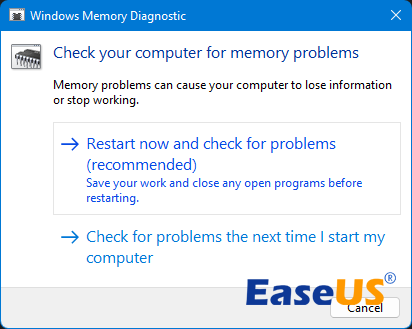
Step 4. Allow your machine to restart, and the utility will do a thorough RAM check on the next startup.
| ✨Note: If any problems are discovered, the tool will generate a report to guide you through the next steps to fix the memory management blue screen in Windows 10. |
4. Update Driver in Windows
To quickly fix the memory management BSOD, ensure that your system drivers are up to date. The release of new software or hardware often results in updated drivers, and your system may be unaware. Follow the steps below:
Step 1. To launch the Settings panel, press Windows Key + I.
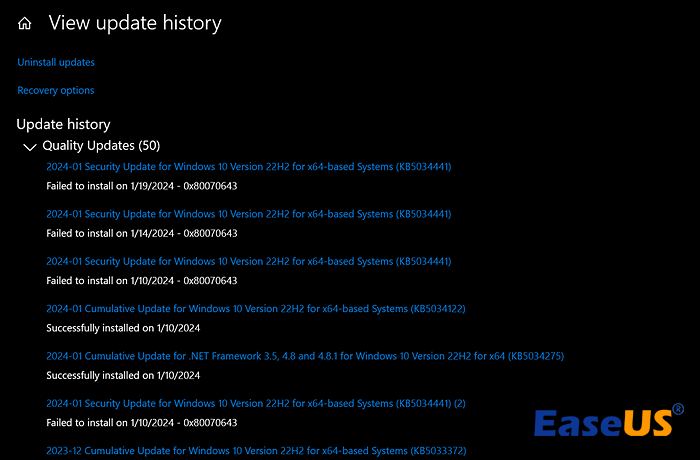
Step 2. Select "Update & Security" and then "View Update History".
Step 3. Locate any pending driver updates in the update history.
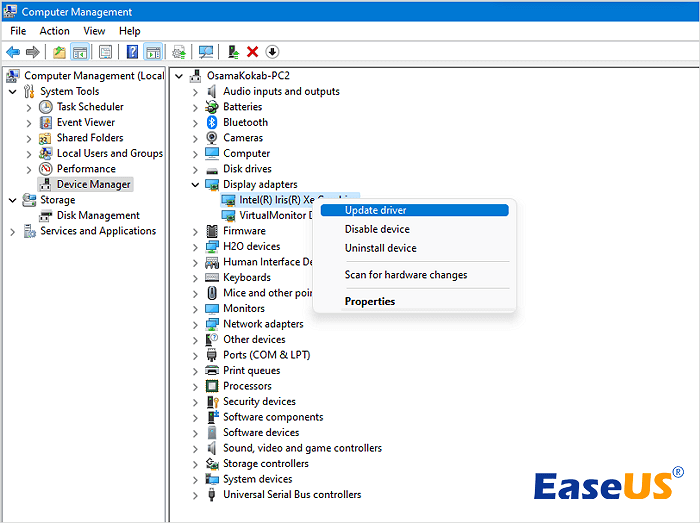
Step 4. Type "device manager" into the Start menu search field and choose the best result.
Step 5. Check Device Manager for problem signals next to any listed drivers.
Please mark and share this passage in case you want to recommend the methods to users who encounter the same issue as you.
5. Run CHKDSK in CMD
To address a probable Memory Management Blue Screen issue caused by a damaged NTFS volume, perform the steps below:
Step 1. Press Windows Key + S to open the search bar and type "cmd" in the search box.
Step 2. Right-click Command Prompt and choose "Run as administrator".
Step 3. Enter "chkdsk /f /r".
Step 4. When requested to schedule a volume check for the next system restart, enter "Y".
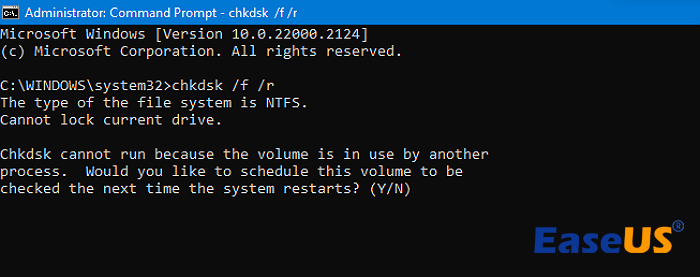
Step 5. Close the Command Prompt and restart the device. This method also works for fixing BSOD after installing SSD.
6. Run the SFC Scannow Tool
You can identify and resolve BSOD faults using the Windows SFC scan. Follow the steps below to run the scan:
Step 1. Search "Command Prompt" and choose "Run as administrator."
Step 2. When the pop-up appears, click "Yes".
Step 3. Paste "sfc/scannow" into the Command Prompt and hit Enter.
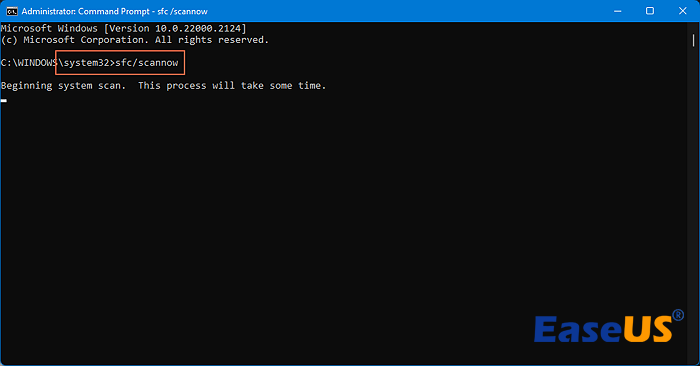
Step 4. Wait for the procedure to complete before checking for any resolved faults.
7. Reset Windows to Factory Settings
As a final resort, reset or reinstall Windows to fix these persistent issues. Instead of reinstalling, Windows provides a built-in reset feature. Right-click the Start menu, choose Settings > System > Recovery > Reset this PC, and then choose whether to retain data or wipe the Windows installation.

These comprehensive solutions address multiple aspects of the Memory Management Blue Screen problem. After completing these procedures, your system should be more stable. Don't hesitate to share these important solutions with others suffering similar issues by posting this excerpt on social media.
How to Recover Data from Memory Management Blue Screen PC
When you see the memory management blue screen on your PC, data loss might exacerbate the problem. EaseUS Data Recovery Wizard is a reliable rescuer, giving strong tools for recovering lost data in various scenarios.
The advanced EaseUS Data Recovery Wizard can recover your valuable data if your computer crashes suddenly because of BSOD errors like memory management or 0x00000133. EaseUS recovers documents, multimedia, and more from memory management problems. With support for external drive recovery, memory cards, and other storage device recovery, EaseUS provides a complete recovery solution no matter what startup disk you are using.
With EaseUS Data Recovery Wizard, you'll have no worries about recovering data. Do not allow memory management failures to cause irreversible data loss. Invest in EaseUS's dependability and agility to protect your digital assets.
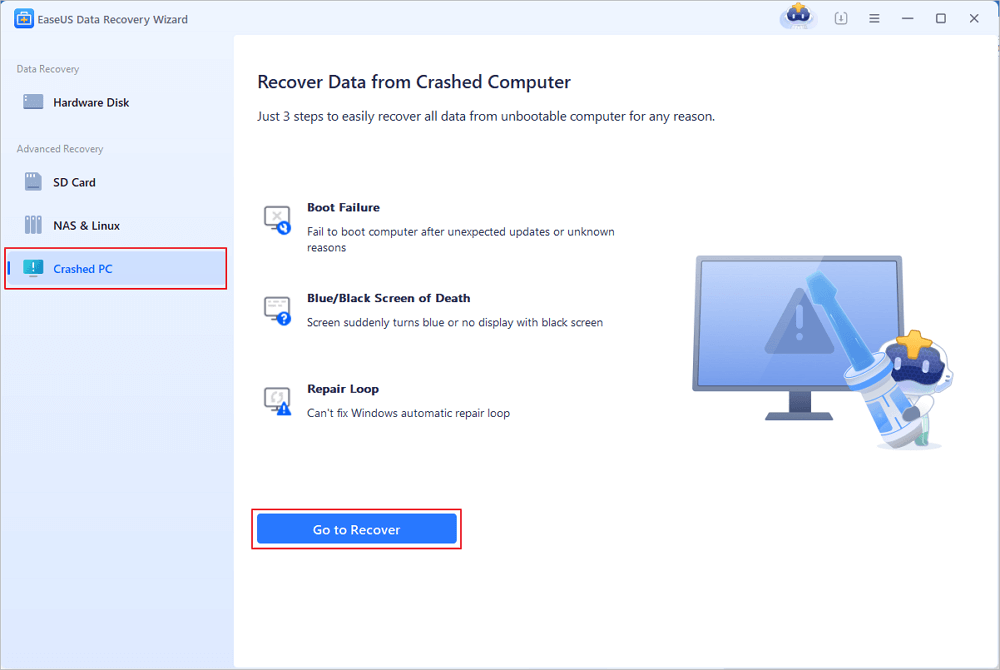
Step 1. Create a bootable disk
Launch EaseUS Data Recovery Wizard, choose "Crashed PC" and click "Go to Recover".
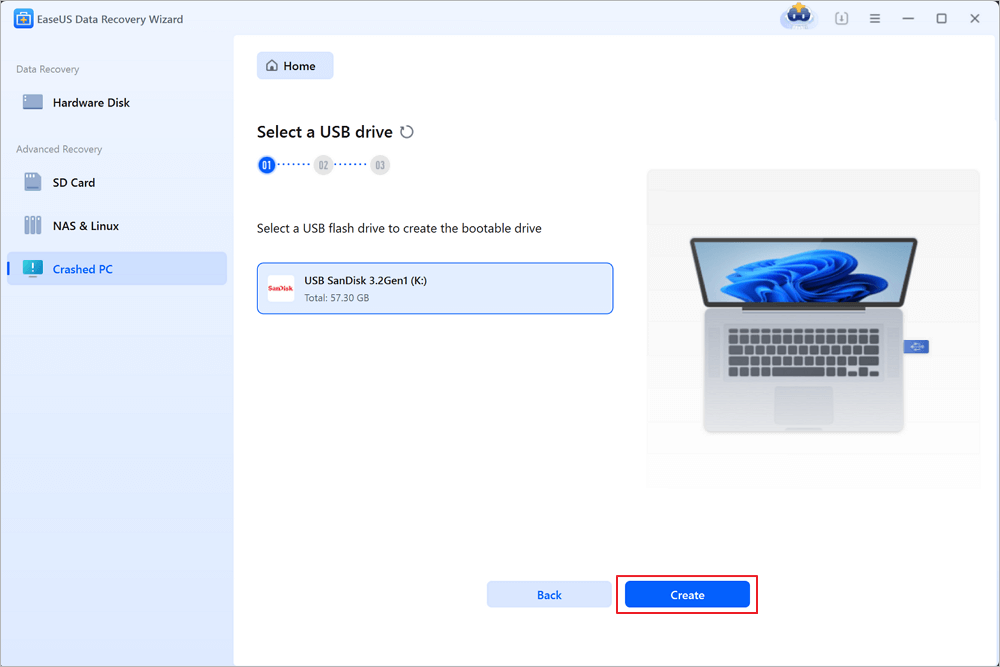
Select an empty USB to create the bootable drive and click "Create".
⚠️Warning: When you create a bootable disk, EaseUS Data Recovery Wizard will erase all data saved in the USB drive. Back up important data beforehand.
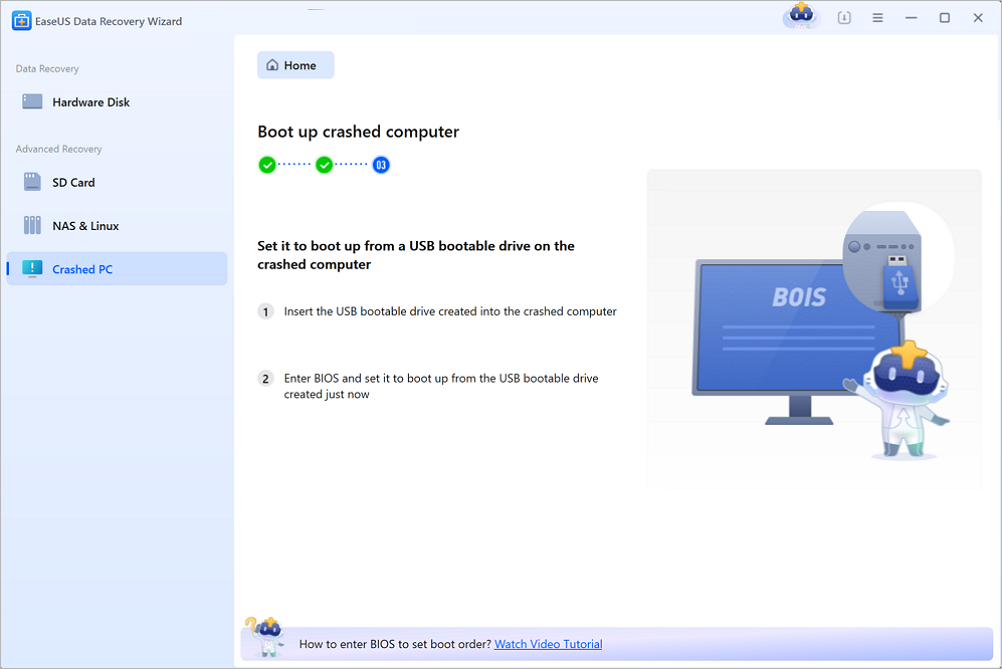
Step 2. Boot your computer from the bootable USB
Connect the bootable disk to the PC that won't boot and change your computer boot sequence in BIOS. For most users, it works well when they restart their computer and press F2 simultaneously to enter BIOS.
Set to boot the PC from "Removable Devices" (bootable USB disk) beyond Hard Drive. Press "F10" to save and exit.
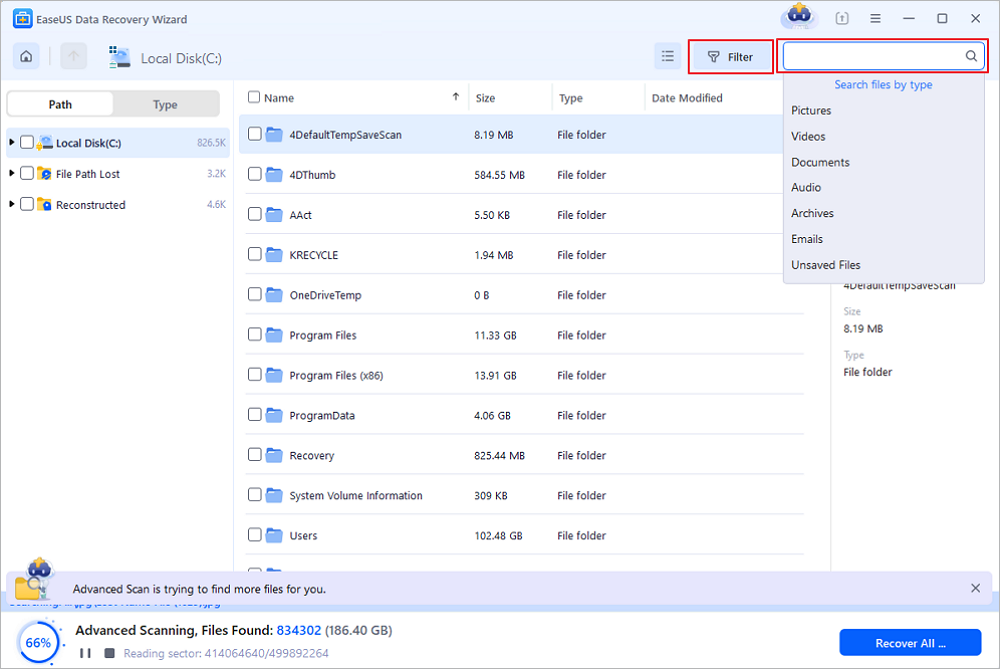
Step 3. Recover data from a crashed system/PC
After booting from EaseUS Data Recovery Wizard bootable disk, select the drive you want to scan to find all your lost files. Preview and recover the files you need to a safe location.
💡Tip: You can restore data on the local disks, external hard drives, and also the cloud storage.
Share this informational guide on social media to assist others with recovering their data in times of need.
What Causes Memory Management BSOD Error
Memory Management Blue Screen of Death (BSOD) issues may be baffling, forcing users to deal with system breakdowns. Understanding the underlying issues is critical to good troubleshooting. There are four common causes:
| ❌Faulty RAM modules | Damaged or mismatched RAM modules might cause Memory Management problems. When RAM fails to store or retrieve data correctly, the system becomes unstable. |
| 💻Corrupted system files | Critical system files are necessary for smooth functioning. Memory Management BSOD issues may occur as a consequence of file corruption, which is often caused by sudden shutdowns or malware. |
| ⚡Outdated or incompatible drivers | Drivers provide communication between hardware components and the operating system. Obsolete or incompatible drivers might interfere with communication, resulting in memory-related difficulties. |
| 🦠Virtual Memory Issues. | When physical memory is exhausted, virtual memory, a place on the hard drive that serves as an extension of RAM, is activated. Misconfigurations in virtual memory settings might lead to Memory Management problems. |
The Bottom Line
The Memory Management Blue Screen needs to be dealt with using an organized plan. From simple restarts and system upgrades to using complex tools like Windows Memory Diagnostic, each step adds to a thorough troubleshooting procedure. Updating drivers and using diagnostic tools appear as critical strategies.
The EaseUS Data Recovery Wizard emphasizes the significance of protecting data in the face of such issues. Understanding probable reasons improves users' capacity to fix problems before they arise. In negotiating the difficulties of computer failures, a proactive approach, along with dependable tools, may reduce interruptions and contribute to a more enjoyable computing experience.
MEMORY_MANAGEMENT Error FAQs
Following are some queries that users ask when they encounter the MEMORY_MANAGEMENT Error:
1. Why did I encounter a memory management blue screen error?
This blue screen of the death problem could be associated with unequal division of memory resources. Damaged or corrupted system files may also cause the blue screen of death.
2. How do you fix MEMORY_MANAGEMENT BSOD in Windows 10?
The MEMORY_MANAGEMENT BSOD Error in Windows 10 can be fixed with some simple methods:
- 1. Try Restarting your computer.
- 2. Check to see if the Windows driver is updated or not.
- 3. Run an SFC scan to repair any corrupted files.
3. Can running out of memory cause a memory management blue screen?
The Memory management blue screen error is associated with multiple problems other than simple memory resources. It could result from faulty RAM, an outdated driver, and memory division issues.
Was this page helpful?
-
Cedric Grantham is a senior editor and data recovery specialist of EaseUS. He mainly writes articles and how-to tips about data recovery on PC and Mac. He has handled 10,000+ data recovery cases and is good at data recovery of NTFS, FAT (FAT32 and ExFAT) file systems, and RAID structure reorganization. …
-
Dany is an editor of EaseUS who lives and works in Chengdu, China. She focuses on writing articles about data recovery on Mac devices and PCs. She is devoted to improving her writing skills and enriching her professional knowledge. Dany also enjoys reading detective novels in her spare time. …

20+
Years of experience

160+
Countries and regions

72 Million+
Downloads

4.9 +
Trustpilot Score


Free Data
Recovery Software
Recover data up to 2GB for free!
