-
![]()
-
![]()
-
![]()
-
![]() Can VLC Repair MP4? Look How to Repair Corrupted MP4 Video Files Using VLC
Can VLC Repair MP4? Look How to Repair Corrupted MP4 Video Files Using VLC July 23,2026
 6 min read
 -
![]() How to Fix Dump File Creation Failed Due to Error During Dump CreationJuly 23,20266 min read
How to Fix Dump File Creation Failed Due to Error During Dump CreationJuly 23,20266 min read -
![]() Windows 11 Won't Wake from Sleep | Stuck in Sleep ModeJuly 23,20266 min read
Windows 11 Won't Wake from Sleep | Stuck in Sleep ModeJuly 23,20266 min read -
![]() Recover Data from Formatted Transcend External Hard Disk/SD CardJuly 23,20266 min read
Recover Data from Formatted Transcend External Hard Disk/SD CardJuly 23,20266 min read -
![]()
-
![]()
-
![]()
Page Table of Contents
PAGE CONTENT:
Have you come across Window Blue Screen of Death after SSD installation? Don't worry, as this fix can quickly be resolved! SSD, with its seamless writing, advanced reading performance, and minimal latency characteristic, has become the premium choice for PC users to install OS. However, users often feel hopeless about experiencing BSOD after installing SSD. The possible reasons for BSOD after installing SSD are corrupted system files in the PC, incomplete software program installation, and a failed upgrade.
Are you ready to know more about the fixes? Before that, we will walk you through software to help retrieve data from your BSOD PC first. Let's get started!
Recover Data with SSD Recovery Software from Your BSOD PC First
The Blue Screen of Death, also known as the STOP Error or BSOD Error, is a Windows warning message that shows up after a severe computer breakdown. After this issue, the system can stop functioning and decline to boot up, making every information you have kept there inaccessible. The three most common causes of BSOD are hardware malfunctions, driver issues, and system crashes.
You might wonder if a blue screen appears on your laptop running on Windows when it collapses and ceases performing. It's incorrect! A computer issue gives birth to the blue screen of death. The root cause is a system issue; the effect is the blue screen.
Although BSOD doesn't eliminate data from your PC, often users are worried about that. Whenever BSOD ensues, you can't access the stored data on your PC, but you can recover data from SSD that won't boot with professional recovery software. Additionally, you risk losing data if the BSOD failure is connected to hardware or system glitches. For this reason, you should first figure out how to recover what's stored on your computer before confronting the blue screen issue. Files from many different types of storage, such as SSDs, HDDs, external hard drives, USB flash drives, SD cards, and much more, may now be restored with the help of an excellent data retrieval program entitled EaseUS Data Recovery Wizard.
The most helpful PC data retrieval tool that makes it easy to get files off a hard drive that won't turn on is EaseUS hard drive recovery software, regardless of whether the data was erased with intent, accidentally, or for whatever reason:
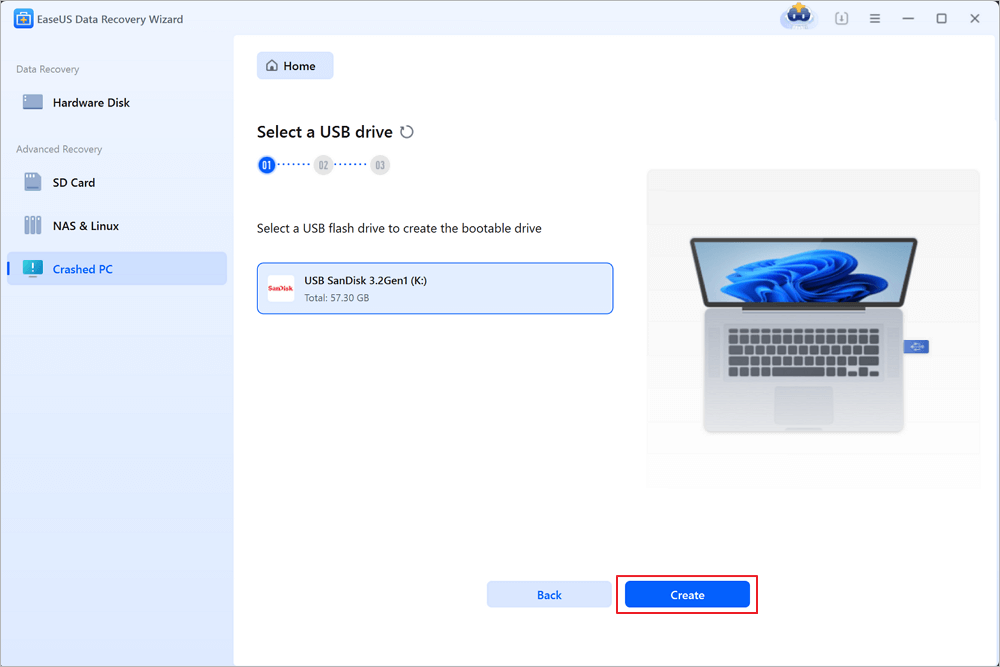
Step 1. Create a bootable disk
Launch EaseUS Data Recovery Wizard, choose "Crashed PC" and click "Go to Recover".
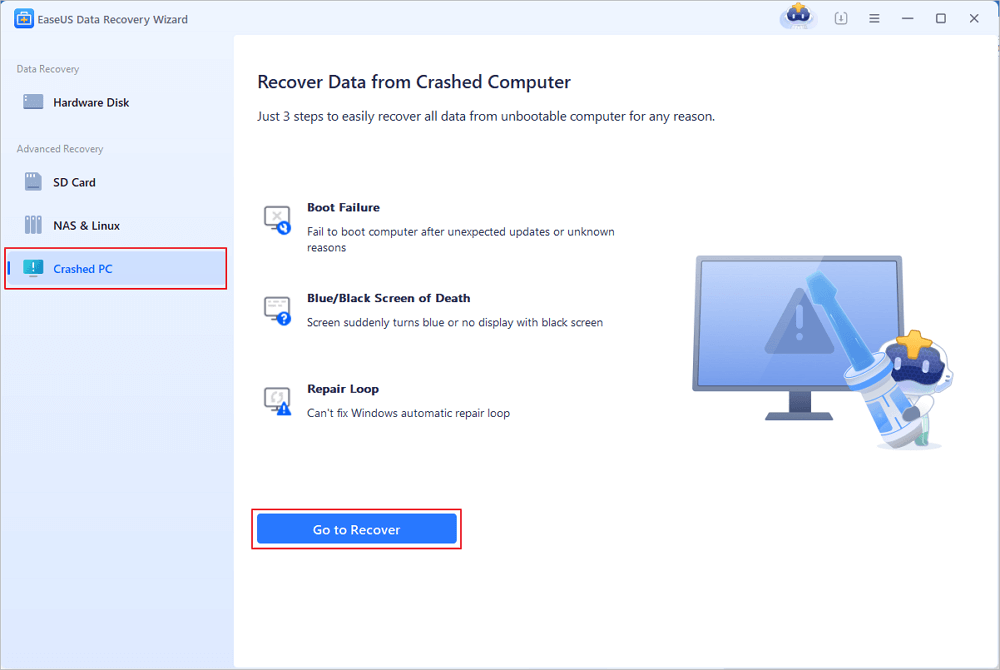
Select an empty USB to create the bootable drive and click "Create".
⚠️Warning: When you create a bootable disk, EaseUS Data Recovery Wizard will erase all data saved in the USB drive. Back up important data beforehand.
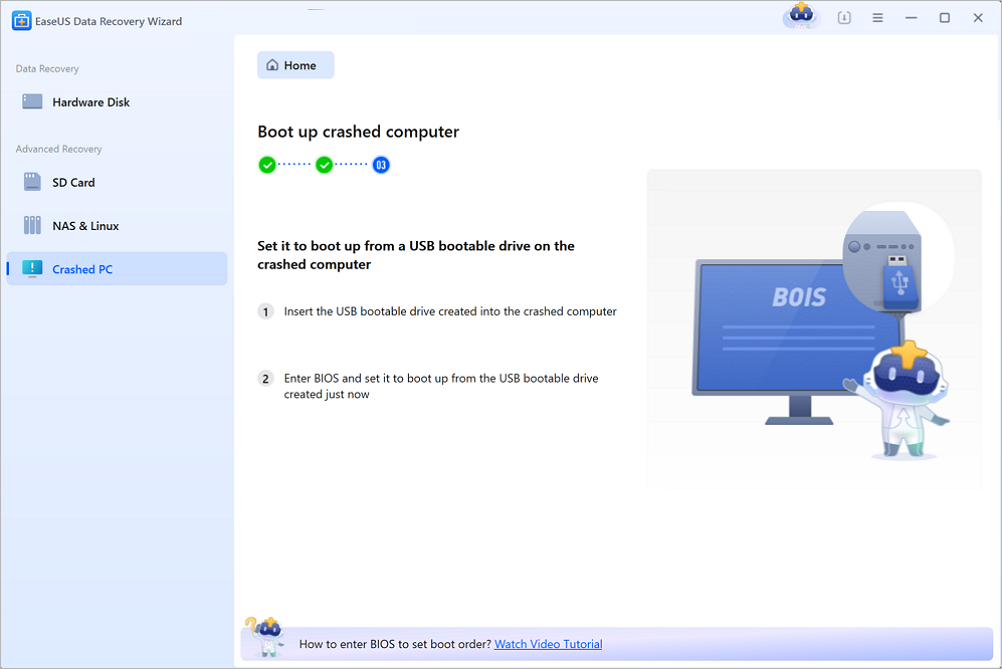
Step 2. Boot your computer from the bootable USB
Connect the bootable disk to the PC that won't boot and change your computer boot sequence in BIOS. For most users, it works well when they restart their computer and press F2 simultaneously to enter BIOS.
Set to boot the PC from "Removable Devices" (bootable USB disk) beyond Hard Drive. Press "F10" to save and exit.
Step 3. Recover data from a crashed system/PC
After booting from EaseUS Data Recovery Wizard bootable disk, select the drive you want to scan to find all your lost files. Preview and recover the files you need to a safe location.
💡Tip: You can restore data on the local disks, external hard drives, and also the cloud storage.

So, download this professional portable data retrieval software today! Also, if you like the information, kindly share this passage with your friends on social media.
Quick Fixes for BSOD After SSD Installation
If you're ready to know the instant fixes for BSOD after SSD installation error, these are the top 4 fixes mentioned below:
⏱️Check for compatibility
A piece of hardware creates this BSOD error; you need to ensure the hardware is on the Windows Hardware Compatibility list. You will obtain this error as the hardware is incompatible with the current Windows version. In that case, you need to upgrade the hardware's firmware.
🔌Check cables and connections
If there are any loose connections and damaged cables, it will also lead to BSOD. In case you're not connected to the network, you may connect it by navigating to settings and then network & internet.
🔋Check power settings
A malfunctioning power source may result in your Windows computer overheating, stuttering, crashing, or displaying the blue screen of death.
🦠Check for malware or viruses
BSOD will also ensue if your PC is infected by malware or viruses. The common signs of malware in your system are the PC slowing down or malfunctioning all of a sudden and not restarting or shutting down.
Run Disk Check to Repair the Installed SSD
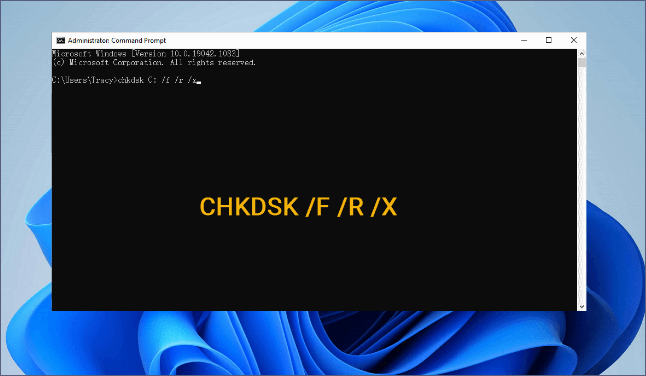
CHKDSK is a leading built-in disk repair and scan tool in Windows OS, which can be operated from the Command Prompt to verify and mend disk glitches. Running a disk check to repair the installed SSD is safe and doesn't affect the performance. The steps are the following:
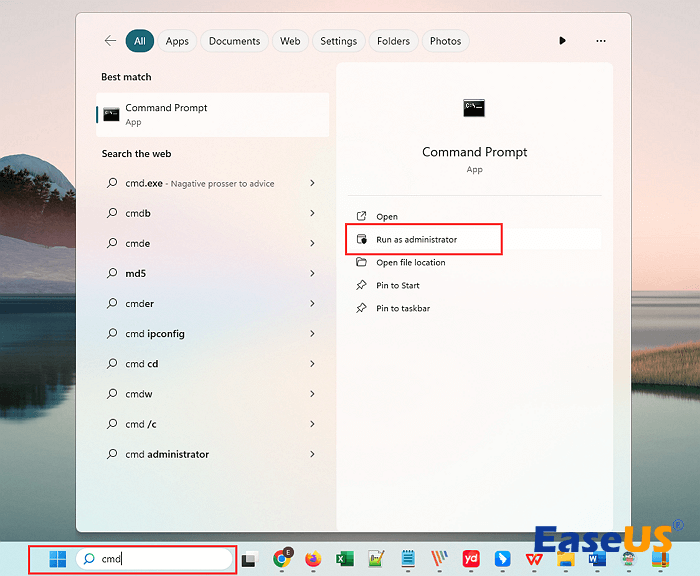
Step 1. Move the pointer to the search box.
Step 2. Type cmd, and hit the "enter" button to launch "Command Prompt".
Step 3. Hit "Run as Administrator" and log in as "Administrator".
Step 4. Hit the "Enter" key after entering the command chkdsk C: /f /r /x in the command prompt. Remember that your faulty SSD's drive letter is "C:" Make sure you change this to the correct letter.
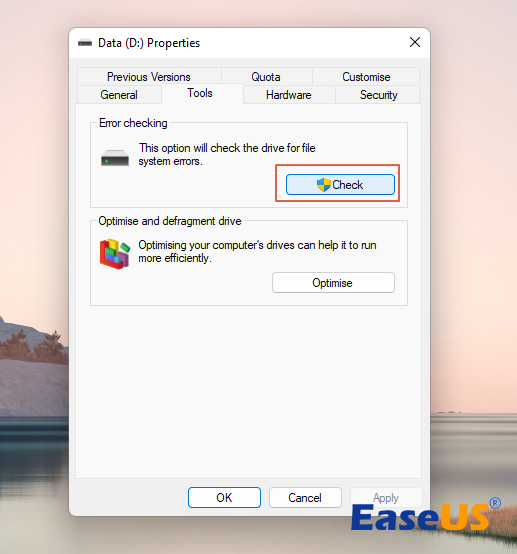
You can also use the Check Disk option in Windows to repair the corrupted SSD. Follow the steps below to check the SSD:
Step 1. Boot Windows with other bootable disks and open the File Explorer.
Step 2. Find the SSD and right-click it, then choose "Properties".
Step 3. Locate the Tools tab and click the "Check" button. Then, this built-in tool will automatically scan the check the SSD for you.
Share these steps with your pals on social media if you find them useful.
For SSD Installation, Activate AHCI Mode to Resolve BSOD
After installing Windows OS successfully, you might encounter a BSOD problem if you switch on AHCI settings. Moreover, when you switch from IDE to AHCI and reinstall Windows, the procedure is indicated and erroneous. Therefore, follow the steps below to enable AHCI mode to fix BSOD after installing SSD:
Step 1. Reboot your PC and hit "Del" to enter the BIOS interface.
Step 2. Opt for "Integrated Peripherals"> "SATA RAID /AHCI Mode"> "IDE". Finally, hit "F10" to save the changes, and reboot your PC.
Step 3. Hit the "Windows + R" key when the PC awakens to launch the "Run" dialogue box.
Step 4. Type "regedit" and hit either "enter" or "OK" to launch the Registry Editor.
Step 5. Broaden the entries on the left-hand panel to navigate to the subsequent path: HKEY_LOCAL_MACHINE\SYSTEM\CurrentControlSet\services\msahci
Step 6. To modify the value of the Start DWORD from 3 to 0, double-click on it. To make the adjustment, hit "OK".
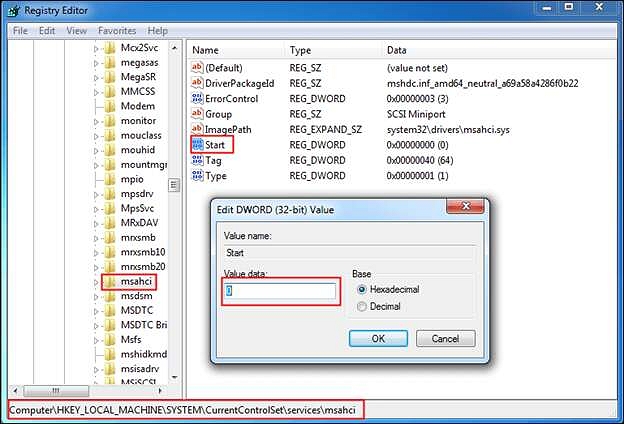
Step 7. Restart your PC, and set the SATA mode to AHCI. Now, hit "F10" to save the changes, and reboot your PC.
To Wrap Up
Now that you know how to resolve the Windows blue screen after installing an SSD, you need to identify the root of the issue and select the appropriate cure from the list above. These methods also resolve the blue screen issue following an SSD installation. Many capabilities in the EaseUS Data Recovery Wizard can help retrieve data quickly.
SSD Installation BSOD Issue FAQs
Go through the FAQs below to understand the topic better:
1. Why does the SSD installation cause BSOD?
Certain parts of the SSD may malfunction due to defective circuits or chips, which may cause the blue screen of death on your Windows PC.
2. What is the blue screen of death on a corrupted SSD?
When Windows 10 fails to boot, the SSD encounters the Blue Screen of Death (BSOD) error. If Winlogon.exe or Csrss.exe quits functioning, this error may appear. The following are some potential reasons why the PC included corrupt system documents.
3. Can I fix the BSOD by enabling AHCI mode?
The BSOD error may be fixed by moving to AHCI mode, which allows the computer's OS and storage controller to interact more effectively. The system BIOS may need to be modified, or drivers might require an update to transition from ATA to AHCI mode successfully.
Was this page helpful?
-
Dany is an editor of EaseUS who lives and works in Chengdu, China. She focuses on writing articles about data recovery on Mac devices and PCs. She is devoted to improving her writing skills and enriching her professional knowledge. Dany also enjoys reading detective novels in her spare time. …


20+
Years of experience

160+
Countries and regions

72 Million+
Downloads

4.9 +
Trustpilot Score


