
-
![]()
-
![]() [KB5063878] SSD/HDD Not Recognized After Windows 11 Update
[KB5063878] SSD/HDD Not Recognized After Windows 11 Update June 30,2026
 6 min read
 -
![]()
-
![]()
-
![]()
-
![]()
-
![]()
-
![]() How to Fix Windows 10 Error Code 0xc00000e Without Data LossJune 16,20266 min read
How to Fix Windows 10 Error Code 0xc00000e Without Data LossJune 16,20266 min read -
![]() How to Recover Data from External Hard Drive [Full Solutions]July 02,20266 min read
How to Recover Data from External Hard Drive [Full Solutions]July 02,20266 min read -
![]() Hard Drive Randomly Wiped Data! What's WRONG? I Want Data BackJuly 02,20266 min read
Hard Drive Randomly Wiped Data! What's WRONG? I Want Data BackJuly 02,20266 min read
Page Table of Contents
How to recover data from a quick formatted drive:
- Step 1. Download and run EaseUS Data Recovery Wizard.
- Step 2. Select the quick formatted hard drive to scan for lost files.
- Step 3. Preview and recover data from the hard drive.
- More items...
PAGE CONTENT:
Quick Format Recovery Overview
"I accidentally quick formatted a hard drive and lost some important files saved in that drive. Can I possibly undo the format and recover data after quick format?
Please let me know if you have any reliable quick format recovery tool or software for a recommendation. Thanks!"
- Important
- To bring all your lost files back, stop using your formatted device immediately once you complete quick formatting.
Do you need to undo quick format and recover lost files? Follow the quick format recovery solution below to bring back your formatted files and unformat your device to be usable again. This article offers you an easy and safe recovery software - EaseUS data recovery software in Part 1 to help you restore all lost data. With this reliable quick format recovery tool, you can recover data files from a formatted drive, partition, or external storage device in three simple steps.
Before recovering formatted hard drive, if you want to learn more things about Quick Format, stay here. This part includes everything you need to know about Quick Format:
Quick Format vs. Full Format
To help you better understand what is quick format and the difference between quick format and regular format, we'll compare Quick format and Full format (also known as Complete format) - two basic methods to format a hard drive partition:
The difference between Full Format and Quick Format is whether the volume will scan the bad sectors.
- 🔎Full Format is a formatting process that will remove the address files and scan bad sectors on a storage device so as completely reset the target device.
- 🏃Quick Format is a process to quickly set a storage device ready with full capacity by removing all saved data and resetting its file system valid, which will skip all bad sectors.
Does Quick Format Erase all Data
Not really. A Quick Format takes half the amount of time as a Full Format. Quick Format only removes the saved data on your target device instead of completely erasing them.
Is it possible to recover lost data after quick format a hard drive? Yes!
Why Quick Format Recovery Possible
Why is it possible? First, we can confirm that quick format only removes data from the target device, not wiping or erasing. Normally, the quick format only rebuilds the file system, while the data area won't be damaged.
Therefore, recovering quick formatted drives or storage devices and all important files is possible if you stop using the drive immediately.
As shown in part 1, in order to undo quick format, you'll need professional data recovery software to recover all the lost data and then revert the file system back to its previous state.
How to Undo Quick Format [ 3 Recommend Methods]
Applies to: Help you unformat a hard drive and recover data from a disk that was quickly formatted by mistake.
In this part, you'll learn:
- ✅What tool can be used to recover data from a disk that was quick formatted
- ✅How do you unformat a hard drive, perform quick format recovery
| 🧰Use Quick Format Recovery Tool | Formatting is unlike removing files to the Recycle Bin, you can't simply perform recycle bin recovery to get all lost files back after quick format. It's more complex for unformatting a storage device and recover all formatted data. Therefore, you'll need to turn to a reliable format recovery tool for help. |
| 💻Consult with Data Recovery Service | If you have discovered that some data cannot be restored using the EaseUS data recovery wizard by yourself. You may also try restoring data after quick format with data recovery services. |
| 🎒Backup and Restore (Windows 7) | The built-in tool is free and compatible with the majority of Windows OS, but it necessitates advanced backups and only applies to local disks, not external hard drives. |
#1. Undo Quick Format with Data Recovery Software
| Difficulty: ⭐ | Time: 5 Mins |
How to recover data from quick formatted hard drive? To recover lost data, EaseUS Data Recovery Wizard is an ideal choice. It enables you to rescue lost files from formatted drives with a corrupted file system, invalid or RAW issues. It fully scans the formatted device and lists all found files for preview on its scanning result window.
What else can EaseUS quick format recovery tool do:
- Recover deleted files from all data loss issues, like software crashes, virus attacks, accidental deletion, RAW issues, hard disk damage, etc.
- Support hard drive recovery, recover data from partitions, SD cards, USB flash drives, memory cards, and other storage devices.
- Support to retrieve multiple file types, and it can recover deleted photos, videos, audio files, emails, documents, etc.
There is also a video guide for you to learn how to recover formatted hard drives:
- 00:03 Formatted hard drive recovery overview
- 01:50 Reasons to format hard drives
- 02:33 Recover formatted hard drives
Let's see how to perform quick format recovery and recover files after quick format on your own:
Note: To guarantee a high data recovery chance, install EaseUS data recovery software on another disk instead of the formatted disk.
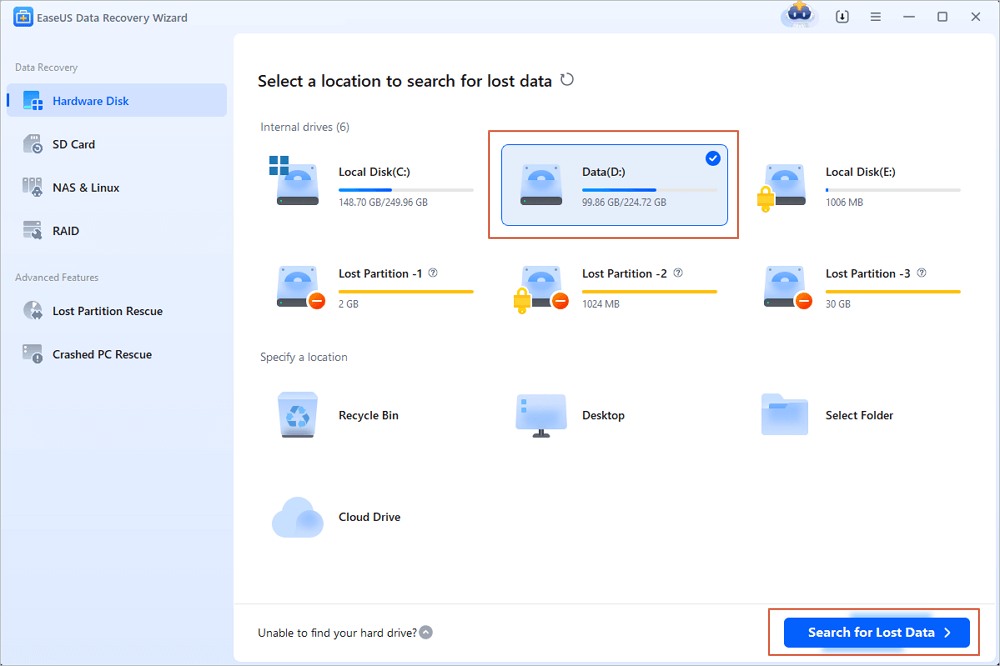
Step 1. Launch EaseUS Data Recovery Wizard. Choose the hard drive partition which you've accidentally formatted and click "Search for Lost Data".
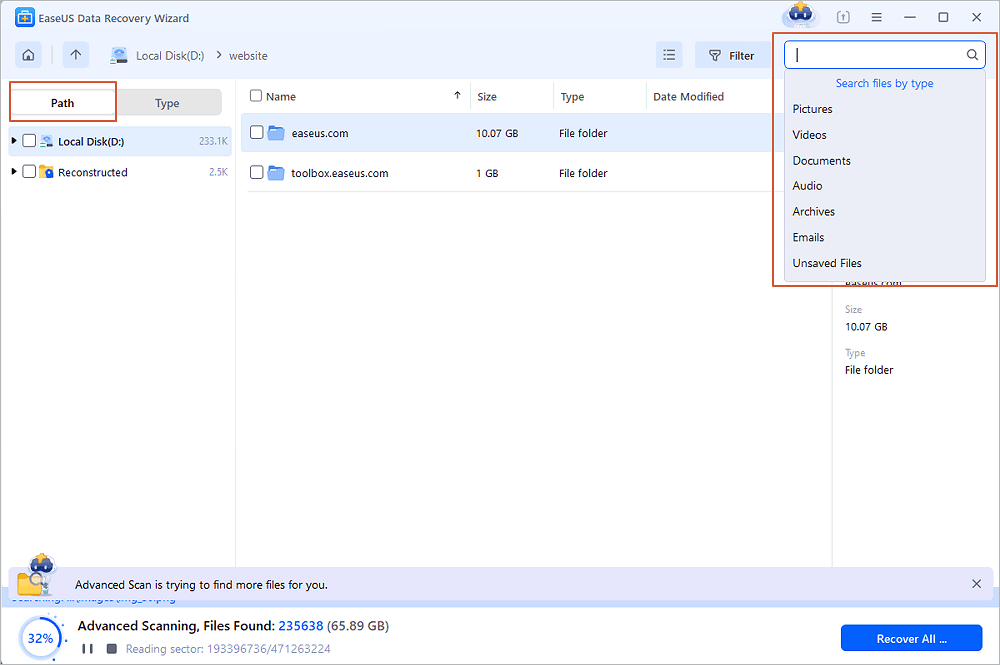
Step 2. This formatted hard drive recovery software will start scanning for all the lost data and files. After scanning, you can click "Filter" to filter a specific file type to quickly find files you need. Or search the file's name in the search box to select data that you want to recover.
Step 3. Preview the scanned files. Then, select the ones that you wish to recover and click "Recover". Choose a new location or Cloud drive to store the files and click "OK".

Don't forget to share this page to help more users recover data from a formatted hard drive!
#2. Perform Quick Format Recovery with Data Recovery Services
| Difficulty: ⭐⭐ | Time: 1-2 Weeks |
Note that if you want to revert the formatted device to its previous file system, please save the recovered data to another secure location first. Then, move to the tips below unformat the drive.
If EaseUS quick format recovery tool doesn't find your lost formatted data, you may also try EaseUS data recovery services. Our engineers will stay online 24 hours a day, and they will ask all your questions.
Consult with EaseUS Data Recovery Experts for one-on-one manual recovery service. We could offer the following services after FREE diagnosis:
- Repair corrupted RAID structure, unbootable Windows OS and corrupted virtual disk file (.vmdk, .vhd, .vhdx, etc.)
- Recover/repair lost partition and re-partitioned drive
- Unformat hard drive, recover formatted SD card and repair RAW drive (BitLocker encrypted drive)
- Fix disks that become GPT protected partitions
#3. Recover Quick Format Hard Drive with Backup and Restore
| Difficulty: ⭐⭐ | Time: 10 Mins |
Another option for dealing with data loss is backup. Backup and Restore (Windows 7) is the standard backup tool for Windows machines.
Users might use it to back up any files or folders from any local location.
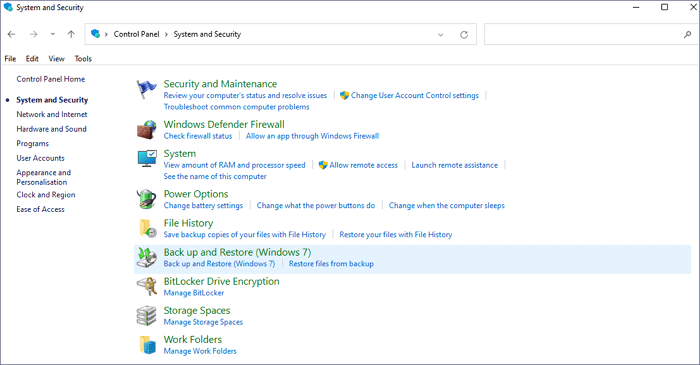
Step 1. In Windows 10/11, navigate to "Control Panel" > "System and Security" > "Backup and Restore".
Step 2. Restore my data.
Step 3. Select the desired files by clicking "Browse" for files/folders > "Next".
Step 4. Select a target location > click "Restore". It is advised not to restore the files to their original places to avoid overwriting.

If you cannot recover data from Windows Backup and Restore and want to know how to recover files without backups, check the passage below to learn more:

How to Recover Deleted Files Without Backup in Windows 10/11
How to recover deleted files without backup in Windows? This guide covers 4 Efficient methods to restore deleted files without backup. Read more >>
Bonus Tip: How To Perform Quick Format Without Losing Data
So how to safely quick format a device without losing any data? Follow the tips below, you'll quickly make your drive ready:
#1. Back Up Data to Another Device in Advance
To avoid unnecessary data loss due to the quick format, it's always smart to create a backup in advance. To do so, you have two options:
- One is to manually copy and paste valuable files to another location one by one. (Time-Consuming)
- The other one is to select and back up all valuable data at one time with the help of reliable file backup software.
#2. Use the Default File System While Quick Formatting a Disk
If you don't have a specific need to change the file system, it's also suggested that you should use the default file system provided by Windows when you quick format a drive.
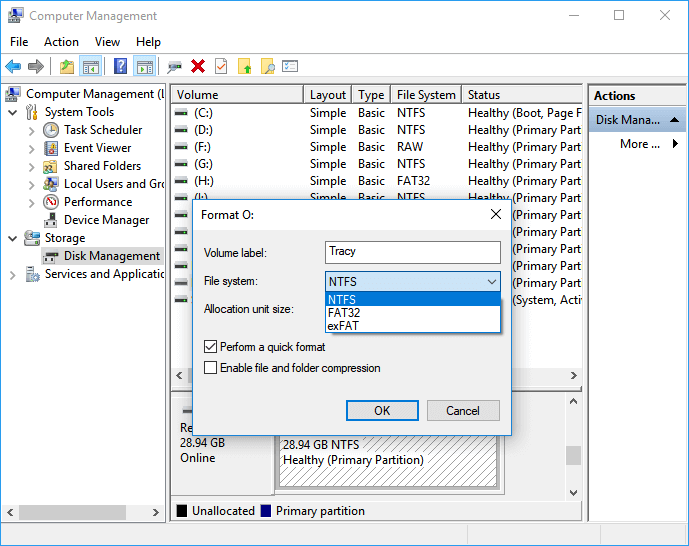
Here, we'll show you how to quick format a hard drive using Disk Management:
Step 1. Connect the external hard drive to your computer.
Step 2. Right-click "This PC/My Computer", click "Manage", and select "Disk Management".
Step 3. Right-click the target drive and select "Format".
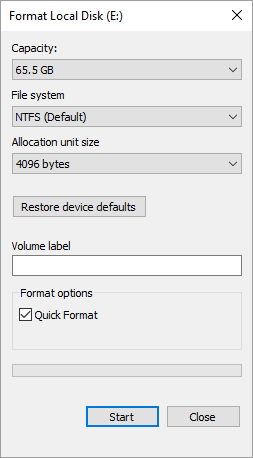
Step 4. Tick "Perform a quick format" and click "OK" to quickly format your target drive. Don't change the file system as shown below. Just use the default format for your drive.
After this, your drive is formatted, and you can use it for saving data or other usages again. If you encounter tricky issues like the hard drive not showing up, you can try to fix it with the methods mentioned in the following passage:

Hard Drive Not Showing Up or Detected in Windows? Learn How to Fix
Don't worry if your hard drive is not showing up in Windows computers. Sometimes, it could be a connection issue. Read more >>
The Bottom Line
On this page, we provided the reliable formatting recovery software - EaseUS Data Recovery Wizard to help you perform format file recovery from a storage device. If you changed the device file system, you can also reformat the drive to revert its format to the previous state.
Besides we also collected some basic information about Quick Format and even offered extra tips to help you safely quick format a device without losing any data by creating a backup in advance and use the default file system recommended by Windows.
Quick Format FAQs
If you still have some other questions about Quick Format, check the questions and answers below. You may find a satisfying solution here:
1. How long does it take to quickly format a hard drive?
Some of you may want to know how long should a quick format take on a hard drive. There are many factors that may affect the quick format speed, for example:
- Format tool for quick format
- Used space on your device
- USB connection cable for external storage device - 2.0, 3.0 or 4.0
Estimated, if you quick format a 50GB or smaller drive, it takes about 3-5 minutes. If you quick format a 50-500GB drive, it takes 20 to half an hour or so. As for 1TB or 2TB drives, it may take about 1-3 hours or even longer to complete the quick format.
2. Can I recover files from a low-level formatted drive?
The answer to "can you recover data after low-level format" depends on how you proceed with the formatting process. As the low-level formatting process lasts a very long period, you may still have a chance of data recovery from the below situations:
- Low-level format didn't utterly finish.
- Low-level format procedure stopped or you halted the operation.
- The data sectors of storage devices didn't get wiped or were partially removed.
3. What do I do if the computer says "Windows was unable to complete the format"?
There are many causes that may prevent Windows from completing the format process on your devices. Here are 7 fixes that you can apply to get rid of the "Windows was unable to complete the format" error and successfully format your device:
- Use a third-party format tool
- Run Diskpart Command
- Use Disk Management
- Clear Virus
- Remove Write Protection
- Check and Fix Disk Error
- Repair Bad Sectors
Was this page helpful?
-
![]()
Approved by
Evan Galasso is a digital forensics and data recovery engineer with over 10 years of experience in the field. He presents opinions on the current state of storage media, reverse engineering of storage systems and firmware, and electro-mechanical systems of SSDs and HDDs.…

20+
Years of experience

160+
Countries and regions

72 Million+
Downloads

4.9 +
Trustpilot Score


