
Content
Page Table of Contents
About the Author
Hot Topics
Are you struggling with the C drive on your Windows 7 computer? Or have you encountered the frustrating 'extend volume greyed out' issue? If yes, the need to resize your C drive will likely ring a bell. Thankfully, in this continuously evolving world of technology, we have all required solutions within reach. This article is a detailed guide to resizing your C drive in Windows 7, so buckle up, and let's get started.
How to Resize C Drive in Windows 7
Over time, as you install applications, store files, and create memories, this heart can become clogged. This is when the 'C drive full' issue arises. Resizing your C drive allows you to regain control, create more breathing room, and optimize your system's performance.
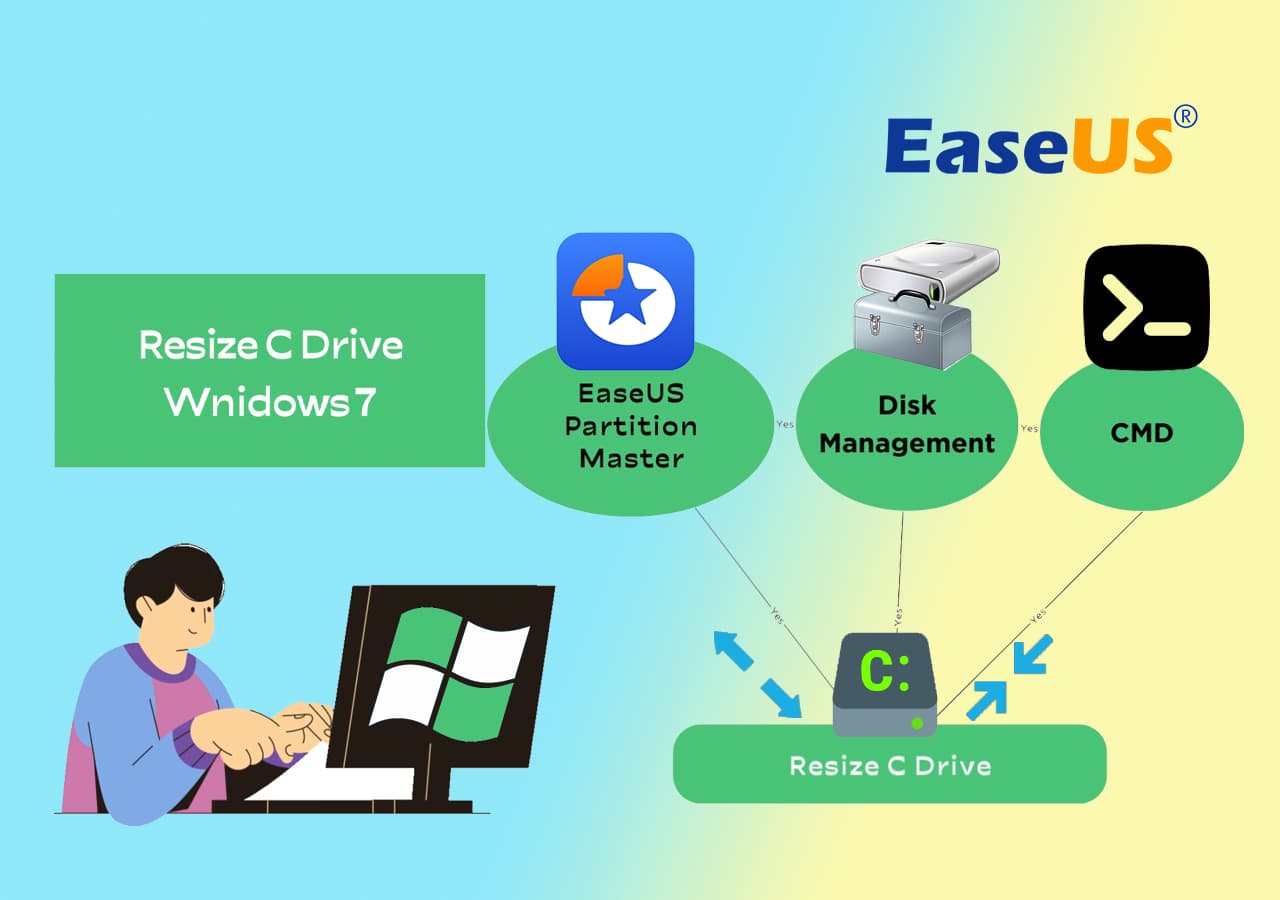
Here is a table that will help you understand which way to go when you are resizing C dive in Windows 7:
| C Drive Resizing Tools | Duration | Complexity |
| 10-15 mins | Easiest | |
| Disk Management | 15 mins | Medium |
| CMD | 20 mins | Medium |
For those venturing into the realm of C drive resizing without an arsenal of advanced computing skills, EaseUS Partition Master stands as an inviting option. Its user-friendly interface and seamless process make resizing your C drive a breeze. If you're new to the tech world, EaseUS Partition Master is your welcoming guide.
For Windows 7 users, a clear goal is essential. Do you want to shrink your C drive for space or extend it using available volumes? Defining your purpose ensures a smoother resizing process. While our tools are trustworthy, backing up your data is still essential. This step safeguards your memories and important files.
#1. Using Free Partition Manager Software - EaseUS Partition Master
- 🎯Applies to: Extend C drive, shrink drive, or allocate disk space to C drive with or without unallocated space
- 🧰Tools: Windows 7 computer, free partition manager software - EaseUS Partition Mater
EaseUS Partition Master Free Edition is a dependable and user-friendly partition manager software. It empowers Windows 7 users to resize, extend, or allocate disk space to their C drive.
Features to resize their C drive space
EaseUS Partition Master Free Edition is your trusted ally for C drive resizing. Equipped with an array of tools, this software boasts features designed to make resizing a breeze:
1. Extend/Shrink: Enlarge or reduce your C drive with a few clicks, adapting to your evolving needs.
2. Resize/Move: Seamlessly adjust the size and location of your partitions for optimal space utilization.
3. Allocate Space: Swiftly allocate free space to your C drive, granting it room to breathe and thrive.
4. Extend C Drive Across 2nd Disk: Seamlessly integrate a second disk's free space into your C drive, maximizing its potential.
To unleash its potential, download the software and follow our comprehensive guide. Whether you're extending, shrinking, reallocating, or partitioning a hard drive, the user-friendly interface ensures a smooth experience, even for those who are new to partition management.
Step 1. Launch EaseUS Partition Master to check for free space at the Partition Manager section.
- If your hard drive has unallocated space, jump to Step 3 to create partition.
- If the hard drive has no unallocated space, continue with Step 2.
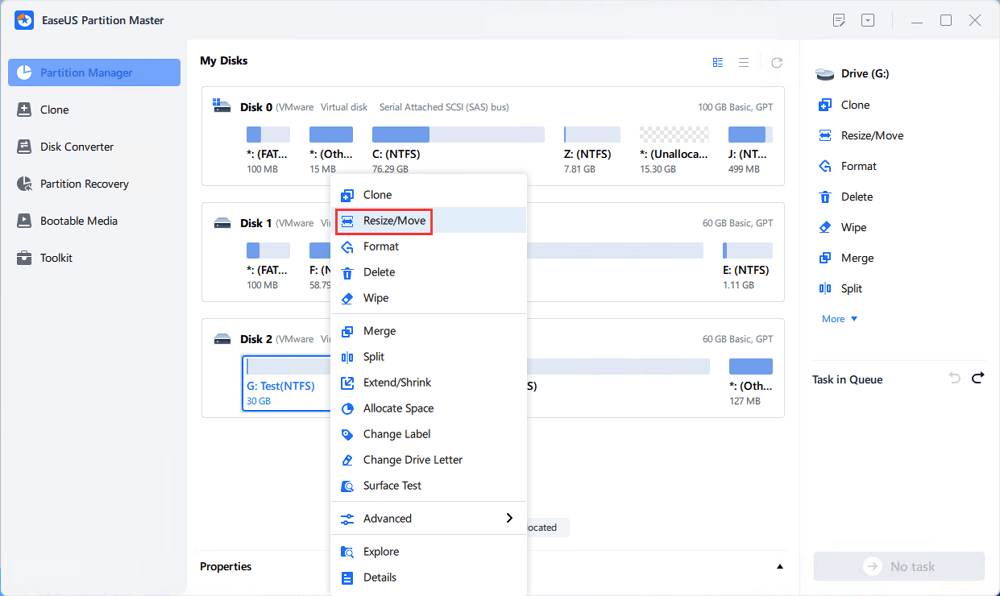
Step 2. Shrink a disk partition to create unallocated space.
Right-click on the target drive partition with a lot free space and select "Resize/Move".
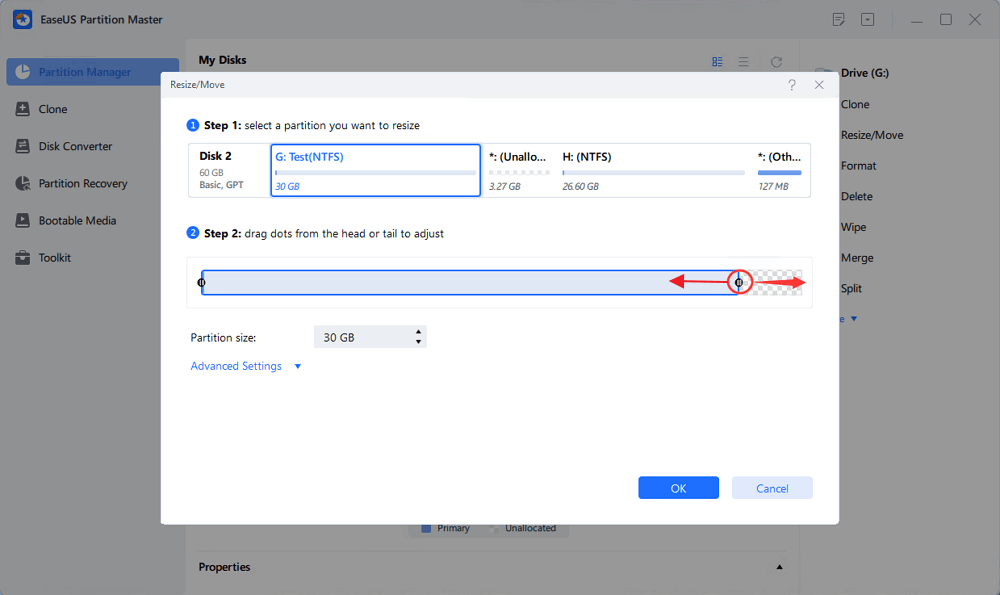
Drag either end of the partition rightwards or leftwards to shrink the partition size so as to get ample unallocated space. You can visually know how much space you've decreased in the "Size of partition" area. Click "OK".
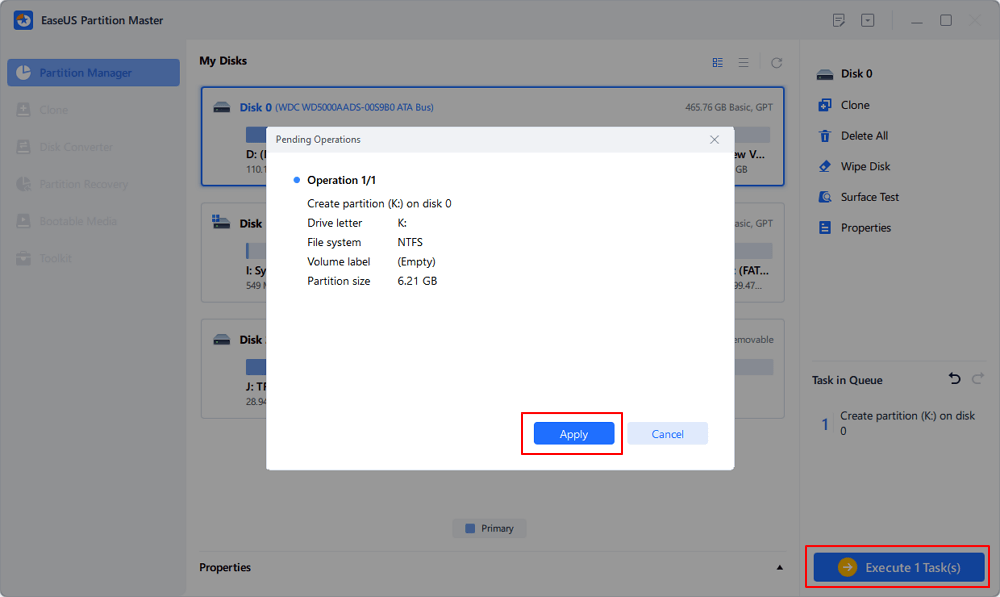
Click "Execute xx Task" and then "Apply" to save all the changes.

Go back to Partition Manager, there should be unallocated space appearing on the same disk and you can continue with the next step to create new partition on your hard drive.
Step 3. Create a new partition with unallocated space on the target hard drive.
Right-click on the unallocated space and choose "Create".
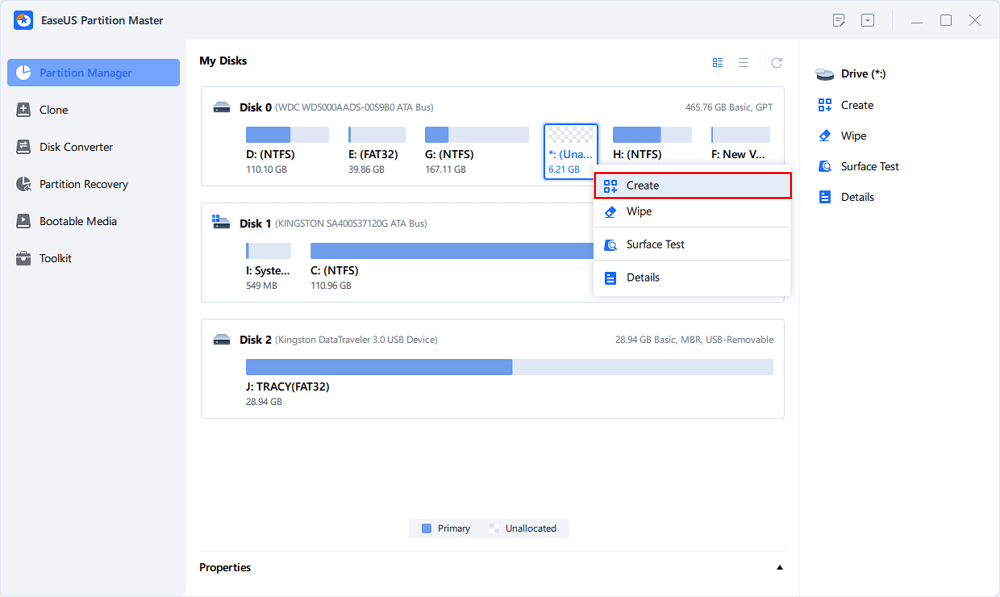
Customize the partition size, partition drive letter, partition label, file system (NTFS, FAT32, EXT2/3/4, exFAT) and more in the Advanced Settings. Click "OK".
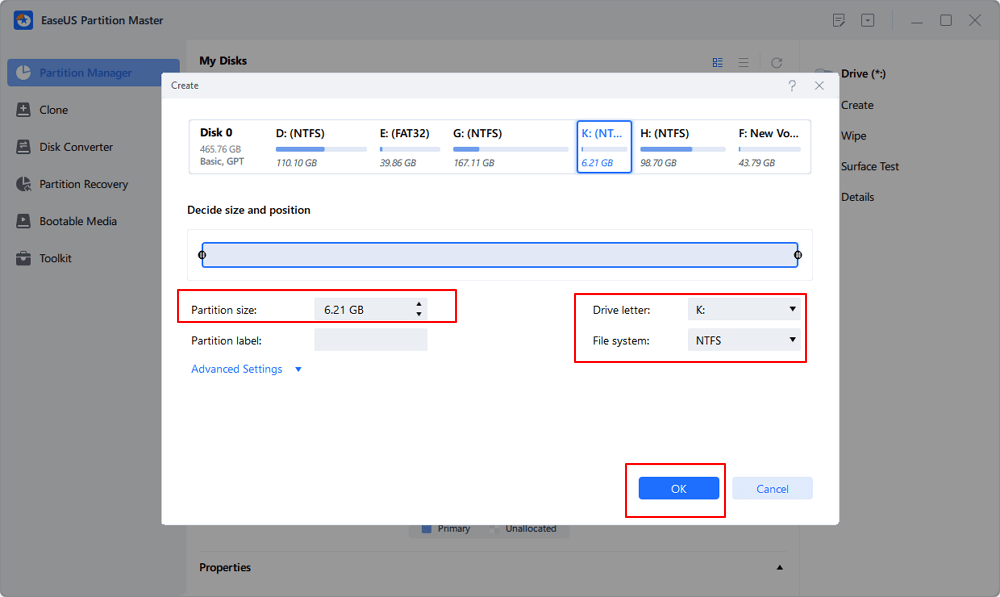
Finally, click "Execute * Task" and "Apply" to complete creating partition with the unallocated space on your disk. Repeat the steps to partition a hard drive and get many more partitions.
If you like this tool and you've successfully resized your C drive on Windows 7, share this method to help more of your friends to manage and optimize their old computers' performance now:
#2. Using Disk Management in Windows 7
- 🎯Applies to: Extend C drive, shrink C drive
- 🧰Tools: Windows 7 computer, Disk Management
Disk Management empowers Windows 7 users to adjust their C drive space effortlessly. This tool is your ally with its Shrink Volume and Extend Volume features. It's a simple yet robust solution designed to streamline the process of reimagining your drive's boundaries.
Step-by-Step Guide:
Follow this guide to extend or shrink your C drive seamlessly.
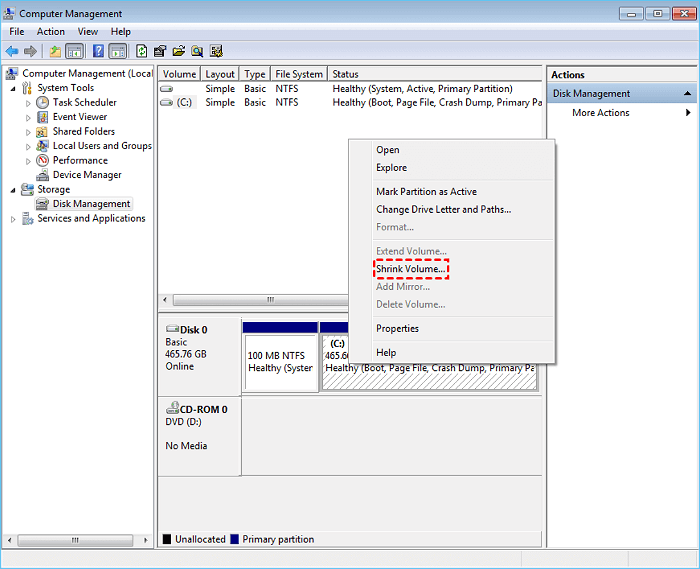
#1. Shrink Volume:
- Right-click on the icon that looks like a computer, click "Manage," then click "Disk Management.
- Right-click on your C drive, choose "Shrink Volume," enter the amount of storage you want to get rid of, and then follow the on-screen instructions.
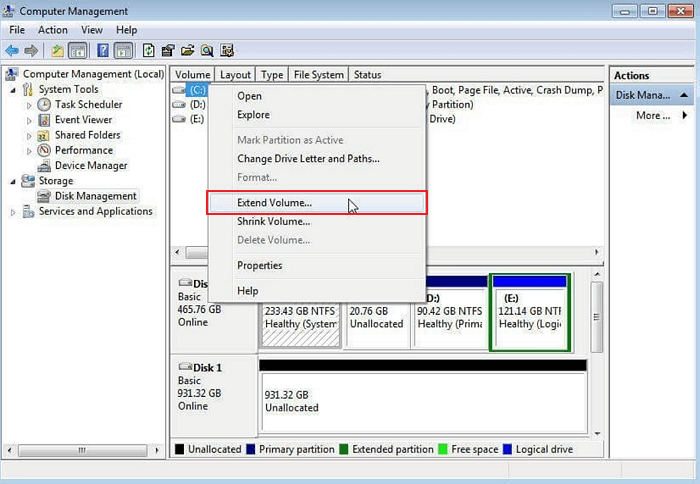
Extend Volume:
- If there is free space next to your C drive, right-click on the C drive, choose "Extend Volume."
- Tell the computer how much room you want to add, and finish the steps.
Feel free to share this method to assist your friends ib shrinking or extending their C drive in Windows 7:
#3. Using CMD
- 🎯Applies to: Extend C drive, shrink C drive
- 🧰Tools: Windows 7 computer, Command Prompt
Command Prompt (CMD) is a command-line interface in Windows that empowers advanced users to execute commands directly. It's a powerful tool for tasks like resizing C drive space. With careful command input, CMD provides precise control over partition adjustments, offering a flexible alternative for resizing tasks.
Step-by-step Guide
Following the below-given steps, you can easily extend or shrink your C drive.
Shrinking C Drive
- Open Command Prompt as Administrator.
- Type "diskpart" and press Enter.
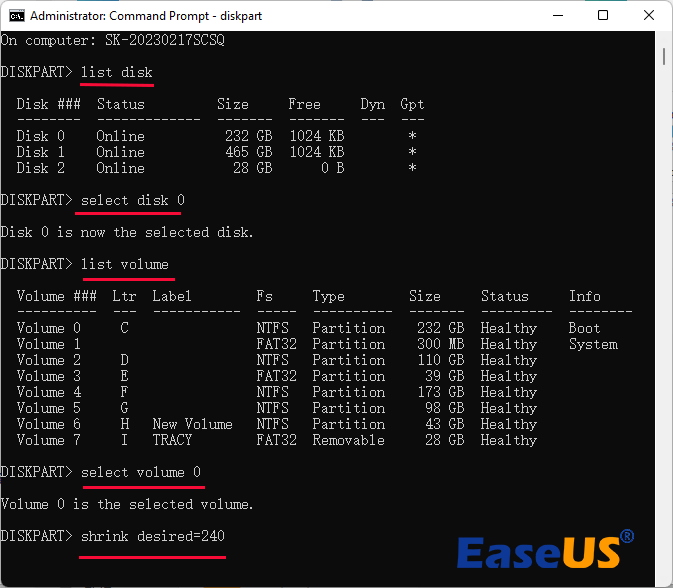
- Input "list disk" and press Enter. Note your target disk's number.
- Type "select disk *" and the disk number, then press Enter.
- Enter "list partition" and press Enter. Note your partition number.
- Input "select partition" and press Enter.
- Type "shrink desired=*" and press Enter. (Replace * with the desired size in MB you want to shrink from C drive.)
Extending C Drive
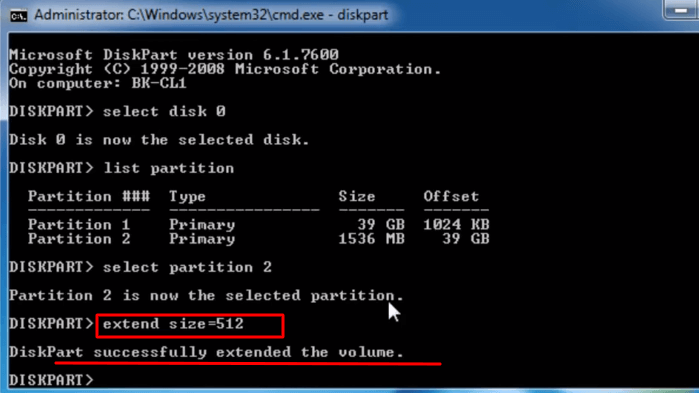
- Open Command Prompt as Administrator.
- Type "diskpart" and press Enter.
- Input "list disk" and press Enter. Note your target disk's number.
- Type "select disk *," then press Enter. (Replace * with the disk number where C drive is)
- Enter "list partition" and press Enter. Note your partition number.
- Input "select partition *" and press Enter. (Replace * with the partition number of C drive)
- Type "extend" and press Enter.
 e
e
Remember, precise command entry is crucial, and a backup of your data is strongly recommended before attempting any resizing operation.
What Should I Notify in Resizing C Drive Space on Windows 7 Computers
As you set out to reclaim precious C drive space on your Windows 7 computer, there are vital considerations to ensure a smooth and secure resizing process. Let's dive into key tips to keep in mind as you embark on this endeavor:
Pause Running Programs: Before you commence resizing, it's crucial to halt or close any active programs or processes. This precaution prevents potential conflicts and interruptions, allowing the resizing process to proceed seamlessly.
Reordering Unallocated Space: For those opting for Method 2 or 3, where unallocated space is involved, remember that the unallocated space must be positioned behind the C drive. This strategic arrangement ensures a successful resizing operation and optimal system performance.
Back-Up Data: Even though our methods are reliable, unforeseen hiccups can occur. Safeguard your valuable data by backing it up before initiating any resizing action. This precaution ensures your treasured files remain secure, granting you peace of mind.
Power Source and Stability: Ensure your laptop or computer is connected to a stable power source throughout resizing. Any sudden power loss could lead to data corruption or an incomplete operation. A steady power connection guarantees a smooth resizing journey.
Avoid Over-Extending: While extending your C drive can be enticing, it's crucial to avoid overextending. Verify that you have sufficient unallocated space before initiating an extension. Overextending could lead to performance issues or complications down the road.
Conclusion
In the ever-evolving landscape of technology, the challenge of managing your Windows 7 C drive's size has been met with three effective methods. Whether you're a tech novice or an adept user, these approaches provide the means to optimize your system's space effortlessly. EaseUS Partition Master offers a welcoming entry point, while Disk Management and Command Prompt cater to varying levels of expertise.
Remember, regardless of your chosen method, a mindful approach, cautious execution, and data backup are essential companions on this journey. As you navigate the path to resizing success, consider EaseUS Partition Master for a user-friendly introduction to reshaping your C drive without the need for formatting. Embrace the power at your fingertips and transform your Windows 7 experience into one of enhanced performance and space optimization.
FAQs About Changing C Drive Size in Windows 7
Here are some common concerns and provide solutions to help you navigate the process with confidence.
1. Why can't I extend the C drive with unallocated space in Windows 7?
When the "Extend Volume" option is grayed out, it could be due to limitations in Disk Management. It's possible that the unallocated space is not directly adjacent to the C drive. To resolve this, consider using a third-party tool like EaseUS Partition Master. With this software, you can easily move unallocated space next to the C drive and extend it seamlessly.
2. What to do if Windows 7 extend volume option is greyed out?
If you find the "Extend Volume" option unavailable in Disk Management, it might be due to certain conditions. First, ensure that the unallocated space is adjacent to the C drive. If not, use a tool like EaseUS Partition Master to move the unallocated space closer. Additionally, check if there's any logical partition between the C drive and unallocated space. Converting it to a primary partition could make extension possible.
3. Is there free software to extend the C drive in Windows 7?
Absolutely. EaseUS Partition Master Free Edition is a reliable option for extending your C drive without spending a dime.
- Download and install EaseUS Partition Master Free Edition.
- Launch the software and select your C drive.
- Choose "Resize/Move" and adjust the partition size as needed.
- Apply the changes and let the software do the rest.
How Can We Help You
About the Author
Updated by Joey Albert
Joey is an enthusiast of science and technology. With a passion for uncovering the latest tech innovations, she creates clear, engaging how-to guides that make technology accessible and enjoyable for all.
Written by Tracy King
Tracy became a member of the EaseUS content team in 2013. Being a technical writer for over 10 years, she is enthusiastic about sharing tips to assist readers in resolving complex issues in disk management, file transfer, PC & Mac performance optimization, etc., like an expert.
Product Reviews
-
I love that the changes you make with EaseUS Partition Master Free aren't immediately applied to the disks. It makes it way easier to play out what will happen after you've made all the changes. I also think the overall look and feel of EaseUS Partition Master Free makes whatever you're doing with your computer's partitions easy.
Read More -
Partition Master Free can Resize, Move, Merge, Migrate, and Copy disks or partitions; convert to local, change label, defragment, check and explore partition; and much more. A premium upgrade adds free tech support and the ability to resize dynamic volumes.
Read More -
It won't hot image your drives or align them, but since it's coupled with a partition manager, it allows you do perform many tasks at once, instead of just cloning drives. You can move partitions around, resize them, defragment, and more, along with the other tools you'd expect from a cloning tool.
Read More
Related Articles
-
Extend or Expand SSD C Drive Across Disks Like An Expert in 2026
![author icon]() Tracy King/2026/06/17
Tracy King/2026/06/17 -
How to Check What Is Using Up My C Drive Space [2026 Tutorial]
![author icon]() Cici/2026/06/17
Cici/2026/06/17 -
Best C Drive Split Software Free Download Recommended🔥
![author icon]() Shelly/2026/06/17
Shelly/2026/06/17 -
How to Clone C Drive on Windows 10 in 2026 [Newest Solution]
![author icon]() Sherly/2026/06/17
Sherly/2026/06/17


