🚀Quick Answer: If you need unsaved Word document recovery on Mac, try these methods in order:
- 1. Use AutoRecovery in Microsoft Word
- 2. Check Mac temporary folders
- 3. Restore via AutoSave
- 4. Recover from Time Machine
- 5. Use recovery software (last but most effective resort) 🔥
👉 These methods work for crashes, accidental closure, or system shutdown.
What Is Unsaved Word Document Recovery on Mac? Unsaved Word document recovery on Mac refers to retrieving files that were never manually saved due to:
- Word keeps crashing or freezing
- Mac's sudden shutdown, and Word is not saving
- Closing without saving
- Accidentally pressed don't save on Word for Mac
This guide applies to all modern versions of macOS and Word (including Microsoft 365).
Method 1. Recover from AutoRecovery (Best First Option)
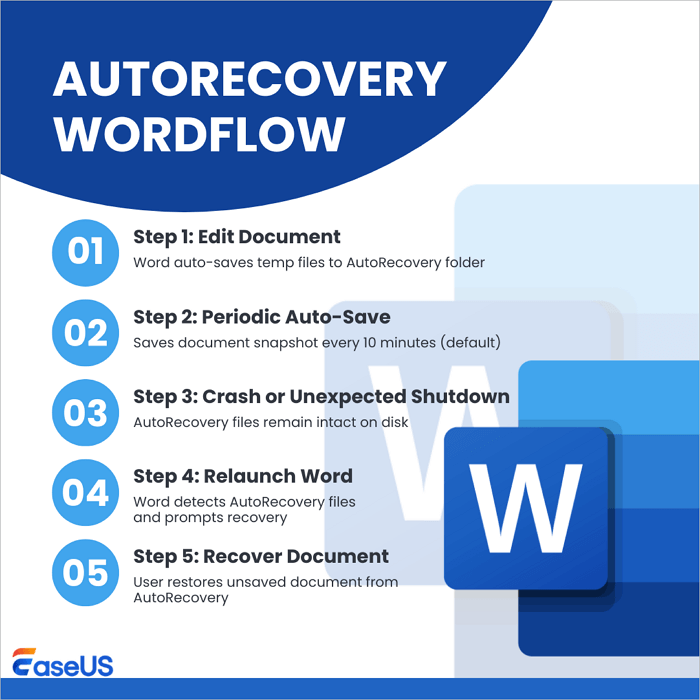
AutoRecovery is the fastest and most reliable way to recover unsaved Word documents on Mac.
AutoRecover, a feature that is available in some Office applications, attempts to recover files automatically in the event of an application or system crash. It does this by periodically saving a copy of the file in the background. By default, AutoRecover saves a recovery file every 10 minutes... - from Microsoft Support
Steps to recover unsaved documents in Word for Mac:
Step 1. Open Microsoft Word and click "File > Open Recent".
Step 2. Select "Recover Unsaved Documents".
Step 3. Open and save the recovered file.
Steps to recover unsaved Word docs with AutoRecovery:
Step 1. Open Finder on your Mac.
Step 2. Select Go from the top Finder menu. Then, go to the Folder.
Step 3. Type in this path and hit Enter:
~/Library/Containers/com.microsoft.Word/Data/Library/Preferences/AutoRecovery

Step 4. Open the AutoRecovery folder, and locate the files that start with the words "AutoRecovery save of". Find the one you want to recover.

Why this works:
Word automatically saves temporary versions every few minutes.
👉 Best for:
- Word crash
- App force quit
- Unexpected restart
Prefer a visual walkthrough? We've put together a step‑by‑step video guide that covers all five recovery methods - from AutoRecovery and temporary folders to Time Machine and professional Mac data recovery software, so you can see exactly how to retrieve your unsaved Word document on a Mac.
- 00:37 - AutoRecovery in Word
- 02:04 - Recover Doc From TMP Folder
- 03:06 - Recover Doc From Mac Trash
- 03:39 - Recovery Software

Method 2. Recover Unsaved Word Document from Mac Temp Folder
If AutoRecovery fails, you can manually locate temporary files.
Steps:
Step 1. Open Finder and press "Command + Shift + G".
Step 2. Enter: /private/var/folders

Step 3. Search for files ending in: ".tmp" and "Word Work File".
Step 4. Open the temporary files in Word and save them as new Word documents.
💡 Pro Tip: Mac stores temporary files even if Word crashes unexpectedly, making this a powerful backup method.
👉 Best for:
- System crash
- Power outage
- Word is not reopening the recovery file

Method 3. Recover via AutoSave on Mac
Honestly, if you're on a Mac and you've ever closed a Word doc only to realize you never hit Save, AutoSave might've saved you - but only if the file was sitting in the right place.
A lot of people assume AutoSave is always running in Word for Mac. It isn't. It only works if the file is stored somewhere like OneDrive or iCloud Drive. If you're saving locally - say, in your Documents folder - AutoSave just stays off, even though the option is still there.
In that case, Word falls back to AutoRecover. It helps, sure, but it's not the same thing. AutoRecover saves versions every few minutes, not continuously. That gap is usually where things go wrong when you're trying to deal with an unsaved Word document on Mac.
Steps:
Step 1. Launch Microsoft Word on your Mac. In the application menu bar, click "File > Open Recent".

This list displays documents that AutoSave has been actively managing in the background.
Step 2. Browse the list for your missing file. If the document was being auto-saved, you will see it listed here, often marked with a timestamp or the "AutoSaved" status. Click the file to open it directly.
Why users miss this:
A lot of people miss this: when AutoSave is on - you'll spot that little toggle up in the Word title bar - there's no pop-up asking if you want to save. It's all silent.
Most people have done this at least once - close a document, assume it saved, and only realize later that it didn't. If the file was in iCloud Drive or OneDrive, you might get lucky. Word sometimes keeps a version in the background and shows a recovery prompt when you reopen it.
And even if it doesn't show anything right away, it's still worth reopening Word. I've seen cases where the file just reappears after a restart, especially with synced folders.
👉 Best for:
- Files edited recently
- Documents stored in the cloud or default folders
Method 4. Restore Unsaved Word Documents Using Time Machine
If the document is completely gone: deleted, overwritten, or never properly saved, then Time Machine is probably your best shot.
It runs in the background and keeps snapshots of your system over time. So instead of relying on Word alone, you can go back to an earlier version of your Mac and pull the file from there.
It's not instant, but in practice, this method tends to work more often than the others when things get serious.
Steps to restore files from Time Machine on a Mac:
Step 1. Open the folder where the file was stored. This is essential because Time Machine restores files to their original location.
Step 2. With the folder open, click the Time Machine icon in the menu bar and select "Enter Time Machine". Alternatively, you can press "Command + Shift + T" on your keyboard.

Step 3. A timeline appears on the right edge of your screen. Use the arrow buttons or scroll through the timeline to locate a date and time when the document still existed and was in a usable state.
- For deleted files: Look for a backup made before the deletion occurred.
- For overwritten or unsaved changes: Look for a backup version that contains the content you need.
Step 4. Once you find the correct version, click on the file to select it, then click the Restore button at the bottom of the screen.

Time Machine will copy the selected version back to its original folder. If a newer version already exists, you will be prompted to keep both versions, replace the existing one, or cancel.
- Important
- Time Machine only helps if it was already turned on. That's the part a lot of users overlook. If backups weren't running before the file was lost, there's nothing to restore from. But if you did have it enabled - whether on an external drive or network backup - you can often recover files even after they've disappeared completely from Finder.
👉 Best for:
- Deleted Word documents
- Older file versions
Method 5. Use Data Recovery Software (Last Resort)
If your document is missing entirely, recovery software can help. A tool like EaseUS Data Recovery Wizard for Mac can scan your Mac and recover lost Word files - even after deletion. It offers a high success rate for Word documents (.docx, .doc) and supports APFS, HFS+, and exFAT file systems
These tools bypass system folders and scan the raw storage sectors of your Mac to locate recoverable file fragments, even after deletion.
When to use this method:
- File permanently deleted
- Trash emptied
- Disk error or corruption
Why this works:
Recovery tools scan disk sectors instead of relying on system folders.
Step:
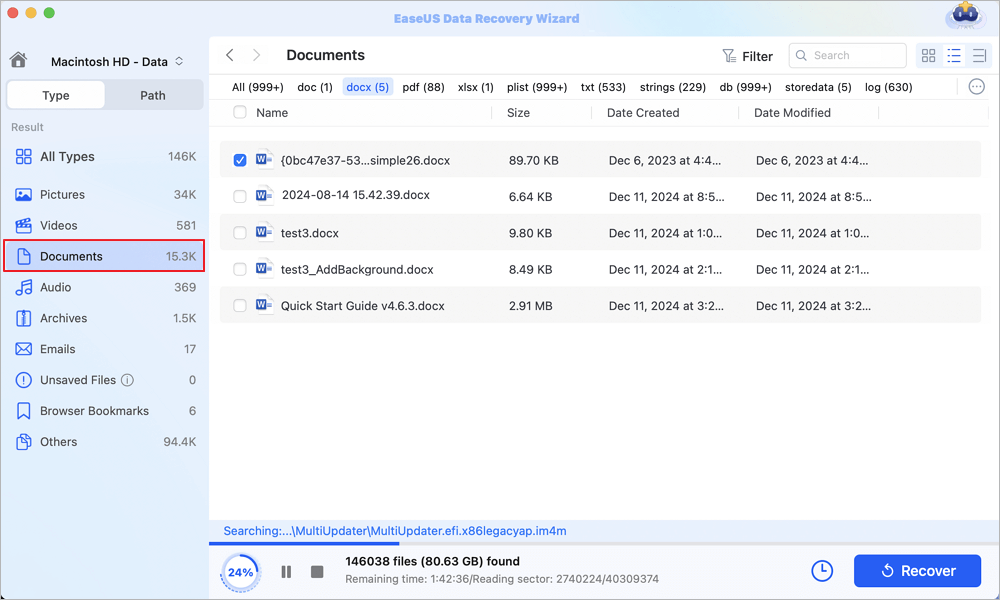
Step 1. Scan for lost documents
Select the location where your important Word/Excel/PPT/Numbers/Pages documents were lost and click "Search for lost files".

Step 2. Find lost documents on Mac
EaseUS Data Recovery Wizard for Mac will immediately start a scan on your selected disk volume. Meanwhile, the scanning results will be presented in the left pane. Select "Documents" and you can quickly filter the DOC/PDF/PPT/XLS files you've lost earlier.
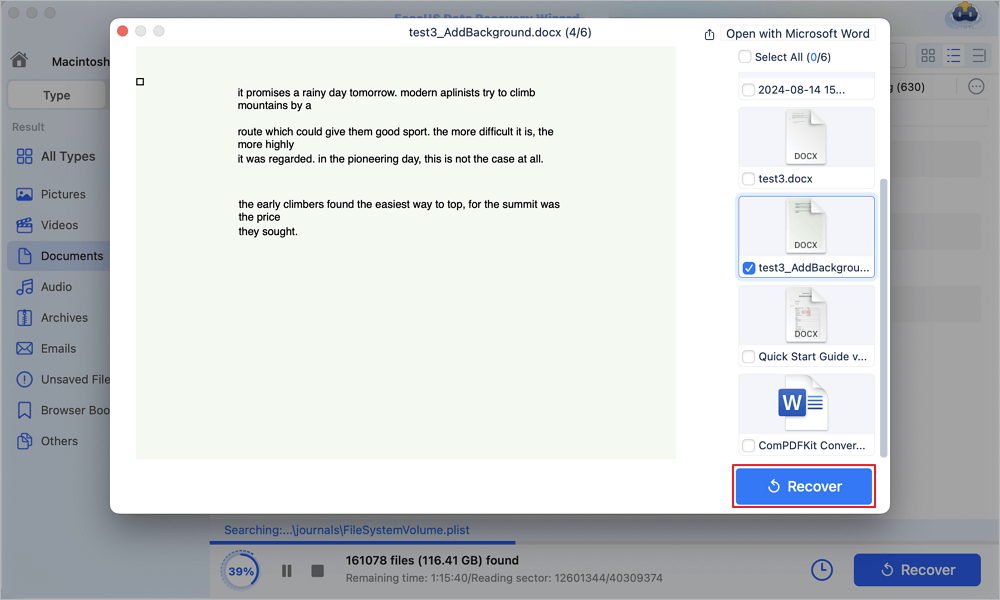
Step 3. Recover lost/deleted documents
Select the target files and preview them by double-clicking them. Then, click "Recover" to get lost documents back at once.
Common Reasons Word Documents Get Lost on Mac
Understanding the cause helps choose the right recovery method:
- Word crash or freeze
- macOS update or restart
- Accidental closure without saving
- Disk or system error
Smart Recovery Strategy
Use this decision flow:
- File exists but unsaved -> AutoRecovery
- File missing -> Temp folder
- File deleted -> Time Machine
- File gone completely -> Data Recovery software
FAQ: Unsaved Word Document Recovery on Mac
Q1: Where are unsaved Word files stored on a Mac?
Unsaved Word documents are typically stored in two locations:
- AutoRecovery folders – A protected folder managed by Microsoft Word where temporary recovery versions are saved at regular intervals.
- Temporary system directories – macOS temporary folders (e.g., /private/var/folders/) where Word may cache unsaved content.
For detailed steps to access these locations, refer to Method 1 (AutoRecovery) and Method 2 (Mac Temporary Folders) above.
Q2: Can I recover a Word document I never saved?
Yes, in most cases. If either of the following features was active, recovery is highly likely:
- AutoRecovery – Enabled by default in Word, it saves temporary versions every 10 minutes.
- AutoSave – Available for documents stored in iCloud or OneDrive; it saves changes continuously.
If you never saved the file and both features were off, your chances decrease, but you can still attempt Method 5 (Data Recovery Software) to scan for residual file fragments.
Q3: How do I recover a Word document after a crash on Mac?
After a crash, follow these steps in order:
Step 1. Restart Microsoft Word – Upon reopening, Word automatically displays the AutoRecovery pane on the left side of the startup window, listing any recoverable documents.
Step 2. Check the recent files list – Go to File > Open Recent and look for the document with an "AutoSaved" or "Recovered" label.
Step 3. If not found, use temporary folder recovery – Proceed to Method 2 (Mac Temporary Folders) or Method 3 (AutoSave) depending on where the file was stored.
Word's crash recovery behavior is designed to minimize data loss, but acting immediately after the crash yields the best results.
Q4: Why did my Word document disappear on Mac?
Disappearance usually results from one of the following scenarios:
- Application crash – Word closes unexpectedly before saving changes.
- Power failure or system shutdown – The Mac loses power while the document is open.
- Accidental closure – You clicked "Don't Save" or closed the window without saving.
- File system corruption – Rare disk errors can make files temporarily invisible.
- Accidental deletion – The file was moved to Trash and possibly emptied.
For each cause, a specific recovery method applies. Refer to the comparison table at the start of this guide to match your situation with the most effective solution.
Final Thoughts
In most cases, recovering an unsaved Word document on Mac isn't as bad as it first feels. Start simple. Check AutoSave, then AutoRecover. If those don't work, move on to Time Machine.
The main thing is not to panic and start overwriting files - that's usually what makes recovery harder. Consider using EaseUS Data Recovery Wizard for Mac to recover unsaved Word documents on your Mac when all the above methods fail.
Was This Page Helpful?
Brithny is a technology enthusiast, aiming to make readers' tech lives easy and enjoyable. She loves exploring new technologies and writing technical how-to tips. In her spare time, she loves sharing things about her game experience on Facebook or Twitter.
Written by Tracy King
Tracy became a member of the EaseUS content team in 2013. Being a technical writer for over 10 years, she is enthusiastic about sharing tips to assist readers in resolving complex issues in disk management, file transfer, PC & Mac performance optimization, etc., like an expert.
-
EaseUS Data Recovery Wizard is a powerful system recovery software, designed to enable you to recover files you’ve deleted accidentally, potentially lost to malware or an entire hard drive partition.
Read More -
EaseUS Data Recovery Wizard is the best we have seen. It's far from perfect, partly because today's advanced disk technology makes data-recovery more difficult than it was with the simpler technology of the past.
Read More -
EaseUS Data Recovery Wizard Pro has a reputation as one of the best data recovery software programs on the market. It comes with a selection of advanced features, including partition recovery, formatted drive restoration, and corrupted file repair.
Read More
Related Articles
-
How to Recover Deleted DCIM Folder from Android
![author icon]() Tracy King/Jun 16, 2026
Tracy King/Jun 16, 2026 -
3 módszer: Nem mentett vagy elveszett Excel fájl helyreállítása Mac rendszeren
![author icon]() Cedric/Jun 30, 2026
Cedric/Jun 30, 2026 -
How to Recover Previous Versions of Word Documents on Mac [Solved]
![author icon]() Tracy King/Jun 14, 2026
Tracy King/Jun 14, 2026 -
4 Fixes to Recover Unsaved Photoshop Files Mac Now!
![author icon]() Tracy King/Jun 30, 2026
Tracy King/Jun 30, 2026