Recovering a previous version of a Word document on Mac means restoring an earlier saved copy of the file using Microsoft Word's version history, AutoRecovery, Time Machine, or recovery software after accidental overwriting, deletion, corruption, or unsaved changes.
- Method 1. Recover Previous Versions Using Word Version History
- Method 2. Recover Unsaved Word Documents from AutoRecovery
- Method 3. Restore Previous Versions Using Time Machine
- Method 4. Recover Deleted or Replaced Word Files with Recovery Software
- Method 5. Recover Temporary Word Files from the TMP Folder
- Method 6. Recover Previous Versions from OneDrive or iCloud
I accidentally saved over a document yesterday thinking I saved as a new Word document. I continued work today and I kept saving as I worked because habits. I only realized my mistake 12 hours later. I did as googled told and delved into the properties of the document and found no previous versions. I'd appreciate any help I can get. - from Reddit
Accidentally replacing or overwriting a Word document on your Mac can feel disastrous, especially when important work disappears instantly. Fortunately, macOS and Microsoft Word include several built-in recovery systems that may help restore older versions of your files. Even if Version History is unavailable, you may still recover overwritten, unsaved, deleted, or replaced Word documents using AutoRecovery folders, Time Machine backups, temporary files, or professional data recovery software.
In this guide, you will learn exactly how to recover previous versions of Word documents on Mac, including advanced recovery scenarios for Microsoft 365, OneDrive syncing, APFS-based Macs, and the latest macOS versions such as Sonoma and Sequoia.
✅Quick Comparison of Word Document Recovery Methods on Mac:
| Recovery Method | Best For | Requires Backup | Difficulty | Success Rate |
|---|---|---|---|---|
| Version History | Overwritten files | No | Easy | High |
| AutoRecovery | Unsaved documents | No | Medium | Medium |
| Time Machine | Historical backups | Yes | Easy | Very High |
| TemporaryItems Folder | Crash recovery | No | Medium | Low |
| Recovery Software | Deleted or emptied Trash files | No | Medium | Medium-High |
What Does 'Recover Previous Version' Mean on Mac
Word Version History is a Microsoft 365 feature that stores earlier versions of Word documents locally or in the cloud, allowing Mac users to restore overwritten, deleted, or unsaved changes without manually creating duplicate copies.
Difference Between Overwritten, Unsaved, and Deleted Files
- Overwritten files: A newer version replaced the old document.
- Unsaved files: Changes were never manually saved.
- Deleted files: The file was removed from storage or Trash.
Understanding the difference matters because each scenario requires a different recovery method. Overwritten documents are often recoverable through version history or cloud sync, while deleted files may require data recovery software.
How Word Version History Works on macOS
When AutoSave and OneDrive are enabled in Microsoft 365, Word continuously creates restore points for your documents. These versions are stored either locally, inside AutoRecovery folders on Mac, or within OneDrive cloud history.
According to Microsoft Support, Version History works best when files are saved to OneDrive or SharePoint because cloud syncing preserves multiple restore points automatically.
Something You Should Know:
- Version History helps restore overwritten files.
- AutoRecovery focuses on unsaved documents.
- Cloud sync improves recovery success.
- Deleted files may require recovery software.
What to Do Immediately After Saving Over Word Document
If you accidentally saved over an important Word document, your first actions will directly affect the success of the recovery.
❗Stop Using the Drive Immediately
- Avoid downloading new files.
- Do not install large applications.
- Do not copy files onto the same drive.
Modern Macs use SSD storage and the APFS file system. Once overwritten sectors are replaced permanently, recovery becomes significantly harder.
⚠️Check Built-In Recovery Locations First
- Open Word Version History.
- Check the AutoRecovery folder.
- Review OneDrive or iCloud history.
- Open Time Machine backups.
- Search TemporaryItems folders.
Method 1. Recover Previous Versions Using Word Version History
Word Version History is the easiest way to recover overwritten Word documents on Mac because it restores earlier saved copies directly inside Microsoft Word.
How Version History Works in Microsoft 365
If your Word document was saved to OneDrive or SharePoint, Microsoft 365 automatically stores historical versions of the file. This allows you to roll back to earlier edits after accidental changes or replacements. Steps to Recover Previous Versions of Word Documents on Mac
Step 1. Open Microsoft Word.
Step 2. Open the affected document.
Step 3. Click "File" from the top menu.
Step 4. Select "Browse Version History".
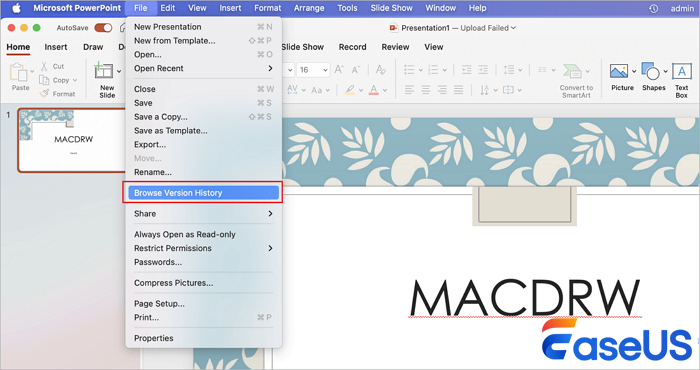
Step 5. Choose the version you want.
Step 6. Preview the document carefully.
Step 7. Click "Restore".
Fix Word Version History Missing on Mac
If Browse Version History is greyed out or unavailable, check the following:
- The file is stored locally instead of OneDrive.
- AutoSave is disabled.
- You are using an older Office version.
- The file format is unsupported.
- OneDrive synchronization failed.
You can share this method on social media to help more Mac users restore previous version of Word documents.

Method 2. Recover Unsaved Word Documents from AutoRecovery
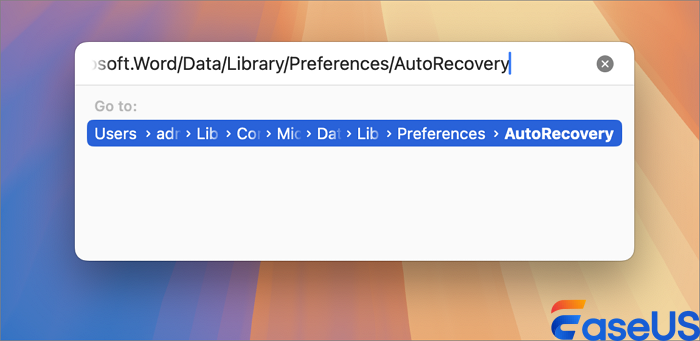
AutoRecovery is a built-in Microsoft Office feature that automatically saves temporary copies of Word documents at scheduled intervals on Mac. Where Are AutoRecovery Files Stored on Mac? Use the following path to access Word AutoRecovery files
|
~/Library/Containers/com.microsoft.Word/Data/Library/Preferences/AutoRecovery |
How to Recover Unsaved Word Documents on Mac:
Step 1. Open Finder.
Step 2. Click "Go" > "Go to Folder".

Step 3. Paste the AutoRecovery path.
Step 4. Locate AutoRecovery files.
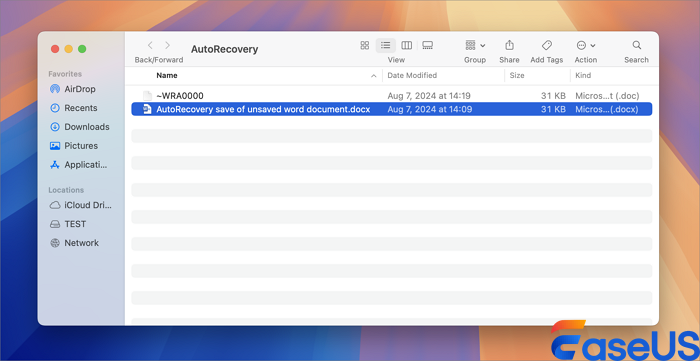
Step 5. Open the newest file.
Step 6. Save it immediately with a new name.
Why AutoRecovery Sometimes Fails
- AutoRecovery was disabled.
- The Mac restarted unexpectedly.
- The temp cache was deleted.
- The document was never saved initially.
We tested AutoRecovery on macOS Sonoma using Microsoft Word 365 after simulating a forced crash. The feature restored the latest document draft successfully within two minutes.
Method 3. Restore Previous Versions Using Time Machine
Time Machine is Apple's built-in backup system that allows Mac users to restore historical file versions from external or network-based backups.
When Time Machine Works Best
- You created regular backups.
- The Word document existed before deletion.
- The backup drive is accessible.
Steps to Recover Previous Word Versions with Time Machine:
Step 1. Connect your Time Machine backup drive.
Step 2. Open Finder.
Step 3. Navigate to the original file location.
Step 4. Launch "Time Machine."
Step 5. Browse the timeline.
![]()
Step 6. Select the older Word version.
Step 7. Click "Restore".
Limitations of Time Machine Recovery
- No backup means no restoration.
- Deleted snapshots may be unavailable.
- External drives can fail physically.
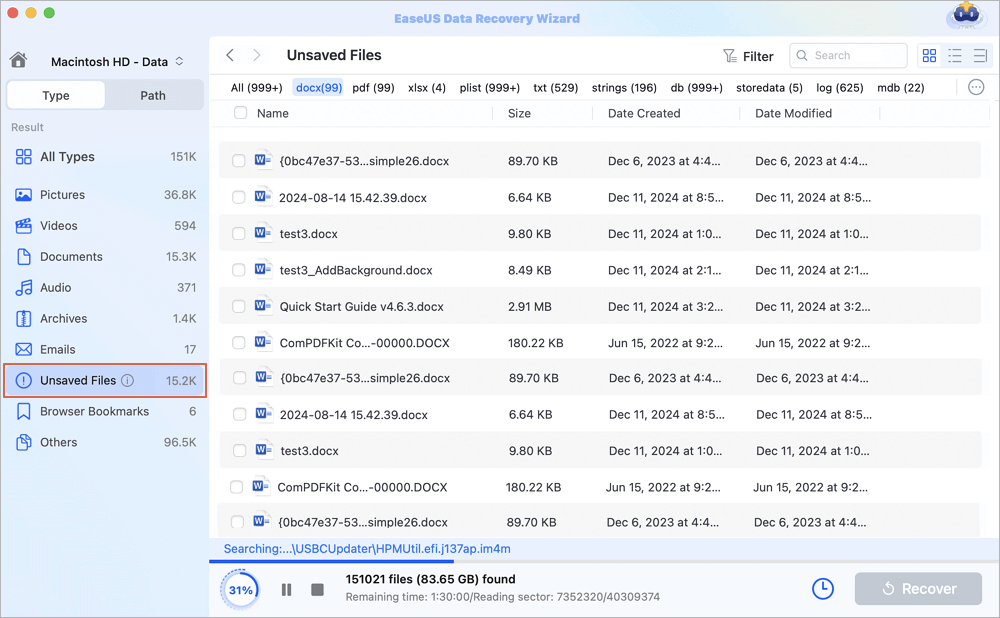
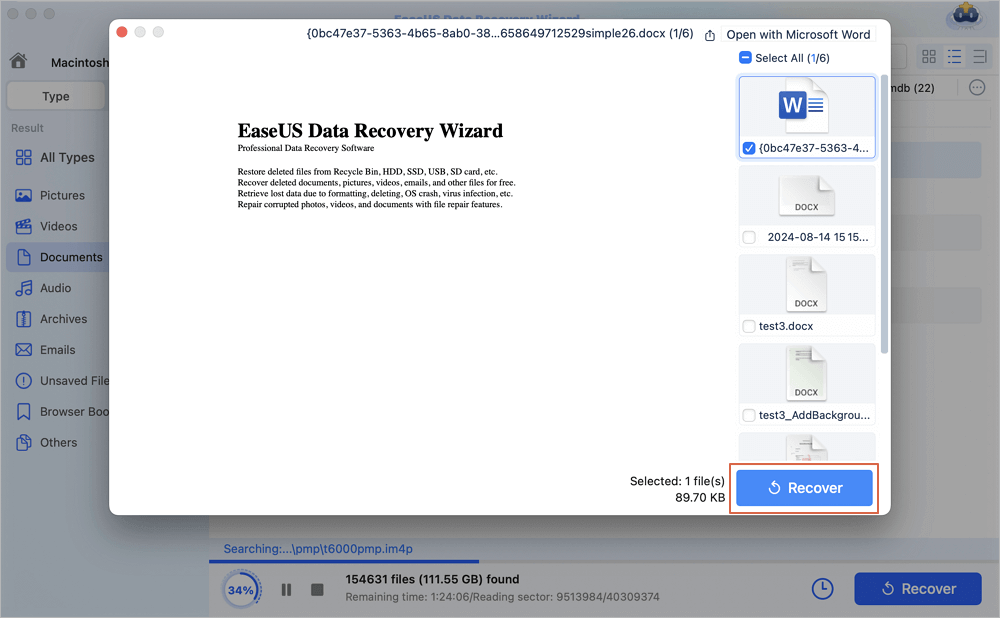
Method 4. Recover Deleted or Replaced Word Files with Recovery Software
Data recovery software scans storage devices for deleted or inaccessible Word files that no longer appear in Finder, Trash, or Version History.
When Recovery Software Is Necessary
- Trash was emptied.
- The document was "permanently" deleted.
- The drive became corrupted.
- No backup exists.
EaseUS Data Recovery Wizard for Mac can scan APFS-based drives for deleted DOC, DOCX, XLSX, PPTX, and other Office files. The software supports recovery from an emptied Trash, accidental formatting, corrupted partitions, and deleted documents.
How EaseUS Data Recovery Wizard Helps:
- Supports APFS and HFS+ recovery.
- Recovers deleted Office documents.
- Recover unsaved Word documents on Mac.
- Previews DOCX files before restoration.
Steps to Recover Word Documents Using Recovery Software:
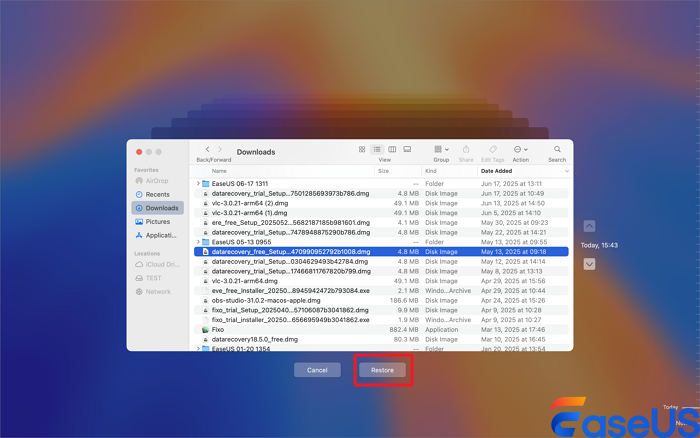
Step 1. Select the disk
Launch EaseUS Data Recovery Wizard for Mac, hover the mouse over the device where you lost an unsaved file, and click "Search for lost files".

Step 2. Choose unsaved documents
After the scan, click "Type", and expand "Unsaved Documents". Click the exact file type - Word, Excel, Powerpoint, Keynote, Pages, or Numbers you lost without saving.
Step 3. Preview and recover unsaved files
Double-click to preview your unsaved file, select the right version and click "Recover" to save the file to another secure location on Mac.
Here are some reviews from EaseUS Data Recovery Wizard for Mac users:
| 💡Reviews |
|
⚠️Important: Recovery success depends heavily on whether the original file sectors have already been overwritten.
Method 5. Recover Temporary Word Files from the TMP Folder
TemporaryItems folders store temporary cache files generated during editing sessions, application crashes, or unsaved Word operations.
How to Access the TMPDIR Folder
Step 1. Press Command + Space.
Step 2. Open Terminal.
Step 3. Type open $TMPDIR.
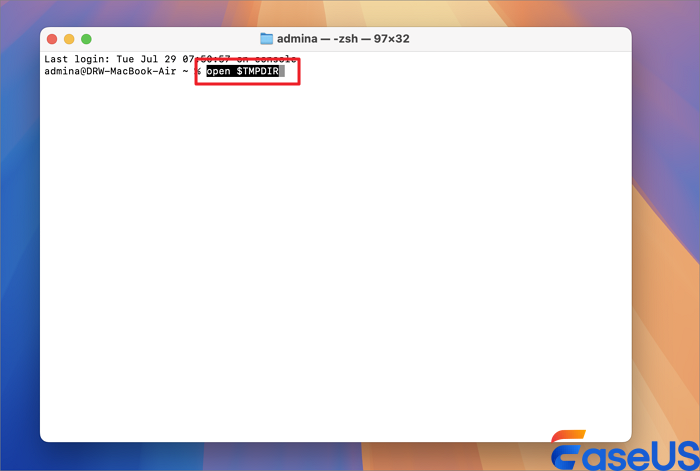
Step 4. Press Return.
Step 5. Locate the TemporaryItems folder.
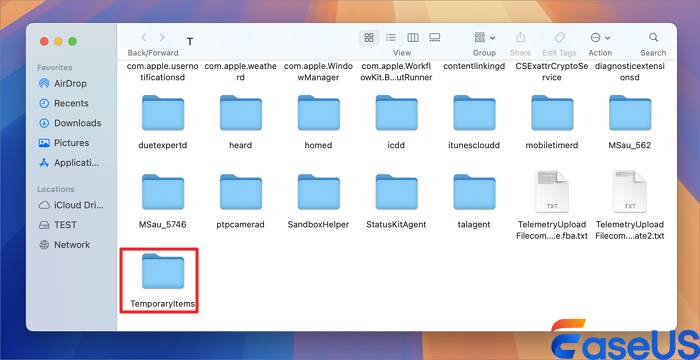
How to Restore Temporary Word Files
Step 1. Find files ending in .tmp.
Step 2. Duplicate the file first.
Step 3. Rename the extension to .docx.
Step 4. Open the file in Word.
Step 5. Save the recovered content.
Why Temporary Recovery Often Fails
- macOS automatically clears temp files.
- Restarting the Mac removes caches.
- Corrupted TMP files may not open.
Method 6. Recover Previous Versions from OneDrive or iCloud
Cloud storage services such as OneDrive and iCloud often keep older document versions even after local files are overwritten or deleted.
Recover Previous Versions from OneDrive
Step 1. Open OneDrive online.
Step 2. Locate the Word document.
Step 3. Right-click the file.
Step 4. Select "Version History".
Step 5. Choose an earlier version.
Step 6. Restore or download it.
Recover Files from iCloud Drive
Step 1. Open iCloud.com.
Step 2. Go to Drive.
Step 3. Open Recently Deleted.
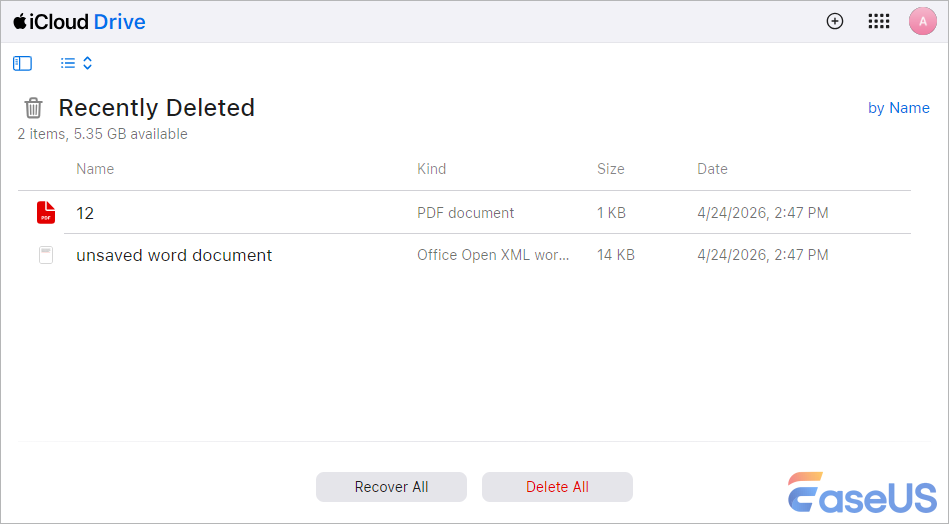
Step 4. Select the deleted document.
Step 5. Click Restore.
Why You Cannot Recover Older Word Versions on Mac
Common Recovery Failures
- The file was overwritten permanently.
- No backups existed.
- AutoSave was disabled.
- Temporary files were removed.
- The SSD performed TRIM cleanup.
How APFS and SSD Storage Affect Recovery
Modern Macs use SSDs with TRIM technology, which permanently clears deleted blocks to improve performance. This can reduce the recovery success rate after deletion or overwrite events.
However, cloud version history and Time Machine backups remain highly effective because they preserve independent copies of the file.
Best Practices to Prevent Losing Important Word Documents
If you don't want to lose important Word documents on your Mac in the future, you can follow these tips:
Enable AutoSave and AutoRecovery
- Enable AutoSave in Word.
- Reduce AutoRecovery intervals.
- Store files in OneDrive.
Build a 3-2-1 Backup Strategy
- Keep three copies of important files.
- Use two storage types.
- Store one copy offsite or in the cloud.
Use Better File Version Naming
- Add dates to filenames.
- Create milestone copies manually.
- Avoid replacing originals directly.
Feel free to share these tips on social media to help more Mac users!
Conclusion
Losing an important Word document on Mac does not always mean the file is gone permanently. Whether your document was overwritten, replaced, unsaved, corrupted, or deleted, you still have multiple recovery options available. Start with built-in solutions such as Word Version History, AutoRecovery, OneDrive, and Time Machine before moving to professional recovery software.
The most important factor is acting quickly. Avoid writing new data to the affected drive and begin recovery immediately to maximize your chances of restoring previous versions successfully.
FAQs About Recovering Previous Versions of Word Documents on Mac
1. Can I recover an overwritten Word document on Mac?
Yes. You can often recover an overwritten Word document on Mac using Word version history, OneDrive versioning, Time Machine backups, AutoRecovery files, or recovery software. The highest recovery success rates occur when AutoSave or cloud synchronization was enabled before the overwrite happened.
2. Where are Word autorecovery files stored on Mac?
Word AutoRecovery files are typically stored in the following location: ~/Library/Containers/com.microsoft.Word/Data/Library/Preferences/AutoRecovery
You can access the folder using Finder and the "Go to Folder" option.
3. Why is Version History missing in Word for Mac?
Version History may be unavailable if the document is stored locally instead of OneDrive, AutoSave is disabled, synchronization failed, or you are using an unsupported Office version.
4. Can Time Machine recover previous versions of Word documents?
Yes. Time Machine can restore earlier versions of Word documents if backups were created before the file was deleted, overwritten, or corrupted.
5. Can I recover unsaved Word documents after a Mac crash?
Yes. AutoRecovery and temporary files may still contain unsaved Word content after a system crash or forced shutdown.
6. Does Word save previous versions automatically?
Microsoft Word can automatically save previous versions when AutoSave and OneDrive synchronization are enabled in Microsoft 365.
7. Can I recover Word files after emptying Trash?
Yes, but the recovery success rate depends on whether the deleted data has been overwritten. Recovery software may still locate recoverable DOCX files.
8. How long are temporary Word files stored on a Mac?
Temporary Word files are usually stored only for a limited time. Restarting the Mac or clearing cache files may remove them permanently.
9. Can OneDrive restore older Word versions?
Yes. OneDrive includes built-in version history that allows users to restore earlier document versions directly from cloud storage.
10. What is the best recovery method for Word documents on macOS Sequoia?
The best method depends on the situation. Version History and Time Machine provide the highest success rates, while AutoRecovery and recovery software help in unsaved or deleted file scenarios.
Was This Page Helpful?
Dany is an editor of EaseUS who lives and works in Chengdu, China. She focuses on writing articles about data recovery on Mac devices and PCs. She is devoted to improving her writing skills and enriching her professional knowledge. Dany also enjoys reading detective novels in her spare time.
Written by Tracy King
Tracy became a member of the EaseUS content team in 2013. Being a technical writer for over 10 years, she is enthusiastic about sharing tips to assist readers in resolving complex issues in disk management, file transfer, PC & Mac performance optimization, etc., like an expert.
-
EaseUS Data Recovery Wizard is a powerful system recovery software, designed to enable you to recover files you’ve deleted accidentally, potentially lost to malware or an entire hard drive partition.
Read More -
EaseUS Data Recovery Wizard is the best we have seen. It's far from perfect, partly because today's advanced disk technology makes data-recovery more difficult than it was with the simpler technology of the past.
Read More -
EaseUS Data Recovery Wizard Pro has a reputation as one of the best data recovery software programs on the market. It comes with a selection of advanced features, including partition recovery, formatted drive restoration, and corrupted file repair.
Read More
Related Articles
-
How to Recover an Unsaved Word Document on Mac (2026 Guide)
![author icon]() Tracy King/Jun 30, 2026
Tracy King/Jun 30, 2026 -
How to Recover Deleted DCIM Folder from Android
![author icon]() Tracy King/Jun 16, 2026
Tracy King/Jun 16, 2026 -
Screen Recording Didn't Save? Methods to Fix!
![author icon]() Jaden/May 19, 2026
Jaden/May 19, 2026 -
3 módszer: Nem mentett vagy elveszett Excel fájl helyreállítása Mac rendszeren
![author icon]() Cedric/Jun 09, 2026
Cedric/Jun 09, 2026