Accidentally losing files on your Mac can be stressful, whether it's a deleted presentation, family photos, or important documents. Recovering deleted files on a Mac can seem daunting.
To recover deleted files on a Mac, first check the Trash (right-click > Put Back) or the Recently Deleted folder if iCloud is enabled. Suppose the trash folder is emptied. Use your Time Machine backups to restore from a previous date; if no backup exists, use third-party data recovery software like EaseUS Data Recovery Wizard for Mac to scan your drive for recoverable data and act quickly to minimize overwriting.
Based on over 20 years of Mac data recovery expertise and tested strategies, we have developed a comprehensive, step-by-step guide to recovering deleted files on Mac, optimized for reliability and efficiency, and conclude with 5 effective recovery solutions for all possible data loss scenarios.
Quick Answer: 5 Ways to Recover Deleted Files on Mac
Deleted files on Mac are often recoverable unless they've been overwritten. Even if you emptied the Trash, your data may still exist on the disk.
| Recovery Method | Ease of Use | Recovery Rate | Notes |
| Restore from Trash | ⭐⭐⭐⭐⭐ | High | Only if the Trash is not emptied. |
| Use Time Machine Backup | ⭐⭐⭐ | High | Only if you have existing backups. |
| Recover from iCloud | ⭐⭐⭐ | High | Only for iCloud Drive files. |
| Use Data Recovery Software🔥 | ⭐⭐⭐⭐⭐ | Very High | Can recover emptied Trash, external drives, SD cards, etc. |
| Use Terminal | ⭐ | Medium | Advanced users only |
Method 1. Recover Deleted Files on Mac from Trash
|
Where is the recently deleted file on a Mac? If you drag a file to the Trash or right-click the file and click "Delete" and haven't emptied the Trash yet, the recently deleted file goes to the Trash. The following simple steps can quickly restore the deleted data in the macOS Trash folder.
Step 1. Open the Trash Bin icon on your desktop to see all the deleted files.
Step 2. Restore a single file: find the file you need, right-click it, and select "Put Back" to restore it to its original location. Alternatively, you can drag and drop the files back to the destination directory.

Step 3. Batch file recovery: Hold down the Command key and click to select all the files you want to recover, then right-click and select "Put Back".
Method 2. Recover Deleted Files on Mac Using Time Machine
|
Time Machine is Apple's backup solution for the Mac, designed to offer an easy way to back up and restore files on the Mac. It enables users to automatically back up documents, applications, system files, photos, videos, emails, audio files, and other data to an external hard drive, USB, or a network-attached storage (NAS) device.
It creates incremental backups rather than a full backup, which means it only copies newly added or modified files since the previous backup, saving time and disk space, supporting multiple backup plans, including hourly backups for the past 24 hours, daily backups for the past month, and weekly backups for all previous months.
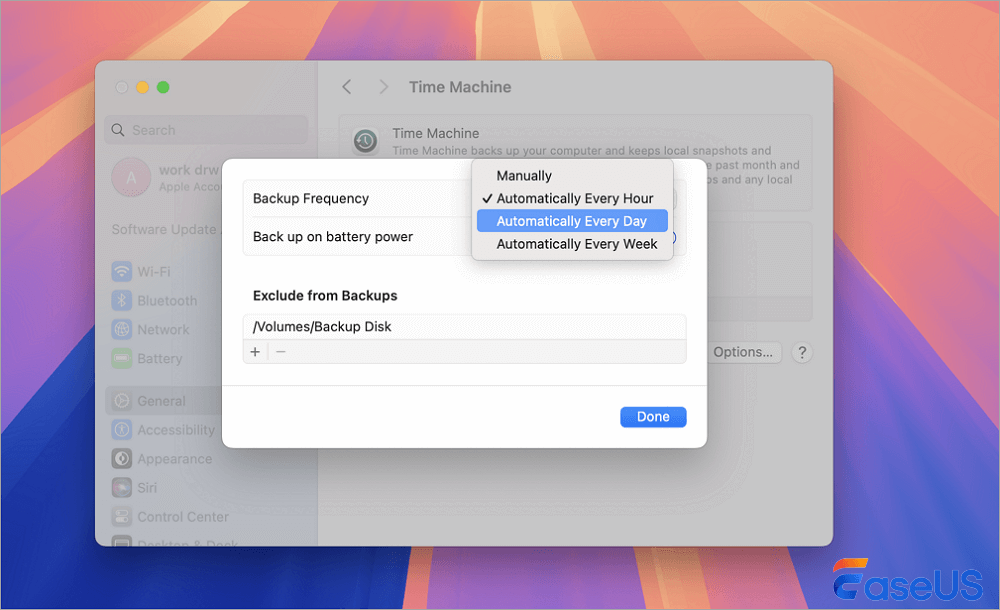
Notice: Once you have enabled Time Machine backup, you can recover deleted data on a Mac from a recent backup, even if you have emptied the Trash bin. This way is useless if no backup has been created before. If you need to recover permanently deleted files without a backup, refer to the ✨Mac deleted file recovery program for help.
When you need to restore data, you can go back to any restore point and recover individual files or entire folders. Follow the steps below to restore files from Time Machine backups:
Step 1. Connect the previously created backup media to your Mac, such as an external storage device.
Step 2. Launch Time Machine on your Mac. You can click the Time Machine icon in the menu bar, choose Browse Time Machine Backups.

Step 3. You can browse through previous backups by using the timeline on the right side of the panel and quickly find the folder where the deleted files were originally located.
Step 4. Use the up/down arrows or search at the top-right corner of the Finder window to find the file you want to recover. Then, preview them by pressing the Space Bar.
Step 5. Preview the files to ensure you are restoring the correct version of the file. Click on the "Restore" button or drag the files to restore the selected files to their original location on your Mac.

Apple Support provides full instructions on restoring items backed up with Time Machine on a Mac. Go check the content in detail.
Method 3. Recover Deleted Files on Mac from iCloud
iCloud provides a convenient way to store and sync your files across devices, including the ability to recover deleted files. If you use iCloud Drive or other iCloud-enabled apps (like Photos), you can often recover recently deleted files directly from iCloud.
You can restore lost data from iCloud or use iCloud data recovery tool.
1️⃣Restore deleted photos on Mac from iCloud
Step 1. Open your web browser and go to iCloud.com. Sign in with your Apple ID.

Step 2. Choose "Photos", then "Recently Deleted" on the left panel. Browse deleted files and find the one you want to restore. Click the "Recover" button at the top of the page. The media will be restored to your main Photos library.

If you have enabled iCloud multi-device data synchronization on iOS and macOS, deleting files on your phone will cause the synchronization on your Mac to disappear. You need to quickly disconnect the WiFi on your Mac, pause synchronization, and then quickly access /Users/username/Library/Mobile Documents/com~apple~CloudDocs and copy the remaining files to the local hard drive.
2️⃣Use EaseUS Mac iCloud Recovery Tool
EaseUS Mac data recovery software also comes with iCloud data recovery options. It is also effective in recovering deleted photos, videos, notes, and other data types from iCloud.
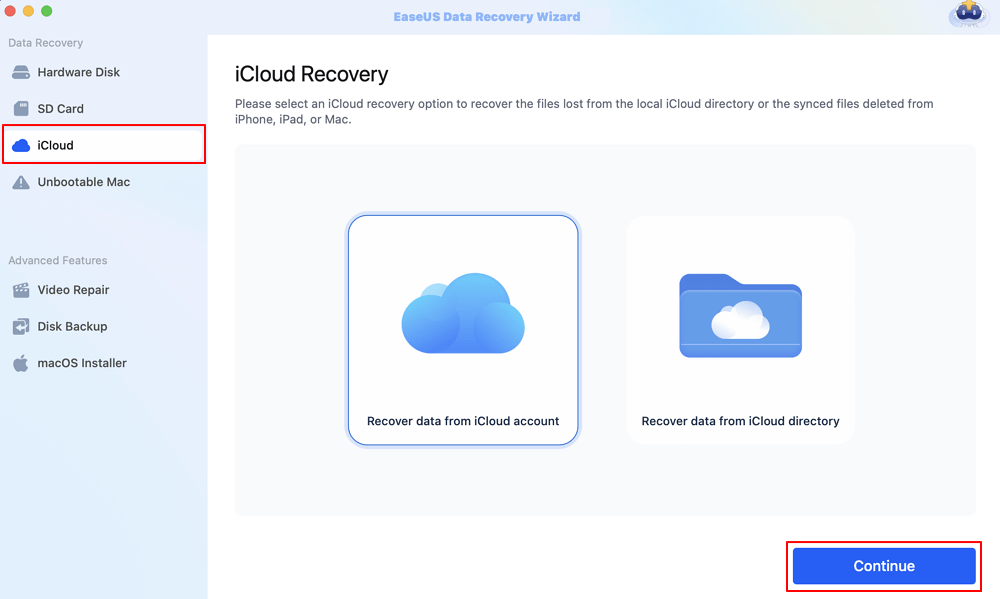
Step 1. Choose iCloud Recovery
Select the iCloud tab from the left list, choose the "Recover data from iCloud account" option to recover your iCloud Drive data, and click "Next" to log in to your iCloud account.
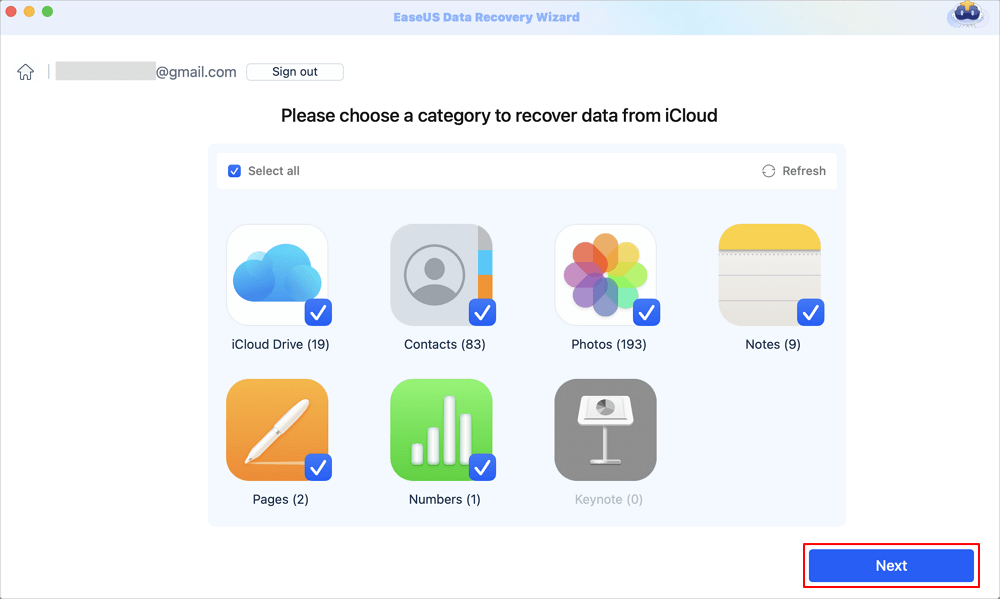
Step 2. Choose the "iCloud Drive" category
EaseUS software will quickly scan all the recoverable data from your iCloud account. Check the "iCloud Drive" category, and click the "Next" button.
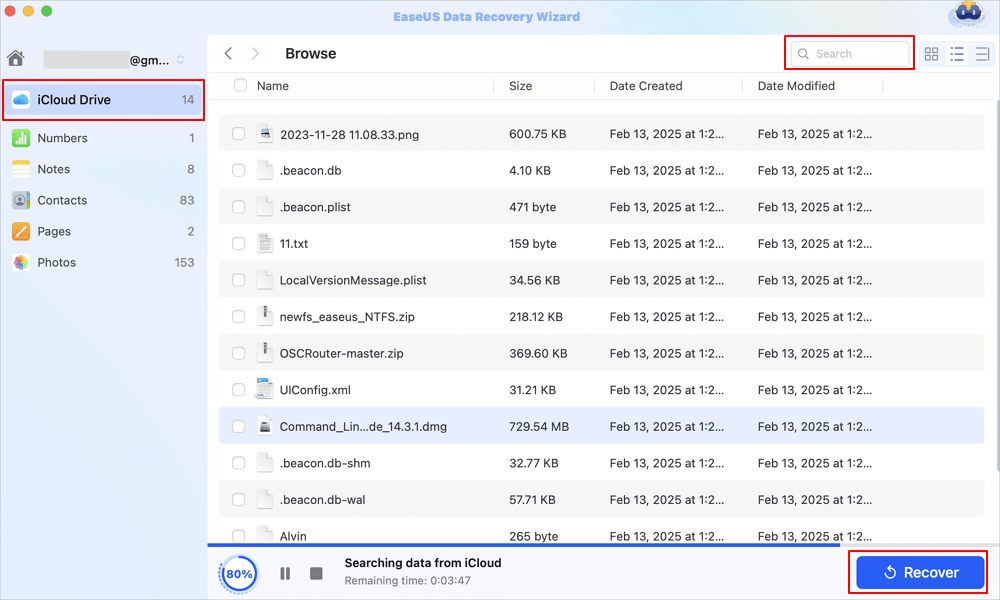
Step 3. Recover iCloud Drive data from iCloud
Select the iCloud Drive data you want to restore, click the eye icon to preview the details, and then click the "Recover" button to get them back.
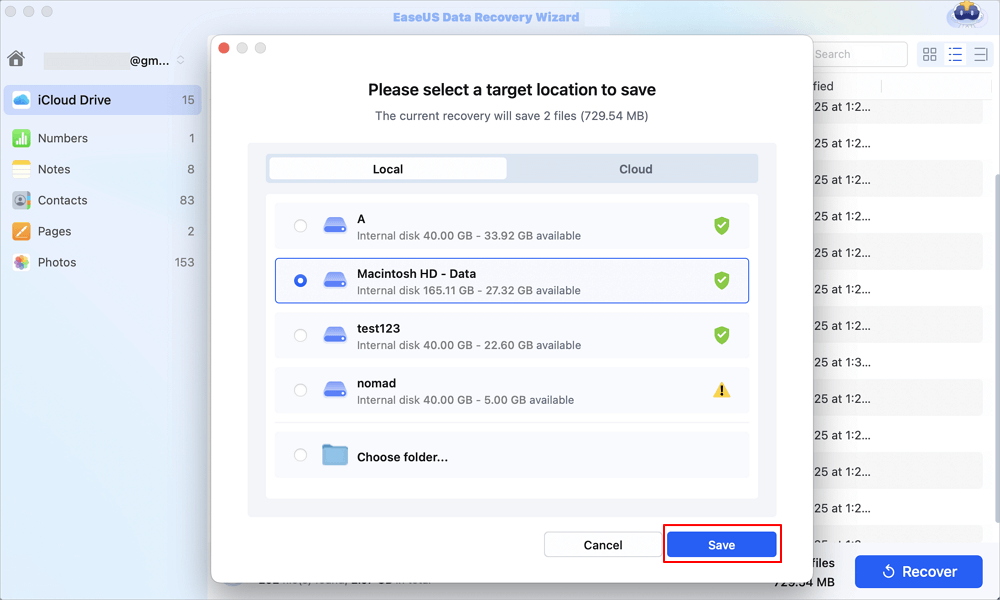
Step 4. Save recovered iCloud Drive data
Choose a safe storage location on your Mac hard drive to save the recovered iCloud Drive data. You can also save the recovered data to your cloud drives, such as DropBox, OneDrive, GoogleDrive, etc.
Share the step-by-step guides for retrieving deleted files on Mac from iCloud.

Method 4. Use Data Recovery Software to Recover Deleted Files on Mac (Best Option)
|
- ❓Why this works: Data recovery tools scan disk sectors and rebuild lost files.
- 👍Recommended Tool: EaseUS Data Recovery Wizard
EaseUS Data Recovery Wizard for Mac is outstanding at recovering deleted files on your Mac, thanks to its straightforward interface and powerful scanning and recovery capabilities. Whether you've accidentally deleted important documents, videos, photos, or other types of files, this Mac data recovery program helps you restore them without any effort.
- Recover deleted files from SD cards, USBs, external hard drives, and more devices on Mac
- Support deleted photos, videos, documents, audio files, and email recovery
- Recover deleted files on macOS Sonoma/Ventura/Monterey/Big Sur/Catalina/High Sierra, etc.
- Restore permanently deleted files after emptying the Trash, hard drive formatting, OS crashes, etc.
🙇♀️User's Review
- 👉I accidentally deleted all files on my external hard drive. Panicked, I searched online and found EaseUS Data Recovery. Also, purchased for Windows, the assistant was happy to change for a Mac user type regarding my situation. Thank you! from Varis
- 👉I had a drive that I couldn’t access or repair on my own. Your agent was excellent. My files were copied to a new folder by your software, and it solved my problem for me. Thank you. from Greg Holden
Download this data recovery software for Mac and undelete files on Mac using the steps below.
Step 1. Scan for deleted files
Select the hard drive, external drive, or SSD where your important data & files were deleted and click "Search for lost files".

Step 2. Filter the lost files
The software will run quick and deep scans and work hard to find as many deleted files as possible on the selected volume. Filter wanted files through the "Type" and "Path" options.

Step 3. Recover deleted files
Double-click the deleted files to preview. Then, click the "Recover" button to get them back.

Find this Mac file recovery tool helpful? Share it with your followers on social media.
Method 5. Use Terminal to Recover Deleted Files on Mac
Using Terminal is an excellent choice if you want to recover data on a Mac without software. But note that the commands explained below can only recover files deleted from the Trash folder on a Mac. If the Trash has been emptied, you need to use Time Machine backup or a third-party Mac data recovery tool to retrieve the data.
To restore deleted files on a Mac via Terminal, follow these steps:
Step 1. Go to "Finder" > "Applications" > "Utilities" and double-click "Terminal".

Step 2. Type the command cd .Trash and press the "Return" key on your Mac.
Step 3. Continue typing "ls -al ~/.Trash". This command lets you view the contents of your Trash folder.
Step 4. Enter "mv ~/.Trash/[filename] ~/Desktop/" and press "Return"; this will restore the deleted files to their original location on your Mac.
💡Important:
- The filename must be the full file name for this command line to take effect.
- If there is already a file with the same name at the target location, the mv command will overwrite the original file. Therefore, please operate carefully.

Step 5. Type "Quit" in the Terminal to exit the Terminal window.
The recovered files by Terminal are located in your home directory folder. You can then navigate there and check the items.
Why Deleted Files Can Still Be Recovered
When you delete a file from a standard computer (Windows, macOS, Linux), the operating system does not immediately erase the actual data (the 1s and 0s) from the storage drive. Instead, it simply deletes the pointer (like a library's index card) to that data and marks the space where the data lives as "available for new writing." Until that space is actually overwritten by a new file, the original data remains physically intact and can be reconstructed using recovery software.
How to Increase Recovery Success Rate
- 🟢Stop using your Mac immediately
- 🟡Avoid installing new apps
- 🔵Recover files ASAP
FAQs on How to Recover Deleted Files on Mac
1. Can I recover permanently deleted files on Mac?
Yes, you often can recover permanently deleted files on a Mac. When you empty the Trash or use a "permanent delete" shortcut, macOS simply removes the file's index, marking its space as available for new data. The original file remains on your drive until it is overwritten by something new. Using a data recovery tool like EaseUS Data Recovery Wizard would help you recover deleted files ASAP。
2. Is free recovery possible?
Yes, recovering permanently deleted files on a Mac can be done completely for free, but the methods and limitations vary significantly depending on which tool you choose.
3. How long are files recoverable?
There is no single answer to how long deleted files remain recoverable on a Mac—it largely depends on the type of drive your computer has. The difference between a modern SSD (Solid State Drive) and a traditional HDD (Hard Disk Drive) is massive; one may offer only a tiny window of opportunity, while the other could keep your data recoverable for months or even years.
Final Verdict
How to recover deleted files on Mac? If you want the highest recovery success rate, use professional software. If you have backups, restore from Time Machine or iCloud first.
Was This Page Helpful?
Dany is an editor of EaseUS who lives and works in Chengdu, China. She focuses on writing articles about data recovery on Mac devices and PCs. She is devoted to improving her writing skills and enriching her professional knowledge. Dany also enjoys reading detective novels in her spare time.
Daisy is the Senior editor of the writing team for EaseUS. She has been working at EaseUS for over ten years, starting as a technical writer and moving on to being a team leader of the content group. As a professional author for over ten years, she writes a lot to help people overcome their tech troubles.
-
EaseUS Data Recovery Wizard is a powerful system recovery software, designed to enable you to recover files you’ve deleted accidentally, potentially lost to malware or an entire hard drive partition.
Read More -
EaseUS Data Recovery Wizard is the best we have seen. It's far from perfect, partly because today's advanced disk technology makes data-recovery more difficult than it was with the simpler technology of the past.
Read More -
EaseUS Data Recovery Wizard Pro has a reputation as one of the best data recovery software programs on the market. It comes with a selection of advanced features, including partition recovery, formatted drive restoration, and corrupted file repair.
Read More
Related Articles
-
Recently Deleted Photos Missing: Why & How to Fix
![author icon]() Brithny/Mar 22, 2026
Brithny/Mar 22, 2026 -
macOS Sequoia Data Recovery Software: Top 3 in 2026 [Supports macOS 14 - OS X 10.9]
![author icon]() Brithny/Jun 30, 2026
Brithny/Jun 30, 2026 -
How to Recover Emptied Trash on Mac and Restore Deleted Files
![author icon]() Daisy/Jun 30, 2026
Daisy/Jun 30, 2026 -
If I Reset My Mac, Will I Lose Everything on iCloud
![author icon]() Jaden/Jun 30, 2026
Jaden/Jun 30, 2026