Quick Access to Troubleshooting Tips
As we all know, when you want to restore a file from a Time Machine backup, you should navigate to the folder containing the file you want to recover, launch Time Machine, browse through the backups using the timeline, select the desired file, and then click "Restore". This will restore the file to its original location.
However, few people know how to restore a deleted Time Machine backup. This article covers solutions to restore Time Machine backup as well as recover lost or deleted files from the Time Machine backup.
| Workable Solutions | Step-by-step Troubleshooting |
|---|---|
| Fix 1. Recover Deleted Time Machine Backup | 1. About Time Machine backup; 2. The tool you will need; 3. steps to recover the deleted backup...Full steps |
| Fix 2. Restore Files from Time Machine Backup | Method 1. Restore files from the Time Machine backup disk...Full steps Method 2. Restore files from local snapshots...Full steps |
How to Recover a Deleted Time Machine Backup
I used to back up my files to Time Machine. But last night, I accidentally deleted some of the backup files. As a result, all of my 4 years' worth of data disappeared suddenly. Is it possible to recover a deleted Time Machine backup? If yes, how can I do it?
How to restore your Time Machine backup if it's been accidentally deleted? Have you encountered a similar situation and tried to find a way to recover a deleted Time Machine backup? If so, you are in the right place since we will focus on how to recover Time Machine backup files in all complex data loss situations.
Tool You Will Need⭐
To make sure you can get back your Time Machine backup effectively and recover deleted files on your Mac. Here we recommend you try the advanced data recovery software - EaseUS Data Recovery Wizard for Mac, a program with powerful data recovery capacity and an easy-to-use interface.
Compared with its equivalents, EaseUS data recovery software outperforms them in many aspects, like scanning speed, scanning depth, and success rate of data recovery. Now, install the software on your Mac, then follow the next part to recover your deleted Time Machine backup immediately.
Steps to Recover Deleted Time Machine Backup
EaseUS doesn't overstate the usability of this tool; you can retrieve your deleted Time Machine backup using the simple steps:
- Important
- The Time Machine backup is saved in a folder named Backups with the extension of .backupdb. Thus, after you scan the backup disk, you can filter the results by the extension to quickly find and recover your Time Machine backup.
Step 1. Scan for deleted files
Select the hard drive, external drive, or SSD where your important data & files were deleted and click "Search for lost files".

Step 2. Filter the lost files
The software will run quick and deep scans and work hard to find as many deleted files as possible on the selected volume. Filter wanted files through the "Type" and "Path" options.

Step 3. Recover deleted files
Double-click the deleted files to preview. Then, click the "Recover" button to get them back.

Since the most important usage of Time Machine backup is to restore the files on your Mac, the next part will show you how to recover files from your Time Machine backup.

How to Recover Files from Time Machine Backup
There are two ways to recover files from your Time Machine backup: one is from the backup disk, the other is from the local snapshots, which are the backups Time Machine stores on your Mac and will help you recover your files when the Time Machine backup disk is not available.
If you want to recover deleted files/folders but you don't have any Time Machine backup, you can also use the EaseUS data recovery tool to recover deleted files without Time Machine.
Method 1. Recover Files from Time Machine Backup Disk
Step 1. Connect your backup disk to your Mac and turn on your computer.
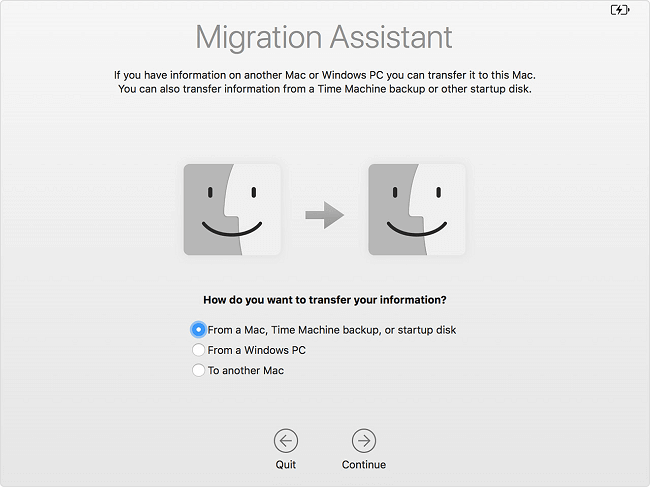
Step 2. If your Mac starts up to the setup assistant, set the details of your country, keyboard, and network. Then choose to transfer your information from a Time Machine backup from the Migration Assistant window.
If your Mac starts up to the Finder, go to "Applications" > "Utilities" > "Migration Assistant" and choose to transfer your information from a Time Machine backup.
Step 3. Select the wanted Time Machine backup and click "Continue".
Step 4. If you have more than one backup option to choose, select one of them and click "Continue".
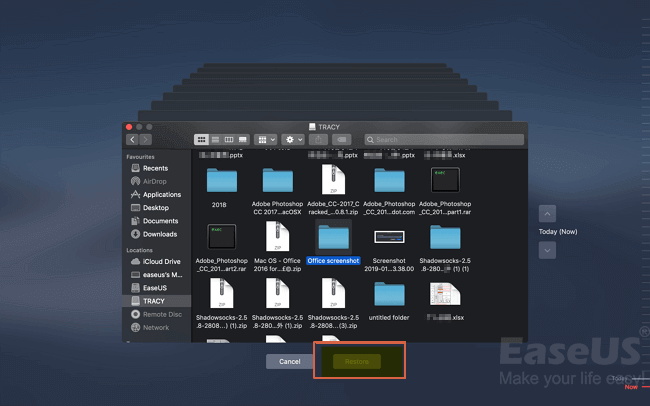
Step 5. Choose the files to transfer and click "Continue".
Step 6. When the transfer has completed, restart your computer and log in to the target account, then you will see all the recovered files.
Method 2. Restore Files from Local Snapshots
Step 1. Enter "Time Machine"
Step 2. Select the file or folder you want to restore, then select an older version of the file or folder.
Step 3. Press "Space" bar to preview and see whether it's the one you want.
Step 4. Click Restore to restore the selected file.
Was This Page Helpful?
Brithny is a technology enthusiast, aiming to make readers' tech lives easy and enjoyable. She loves exploring new technologies and writing technical how-to tips. In her spare time, she loves sharing things about her game experience on Facebook or Twitter.
Written by Tracy King
Tracy became a member of the EaseUS content team in 2013. Being a technical writer for over 10 years, she is enthusiastic about sharing tips to assist readers in resolving complex issues in disk management, file transfer, PC & Mac performance optimization, etc., like an expert.
Related Articles
-
Repair Disk Permissions on Mac | 3 Methods
![author icon]() Finley/Jun 30, 2026
Finley/Jun 30, 2026 -
The Volume Macintosh HD Was Found Corrupt? 2 Effective Ways to Fix It Without Data Loss
![author icon]() Brithny/Jan 19, 2026
Brithny/Jan 19, 2026 -
Word Document Disappeared on Mac: 5 Proven Fixes in 2026
![author icon]() Brithny/Jun 30, 2026
Brithny/Jun 30, 2026 -
Downloads Folder on Mac Dock Disappeared? How to Add
![author icon]() Dany/Jun 30, 2026
Dany/Jun 30, 2026