Time Machine Backup/Restore Failed
Mac users, who're currently running macOS Catalina or Mojave, report that they got an issue with Time Machine. Mainly, it's about Time Machine backup failed to back up the scheduled files to the configured backup disks, let it be the Time Capsule drive or third-party drive. Hence, how to repair Time Machine backup becomes the topic we're going to discuss here.
You can read on or jump to the issue & solution you're most concerned about.
| Workable Solutions | Step-by-step Troubleshooting |
|---|---|
| Issue 1. Can't Backup or Restore | Check Time Machine system requirements > check your Mac...Full steps |
| Issue 2. Backup Corrupted | Create a new backup > restart Time Machine > repair with terminal command...Full steps |
| Issue 3. Backup Missing | Download software to recover missing backups > repair unrecognized...Full steps |
Issue 1. Can't Backup or Restore Your Mac Using Time Machine
One phenomenon to get Time Machine backup failed is that you can't back up or access an existing Time Machine backup, or restore from an earlier backup won't work. According to Apple's official instructions (https://support.apple.com/en-us/HT204157), when you have a problem with Time Machine, check these things if you see an alert that Time Machine is unable to back up your data, or if you can't select your backup disk in Time Machine preferences.
Fix 1. Check Time Machine System Requirements
- External hard drive connected to a USB, FireWire, or Thunderbolt port on your Mac
- Time Capsule or macOS Server on your network
- External hard drive connected to the USB port of an AirPort Extreme Base Station (802.11ac) on your network
Fix 2. Check Your Mac
- Make sure that your Mac software is up to date.
- Restart your Mac and see if the issue continues.
Fix 3. Check your AirPort Base Station
- If you're using an AirPort Time Capsule or a drive connected to an AirPort Extreme Base Station, make sure that your AirPort firmware is up to date.
- Restart your base station and see if the issue continues. To restart, unplug the base station from AC power for 5 seconds, then plug it back in.
Fix 4. Check Your Network Connection
If you back up to a server, AirPort Time Capsule, or drive connected to your AirPort Extreme Base Station, make sure that your Mac is connected to the same network as your backup drive. You can select your wireless network from the Wi-Fi status menu.
Fix 5. Check Your Backup
If you back up to a server, AirPort Time Capsule, or drive connected to your AirPort Extreme Base Station, make sure that your current Time Machine backup doesn't have any issues that could prevent further backups:
- While holding down the Option key on your keyboard, click the Time Machine menu in the menu bar, then choose Verify Backups.
- If Time Machine finds an issue with your backup, it displays a message with details. Follow the onscreen instructions.
Fix 6. Check Your Drives
- If you're using a drive connected to a port on your Mac or AirPort Extreme Base Station, make sure that the drive is turned on.
- If you're using a USB hub or a similar device, try connecting the drive directly to your Mac or base station.
- If you're backing up to an external third-party drive, check with the drive manufacturer to make sure the drive's firmware is up to date.
- If you're backing up to an external drive, check the formatting of the drive. Time Machine requires that an external drive be formatted like a Mac startup disk: Mac OS Extended (Journaled) with a GUID Partition Table (GPT). If you select a differently formatted drive for use with Time Machine, your Mac automatically prompts you to erase it for Time Machine.
- Reformatting a disk erases all data stored on the disk, so you might want to move important files to another disk first.
If your drive is already formatted correctly, turn off Time Machine, then check it for problems:
- To check the drive of an AirPort Time Capsule, follow the steps to verify an AirPort Time Capsule drive.
- To check an external drive connected to your Mac, open Disk Utility from the Utilities folder of your Applications folder. Then use the First Aid feature in Disk Utility to verify your disk. Do this for your startup disk as well.
- You can turn Time Machine back on after your drives are verified or repaired successfully.
Issue 2. Time Machine Backup Is Corrupted
What's a corrupted Time Machine backup? Below are some backup corruption symptoms.
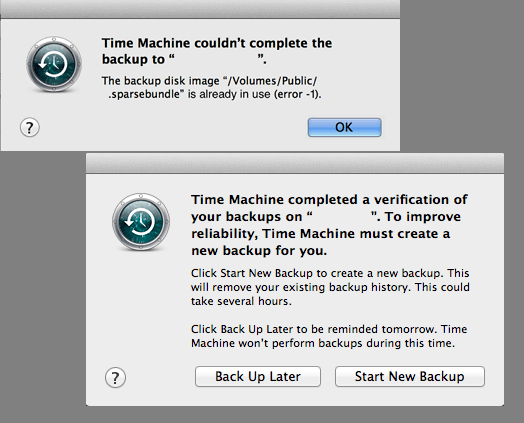
- Fail to complete Time Machine backup
- can't access time machine backups
- Time Machine keeps asking to create new backups
- Searching for time machine backups taking forever
- Time Machine disk or external device becomes unrecognized
How to repair a corrupted Time Machine backup? According to some experienced users and professional geeks, when Time Machine corrupted, it can be fixed by the following four troubleshooting methods.
Fix 1. Create New Backup
If Time Machine keeps asking you to create new backups, click Create new backup to start the new backup then. So that it can work smoothly later.
Fix 2. Restart Time Machine
Restart Time Machine several times may also help. You may need to switch Time Machine to On-Off-On and then reboot the Time Machine again.
Fix 3. Swap out The Hard Drive
Another solution to repair Time Machine is to set up a new external hard drive with Time Machine as a backup drive.
Fix 4. Repair Corrupted Time Machine with Terminal command
If Time Machine stops responding or even not working on Mac, to repair the corrupted Time Machine becomes tough yet still resolvable with Terminal command.
- Notice:
- Before starting the process, You should stop Time Machine: Time Machine Preferences > Toggle Time Machine 'OFF'.
- Step 1: Open Terminal on Mac and type: $ sudo su - and hit Return.
- Step 2: Type: $ chflags -R nouchg "/Volumes/.sparsebundle" and hit Return.
- If you don't know the TM name, go to Time Machine Prefernces and check out. Or type: $ ls "/Volumes/ and hit Return.
- Step 3: Type: $ hdiutil attach -nomount -readwrite -noverify -noautofsck "/Volumes/.sparsebundle" and hit Return.
- Step 4: Type the below command and hit Return each time:
/dev/disk5 GUID_partition_scheme
/dev/disk5s1 EFI
/dev/disk5s2 Apple_HFS - Step 5: Type: $ fsck_hfs -drfy /dev/diskxs2 and hit Return. After this, if you receive 'The volume was repaired successfully', congratulations.
But if Terminal warns you 'The volume could not be repaired', relax and continue with next command. - Step 6: Type: $ fsck_hfs -p /dev/diskxs2 and hit Return.
- Step 7: Type: $ fsck_hfs -drfy /dev/diskxs2 and hit Return. Wait for the process to complete.
- Step 8: Type: $ vi "/Volumes//.sparsebundle/com.apple.TimeMachine.MachineID.plist" and hit Return.
Change the value of integer from 2 to 0 within that file.
Issue 3. Time Machine Backups Missing
When you cannot access to Time Machine or Time Machine corrupted, you are highly recommended to get backup data back first. How?
Fix 1. Recover Missing Backup Image with Software
If the Time Machine backup disk can be opened but nothing appears, the best way is to scan and restore all lost Time Machines' Backups.backupdb files. Here we'd like to recommend you try EaseUS Data Recovery Wizard for Mac which supports users to restore all lost data from different situations within only 3 steps. Download EaseUS Data Recovery Wizard for Mac and restore Time Machine backups now:
Step 1. Search for lost files
Select the disk location to search for lost files (it can be an internal HDD/SSD or an external hard drive) where you lost data and files. Click the "Search for lost files" button.

Step 2. Go through the scanning results
This software will immediately scan your selected disk volume and display pictures, documents, audio, videos, and emails on the left pane.

Step 3. Select the file(s) and recover
Click the data to preview, and click the "Recover" button to have them back.

What's more, if you lost files on Mac or external storage devices, you can also apply EaseUS Mac data recovery software to easily recover files on Mac without Time Machine backup.
Fix 2. Repair Unrecognized Time Machine Drive
When the Time Machine backup disk or external hard drive becomes unrecognized, as a result, backups are missing, you can first mount it on Mac and then run First Aid on Time Machine disk with disk utility.
Step 1: Connect the Time Machine backup external hard drive to Mac. Launch Disk Utility, check external hard drive at the left panel.
You'll see that the external hard drive is greyed out, marked as untitled. (Untitled means unmounted on Mac computer.)
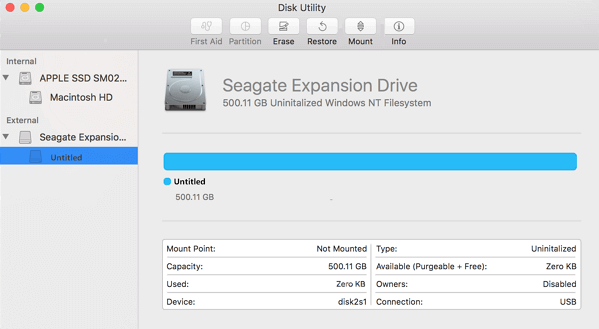
Step 2: Select the untitled external hard drive and click the "Mount" button from the Disk Utility bar.
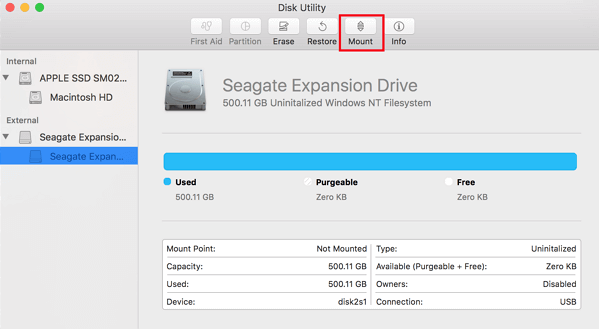
Step 3: Select Time Machine drive at drive level on the left panel of Disk Utility and run First Aid.
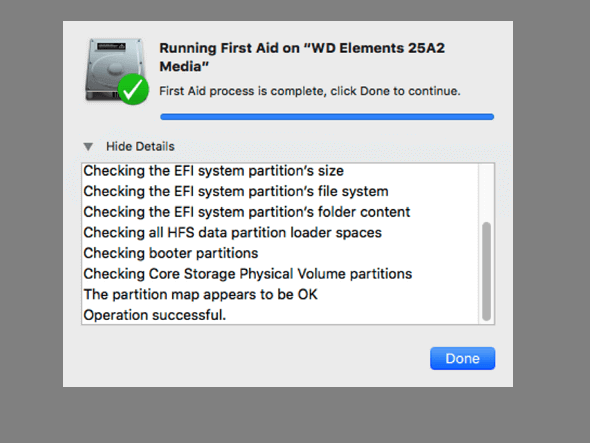
Step 4: Select Time Machine drive at volume level and run First Aid.
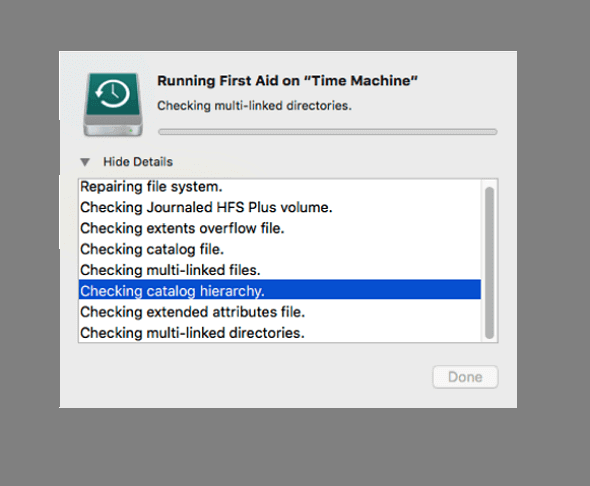
Wait for the process completes, check if Mac computer can recognize your backup disk and open it in Time Machine again.
Conclusion
Regarding the topic "Time Machine backup failed" and "how to repair Time Machine backup", we gathered all feasible solutions to help you resolve the various issues with Time Machine on your Mac. If you have further Time Machine problems, click for more Time Machine guidelines from the following collection.
Was This Page Helpful?
Cedric Grantham is a senior editor and data recovery specialist of EaseUS. He mainly writes articles and how-to tips about data recovery on PC and Mac. He has handled 10,000+ data recovery cases and is good at data recovery of NTFS, FAT (FAT32 and ExFAT) file systems, and RAID structure reorganization.
Written by Tracy King
Tracy became a member of the EaseUS content team in 2013. Being a technical writer for over 10 years, she is enthusiastic about sharing tips to assist readers in resolving complex issues in disk management, file transfer, PC & Mac performance optimization, etc., like an expert.
Related Articles
-
How to Fix Steam Unpacking Slow Error Efficiently - 7 Ways
![author icon]() Sherly/Nov 27, 2024
Sherly/Nov 27, 2024 -
[4 Easy Ways] How to Backup SD Card on Samsung
![author icon]() Jerry/Oct 25, 2024
Jerry/Oct 25, 2024 -
How to Use Fdisk Format Partition in Linux [2024 Ultimate Guide]
![author icon]() Cici/Jan 11, 2024
Cici/Jan 11, 2024 -
Reset SMC MacBook Pro | System Management Controller on macOS Ventura/Monterey
![author icon]() Dany/Oct 25, 2024
Dany/Oct 25, 2024