Error: Volume Hash Mismatch
If you are a MAC user, you might have seen a peculiar warning labeled "Volume Hash Mismatch" Having this problem pop up on your computer for no apparent reason is highly annoying and frustrating. But what is this error? What are its causes, and how to fix this annoying problem? In this guide, we'll try to find the answers to this. We'll explain the nature of this error and provide a foolproof solution.
Apple computers running macOS Monterey often encounter the volume hash inconsistency problem. The data stored on your Mac's hard disk is prone to becoming corrupted. Typically, the information is saved as a hash on the hard drive. A hash is a distinct numeral employed to store data in electronic devices. If there is a discrepancy, it implies that the disk does not correspond to the system's hash. This issue might result in software failures, the system rebooting, or an empty display. Come with me, and you will receive the solution.
Why the Volume Mismatch Error Occurs
It's time to put on our detective caps and try to figure out what's causing the "Volume Hash Mismatch" problem. Here are the 4 main culprits behind this digital headache:
💾1. Disk errors
Disk errors are one of the common reasons for the volume problem. If your Mac's hard disk cannot read or write data, it has likely been damaged or corrupted. This can cause a mismatch between the disk's contents and the hash number recorded there.
Check for disk problems using the First Aid feature in Mac's Disk Utility application. If Disk Utility says your disk has issues it can't fix, you should get rid of it or get a new one.
📃2. Corrupted file system or encryption data
A corrupted file system or incorrect encryption data may also cause volume problems. Your disk's contents are structured and managed by the file system. Similarly, the information that safeguards your data from prying eyes is the encryption data. Any inaccuracy in one of these areas can change your data's functions and cause a hash discrepancy.
🖥️3. Hardware issues, such as a failing hard drive
A failing hard drive is another example of a volume hash problem. This shows that your hard disk has technical or electrical problems that cause it to run less efficiently or reliably. A hash collision or data loss are possible outcomes of this scenario. Hardware failure can result from various factors, including but not limited to age, use, fire, or physical damage.
⚔️4. Incompatible macOS or software version
Lastly, an outdated version of macOS or an incompatible piece of software can also be the reason behind the hash mismatch issue. This could lead to a hash mismatch if your system or program components are incompatible. Many things can lead to incompatibilities between macOS and software, including acquiring a corrupted package or obtaining a version of macOS that OCLP4 does not support.
| ⛑️Run the First Aid | It is a disk utility tool that can help identify and fix disk errors, including volume hash mismatch issues. It scans and repairs the file system, potentially resolving the problem. |
| 🩺Launch Apple Diagnostics | It is a tool that helps diagnose hardware-related issues but may not directly address volume hash mismatch problems. However, if hardware issues cause the mismatch, this fix could help identify and resolve them. |
| 🔐Clean and Reinstall macOS | It involves wiping the system and performing a fresh installation of macOS. This can potentially fix volume hash mismatch issues if corrupted system files cause them. It provides a clean slate for the operating system. |
| ⏬Downgrade macOS | It might be helpful if the volume hash mismatch issue was introduced after a macOS update. By downgrading, you can resolve the problem by returning to a stable version. |
| 🔧Reset SMC and NVRAM | It may not directly target volume hash mismatch problems, it can help resolve specific hardware or system-related issues that could contribute to the mismatch. |
Solutions to Fix the Volume Error on Mac
Now that the cause of the volume hash or mismatch problem has been identified, let's fix the problem. Mac performance may suffer if you continue to receive this warning. Many things can go wrong, from application failure to machine reboot to screen blackout.
You can restore your Mac to working order despite this problem. But before that, it is recommended that you make a cloud or external device backup of your data. In the event of a failure, this prevents data loss.
Here are six solutions to tackle the volume issue.
Solution 1. Run the First Aid
Macs come equipped with toolkits, the First Aid tool handy here. You can utilize this software to diagnose and resolve the error.
Start First Aid by starting Disk Utility and selecting the disk from which you booted your Mac. If there are any file system or disk issues, this utility will fix them.
Here's how you launch a First Aid kit:
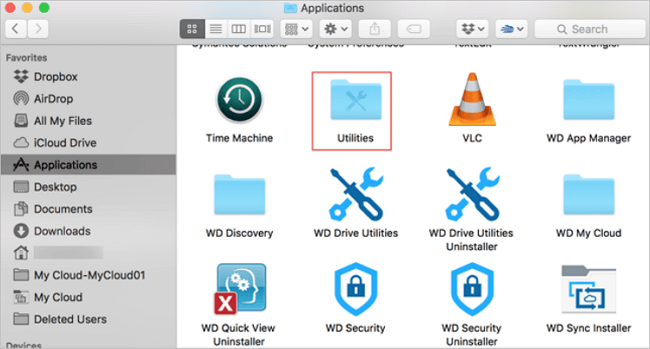
Step 1. Go to the "Utilities" folder by opening the Disk Utility or using the Spotlight search option.
Step 2. Choose "View" and then click "Show All Devices" from Disk Utility's main menu.
Step 3. Select the disk from which you booted your Mac. It should be named "Macintosh HD" or something similar.
Step 4. Click the "First Aid" button and tap Run to scan the selected disk for issues.
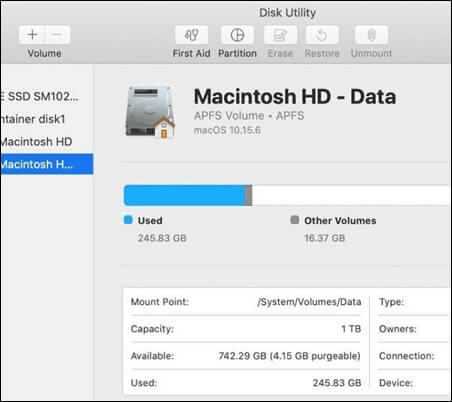
Step 5. Enter your administrator password if prompted to unlock the disk.
Step 6. After scanning the disk, Disk Utility will display a report detailing any identified and fixed issues.
2 Ways to Boot Mac into Disk Utility/Recovery Mode
Disk Utility is a Mac storage manager that can help Mac users manage partitions on Mac. Read more >>
Solution 2. Launch Apple Diagnostics
Secondly, you can use Apple Diagnostics to handle volume hash mismatch issues. This tool can scan your Mac for physical problems such as a bad hard drive, memory, or logic board.
To launch Apple Diagnostics, follow the steps below:
Step 1. Reboot your Mac and press and hold the D key on the computer until you encounter a progress bar or a window where you can select a language.

Step 2. When prompted, let go of the D key.
Step 3. Apple Diagnostics will promptly examine your Mac. This procedure might require some duration.
Step 4. If the instrument identifies any issues, it will display them in the remaining outcomes, alongside the fault code and guidelines on the most proficient method to address them.
Solution 3. Clean and Reinstall macOS
Reinstalling macOS is the third option. You must delete your hard disk and install a new copy of macOS. This way, the volume hash mismatch issue can be resolved by eliminating broken or incompatible system files or applications.
Follow these steps:
Step 1. Power down your Mac computer and connect it to a power source.
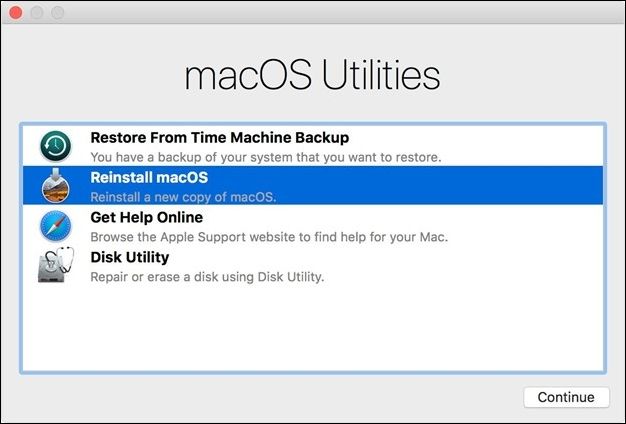
Step 2. Turn on Mac and initiate macOS Recovery mode by pressing and holding the Command-R key combination.
Step 3. Within the macOS Utilities interface, navigate to the Disk Utility option and proceed by selecting it. Subsequently, click on the Continue button to proceed with the desired action.
Step 4. Once the starting disk has been chosen from the left-hand side, proceed to select the "Erase" option located in the toolbar inside the Disk Utility interface.
Step 5. Please provide a name for the disk in the designated Name box. Next, choose APFS (or Mac OS Extended if you use an earlier Mac) from the Format pop-up menu. Finally, click on the Erase Volume Group button.
Step 6. Upon completion, please click on the "Done" button and proceed to pick "Disk Utility" followed by "Quit Disk Utility."
Step 7. Within the macOS Utilities interface, choose the "Reinstall macOS" option and click the "Continue" button.
Step 8. Follow the directions on the screen to choose your disk and initiate the installation process.
Step 9. Wait for the installation to complete. The Mac computer may undergo multiple restarts throughout this procedure.
Step 10. Users are advised to utilize the setup assistant to set up their Mac after installation.
Note: Cleaning and reinstalling macOS will wipe all your personal information and settings from your computer, so make a backup beforehand.
Solution 4. Downgrade macOS to the Last Version
If the problem of volume hash mismatch began after a macOS upgrade, you should revert to the previous version. Sometimes, a file doesn't go well with the latest macOS version. This issue may be resolved by reverting to the most recent stable macOS version.
The downgrading process is quite similar to reinstalling macOS. You just have to erase everything on the current version, which will revert to the previous version.
The only difference is that you won't have to wait too long to downgrade macOS, compared to reinstalling the version. Follow the method linked page to downgrade the version of macOS.
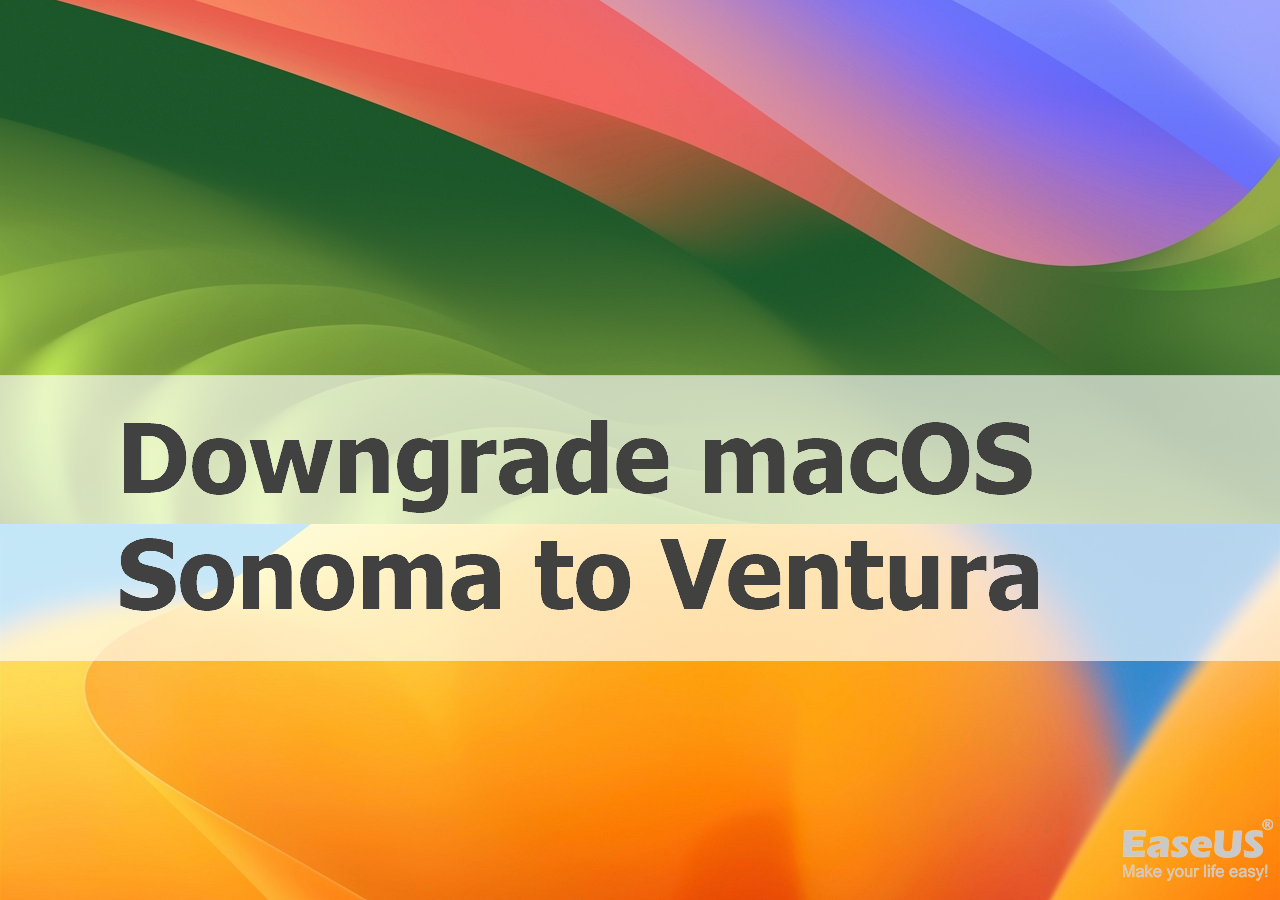
How to Downgrade macOS Sonoma to Ventura | Roll Back OS
If you have downloaded macOS Sonoma, let's look deeper at macOS 14's new features and discuss why some users may want to downgrade macOS Sonoma to Ventura.
Solution 5. Reset SMC and NVRAM
The security of your Mac is ensured by the System Management Controller (SMC) and non-volatile random-access memory (NVRAM).
The SMC, also known as the System Management Controller, is a microprocessor accountable for overseeing your Mac's power assets, such as the battery. However, a Mac's NVRAM, also known as Non-Volatile Random Access Memory, retains data such as the sound level and display settings before the operating system initializes. When the System Management Controller and Non-Volatile Random Access Memory are reset, the issue of volume hash mismatch is resolved.
Methods for clearing your Mac's SMC and NVRAM:
Step 1. Shut down your Mac and detach all external devices except the keyboard, mouse, etc.
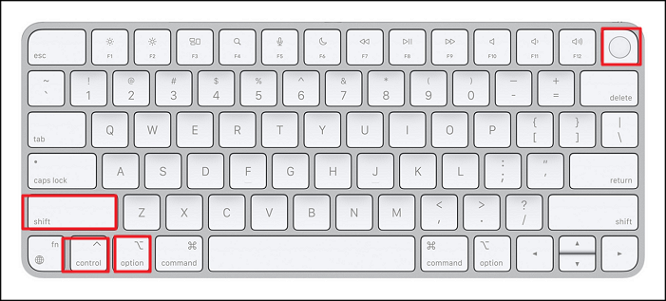
Step 2. If you possess a laptop with an irremovable battery, for 10 seconds, firmly press and maintain the combination of Shift-Control-Option on the left portion of the keyboard and the power button simultaneously. Let go of all keys and press the power button once more to activate your Mac.
Step 3. If you possess a Mac with a detachable battery, eliminate the battery and firmly press and retain the power button for 5 seconds. Swap out the battery and power up your Mac. The issue ought to have been resolved by now.
Solution 6. Clear the disk cache
The last option is to clear the Mac drive cache. The disk cache on a Mac speeds up file opening, software startup, web browsing, and other tasks. However, it may take up a lot of space on the hard drive and should be cleaned more often.
Remove the Mac's disk cache by this method:
Step 1. In the Finder, choose "Go" from the Menu bar. Select the "Folder" option.
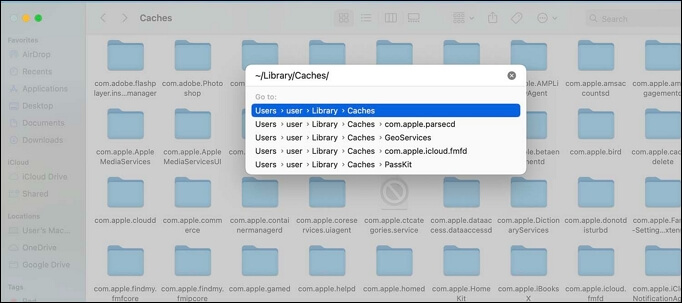
Step 2. After typing ~/Library/Caches and press Enter. This will open the folder containing your cache.
Step 3. Command-A selects all files in this folder. Right-click and choose "Move to Trash".
Step 4. Click the trash can symbol in the Dock, then select "Empty Trash" from the menu bar.
LEARN MORE
Still curious? Click here to learn about Mac Cache Recovery: How to Recover Deleted Cache Files on Mac。
Recover Data from macOS When the Volume Is in Error
You might have faced a problem as a Mac user when your Mac drive won't boot properly. "The volume is in error" or "Not mounted" may appear. Sometimes, the Mac doesn't turn on at all. To fix this, you may need to wipe and reinstall macOS, leading to the potential loss of your precious data.
You can, however, restore your data using EaseUS Data Recovery Wizard for Mac. It is a Mac application capable of recovering and restoring data from corrupted files to macOS. It can search your hard drive for deleted photographs, movies, documents, emails, and other files. The following features differ EaseUS Data Recovery Wizard from other apps:
Key Features
- ✔️It can retrieve information that has been unintentionally erased, misplaced a portion, or experienced the disk being disengaged.
- ✔️It possesses the capacity to swiftly or comprehensively scan. Rapidly scan locates objects swiftly and accurately. It hunts for fresh items sector by sector.
- ✔️The instrument protects against data replacement. This hinders data loss and guarantees its retrieval.
- ✔️The recover unsaved documents on Mac can be stored in Dropbox, Google Drive, OneDrive, and alternative cloud storage platforms. This conserves storage capacity and enables you to access your files anywhere.
Step 1. Scan for lost data on the fusion drive
Select the Fusion Drive partition where you lost data and files. Click the "Search for lost files" button. If you don't know which partition is the fusion drive, click the "search from your disk" anchor text to check the partition name.

Step 2. Find lost files after the scan
EaseUS Data Recovery Wizard for Mac will immediately scan your Fusion disk partition and display the scanning results. You can filter the files through the file type and path.

Step 3. Recover files on the fusion drive
In the scan results, select the file(s) to preview. Then, click the "Recover" button to get them back.

Final Words
In conclusion, we have navigated the "Volume Hash Mismatch" issue and its origins and solutions. This issue may arise due to a problem with the hard disk or the encoded information. Nevertheless, you can address this issue quite effortlessly.
Ensure the security of your data, and in case of any issues, consider utilizing EaseUS Data Recovery Wizard for Mac. This software can aid you in retrieving your precious digital possessions.
Volume Hash Mismatch FAQs
Here are 4 additional questions about volume hash mismatch problems. Check here for the answers.
1. What is an error code hash mismatch?
A Mac error code hash mismatch indicates that your data has been corrupted or altered. It could cause your applications or system to fail. You must repair your disk or system to address the problem.
2. How do I restart my Mac in recovery mode?
For Intel-based Macs, enter Recovery Mode by pressing and holding Command + R until the Apple logo appears. Modern Macs need you to hold the power button until a screen with startup options seems. Then, to enter recovery mode, click Continue and Options.
3. What is the latest Mac OS?
The latest MacOS is macOS 13 Ventura. It was released on Oct. 25, 2022, and is available for download.
4. How do I open Disk Utility on a Mac?
On a Mac, access the Applications directory and, subsequently, the Utilities directory to initiate the Disk Utility. You can additionally utilize Spotlight to look for it.
Was This Page Helpful?
Jaden is one of the editors of EaseUS, who focuses on topics concerning PCs and Mac data recovery. Jaden is committed to enhancing professional IT knowledge and writing abilities. She is always keen on new and intelligent products.
-
EaseUS Data Recovery Wizard is a powerful system recovery software, designed to enable you to recover files you’ve deleted accidentally, potentially lost to malware or an entire hard drive partition.
Read More -
EaseUS Data Recovery Wizard is the best we have seen. It's far from perfect, partly because today's advanced disk technology makes data-recovery more difficult than it was with the simpler technology of the past.
Read More -
EaseUS Data Recovery Wizard Pro has a reputation as one of the best data recovery software programs on the market. It comes with a selection of advanced features, including partition recovery, formatted drive restoration, and corrupted file repair.
Read More
Related Articles
-
How to Recover Deleted iPhone Backup on Mac [Restore Tip]
![author icon]() Jaden/May 19, 2026
Jaden/May 19, 2026 -
3 Ways to Restore a Previous Version of Pages on Mac
![author icon]() Tracy King/Jun 30, 2026
Tracy King/Jun 30, 2026 -
Couldn't Mount Disk (-69842) [Problem Solved]
![author icon]() Dany/Jun 30, 2026
Dany/Jun 30, 2026 -
4 Ways to Fix SanDisk Extreme Portable SSD Not Mounting Mac
![author icon]() Brithny/Jun 21, 2026
Brithny/Jun 21, 2026