Why Downgrade macOS Sonoma to Ventura
For several reasons, it's fairly unusual for people to think about rolling back their operating systems as technology advances. Some macOS users may discover that switching back to Ventura (from Sonoma) provides several advantages. macOS 14, or Ventura, is a reliable and popular operating system update. It provides a streamlined interface, faster performance, and many useful apps and functions to boost efficiency and inspiration. If you have downloaded macOS Sonoma, let's look deeper at macOS 14's new features and discuss why some users may want to downgrade macOS Sonoma to Ventura.
1. Stability and compatibility
If you're experiencing stability or compatibility issues with macOS Sonoma, you may want to consider downgrading to macOS Ventura. Sonoma's beta status implies it may still have flaws and compatibility difficulties with certain programs, even though it may provide exciting new features. By returning to Ventura, users may enjoy a more stable and dependable OS that works with various applications and hardware.
2. Performance optimization
Efficiency is another major consideration. It's important to remember that the Sonoma beta is still under testing, even though it may deliver performance benefits. This means they may not run as smoothly or quickly on certain gadgets as on others. Users may ensure a more fluid and quicker experience by downgrading to Ventura, particularly on older Macs or devices with limited resources.
3. Familiarity and User Experience
Many people have a good experience with macOS Ventura since it is a stable and reliable version of the operating system. Some users may prefer the Ventura interface and overall experience over the more recent Sonoma. Users may keep a consistent workflow without adjusting to Sonoma's new features and user interface by downgrading.
These benefits of downgrading from macOS Sonoma to Ventura should be clear. Please share this article on social media to aid those contemplating a downgrade.
Fix 1. How to Downgrade macOS Sonoma to Ventura with Mac Time Machine
Using a Mac Time Machine restore of your initial installation of macOS Ventura makes downgrading from Sonoma a breeze. Using this strategy, you may keep your files and settings intact while returning to a more reliable OS. However, before doing the Sonoma upgrade, a Time Machine backup should be established. Follow the steps below to restore your system from a Time Machine backup and upgrade from macOS Sonoma to Ventura:
Step 1. Set up your Mac with your Time Machine backup disk.
Step 2. Restart your Mac while holding down the Command and R keys to enter Recovery Mode.
Step 3. Go to the "Utilities" menu in macOS and choose "Restore from Time Machine Backup".
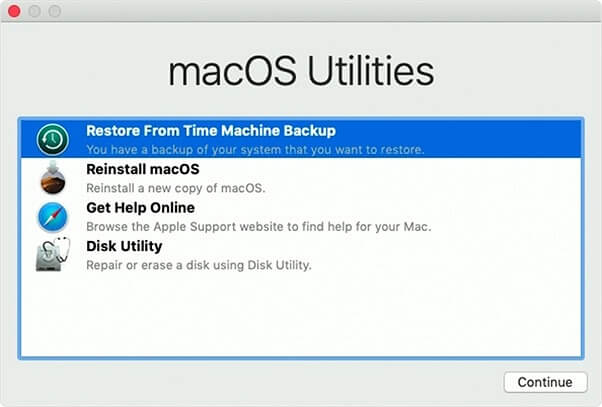
Step 4. Select the disk you use with Time Machine and click Next.
Step 5. Click "Continue" when you've located the backup that contains your Ventura installation.
Step 5. Follow the on-screen prompts to bring back the backup on your Mac.
Step 6. Your Mac will restart after the restoration, and you'll return to the Ventura OS. This method is also workable to downgrade macOS Ventura to Monterey or older versions.
Fix 2. How to Downgrade macOS 14 to 13 in Recovery Mode
If you don't have a Time Machine backup or prefer an alternative way, you may downgrade macOS Sonoma to Ventura using Recovery Mode. This approach uses the system's native utilities but needs a solid internet connection and necessitates wiping your installation. Follow the steps below to begin the macOS 14 to 13 Recovery Mode downgrade lesson:
Step 1. Restart your Mac and press Command + R to enter Recovery Mode.
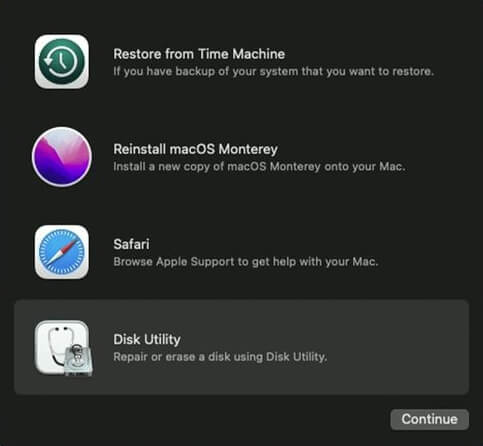
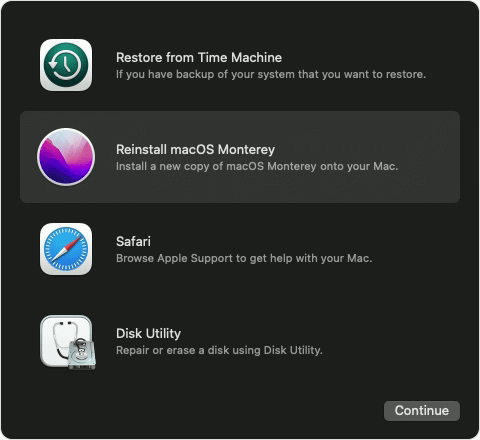
Step 2. Click "Disk Utility" under macOS Utilities and Continue to boot Mac into Disk Utility.
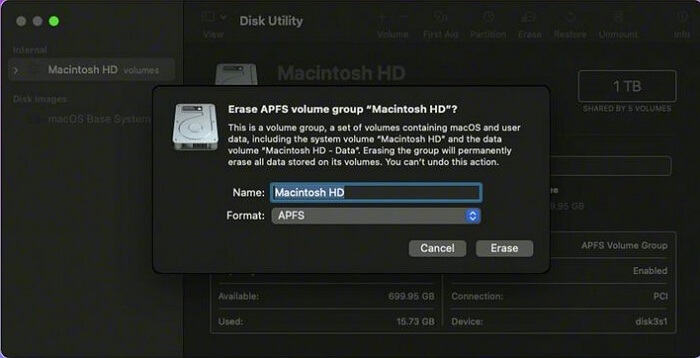
Step 3. Select Mac startup disk "Macintosh HD," your starting disk, and click Erase.
Step 4. Confirm the disk format and click Erase.
Step 5. After erasing the disk, quit Disk Utility and choose "Reinstall macOS" from macOS Utilities.
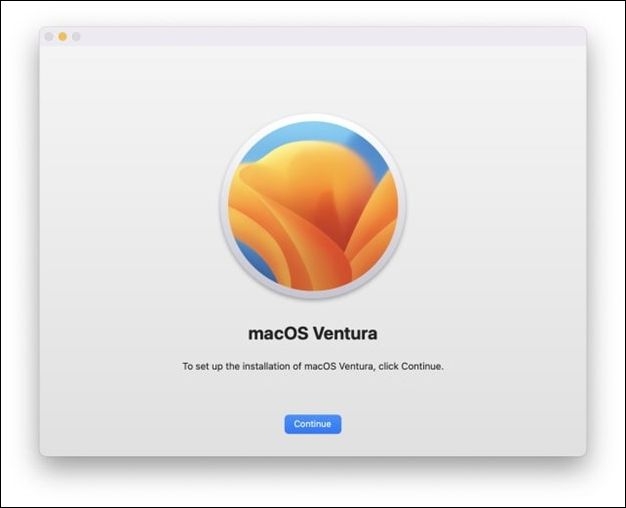
Step 6. Reinstall macOS 13 Ventura on your Mac using the on-screen instructions.
Step 7. After reinstalling, your Mac will restart and downgrade to Ventura.
Fix 3. Downgrade Sonoma with Ventura Bootable Installer
You may also use a Ventura Bootable Installer to revert from macOS Sonoma to Ventura. This method lets you downgrade and install Ventura cleanly. It involves preparing a bootable installation beforehand. Follow the steps below to start the Ventura Bootable Installer-based Sonoma downgrade:
Step 1. Create a Ventura Bootable USB or external storage device.
Step 2. To open the Startup Manager, restart your Mac and press Option as it boots.
Step 3. Plug the Ventura Bootable Installer into your Mac.
Step 4. Select Ventura Bootable Installer as the starting disk in starting Manager and click Continue.
Step 5. Follow the on-screen directions to install.
Step 6. Click Install after selecting your installation location.
Step 7. After installing Ventura, your Mac will restart.
You can also use this method to install macOS Ventura on an unsupported Mac, and you can learn more from the following passage:

Install macOS Ventura on Unsupported Mac
Are you wondering how to install macOS Ventura on unsupported Mac? This article will provide you with nitty-gritty information. Read more >>
Troubleshoot macOS Sonoma Downgrade Issues
Some users have reported experiencing difficulties with the downgrade from macOS Sonoma to Ventura. Listed below are three common problems and the solutions we recommend:
Problem 1: Compatibility Problems with Programs and Applications
It's possible that after downgrading to macOS Ventura, certain programs and software may stop working properly or become unstable.
Solution:
- See whether the developer offers Ventura or macOS version-specific updates or fixes on their website or support forums.
- Consider suitable apps for Ventura or the intended macOS version.
- Try running the program or software in compatibility mode or virtualization.
Problem 2: Drivers are either Unavailable or Unsuitable
If you downgrade to an older macOS version, you may have connection difficulties or diminished functionality due to missing or incompatible drivers for specific hardware components.
Solution:
- Find drivers that work with Ventura or the version of macOS you want to use by visiting the manufacturer's website.
- The updated drivers may be installed by following the on-screen prompts.
- If there are no updated drivers, contact the manufacturer's support or use suitable hardware.
Problem 3: Lost Information or Corrupted Files
Data loss or inaccessibility of certain files might occur due to improper downgrade processes or unanticipated failures.
Solution:
- Ensure you have a backup of all your crucial files and data before switching to a lower version.
- Use a trustworthy data recovery program like EaseUS Data Recovery Wizard for Mac to recover lost files from your backup or the afflicted disk.
- Before doing the downgrade, it is recommended to use data recovery software to retrieve any inaccessible files from the disk.
Recover Data After Downgrading macOS Sonoma
Some customers have reported that after downgrading from macOS Sonoma to Ventura, they lost or couldn't access important data. When this occurs, you may rely on EaseUS Data Recovery Wizard for Mac to help you retrieve the lost information. This program is designed to recover data from various storage media, including hard disks, solid-state drives (SSDs), and USB drives.
This program is accessible to users of varying technical skill sets because of its intuitive interface and streamlined recovery procedure. Whether a user has lost data due to an unintentional deletion, a failed downgrade, or a formatting problem, EaseUS Data Recovery Wizard for Mac is an effective and trustworthy solution. It uses sophisticated file-scanning algorithms to find and recover deleted files on macOS Sonoma or Ventura quickly.
This tool can help you recover missing photos after macOS Sonoma updates or downgrades, and it can also recover missing documents, emails, videos, etc. Check the following tutorial to retrieve lost files with EaseUS.
Step 1. Search for lost files
Select the disk location to search for lost files (it can be an internal HDD/SSD or a removable storage device) on macOS Sierra, High Sierra, Mojave, Catalina, Big Sur, Monterey, Ventura, and the latest Sonoma. Click the "Search for lost files" button.

Step 2. Go through the scanning results
EaseUS Data Recovery Wizard for Mac will immediately scan your selected disk volume and display the scanning results.

Step 3. Select the file(s) and recover
In the scan results, select the file(s) to preview and click the "Recover" button to have them back.

Conclusion
In conclusion, compatibility difficulties or personal preferences are only two of the many valid arguments for reverting from macOS Sonoma to Ventura. This article has covered the benefits of downgrading, how to do a downgrade using a Time Machine backup, perform a downgrade with Recovery Mode and the Ventura Bootable Installer, and handle typical downgrade difficulties. Remember that there is always the possibility of losing data or experiencing instability while downgrading an operating system. Therefore, backing up your critical data and taking the necessary precautions is vital.
If any of your data is lost during the downgrading process, you may get it back with the help of EaseUS Data Recovery Wizard for Mac. Files that have been accidentally deleted are easily retrievable with the aid of this robust program.
We hope this article has given you the tools to roll back macOS Sonoma to Ventura effectively. Take care, carefully adhere to the directions, and think about getting help from a professional if necessary.
Downgrade macOS Sonoma to Ventura FAQs
You can learn more information about downgrade macOS Sonoma to Ventura from the following Q&As:
1. How to downgrade macOS without losing data?
If you want to roll back from Sonoma to Ventura without losing data, you may downgrade macOS using a Time Machine backup, Recovery Mode, or a Ventura Bootable Installer. Using these techniques, you may roll back to an earlier macOS version while keeping your data intact.
2. How to recover lost data after the macOS Sonoma downgrade?
We advise utilizing EaseUS Data Recovery Wizard for Mac if you have lost data due to a downgrade from macOS Sonoma. You may trust that our data recovery program will help you get your files back in working order.
3. What are the new features of macOS 14 Sonoma?
Upgraded privacy options, a more intuitive Control Center, faster page loads in Safari, a more feature-rich Maps app, and cutting-edge FaceTime are some new additions in macOS 14 Sonoma.
4. Is macOS Sonoma better than Ventura?
Both macOS Sonoma and macOS Ventura provide unique capabilities and features. While Ventura may be more reliable and compatible with certain apps, Sonoma may provide new features. Ultimately, it comes down to what each person needs and wants.
Was This Page Helpful?
Dany is an editor of EaseUS who lives and works in Chengdu, China. She focuses on writing articles about data recovery on Mac devices and PCs. She is devoted to improving her writing skills and enriching her professional knowledge. Dany also enjoys reading detective novels in her spare time.
Related Articles
-
How to Fix Zoom Error Code 5003 on Mac [2025 Update]
![author icon]() Jaden/2025-09-17
Jaden/2025-09-17 -
Fixed: File System Check Exit Code Is 8 | Multiple Plans
![author icon]() Dany/2025-09-17
Dany/2025-09-17 -
How to Open Terminal on Mac and How to Use it [2025 Guide]
![author icon]() Jaden/2025-09-17
Jaden/2025-09-17 -
6 Proven Ways to Fix Windows Update Download Error 0x80248007
![author icon]() Larissa/2025-07-04
Larissa/2025-07-04
EaseUS Data Recovery Services
EaseUS data recovery experts have uneaqualed expertise to repair disks/systems and salvage data from all devices like RAID, HDD, SSD, USB, etc.