| Workable Solutions | Step-by-step Troubleshooting |
|---|---|
| Method 1. Downgrade with Time Machine | 1. You need to connect your Time Machine drive to the Mac. 2. Restart the Mac PC...Full steps |
| Method 2. Downgrade with macOS Recovery | 1. Turn off the Mac from the Apple menu. 2. Follow one of the below-mentioned inputs to...Full steps |
| Method 3. Downgrade with Bootable Installer | 1. Get the macOS Monterey installer now. Visit Mac App Store (Where you download ...Full steps |
Reasons for Downgrade macOS Ventura to Monterey
At a glance, macOS Ventura is Apple's next-gen macOS, a major update including a seamless multitasking experience. On the other hand, macOS Monterey is version 12 of mac, the 18th and most recent major release of Apple that provides the newest way to share experiences with friends and family during FaceTime.
Do you know you have adequate reasons for downgrading macOS Ventura to macOS Monterey? After upgrading to macOS Ventura, you may find your Mac device can not run well with this new system, and some specific software is incompatible with the macOS Ventura. Software like Magnet and Dropbox haven't been adequately optimized for Ventura, which is why downgrade macOS Ventura to Monterey is crucial. Besides this reason, some other probable causes are shown below:
● The performance got more rotten
The newest macOS update is full of glitches, and users often report their Macbooks got immensely slow after upgrading to Ventura. Moreover, some of the apps keep getting crashed, or it leads to hanging.
● Crosscheck your Mac first, then reinstall
A downgrade of macOS Ventura to Monterey takes approx an hour. Therefore, before the departure, the final checkup of the Mac should be done and eliminate the issues with your current macOS Ventura setup.
How to Downgrade macOS Ventura with Time Machine
Are you wondering how to get old versions of macOS? The first method to downgrade macOS Ventura to Monterey is the Time Machine option, which is considered the easiest. This seamless approach is available for users with a full-fledged backup of the previous macOS Monterey. However, downgrading to macOS Monterey from Ventura is the most hassle-free thing to do with the previous macOS Monterey backup. These are the ways shown below to downgrade Ventura to Monterey:
Step 1. You need to connect your Time Machine drive to the Mac.
Step 2. Restart the Mac PC.
Step 3. For Intel Macs: When the Apple logo pops up, you need to hold down Command + R.
For Silicon Macs: Keep holding down the Power button on Mac until the startup screen pops up. After that, head to Options > Continue.
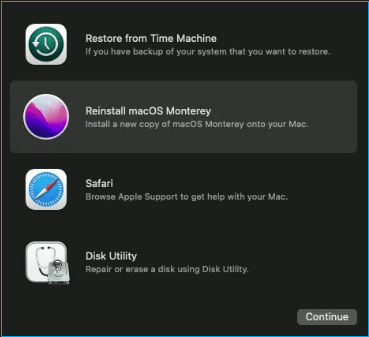
Step 4. Opt for Restore from this Time Machine Backup. After that, don't forget to tap the Continue button.

Step 5. Choose your Restore Source, and then hit the "Continue" button.
Step 6. Choose the desired backup to retrieve from.
Step 7. Carefully follow the prompts to finish the reinstallation. After that, retrieve your files from the backup drive.
Once the macOS Monterey is installed on your MacBook, you can enjoy the most verifiable software on macOS 12.
How to Downgrade macOS Ventura with macOS Recovery
You can retrieve your Mac to one of the most updated functioning states using the macOS recovery method. It's the most robust mode letting you perform elementary troubleshooting and retrieval activities on Mac, for example, OS reinstallation, disk verification, and startup security transformation. However, follow the ways to downgrade macOS Ventura on your device.
Step 1. Turn off the Mac from the Apple menu.
Step 2. Follow one of the below-mentioned inputs to turn on the power by pressing the button:
- Hit the Command + R to reinstall the updated macOS, Ventura.
- Hold Shift + Option + Command + R keys together to reinstall the updated macOS version, which was incorporated with your Mac during its buying time.
- Hold Option + Command + R keys to install the newest supported macOS upgraded version.
- Type your password and hit the continue button.
- Follow the guidelines shown on the PC screen to uninstall macOS Ventura.
Inaugurate macOS retrieval mode to uninstall macOS Ventura
Step 1. You may connect the power cable to your Mac whenever the power is needed.
Step 2. Hit the Apple option and scroll down to shut the device down.
Step 3. For Apple Silicon Mac: Press the power button > Continue pressing until the startup options appear > choose macOS retrieval.
For Intel-based Mac: Hold the power button of the Mac to switch it on > Press and hold CMD + R.
Step 4. Choose Disk Utility once the device is in Retrieval mode.

Step 5. Choose the name of your hard drive, which always pops up as Macintosh HD. After that, hit the "Erase" button.
Step 6. Opt for the GUID partition map for the scheme and the APFS file system for the format.
Step 7. Shut down the Disk Utility window.
Step 8. Hit the option of reinstalling macOS Monterey.
Step 9. Follow the wizard to finish the installation procedure.
Downgrade macOS Ventura to Monterey with Bootable Installer
The third method includes downgrading macOS Ventura to Monterey with a Bootable Installer, allowing you to install macOS from USB. The good news is that you can build a bootable Monterey installer even though you didn't do it prior to installing Ventura. The steps are shown below:
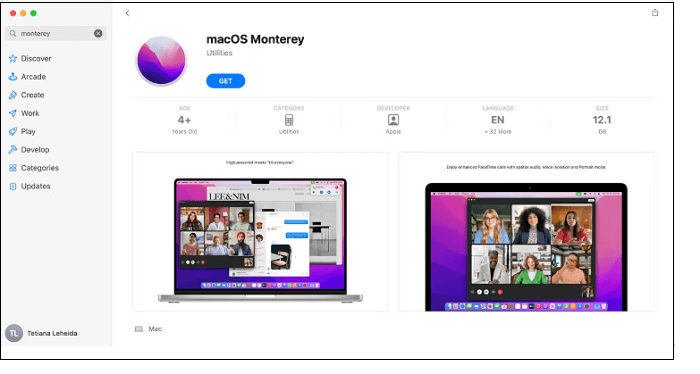
Step 1. Get the macOS Monterey installer now
- Visit Mac App Store (Where you download and install macOS Ventura) and search for Monterey.
- To download macOS Monterey, click Get.
- Search for the bootable installer in the Applications folder.
Step 2. Rename the drive
- Link your Mac to an external drive.
- Under the External section, you need to open Disk Utility and find the drive in the list of available devices.
- Choose Drive and hit erase.
- Set the Scheme to GUID Partition Map and the Format to Mac OS Extended (in case it's available).
- Confirm your preference.
Step 3. Build a bootable installation drive
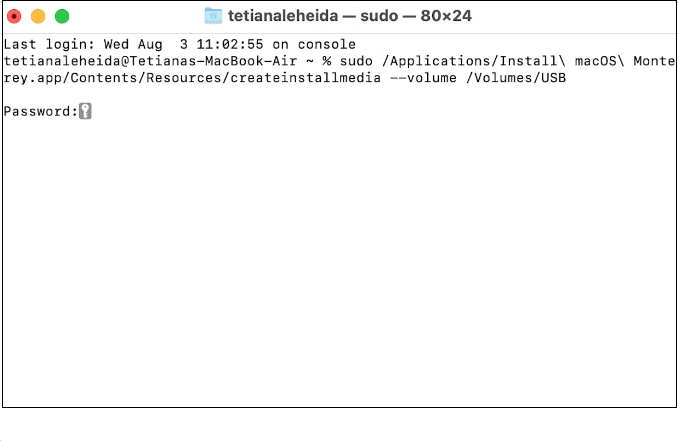
- On your macOS, open the Terminal.
- sudo /Applications/Install\ macOS\ Monterey.app/Contents/Resources/createinstallmedia --volume /Volumes/USB - this command has to be pasted and hit enter.
- Provide a password and hit enter again.
- Press Y when the Terminal needs your permission to move forward.
- Hit the Ok button in case the Terminal needs your permission to check your external drive.
Step 4. Utilize the bootable installer to install macOS Monterey
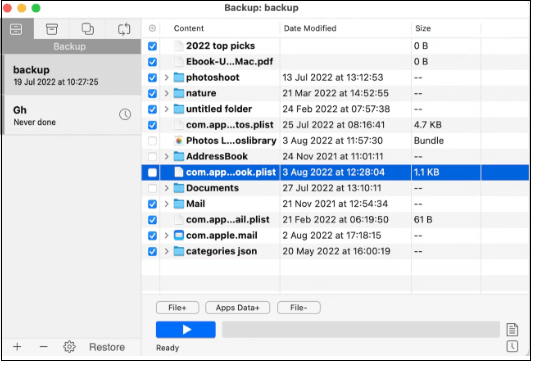
At this final stage, you must eliminate your startup drive, as some drives can't be downgraded unless the formatting is done. If you have any crucial files on macOS Ventura, it's time to build a secure backup.
Install Monterey with the following steps:
Step 1. Link the bootable installer-equipped drive to your Mac.
Step 2. Enter Retrieval mode:
On an Intel Mac: Press Command + R until the Apple logo pops up.
On an Apple Silicon Mac: Press down the Power button until the Startup option appears on the screen. Hit Options > Continue.
How to Recover Lost Data When Downgrading macOS Ventura
Downgrading macOS Ventura to Monterey might lead to data loss, which can be prevented. But do you know how? With EaseUS Data Recovery Wizard for Mac, you can retrieve files from the hard drive, USB stick, SD Card, and even complete a Mac trash recovery. This recovery software also can help you recover lost files after the macOS Ventura update. Click the button to install this software on your macOS.
This high-tech data retrieval software can retrieve your lost data from any storage media. Moreover, this software retrieves all lost data on your macOS during downgrading from Ventura to Monterey so that you don't have to bother about the crucial data anymore. Now you will need only three steps to recover your files (This tutorial can also be used to recover deleted files on macOS Ventura.)
Step 1. Select the drive to be scanned
In the main EaseUS Data Recovery Wizard window, there will be a list of the drives connected to your Mac. Select the drive you need to recover lost/deleted files from, and click the "Search for lost files" button.

Step 2. Select your lost data/files
EaseUS Data Recovery Wizard for Mac will immediately scan your selected disk volume and display the scanning results on the left pane. You can sort the results to find the wanted files if you are looking for certain files.

Step 3. Recover lost/deleted data
Once you have found the desired files, preview the files and then click "Recover" to begin the recovery of your deleted/lost Mac files.

Conclusion
The macOS Venture undoubtedly has numerous features and improvements. But it has some errors and unknown glitches too. These are the three best methods mentioned above to downgrade macOS Ventura and get the best performance every time you use your macOS.
If you lose some vital data while downgrading macOS Ventura to Monterey, using the EaseUS Data Recovery Wizard for Mac to retrieve data almost instantaneously is recommended. Download it now!
Downgrade macOS Ventura to Monterey FAQs
Some of the best FAQs are shown below for downgrading macOS Ventura to Monterey:
What Mac is compatible with Monterey?
macOS Monterey is compatible with MacBook Air M2, 2022, M1, 2020, Retina, 13-inch, 2020, 2019, 2018, MacBook Pro 13-inch, M2, 2022, 16-inch, 2021, 13-inch, 2020, Two Thunderbolt 3 ports, 4 Thunderbolt 3 ports, and more.
How do I downgrade from Ventura to OSX?
Follow the three steps below:
- Switch off your Mac.
- Restart the PC while pressing Shift + Option/Alt + Command + R to enter the Internet Retrieval Mode.
- Opt for the Reinstall macOS option.
- Hit the Install option.
Will Monterey make my Mac slower?
It has been seen that Monterey reduces the macOS performance and speed. From the user's reports, it has been observed that Monterey 12.3 has worsened the speed more.
Can you downgrade a Mac that shipped with Catalina?
Although subsequent upgrades can be rolled back by downgrading to 10.15 Catalina, new Macs that come pre-installed with 10.15 Catalina cannot be downgraded to 10.14 or below. To back up your Mac, remove the startup disc and reinstall macOS.
Was This Page Helpful?
Cedric Grantham is a senior editor and data recovery specialist of EaseUS. He mainly writes articles and how-to tips about data recovery on PC and Mac. He has handled 10,000+ data recovery cases and is good at data recovery of NTFS, FAT (FAT32 and ExFAT) file systems, and RAID structure reorganization.
Dany is an editor of EaseUS who lives and works in Chengdu, China. She focuses on writing articles about data recovery on Mac devices and PCs. She is devoted to improving her writing skills and enriching her professional knowledge. Dany also enjoys reading detective novels in her spare time.
Related Articles
-
How to Fix Raw Drive Without Format Using CMD [Quick & Safe]
![author icon]() Cici/Oct 25, 2024
Cici/Oct 25, 2024 -
How to Use HP USB Format Tool? [2024 Final Guide]
![author icon]() Cici/Nov 27, 2024
Cici/Nov 27, 2024 -
AHCI VS NVMe: Which Is Better? What's Their Difference?
![author icon]() Sherly/Nov 27, 2024
Sherly/Nov 27, 2024 -
How to Fix Reset This PC Not Working on Windows 10/8/7
![author icon]() Jaden/Oct 25, 2024
Jaden/Oct 25, 2024