You can easily upgrade and install the latest macOS update on your Mac machine using the system's Software Update option. That's no problem. But sometimes, we may require a clean installation of the macOS version for hardware/software troubleshooting or to be able to install the same macOS system on multiple devices at the same time. In this regard, you need to install macOS from an external drive or USB, and here are more reasons that you may need to install macOS from a USB bootable installer:
- ✅ Offline installation. With a bootable macOS installer, you don't need to rely on Wi-Fi or wait a long time for large downloads. This is especially useful if you have a limited internet environment.
- ✅ Quick setup. A USB drive macOS installer can speed up the process, saving time compared to downloading macOS every time you reinstall.
- ✅ Multiple installations. A bootable USB can be used multiple times on different devices, making it a practical tool for anyone managing more than one Mac.
In this guide, we'll teach you both auto and manual ways to create a bootable installer on a Mac or Windows. Let's start with the auto way to create a macOS installer with a USB flash drive.
How to Install macOS from USB | Easiest & Automatic Way
You may need to use a command-line tool if you want to create a bootable USB for macOS; if you are not familiar with the Terminal or command lines, it's better to apply this method by applying a handy bootable installer creation tool. You can download EaseUS Data Recovery Wizard for Mac on your computer and create a command-line macOS installer automatically.
EaseUS Data Recovery Wizard Free offers up to 2 GB of free data recovery, including 500 MB available by default and an extra 1.5 GB unlocked after sharing on Facebook and X.
The easiest and most effective solution to download a new or old macOS is using EaseUS data recovery software, which provides a free macOS upgrade or downgrade feature. With this software, you can download macOS Sequoia and even older versions like macOS Mojave. Download this trusted tool and follow the steps below to make a bootable USB for Mac. With this all-in-one data recovery software, you can also back up and recover data from your storage devices easily:
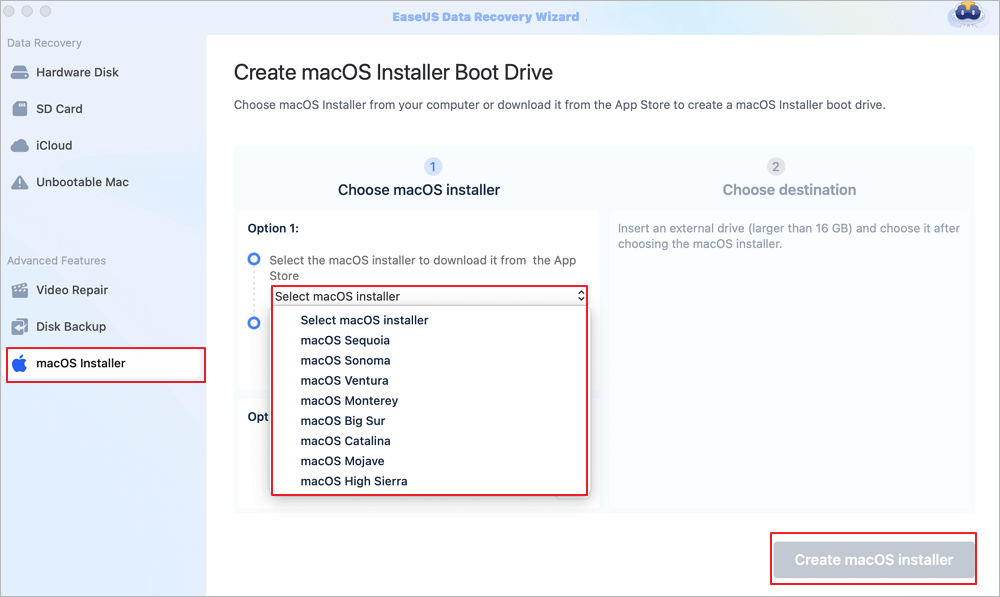
✨Step 1. Connect USB Flash Drive and Choose a macOS Version
Launch EaseUS recovery software, and choose "macOS Installer" from the Advanced Features. Insert a USB that has more than 16GB of free storage space.
- Option 1: Choose a macOS version you want to install, and a new windows will ask you to download macOS installer from App Store. After downloading the installer, click "Refresh".
- Option 2: If you have already downloaded macOS installer, choose "Add" and select the installer you have downloaded.
Finally, you can choose "Create macOS Installer" to start creating the bootable installer. You can select various macOS versions like macOS Tahoe, macOS Sequoia, Sonoma, Ventura, Monterey, Big Sur, and older versions.
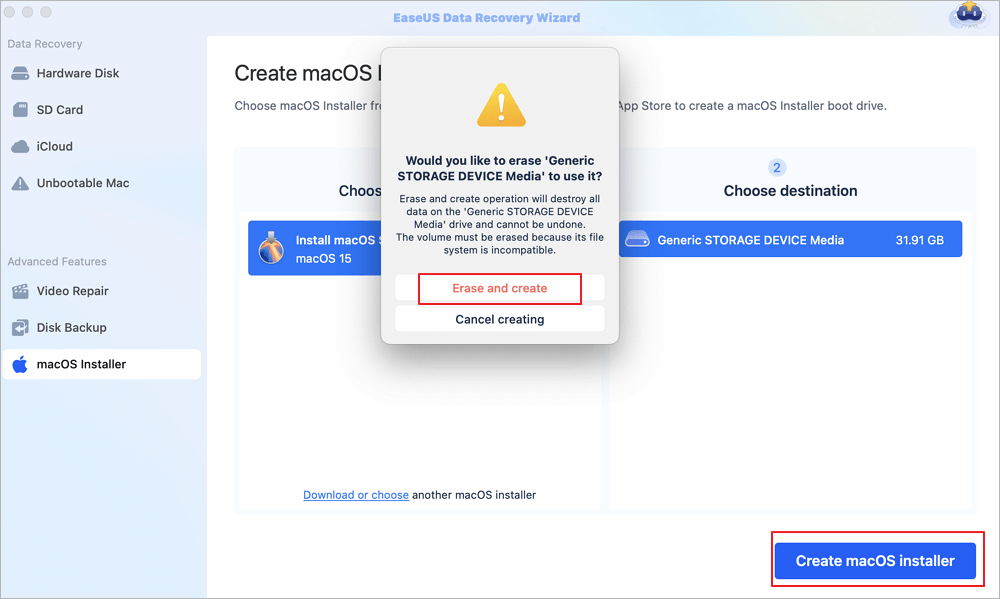
✨Step 2. Erase the USB and Create a macOS Installer
A notice window will appear to warn you this operation will remove everything on this USB. Make sure you have backed up data and nothing important is left on this USB, click the "Erase and create".
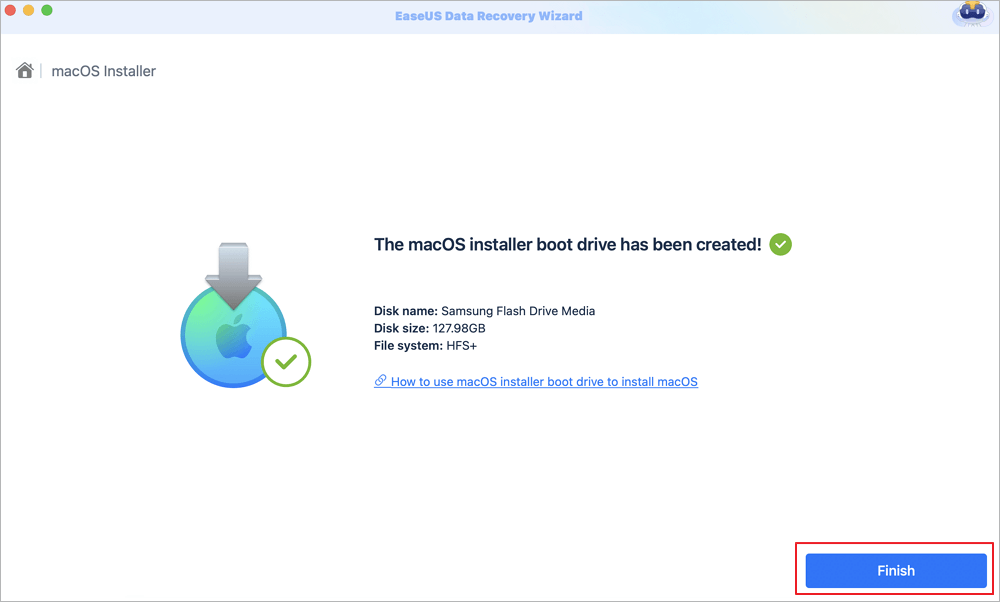
✨Step 3. Wait and Check How to Use macOS Installer
The software will automatically format the USB and download macOS installer files. After creating the bootable macOS installer, click the blue link on the interface to learn how to use the macOS Installer boot device to install macOS. Finally, click "Finish" to complete the whole process.
Share this post with your friends; it helps them speed up the installation of macOS from a USB bootable installer!

How to Install macOS from a USB Manually
You'll follow four steps to install macOS from a USB flash drive. If you are stuck on any steps, try to move back to the automatic way and create a macOS installer with EaseUS Data Recovery Wizard for Mac. If you have already prepared a formatted USB drive, you can skip the first steps and jump to step 2.
- Step 1. Format USB Flash Drive for macOS Installer
- Step 2. Download macOS from a Reliable Source
- Step 3. Create the Bootable Installer After Download
- Step 4. Install macOS from the Bootable Installer
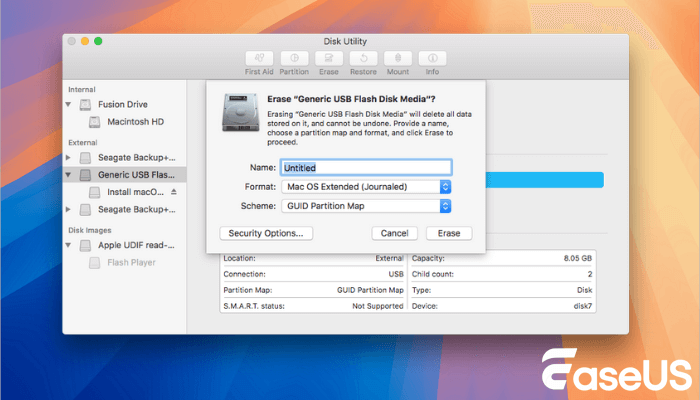
Step 1. Format USB Flash Drive for macOS Installer
You should prepare a USB flash drive with more than 16GB of storage space. If your USB drive is not empty, make sure you have backed up all the important files in advance. Then, you can follow this tutorial to format the prepared USB drive:
Step 1. Launch Disk Utility on your Mac. You can easily find this utility with Spotlight.

Step 2. Locate your USB drive in Disk Utility, and click "Erase".
Step 3. Then, you can name this USB as "macOS Installer" or other names, and choose "Mac OS Extended (Journaled)" as the format and "GUID Partition Map" as the scheme.
Step 2. Download macOS from a Reliable Source
Click the download link for the MacOS version you want to install; these links are 100% from Apple. If you need to create a macOS Tahoe bootable installer, you need to visit a website like Mr. Macintosh to download the beta versions.
- macOS Sequoia
- macOS Sonoma
- macOS Ventura
- macOS Monterey
- macOS Big Sur
- macOS Catalina
- macOS Mojave
- macOS High Sierra
Each macOS download is going to be sent to the Applications folder as an app named Install macOS [version name]. If the installer opens after downloading, quit it without continuing installation. To get the correct installer, download it from a Mac that uses macOS Sierra 10.12.5 or later, or El Capitan 10.11.6. Enterprise administrators, please download from Apple, not a locally hosted software update server.
Pay attention: OS X El Capitan is quite different from the other five. This download is presented in a disk image format named InstallMacOSX.dmg.
Step 3. Create the Bootable Installer After Download
We should remind you that the installer creation process will format and erase all data on the USB to take effect. If you format the wrong USB or need to recover data from a formatted hard drive on your Mac, try EaseUS Data Recovery Wizard for Mac as soon as possible.
- In the Finder, find the Applications/Utilities folder, then double-click Terminal.
- Each macOS installer needs an exclusive command line in the table. We suggest you copy one of the following commands and paste it in Terminal. (You may be required to replace MyVolume in all the command lines with the real name of your own USB flash drive.)
Sequoia
sudo /Applications/Install\ macOS\ Sequoia.app/Contents/Resources/createinstallmedia --volume /Volumes/MyVolume
Sonoma
sudo /Applications/Install\ macOS\ Sonoma.app/Contents/Resources/createinstallmedia --volume /Volumes/MyVolume
Ventura
sudo /Applications/Install\ macOS\ Ventura.app/Contents/Resources/createinstallmedia --volume /Volumes/MyVolume
Monterey:
sudo /Applications/Install\ macOS\ Monterey.app/Contents/Resources/createinstallmedia --volume /Volumes/MyVolume
Big Sur:
sudo /Applications/Install\ macOS\ Big\ Sur.app/Contents/Resources/createinstallmedia --volume /Volumes/MyVolume
Catalina:
sudo /Applications/Install\ macOS\ Catalina.app/Contents/Resources/createinstallmedia --volume /Volumes/MyVolume
Mojave:
sudo /Applications/Install\ macOS\ Mojave.app/Contents/Resources/createinstallmedia --volume /Volumes/MyVolume
High Sierra:
sudo /Applications/Install\ macOS\ High\ Sierra.app/Contents/Resources/createinstallmedia --volume /Volumes/MyVolume
El Capitan:
sudo /Applications/Install\ OS\ X\ El\ Capitan.app/Contents/Resources/createinstallmedia --volume /Volumes/MyVolume --applicationpath /Applications/Install\ OS\ X\ El\ Capitan.app
After typing the command in Terminal, press Return to enter the command. Afterward, it's time to resto all the confirmation warnings by typing Y, including confirming erasing the USB volume, approving the Terminal to access files on the volume,olume and allowing the copy to proceed.
Step 4. Install macOS from the Bootable Installer
To boot a Mac from the bootable USB drive, the operation varies between Intel-based Macs and Apple Silicon-based Macs.
| Intel Macs | Apple Silicon Macs |
|---|---|
|
|
|
|
How to Recover Files After Factory Reset Mac
Reinstalling macOS, Mac OS X, or factory resetting Mac always follows a system crash, computer slowdown, or even when Mac users need to erase their old Mac computer for sale...
[Bonus] Create a macOS Bootable USB on Windows 11/10 PC
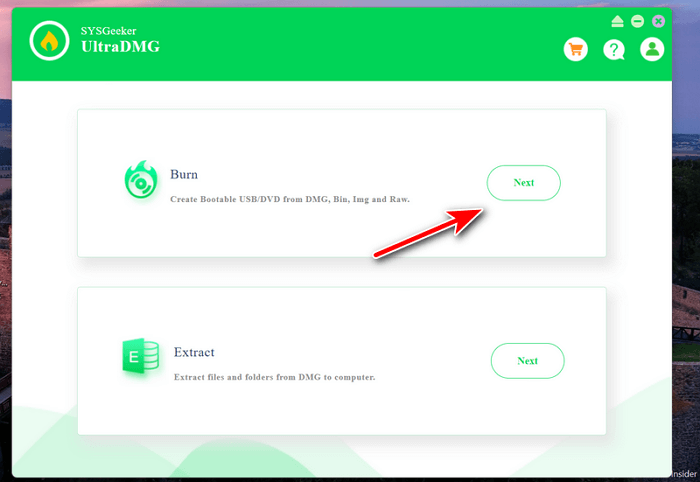
The steps are quite simple if you were on a Mac. However, the situation is totally different if you don’t have a Mac at hand. Fortunately, there are a couple of amazing Windows software out there that can help you create a macOS bootable USB on a PC. The most popular one is SysGeeker UltraDMG.
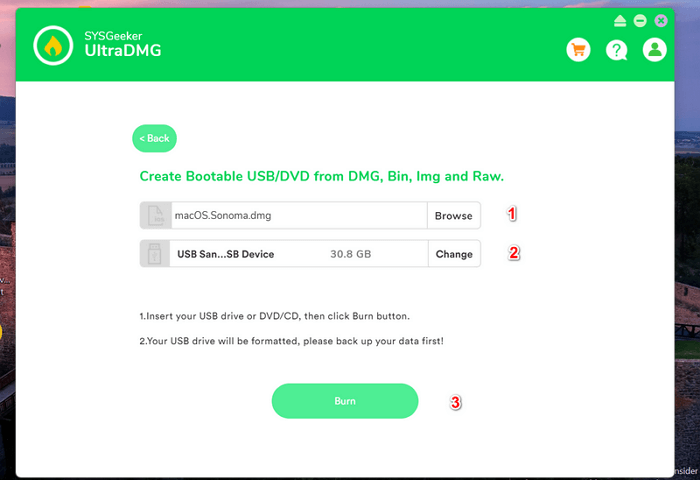
Step 1. Download a copy of macOS DMG file, a bootable disk image containing the macOS operating system. You can go and search from the Internet.
Step 2. Download SysGeeker UltraDMG by clicking the link.
Step 3. After all the operations are complete, the USB drive will have the same name as the installer you downloaded such as Install macOS Monterey. Quit Terminal and disconnect the USB drive. You should then move on to the final installation procedure now.
Step 4. Import the macOS DMG file and click the "Burn" button to make a bootable macOS installer! Wait about 10 minutes, and a bootable macOS USB will be ready for installation!
Closing Words
The four steps to format USB, download macOS, create a bootable installer to an external USB and then clean install macOS from USB should be clear and simple to follow. The process requires you to use the Terminal command lines to erase the USB drive, format it with a proper file system, and save the installer to it. Though the chance is little, use EaseUS hard drive recovery software to recover files while reinstalling macOS.
EaseUS data recovery tool's free feature - macOS Installer can help you create macOS installer easier and faster, download and have a try now!
Some Basics of macOS install from a bootable USB Drive
Installing a Mac operating system in this way can be challenging, as the whole process involves the application of Terminal command lines and creating a bootable installer. Nonetheless, we're trying to make the entire procedure simple to follow and ensure you do not make mistakes. Now, let's begin with some of the most frequently asked questions that many users are trying to answer.
Q1: Why do you install macOS from USB?
The benefits of installing macOS from USB compared with the automatic software update option include:
- It's for a clean install, so you can get rid of junk apps and files that are piled up on your Mac.
- It's useful for troubleshooting Mac startup issues, fixing corruption, or recovering files.
- It can save time and effort when you need to install macOS on multiple systems and machines.
Q2: How do I create a bootable installer for macOS?
All the available installer can be found on the Mac App Store, including macOS Monterey, macOS Big Sur, macOS Catalina, macOS Mojave, or macOS High Sierra and OS X El Capitan. You need to create the installer using correct Terminal commands for different macOS versions.
Q3: Can I install macOS from USB without the internet?
A bootable installer doesn't download macOS from the internet, but it does require an internet connection to get firmware and other information specific to the Mac model.
Was This Page Helpful?
Jaden is one of the editors of EaseUS, who focuses on topics concerning PCs and Mac data recovery. Jaden is committed to enhancing professional IT knowledge and writing abilities. She is always keen on new and intelligent products.
Jean is recognized as one of the most professional writers in EaseUS. She has kept improving her writing skills over the past 10 years and helped millions of her readers solve their tech problems on PC, Mac, and iOS devices.
-
EaseUS Data Recovery Wizard is a powerful system recovery software, designed to enable you to recover files you’ve deleted accidentally, potentially lost to malware or an entire hard drive partition.
Read More -
EaseUS Data Recovery Wizard is the best we have seen. It's far from perfect, partly because today's advanced disk technology makes data-recovery more difficult than it was with the simpler technology of the past.
Read More -
EaseUS Data Recovery Wizard Pro has a reputation as one of the best data recovery software programs on the market. It comes with a selection of advanced features, including partition recovery, formatted drive restoration, and corrupted file repair.
Read More
Related Articles
-
How to Install MacOS on a New SSD | 3 New Ways
![author icon]() Sherly/Jun 30, 2026
Sherly/Jun 30, 2026 -
How to Download Older macOS | OS X Included
![author icon]() Dany/Jun 30, 2026
Dany/Jun 30, 2026 -
How to Fix Failed to Create macOS Installer OpenCore on Mac
![author icon]() Dany/May 10, 2026
Dany/May 10, 2026 -
Create macOS Tahoe Bootable Installer and Get macOS 26 Beta
![author icon]() Dany/Feb 01, 2026
Dany/Feb 01, 2026