Are you excited about using the Stage Manager on Mac to ace multitasking? It might also be curious to try your hands on the New Apple Releases for Mac. Apple always impresses us either its well-optimized devices with features! So, you would have downloaded Ventura but faced the macOS Ventura Won't Install issue. So, if you are looking for how to fix can't install macOS Ventura, here are the solutions for the same!
Why Can't Install macOS Ventura - 4 Reasons
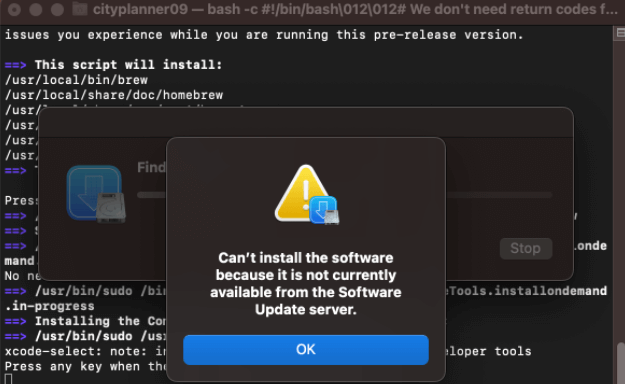
Why can't your Mac install the macOS Ventura error message if you are thinking? Then we have answers to all your questions. Below mentioned are the causes behind macOS Ventura can't install problem:
Device Compatibility
All the Mac models are not compatible with the Ventura update. In addition, Ventura is incompatible with older Mac models. Hence, you should check if your OS version is compatible or not.
Poor Internet Connectivity
You do need active internet connectivity to download the Ventura update. If your Mac has a poor network or WiFi connection, then fixing it helps.
Low Storage Space
If you use Sierra or a similar macOS version, you need 26 GB of free memory on your Mac. Moreover, if you use a previous version like Yosemite, then a minimum of 44 GB of space is required. So in the best-case scenario, having more than the required space is apt.
Apple Server is Down
When Apple servers are down, several of its services do not work. Therefore, you should visit the System Status page of Apple to check if any server issue is responsible for the cause or if there is something else.
No matter what the cause, we will help you install the macOS Ventura upgrade. Follow the steps below to fix the macOS update not found, or macOS 13 installation failed error.
9 Ways to Fix macOS Ventura Won't Install
macOS Ventura won't install issue might freak you often. However, while some might also think your Mac is not functioning optimally, you can resolve it efficiently. Depending upon the causes, we have specified 9 ways to deal with it!
- 1. Check Your Mac Device Compatibility
- 2. Check the Storage Space
- 3. Check the Internet Connection
- 4. Restart Mac and Check Again
- 5. Check the Firewall Settings
- 6. Upgrade to Ventura Again
- 7. Install macOS Ventura from App Store
- 8. Delete the Installer App
- 9. Install macOS Ventura from Recovery Mode
Before starting the process, back up all your data on your Mac. To backup and restore data on your MacBook Air, download the EaseUS data recovery software:
Back Up Your Mac and Never Lose Data
Back up and restore your MacBook/iMac without Time Machine, iCloud, or external hard drives.
Fix 1. Check Your Mac Device Compatibility
macOS Ventura won't install, which can be due to multiple reasons. However, it becomes your prime responsibility to ensure whether your Mac model is compatible with it or not. Yes, it's a Mac update, but it's not for all MacBooks. Therefore, checking compatibility is a must before proceeding to fix the issue.

We have mentioned below a list of all the Macs compatible with macOS Ventura:
- iMac 2017 and later
- iMac Pro 2017 and later
- MacBook Pro 2017 and later
- MacBook 2017 and later
- MacBook Air 2018 and later
- Mac Mini 2018 and later
- Mac Pro 2019 and later
- Mac Studio 2022
However, you would not be able to install Ventura if your Mac does not belong to any of these. More precisely, if it's older than the models listed, then macOS Ventura is incompatible.
Fix 2. Check the Storage Space to Fix macOS Ventura Issues
Low storage space on your macOS does not let you install Ventura. It is because you need from 26GB to 44GB of free memory on your device, depending on the macOS you are currently using. For those who have Sierra or a later one active, 26GB is enough for you. However, if you have installed Yosemite, Capitan, or similar versions, you require a minimum of 44 GB of free space.
The good part is that you can avoid it by freeing up some memory and increasing storage. Follow the steps given below to check your Mac Storage space:
Step 1. Tap on the Apple logo at the top left of your screen
Step 2. Click on About This Mac from the drop-down menu that appears
Step 3. Navigate to the Storage tab from the pop-up that appears
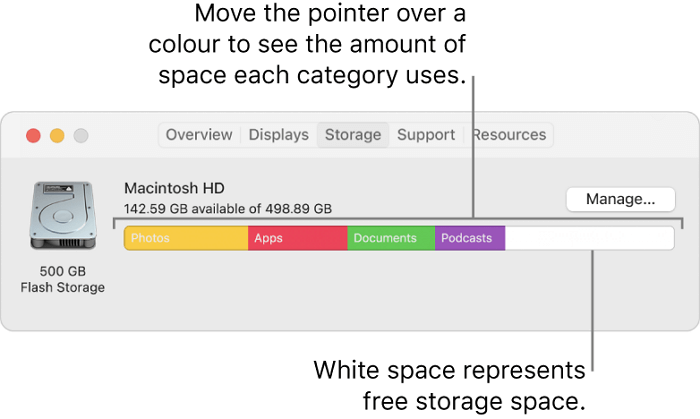
It will display a graph showing which type of files consume storage space. Files, Systems, Apps, and Photos are some categories available. You can then analyze which type of files are consuming the most storage.
Further, you can declutter by deleting unnecessary files. Also, check on the large-sized files and, if possible, move them to a cloud drive like iCloud or Google Drive. Otherwise, you can also use a secondary storage device to save large unnecessary files that are accessible anytime. Several of the later Mac models have a feature that suggests how you can free up memory.
Fix 3. Check the Internet Connection of Your Mac
A poor internet connection disrupts your emails and other web browsing activities. In such a scenario, if you think of installing software, then that's pretty challenging. Therefore, installing an update amidst a poor internet connection gives you the macOS Ventura Won't Install error message.
Check if your internet connection is stable or not. If it's not, try to sit close to the router or reconnect the internet. The best solution for a poor internet connection is to enable and disable the flight mode to re-establish the connection.
Fix 4. Restart Mac and Check Again
If you weren't prompted with any specific error messages during the installation process, but macOS Ventura won't install, you can try to restart your Mac. And here's how you can do so without just holding down the power button until your Mac turns itself off and then back on again. Follow the steps given below to restart your Mac:
Step 1. Click on the Apple logo at the top-left corner of the home screen
Step 2. Select the Restart option in the menu that appears
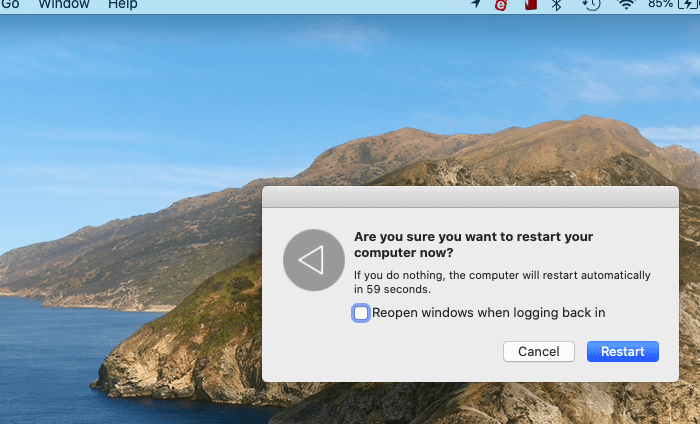
Step 3. Your Mac will now restart. Please wait for it to complete the reboot process. Afterward, head over to download Ventura and check whether the problem persists.
If minor issues like cache are interfering, then it will be resolved. However, if not, there would be an issue with Firewall configurations. The following method will help you with it!
Fix 5. Check the Firewall Settings
Often Firewall settings hinder installing macOS Ventura on the device leading to the error message. A specific Firewalls Settings is the leading cause; resolving it will help. Follow the steps given below to check Firewall settings on Mac:
Step 1. Click on the Apple logo at the top left corner to open the Menu
Step 2. Select System Preferences from the drop-down menu
Step 3. Navigate to Security and Privacy
Step 4. Go to Firewall
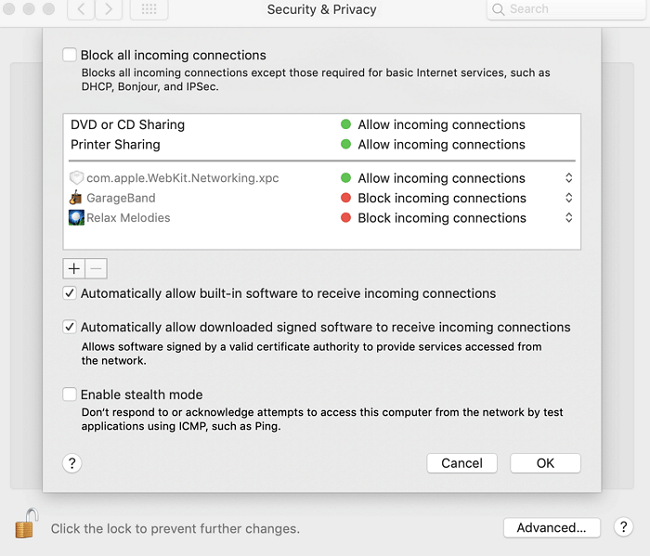
Step 5. Click on the Block Incoming Connections checkbox to uncheck it.
Besides, enable the Automatically Allow Embedded Software to receive incoming connections option to resolve it. If you are not using Firewalls or there's nothing wrong with its Settings, there would be a problem with updates. The following method will help you resolve it.
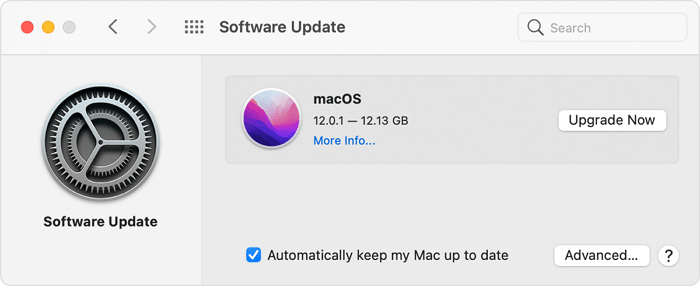
Fix 6. Check for Updates to Upgrade to Ventura Again
If your Mac software is already outdated, directly installing a Ventura update can be troublesome, leading to the error message. Apple brings in new patches and debugs its former software and brings in more recent updates. Hence, older software would make it difficult for you to install Ventura. All you have to do is check if an update is available on your current macOS. If yes, you should update the software and install the new release "Ventura."
Here's how you can get a software update before proceeding with Ventura:
Step 1. Head over to Apple Menu
Step 2. Click on Software Update from the drop-down menu
Step 3. You would then see an update if it would be available. Click on the Download and Install option to proceed. Let your Mac complete with the update and later install macOS Ventura.
Rather than relying on the inbuilt software feature, you can download from macOS from the App Store.
Fix 7. Install macOS Ventura from Mac App Store
Apple has made all its updates and releases available in the App Store. So, if it doesn't appear in the updates section or when you encounter the Can't Install macOS Ventura error when you do so from the updates section, then the App Store helps. You can download it from there and eliminate the Ventura issue.
Follow the steps given below to install macOS Ventura from Mac App Store:
Step 1. Go to App Store on your Mac
Step 2. Type macOS Ventura in its search box and press the Get button
Step 3. You might be asked to enter your Apple ID credentials. Then, click OK and wait for App Store to complete the installation.
Step 4. You will find macOS Installer Ventura Application. Run it, and then follow a procedure to update Ventura.
If it does not let you resolve the problem, then the following method will help you!
Fix 8. Delete the Installer App and Try Again
You would have downloaded the Ventura Installer app, which would not have helped you. Therefore, it is advisable to delete the Installer application and Try Again in such a scenario. You can delete it in the same manner by which you uninstall apps.
Here's how you can delete the macOS Ventura Installer app:
Step 1. Go to Finder and click on Applications from the left pane
Step 2. Navigate to macOS Ventura and drag that toward the Trash icon to uninstall
Step 3. Click on the Trash icon and empty it
Step 4. Reboot your device
Emptying Trash will let you ensure clear any kind of clutter associated with macOS Ventura that the Installer app would have brought. Now, you should check for the Software Updates section and move over to install it again.
You would have installed Ventura by now! If not, then the last fix is the ultimate rescue for you.
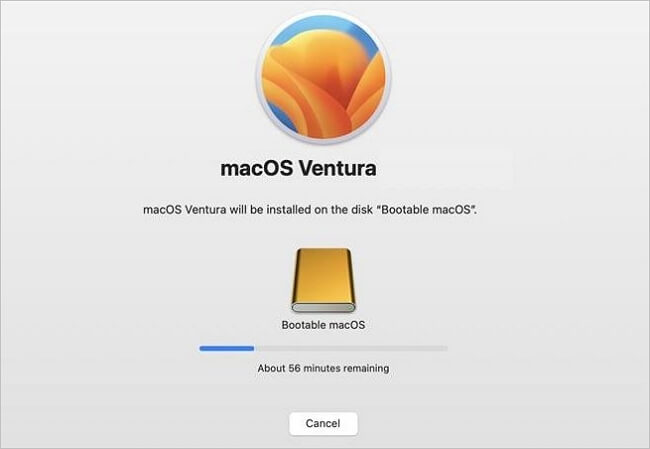
Fix 9. Install macOS Ventura from Recovery Mode
Using the Recovery Mode is the ultimate rescue to tackle the Ventura can't install error. You can switch to Recovery mode and then install the macOS Ventura. However, recovery Mode might seem tedious, and its steps vary for Intel Macs and Apple Silicon Macs (Apple M1 chip, M2 chip).
Install macOS Ventura using Recovery Mode on Apple Silicon (M1/M2 Mac):
Step 1. Turn on your Mac and hold the Power button till the time you do not see Startup Window
Step 2. Click on the gear-shaped icon to see the Options and select the Continue option
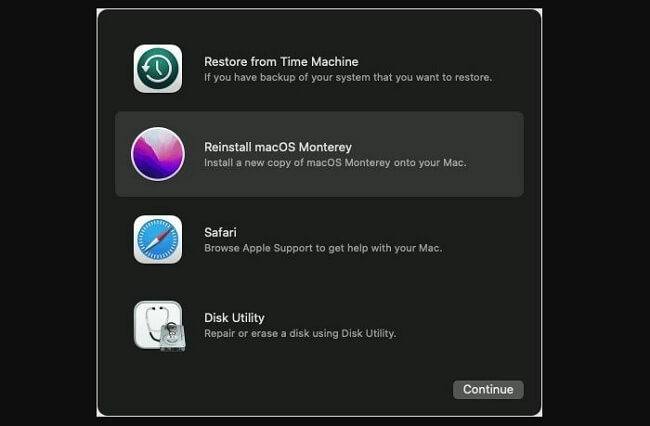
Install macOS Ventura using Recovery Mode on Intel Macs:
Step 1. Press and hold the Power and Cmd R keys simultaneously
Step 2. Release the keys when the Apple logo comes up
Step 3. Mac now opens in Recovery Mode. You will now be prompted to install a release to the macOS. Afterward, your Mac will restart to install Ventura.
Bonus Tips: How to Recover Data After macOS Ventura Install
Amidst the Ventura installation error, you might have a data loss. In such a scenario, it would help if you could restore all your files after a data loss. A reliable and effective throw party tool like EaseUS Data Recovery Wizard for Mac is the best option to fetch your data back.
The most surprising aspect is that you can recover files after accidental deletion and in situations like cleaning the Trash bin.
Here's why Apple users love the data recovery solution:
- It restores missing photos after macOS Ventura update and also supports music, videos, etc.
- You can recover permanently deleted files on Mac, MacBook, iMac, etc.
- It's a robust app with incredible features and is easy to use.
- It supports unsaved Word document recovery on Mac and other unsaved files.
Using the tool is easy-peasy. Issues with Mac can happen anytime. Sometimes System Failure can also be a leading cause of losing all your data. The EaseUS Data Recovery Wizard for Mac helps.
Step 1. Search for lost files
Select the disk location to search for lost files (it can be an internal HDD/SSD or a removable storage device) on macOS Sierra, High Sierra, Mojave, Catalina, Big Sur, Monterey, Ventura, and the latest Sonoma. Click the "Search for lost files" button.

Step 2. Go through the scanning results
EaseUS Data Recovery Wizard for Mac will immediately scan your selected disk volume and display the scanning results.

Step 3. Select the file(s) and recover
In the scan results, select the file(s) to preview and click the "Recover" button to have them back.

The Conclusion
You will get your answer if you check out Can't Install macOS Ventura. The common causes of the error include compatibility issues with Mac and Ventura, poor internet, low Storage Space, or a down Apple Server.
You can thus check Ventura's compatibility, fix a poor internet and see if you have 26-44GB of free space. During the error or while you are tackling it, you can end up losing your data. But do not panic! Here, we recommend using the EaseUS Data Recovery Wizard for Mac, and you can thus restore your data in a few clicks.
Mac Won't Update FAQs
If you still have problems with the macOS update, read the FAQs below to get additional help.
1. What to do if macOS can't be installed?
Switch off your Mac and again begin installing macOS. Besides, also check that your Mac should not be low on storage space. If that's the case, then clear some memory and try again.
2. Does updating macOS delete everything?
Usually, updating macOS will not remove data or erase the hard drive. Get more information here - does updating macOS delete everything?
3. Is my Mac too old to update?
If you have not received MacOS updates for a long time, there is a higher probability that Mac is too old to update. It mostly happens if your Mac is older than seven years.
4. How to Install the macOS 13 Ventura?
To install macOS 13 Ventura, you should go to System Preferences from the Apple Menu. Check out for Software updates and wait till the macOS Ventura shows up. Now, click to download it. Alternatively, you can also visit the App Store, download macOS Ventura and run the app to install.
Was This Page Helpful?
Dany is an editor of EaseUS who lives and works in Chengdu, China. She focuses on writing articles about data recovery on Mac devices and PCs. She is devoted to improving her writing skills and enriching her professional knowledge. Dany also enjoys reading detective novels in her spare time.
Brithny is a technology enthusiast, aiming to make readers' tech lives easy and enjoyable. She loves exploring new technologies and writing technical how-to tips. In her spare time, she loves sharing things about her game experience on Facebook or Twitter.
Related Articles
-
How to Choose and Set the Roku SD Card Format [2025 Best Ways]
![author icon]() Cici/2026-06-30
Cici/2026-06-30 -
How to Fix Raspberry Pi Not Booting [4 Efficient Solutions]
![author icon]() Cici/2025-07-10
Cici/2025-07-10 -
How to Fix Minecraft OpenGL Errors [Full Guide]
![author icon]() Daisy/2025-07-04
Daisy/2025-07-04 -
How to Format Unallocated Disk [Step-by-Step Guide]
![author icon]() Cici/2025-07-10
Cici/2025-07-10
EaseUS Data Recovery Services
EaseUS data recovery experts have uneaqualed expertise to repair disks/systems and salvage data from all devices like RAID, HDD, SSD, USB, etc.