macOS Ventura is making waves as of late. But what happens if you face problems installing it? Apple has a reputation for releasing visually appealing and feature-rich operating systems. It was no different when Apple announced the same upgrade path for many mac devices with their latest and advanced macOS Ventura at WWDC 2022.
It introduced many new exciting features, such as Stage Manager, Continuity Camera, using the iPhone camera as your webcam, etc. However, the main culprit here is that many users faced problems when the macOS 13 Ventura installation failed. In this article, we will talk about the reasons behind this problem. And what we can do to fix or avoid this issue. So, let's dive right into it.
- 1. Force to Restart Your Mac
- 2. Reset PRAM/NVRAM
- 3. Free Up Disk Space
- 4. Restart Mac in Safe Mode
- 5. Redownload and Install macOS 13
macOS Ventura Won't Install, How to Fix?
Apple released macOS Ventura recently. Introduced earlier this year, it's the latest and most feature-rich Mac operating system. However, the issue behind it could be caused by many different things, but we'll discuss that later.
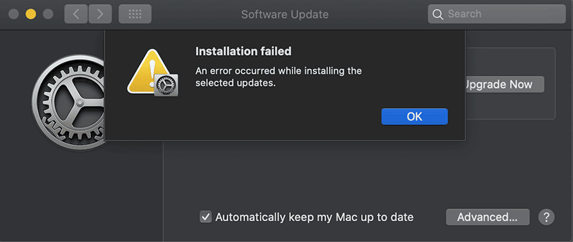
For now, the installation might be stopped because of a bad connection or lack of storage. As a result, the users see continuous failed attempts at installing or updating their Macs to the latest operating system.
The problem has occurred to many users, and in the early days, it was caused by some issues with updating servers - because of traffic. But, as time passed, many of those users could install it. Yet, some still face this problem today. So, let's keep digging to understand what causes it and how to fix it.
Why Does macOS 13 Ventura Installation Fail
As mentioned before, in the early days of this update, many users couldn't download it because of busy servers. However, the users still facing this issue could be caused by some reasons. Some of the major reasons behind that include:
1 - Incompatibility
If your device is incompatible with the latest updates, it won't install on your Mac. So, you need to have at least these sets of devices:
- Apple iPhone 11, XR, or later
- Mac Pro 2019, iMac Pro 2017 or later, MacBook Air 2018 or later
- MacBook Pro 2017 or later, MacBook 2017 or later
- Mac Mini 2018 and later
So, if you don't have one of these devices, it's futile to try and download it before installing it.
2 - Not enough storage space
The other major reason behind the failing updates is the lack of storage. Remember, the installer update is around 12GB. But, many experts recommend that you have at least double or more free to install it properly. So, you need at least 25-30 GB free on your storage to install it.
3 - Wrong installation package
This error is also common since many devices that don't support it might download it but fail to install it. This problem tails back to the fact that the device you're trying to install is just not compatible with the latest Mac outing. So, it's futile to try once again.
5 Ways to Fix macOS 13 Ventura Installation Failed
Suppose you're looking to fix your Ventura installation failing despite having a lot of storage and a compatible device. In that case, we'll look through some fixes in this section. You can check out this video, where you can find each solution, such as:
- 00:13 Force Restarting Your Mac
- 00:50 Resetting PRAM/NVRAM
- 01:55 Freeing Up Disk Space
- 02:09 Restart Mac in Safe Mode
So, if you don't want to watch the video, let us spell it out for you. To prevent unneeded data loss, you should back up your vital files using EaseUS data recovery software beforehand.
Back Up Your Mac and Never Lose Data
Back up and restore your MacBook/iMac without Time Machine, iCloud, or external hard drives.
Here are five possible fixes for this issue:
Fix 1. Force to Restart Your Mac to Fix macOS 13 Ventura Installation Failed
The first thing you can do is force-restart your Mac. There are a lot of times when the cache build up and other things get in the way, and a simple restart can do the trick. So, here's what you should do:
- Press the power button and hold it for 10 seconds
- Wait for the Mac to turn off
- Wait for 10-15 seconds
- Press the same button to power your Mac back on
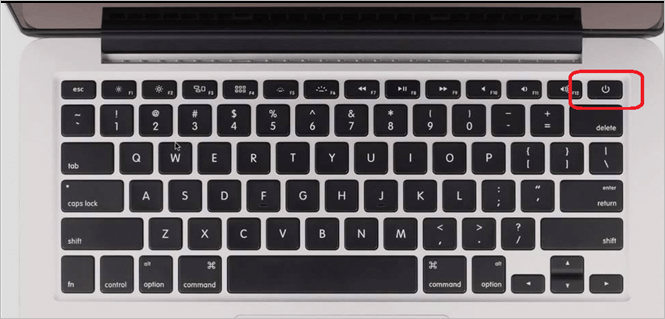
It's important to note that you need to disconnect everything external from your Mac before doing this, such as external drives, a keyboard, a mouse, or any other device. Once you do this, the problem will likely fix itself for compatible Mac devices.
Fix 2. Reset PRAM/NVRAM to Fix macOS 13 Ventura Installation Failed
The next thing you can do is reset the PRAM/NVRAM on your Mac. To do this, you'll have to follow a few steps such:
- Turn off your Mac device
- Turn it back on but immediately press and hold Command + Option + P + R
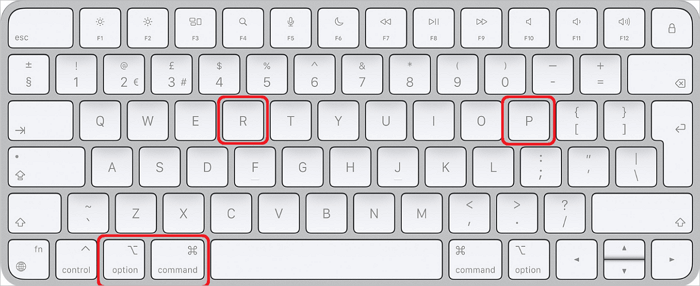
- Wait until your Mac reboots again
- Wait until the Apple logo flashes
- Wait for it to reboot into the desktop
This will reset your NVRAM/PRAM and restart your OS on the desktop. After that, trying to download and install macOS13 Ventura might be smooth.
Fix 3. Free Up Disk Space to Fix the Failed Installation
As mentioned before, you need to delete some files to make up at least 25-30GB of storage in your Mac device. So, you'll have to free up space by:
- Deleting temporary files, unneeded downloads, large files, etc.
- Copying files to another/external storage
- Backing up files to another device
This will ensure that your files are safe and secure while your Mac has enough space to update. Therefore, you'll have to focus on freeing up space for this to work.
Fix 4. Restart Mac in Safe Mode
This part of the fix depends on the Mac you're using. So, if an Apple processor powers it, the process will differ from an Intel-based one. Here's a breakdown of the two:
Apple Silicon-Based:
- Turn your Mac off and wait for it to shutdown
- Press and hold the power button until you see "loading startup options".
- Select the volume (of your OS)
- Press the shift key and hold It as you click "Continue in Safe Mode".
- Wait for the PC to restart in Safe Mode.
Intel Silicon-Based:
- Turn the Mac off or restart it while pressing the shift key
- Log into your Mac account
- Log in again if asked for it
- Press Safe Boot when you can see it in the menu bar
Remember, use only the process relevant to your computer and silicon.
Fix 5. Redownload and Install macOS 13 Ventura
One of the significant reasons behind failing installations could be the update methods provided by Apple. So, you can download and manually install macOS 13 Ventura on your Apple device. So, if it's compatible and there's enough space on it, here's what you need to do:
- Head to the Mac App Store
- Look for macOS Ventura
- Find the page and press the Get button
- You'll be prompted for Apple ID and Password - enter them
- Wait for the download to finish
After you're done, you can find the installer in the Applications folder in Finder. Then, double-click the application installer, and it'll finish updating your Mac to the latest.
Bonus Tips: How to Recover Data After macOS 13 Installation
Once you're done recovering or fixing the issue with macOS 13 Ventura installation, you might need a bit of data recovery. Because of installation errors, losing data is a common problem in many Mac devices.
That's why you need to use a professional data recovery tool to avoid this problem. For that, you have EaseUS Data Recovery Wizard for Mac. This outstanding and professional recovery tool is all everyone needs to ensure swift and thorough recovery of their lost files. The reason you need this one for recovering data is that:
- It recovers missing photos after macOS Ventura update, system crash, or virus attack.
- It recovers deleted files on Mac, or files lost in a system crash, virus attack, operation error, etc.
- It thoroughly recovers files lost when macOS is wrongly restored or installed.
- It recovers Word document not saved on Mac due to installation failure.
These factors make it an ideal tool for recovery. So, if you want to use it, here's how you can:
Step 1. Select the location
Select the disk where you lost data after updating to macOS Sonoma/Ventura/Monterey/Big Sur. Then, click "Search for lost files".

Step 2. Find lost data after the scan
EaseUS Data Recovery Wizard for Mac will immediately scan your selected disk volume and display the scanning results on the left pane. Use the file type and file path to find wanted data on Mac.

Step 3. Recover data after macOS update
Select the target files that were unknowingly lost during or after the update and click the "Recover" button to get them all back.

Conclusion
These are some of the most renowned ways of fixing installation issues with macOS 13 Ventura. Not only do you need to ensure your mac device is compatible with this update, but you also need to ensure that you have enough space for it. So, once you successfully install the latest OS, use EaseUS Data Recovery Wizard for Mac to restore any lost files or data.
macOS 13 Ventura Install Is Stuck FAQs
If you've got further questions, then check out our FAQs section:
1. Why does the macOS Ventura download fail?
The most common reason behind this is that your Mac device might not be compatible with the latest update. If it is, then you might not have enough storage, or your internet might not be working properly.
2. How to fix an unstable macOS Ventura on Mac?
The easy step is to redownload the update using the method shared in this article. This will allow you to ensure a fresh installation of the latest update by Apple.
3. What is the latest macOS version?
The latest version of macOS is Ventura or macOS 13 Ventura.
4. How to fix macOS 13 Ventura upgrade failed?
To fix the macOS Venture upgrade failed:
- 1. Restart Your Mac
- 2. Run a Virus Scan
- 3. Check the Internet Connection...
Was This Page Helpful?
Dany is an editor of EaseUS who lives and works in Chengdu, China. She focuses on writing articles about data recovery on Mac devices and PCs. She is devoted to improving her writing skills and enriching her professional knowledge. Dany also enjoys reading detective novels in her spare time.
Brithny is a technology enthusiast, aiming to make readers' tech lives easy and enjoyable. She loves exploring new technologies and writing technical how-to tips. In her spare time, she loves sharing things about her game experience on Facebook or Twitter.
Related Articles
-
How to Turn off The Firewall in Windows 10 [A Complete Guide]
![author icon]() Daisy/2025-07-04
Daisy/2025-07-04 -
[Quickly & Easily] How to Update BIOS with USB in 2025
![author icon]() Jerry/2025-07-04
Jerry/2025-07-04 -
How to Fix macOS Sonoma Freezing and Crashing
![author icon]() Brithny/2025-09-17
Brithny/2025-09-17 -
How to Mirror a Hard Drive in Windows 10 [step by step]
![author icon]() Tracy King/2025-12-31
Tracy King/2025-12-31
EaseUS Data Recovery Services
EaseUS data recovery experts have uneaqualed expertise to repair disks/systems and salvage data from all devices like RAID, HDD, SSD, USB, etc.