In this article, you'll learn:
- Recover Photos After macOS Sonoma Update [Safe and Quick] 🔥
- Repair Mac's Photo Library to Find Missing Photos
- Recover Disappeared Photos After macOS 14 from iCloud
- Fix Photos Disappeared After Update with Trash on Mac
- Retrieve Lost Photos After Update from Time Machine
- Find Original Photographs from Library After Update
macOS Sonoma has recently made headlines. But what if you have trouble installing it? Apple is known for producing visually stunning and feature-rich operating systems. However, not everyone was pleased with the macOS Sonoma upgrade. Some users were taken aback when they discovered that their Photos app included no pictures, neither in the "Recently Deleted" folder nor in the "Import" area.
Don't freak out if you happen to run into the same problem. There are various methods for recovering missing photos after the macOS Sonoma update. Of course, you can recover missing files more than photos by learning the linked page below.
How to Recover Deleted Files on macOS Sonoma
We will introduce five ways to recover deleted files on macOS Sonoma. You can recover files from Trash, Time Machine backup, iCloud, or with EaseUS Data Recovery Wizard for Mac.
#1 [Quick] Recover Photos After macOS Sonoma Update
| ✅Applies to: recover deleted photos that are not overwritten | ⏱️Time: 5 mins |
You may require data recovery after updating to macOS 14 Sonoma installation. Due to installation difficulties, data loss is a typical problem in many Mac devices.
The quickest and most straightforward approach to recover lost photos after a macOS update is to use a data recovery application. A safe and professional tool can save Time and restore more valuable data to your MacBook Pro or Air.
EaseUS Data Recovery Wizard for Mac is the most valuable software among the products in the market. It is a powerful data recovery software capable of scanning and recovering lost photographs with the macOS Sonoma update.
Why you should choose EaseUS:
- 🔧It retrieves deleted images following a macOS update, a system crash, or a virus attack.
- 🔙It restores deleted files on Mac and files lost due to a misoperation, malware attack, macOS error, etc.
- 💿Mac data recovery: it supports not only laptops but also devices such as HDD, SSD, memory cards, and so on.
- 🧑When assistance is required, a remote IT specialist team is available.
This software is a trial version that allows you to scan and preview all lost photos for free. After confirming that this software works, you can pay to restore the missing photos.
Step 1. Select the location
Select the disk where you lost data after updating to macOS Sonoma/Ventura/Monterey/Big Sur. Then, click "Search for lost files".

Step 2. Find lost data after the scan
EaseUS Data Recovery Wizard for Mac will immediately scan your selected disk volume and display the scanning results on the left pane. Use the file type and file path to find wanted data on Mac.

Step 3. Recover data after macOS update
Select the target files that were unknowingly lost during or after the update and click the "Recover" button to get them all back.

#2 Repair Mac's Photo Library to Find Missing Photos
| ✅Applies to: photos are unreadable but still exist in Photo Library | ⏱️ Time: several hours |
The Photo Library is the database that stores all photo files and the data for pictures on your Mac. Suppose you can see the library folder without photos after updating to the macOS Sonoma. In that case, it may have become corrupted due to the incompatibility. However, the macOS allows users to repair Photo Library on Mac when photos or photo albums are disappeared for no apparent reason, become unreadable, or missing.
Here are the steps:
Step 1. If the Photos app is open, close it.
Step 2. While re-opening Photos, hold down the Option and Command keys.

Step 3. To restore lost photographs on Mac after an upgrade, click "Repair" on the pop-up Repair Library window. (An account and password may be required to authorize Library Repair.)
Step 4. Wait for the Repair process to complete before opening your photo library and inspecting your photos.
#3 Recover Disappeared Photos After macOS 14 from iCloud
| ✅Applies to: recover photos that are syncing with iCloud | ⏱️Time: 10 minutes |
iCloud is a cloud-based service that allows Mac users to store and retrieve photos from any device. It provides 5 GB of free storage and allows customers to purchase more storage if necessary. If you have enabled iCloud, you can look for a missing photo through iCloud Photos.
Step 1. On a Mac, go to the iCloud official website and log in with entering your Apple ID and password.

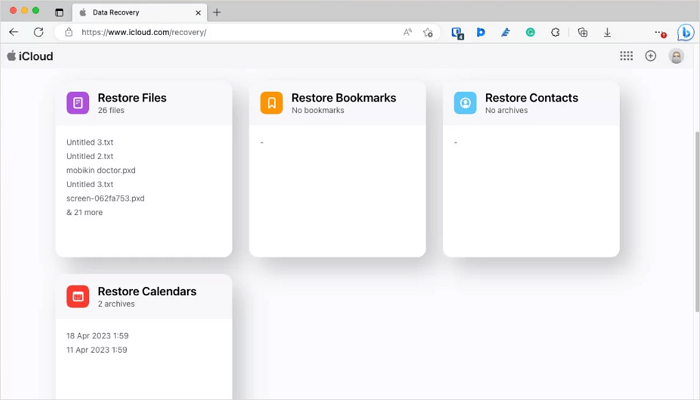
Step 2. To find Data Recovery, scroll down and select the "Data Recovery" option or click the dots in the upper-right corner.
Step 3. On macOS 14, you can recover Mac's deleted photos, bookmarks, and calendars recently. Make your decision and save the files to your MacBook Pro/Air.
#4 Fix Photos Disappeared After Update with Trash on Mac
| ✅Applies to: photos are unreadable but still exist in Photo Library | ⏱️ Time: several hours |
Don't worry if you updated to macOS Sonoma and lost your photos. You may have accidentally deleted or relocated images from your Mac's hard disk or desktop to the Trash. As a result, you can easily undo empty Trash Mac and restore deleted photos.
Step 1. Launch Finder and select the "Go" option at the top of the screen.
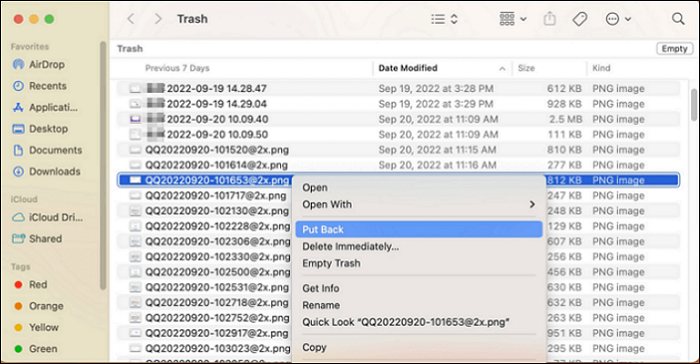
Step 2. Choose "Go to Folder" and enter "/.Trash". This will open the Trash folder.
Step 3. If you see any lost photos here, select them and click "Put Back" to restore them.
Let us learn more ways to recover missing photos after the macOS Sonoma update. Moreover, don't forget to mark this passage by sharing it on Facebook, Twitter, or SNS.
#5 Retrieve Lost Photos After Update from Time Machine
| ✅Applies to: Macs have enabled Time Machine backup before | ⏱️Time: 15 minutes |
Apple's backup solution for the Mac is the Time Machine application. If you have Time Machine backup enabled, you can restore deleted data on Mac from a recent backup no matter when you have emptied the Trash bin. This method is worthless if no backup has been made previously. If you need help to retrieve permanently erased files without a backup, use the Mac deleted file recovery application.
Step 1. Launch Time Machine. You can find it in the Applications folder or by using Spotlight to search for it.

Step 2. Scroll the Timeline at the bottom and right corner of your Mac's screen to identify the date of your photo backup.
Step 3. To find the correct backup version, click the up icon next to the Time Machine window. You can double-click a photo or image to see if it is one of your missing photos.

Step 4. Press the "Restore" button. Time Machine will begin returning your lost images to their original location.
#6 Find Original Photographs from Library After Update
| ✅Applies to: photos are unreadable but still exist in Photo Library | ⏱️ Time: several hours |
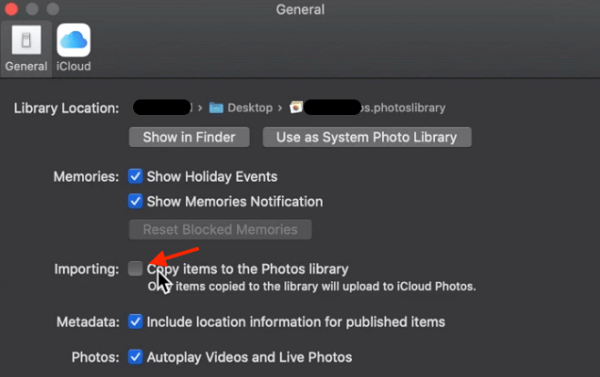
Sometimes we don't get the right setting for our Photos app, such as leaving "Copy items to the Photo library" unchecked, so when we view our photos in Photos but later move them to an external hard drive after a Mac update, when we want to recheck the photos, they become "missing" on your Mac because the original ones are not found. In this instance, we should use Consolidate to restore the missing images.
Step 1. Launch the "Photos" app, navigate to "Preferences" > "General", and select the checkbox next to "Copy items to the Photos library."
Step 2. Continue with "Find Original" after clicking on one of the "missing" photos, then navigate to the drive or folder containing the original photos.
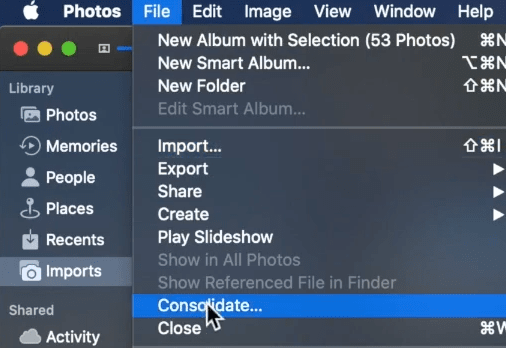
Step 3. Pick all of the original photographs and go to "File" > "Consolidate". The photos will no longer be referenced and saved on an external hard drive; they will be relocated to your photo library.
Conclusion
One of the most upsetting things is losing important images after the macOS Sonoma update. While it is hard to prevent all mishaps, several precautions can be taken to reduce the chance of losing photos. For example, backing up files regularly to an external hard drive or a cloud storage service is critical. The photographs will remain safe even if a laptop is lost or stolen.
Furthermore, if you lose them forever, utilizing iCloud or Mac data recovery software is a good idea to recover lost, deleted, or missing images, videos, and files.
Missing Photos After macOS Sonoma Update FAQs
Here are 4 additional questions about recovering missing photos after the macOS Sonoma update. Check here for the answers.
1. Why did all my photos on my Mac Pro disappear?
By default, MacOS hides some files and directories from its users. As a result, this could be one of the causes of images disappearing from your Macbook Pro. For those who are unaware, Finder is Mac's default file manager.
2. How to upgrade to macOS 14 without losing files?
You should thoroughly back up your Mac machine to upgrade to macOS 14 without losing data. You can back up your files to an external hard drive or upload them to iCloud. Data recovery software will come in handy when you don't have any backups.
3. Why did my photos disappear on my iPhone?
Ensure the Hidden album is set on to see any missing photographs or videos. If you utilize iCloud Photos, any photos you hide on one device will also be hidden on all other devices.
4. How to fix the macOS 14 Sonoma upgrade failed?
When your macOS 14 of Sonoma's upgrading is failed or not working, try the methods below:
- Force to restart the Mac devices
- Hard Reset PRAM or NVRAM
- Free up your Mac's disk space
- Boot the Mac in Safe Mode
- Redownload and Install macOS 14
Was This Page Helpful?
Jaden is one of the editors of EaseUS, who focuses on topics concerning PCs and Mac data recovery. Jaden is committed to enhancing professional IT knowledge and writing abilities. She is always keen on new and intelligent products.
-
EaseUS Data Recovery Wizard is a powerful system recovery software, designed to enable you to recover files you’ve deleted accidentally, potentially lost to malware or an entire hard drive partition.
Read More -
EaseUS Data Recovery Wizard is the best we have seen. It's far from perfect, partly because today's advanced disk technology makes data-recovery more difficult than it was with the simpler technology of the past.
Read More -
EaseUS Data Recovery Wizard Pro has a reputation as one of the best data recovery software programs on the market. It comes with a selection of advanced features, including partition recovery, formatted drive restoration, and corrupted file repair.
Read More
Related Articles
-
Macintosh HD Download? Restore, Reinstall & Recover Data
![author icon]() Daisy/Jun 30, 2026
Daisy/Jun 30, 2026 -
Fusion Drive Recovery: How to Recover Data from Fusion Disk
![author icon]() Brithny/Apr 08, 2026
Brithny/Apr 08, 2026 -
How to Install MacOS Tahoe 26 Easily & Quickly
![author icon]() Finley/Jun 14, 2026
Finley/Jun 14, 2026 -
AutoRecovery Word Mac: How to Turn on AutoRecovery on MacBook Air/Pro
![author icon]() Brithny/Jun 30, 2026
Brithny/Jun 30, 2026