
Before we begin
A smooth workflow begins with reliable files. Ensure your videos, documents, photos, and audio are always intact and ready to support your daily tasks..
Start your free EaseUS Fixo trial today and discover the difference this all-in-one file repair tool can make. Also, read the below troubleshooting tips to solve file corruption issues.
![]() With EaseUS Fixo, keep your digital files error-free and fully functional—so you can focus on what matters most.
With EaseUS Fixo, keep your digital files error-free and fully functional—so you can focus on what matters most.
All images copied or transferred from the iPhone or a memory card are gathered and stored by Mac in the Photos Library. You can find the Photos Library in the Pictures folder on a Mac, and the Photos app can then be used to preview these pictures.
However, many Mac users have complained that when they run Photos on Mac, they see the "Photos must quit because the photo library has become unavailable or its data is corrupt" error message. Why did the error happen? In this article, we will explain the 5 solutions about how to repair photo library on Mac.
The potential causes of the photo library error:
- 🍎You didn't update your macOS or other Apple device.
- 🔌Too many peripheral devices are connected to your Mac.
- 🦠You are under a virus or malware attack on your macOS.
- 🔼The launching of the Library failed or is missing the thumbnails.
How to Repair Photo Library on Mac
Fixing a damaged photo library on a Mac may not be as complicated as it first appears. Here are five simple ways to repair a photo library on Mac. Try these out to quickly fix your problem.
- Method 1. Use Mac Photos Library Repair Tool
- Method 2. Rebuild Library on Mac
- Method 3. Repair Damaged Photos on Mac
- Method 4. Update macOS to Repair the Photo Library
- Method 5. Use Disk Utility to Repair Photo Library
Method 1. Use Mac Photos Library Repair Tool
If your Photos library doesn't open or the Photos application is corrupted, try using the Photos Repair Library tool on a Mac. You must use the following methods to access the Photos Repair Library on your Mac device:
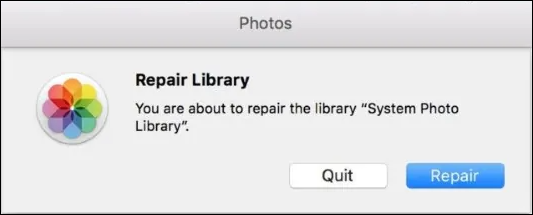
Step 1. If your Photos app is open, click to close it before opening it again.
Step 2. Hold down the Command and Option keys on your keyboard to launch "Photos" when taking a photo.
Step 3. Click "Repair" on the pop-up window to begin the repair procedure. If necessary, enter your account ID and password.
The adjustments can take some time, depending on the size of your Library. The photographs that vanished from iPhoto will emerge in photos once your Mac has finished repairing the Library.
If you can't open or preview your photos on Mac due to corrupted files, click the page below and learn how to repair corrupted files on Mac.
How to Repair Corrupted Files on Mac [macOS Ventura Applicable]
Learn everything there is to know about corrupted files, how to repair them quickly with EaseUS Fixo Document Repair, and further data security advice by reading on.

Method 2. Rebuild Library on Mac
If the first methods fail, you can try to rebuild the photos library on Mac. To do that, you can first watch a video tutorial. The quick navigation is as follows:
- 00:12 - Why would we want to rebuild the Library
- 01:21 - Manually backup your Library
- 01:41 - Duplicate the Library
- 02:45 - Repair the Library
- 03:18 - Delete the temporary copy
- 04:02 - Delete the duplicate Library
To resolve this issue, use Photos Library First Aid on an older version of iPhoto on your Mac. You can use it to recover your iPhoto library database. It allows you to select one of the following four possibilities:
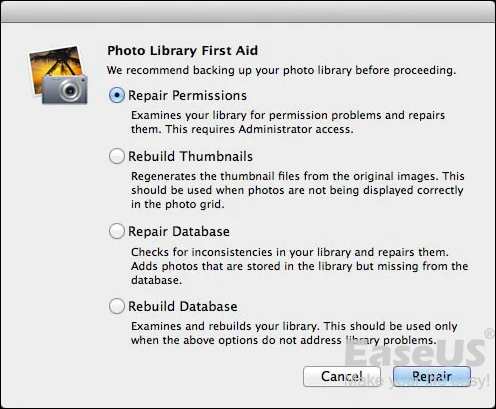
Here are the statements of each selection. Choose one suits you most.
- Repair Permissions: It's possible that files were open at the moment if, for instance, your computer was not turned down properly. This issue is resolved using the "Repair permission" option.
- Rebuild Thumbnails: IPhoto may lack or have damaged temporary photos that it requires. By selecting this, those photos are produced once more.
- Repair Database: If the photographs in your Library don't match what iPhoto believes they should be. iPhoto examines the pictures in the Library and makes the appropriate adjustments to its database.
- Rebuild Database: Use this alternative only if all else fails. However, it could take a while, and you risk losing the data on the pictures or albums. It can explore every alternative before choosing this one.
Depending on your problem, you can choose one of the other options if you need to make additional fixes. It will take some time to finish any restoration or construction, and rebuilding the database and thumbnail typically takes longer than fixing the problem. When finished, your iPhoto Library should function flawlessly.
Method 3. Repair Damaged Photos on Mac
You can tell when an image is corrupted because its colors have altered, there are gray patches, or it can no longer be seen. When you try to open it with Photo Library, a notice claiming that the tool cannot open the file will display.
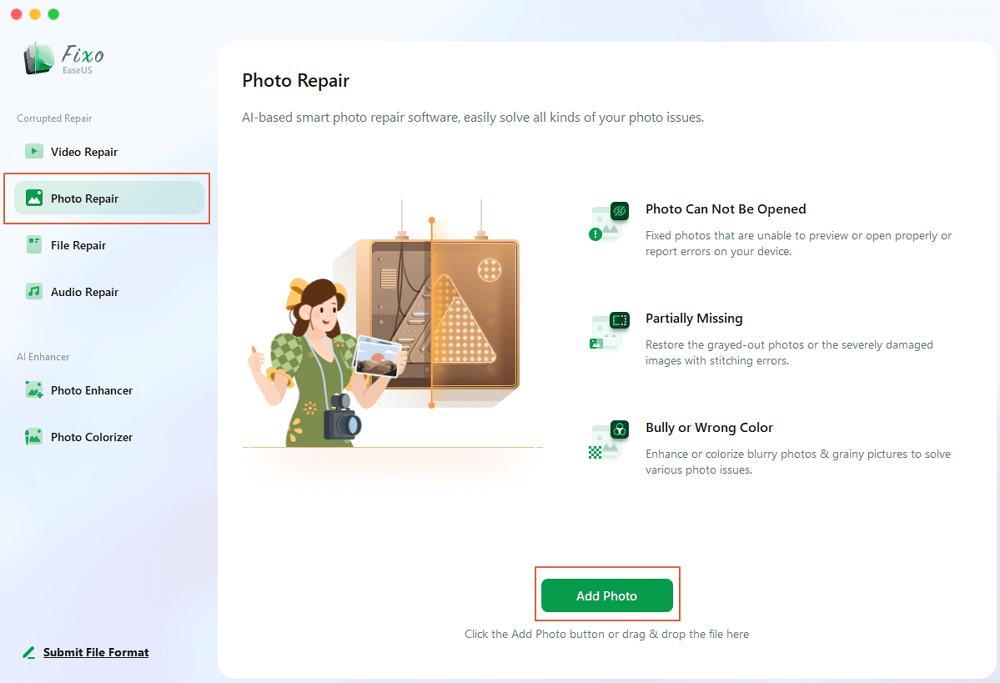
Photo corruption is a common problem experienced by many users, making the data unavailable. Thus, repairing damaged photos can fix the Photo Library as well. We recommend EaseUS Fixo Photo Repair, a professional tool that helps many Mac users.
- Repair the corrupted JPEG files, PNG files, SR2 files, and document types like PDFs and DOCXs.
- On the hard drive of Macs and other connected external storage devices, it facilitates fixing corrupted data.
- This software works with all Macs and external storage devices, including CF cards, external HDD/SSD and more.
Download EaseUS Fixo Photo Repair and follow the steps to repair corrupted photos:
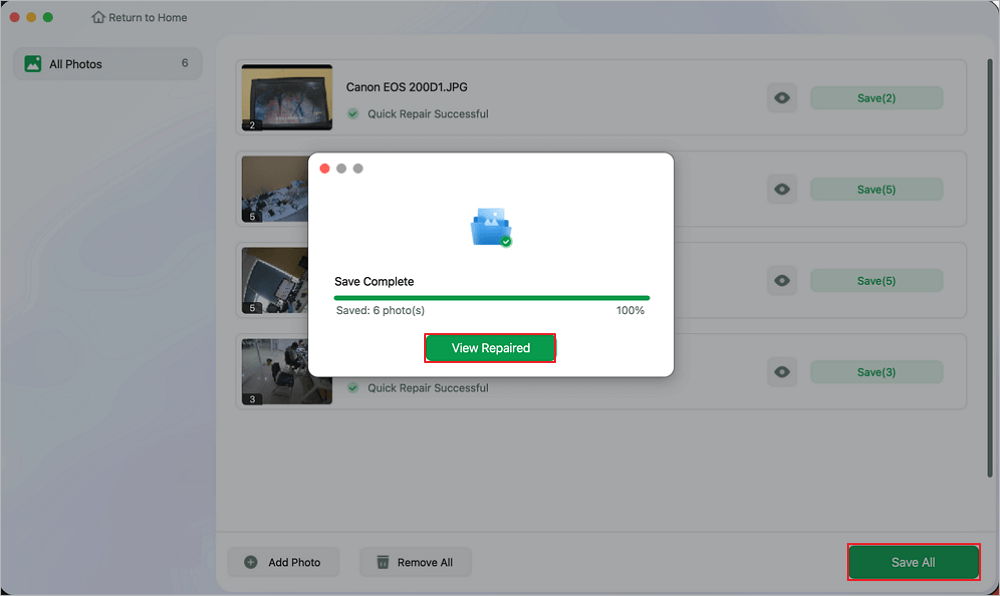
Step 1. Add the Corrupted Images
Launch EaseUS Fixo on your Mac, go to the "Photo Repair" tab and click the "Add Photo" button to add the corrupted images, including JPEG, PNG, JPG, CR3, CR2, NEF, NRW, RAF, etc.
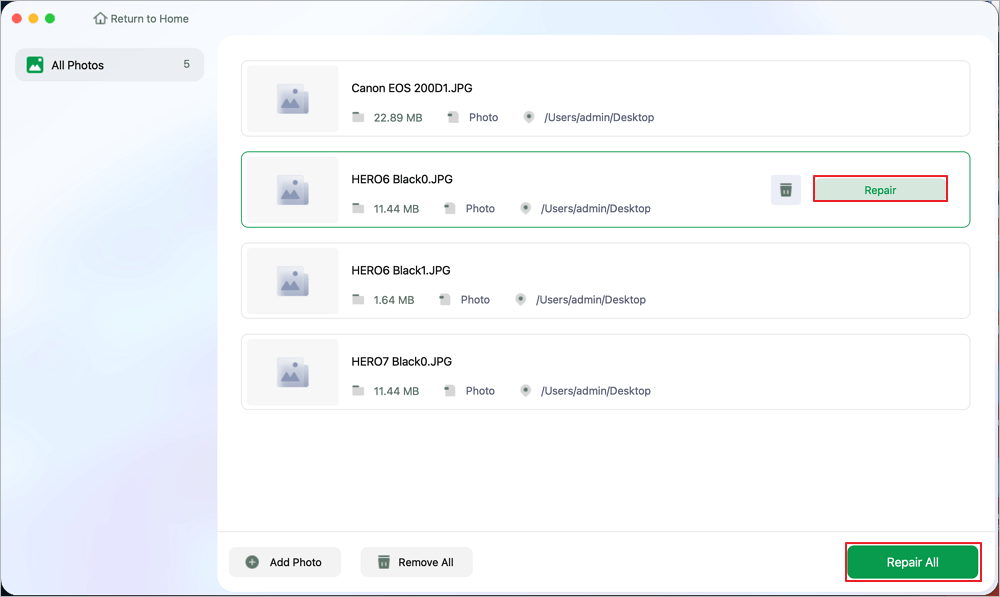
Step 2. Repair the Corrupted Images
Select an image and click the "Repair" button to start the single image repairing process. If you want to repair all the corrupted images, click "Repair All".
Step 3. Save the Repaired Images on Your Mac
Click on the eye icon to preview the repaired images and click "Save" to save them on your Mac. Choose "Save All" to save all the repaired images. Click "View Repaired" to locate the repaired folder.
Share this post on Twitter or Reddit if it is helpful:
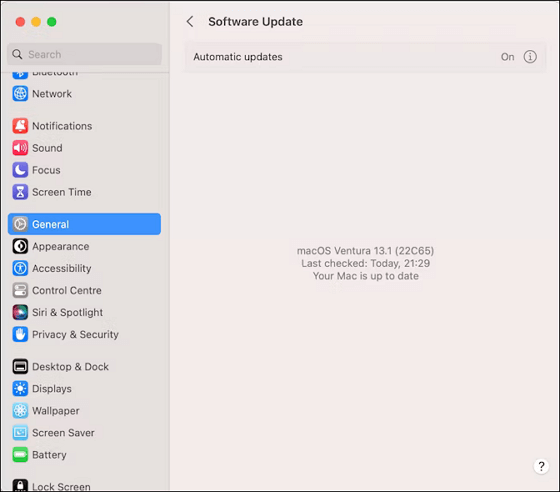
Method 4. Update macOS to Repair the Photo Library
First, use Time Machine or other tools to back up photos on Mac. Running the most recent macOS version will help you resolve various problems related to a corrupted library.
Step 1. To find the macOS Ventura update, navigate to System Preferences > Software Update.
Step 2. Click "Update Now" to start your update and adhere to the onscreen directions.
Method 5. Use Disk Utility to Repair Photo Library
The Mac Disk Utility, found in the utility folder, is essentially the first-aid tool used to determine whether a disk is damaged and start a repair. Additionally, it can be helpful if your Photos collection is damaged. Even if it is not intended to find or fix every issue with the disk. When a problem arises, it is an emergency fix for your disk.
Step 1. Open the Disk Utility application on your Mac.
Step 2. Select "Show All Devices" and choose a disk or volume.
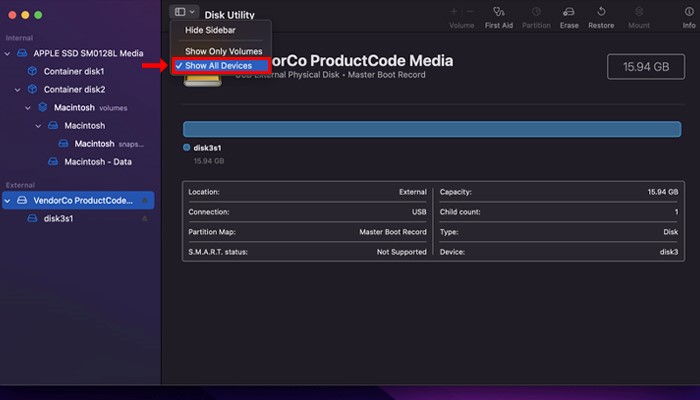
Step 3. Click the "First Aid" option for troubleshooting.
Step 4. Click "Run" to initiate the procedure, then click "Continue".
How to Recover Photos from Library on Mac
If your Mac Photo Library is in trouble, there is a significant risk of data loss. You cannot recover the lost photos from Time Machine if it doesn't keep running and you emptied the Trash after deleting the iPhoto Library.
Try EaseUS Data Recovery Wizard for Mac for assistance if you cannot recover the permanently deleted files Mac. You can directly click the download button for free file recovery if the size of your lost or corrupted files is less than 2GB, including 500 MB available by default and an extra 1.5 GB unlocked after sharing on Facebook and X.
If your Mac photos in Library have already disappeared, try these steps to preview and restore them.
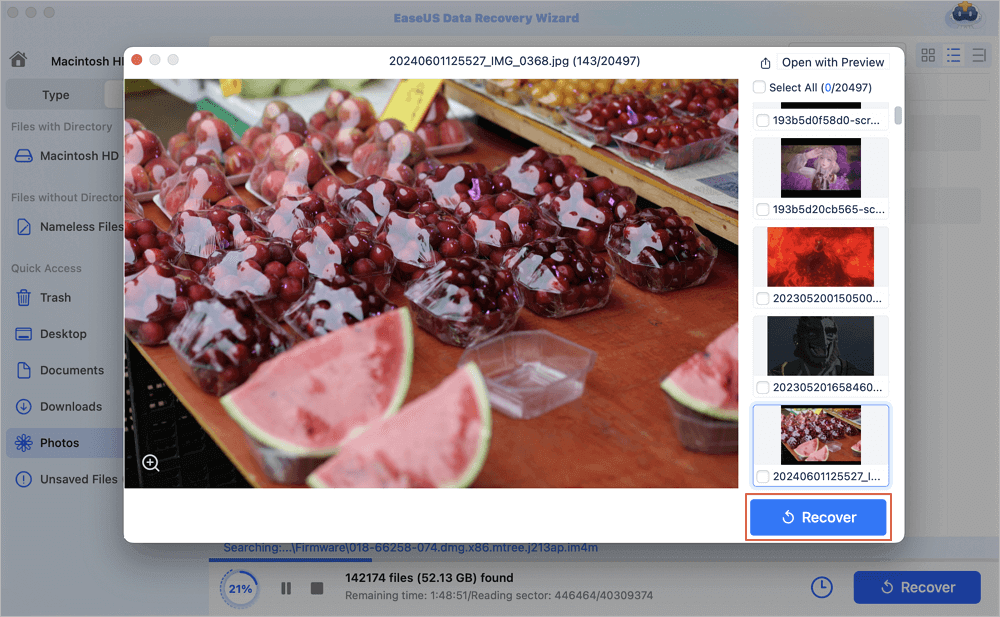
Step 1. Search for lost photos
Launch EaseUS Data Recovery Wizard for Mac, hover the mouse over the system drive where the Photos Library is, and click "Search for lost files".

Step 2. Find pictures from the library
After finishing the scan, click "Photos" under the "Path" tab. All your lost photos will list here.
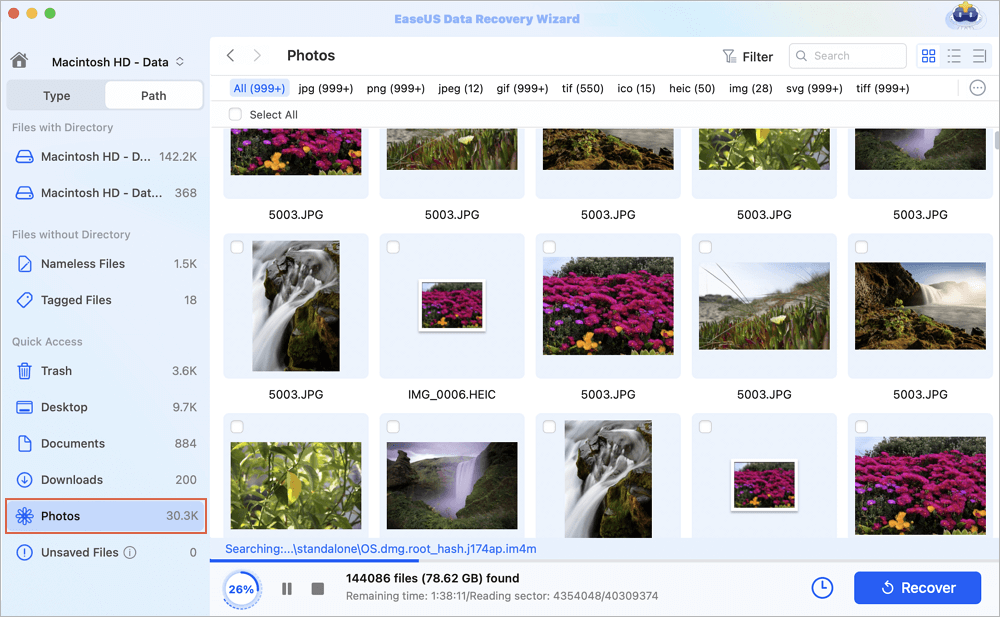
Step 3. Recover photos from the library
Double-click to preview the photo, select the right one and click "Recover" to save the images to another secure location on your Mac.
Final Words
Applications for photo libraries may have issues, including corruption and unintentional photo deletion. These problems show that your Photos app needs to be fixed. Use the above methods to improve the pictures program, and use EaseUS Fixo Photo Repair to recover any destroyed files. Users can preview the files that were discovered as a result of the scanning.
Repair Photo Library on Mac FAQs
Here are 3 additional questions about repairing the photo library on Mac. Check here for the answers.
1. How long does it take to repair the photo library on Mac?
The length of the procedure may vary depending on the quantity, size, and network speed of the photos in your Library. For instance, a 150GB photo library might take around 24 hours. As a result, finishing it requires patience.
2. What should I do when photo library repair fails?
Ensure the location of your photo library is legally yours. To make sure the folder's default structure is readable, use the following procedure since Photos will, by default, create the new Library in your home folder:
- Your Mac should restart in recovery mode.
- Select Terminal under the utility section.
- Enter the command 'resetpassword' into the Terminal.
- In the tool that appears, choose your drive.
- From the drop-down menu, select your username.
- Click the button to reset the rights and ACLs for your home folder.
- Try again after a normal Mac restart.
3. How do I restore my photo library on Mac?
According to the Apple support community, the chances of recovering images from the Trash are often quite slim when you erase the iPhoto Library from a Mac. Here are two techniques to recover your Mac's erased iPhoto Library and its images.
- Recover deleted Photo Library photos on Mac with EaseUS Data Recovery Wizard for Mac.
- Recover deleted Photo Library photos on Mac with Mac Time Machine Backup.
Was This Page Helpful?
Cedric Grantham is a senior editor and data recovery specialist of EaseUS. He mainly writes articles and how-to tips about data recovery on PC and Mac. He has handled 10,000+ data recovery cases and is good at data recovery of NTFS, FAT (FAT32 and ExFAT) file systems, and RAID structure reorganization.
Jaden is one of the editors of EaseUS, who focuses on topics concerning PCs and Mac data recovery. Jaden is committed to enhancing professional IT knowledge and writing abilities. She is always keen on new and intelligent products.
-
EaseUS Data Recovery Wizard is a powerful system recovery software, designed to enable you to recover files you’ve deleted accidentally, potentially lost to malware or an entire hard drive partition.
Read More -
EaseUS Data Recovery Wizard is the best we have seen. It's far from perfect, partly because today's advanced disk technology makes data-recovery more difficult than it was with the simpler technology of the past.
Read More -
EaseUS Data Recovery Wizard Pro has a reputation as one of the best data recovery software programs on the market. It comes with a selection of advanced features, including partition recovery, formatted drive restoration, and corrupted file repair.
Read More
Related Articles
-
How to Fix Disk Utility Found Corrupt Disk Error [Safe Ways]
![author icon]() Jaden/Jun 17, 2026
Jaden/Jun 17, 2026 -
How to Fix Mac Won't Boot After Time Machine Restore
![author icon]() Dany/Jun 17, 2026
Dany/Jun 17, 2026 -
Photos Disappeared from Mac After Update, How to Recover [6 Methods]
![author icon]() Brithny/Jun 17, 2026
Brithny/Jun 17, 2026 -
Word Crashing Repeatedly after macOS Tahoe: How to Fix
![author icon]() Brithny/May 19, 2026
Brithny/May 19, 2026