The common way to delete files on Mac is to move them to Mac Trash, which doesn't delete your files completely, and the deleted files still remain on your Mac, taking up valuable storage space. How to permanently delete files on Mac? Here are the tested methods and user experience:
| Given that this is the most common way to delete files permanently, it is difficult for the average computer user to retrieve the files that disappear after emptying the Trash without using professional data recovery software. | |
| With swift shortcuts, you can permanently delete some private or no longer-needed files. However, you may accidentally delete some important files, and retrieving the files mistakenly deleted by using shortcuts will be difficult. | |
| Permanently delete a file with the Terminal command: you don't even need to locate the file and click it multiple times. But this method is not used for computer rookies; using the Terminal command requires careful operation. | |
| Deletion from Disk Utility is not used to permanently delete single files but to wipe the hard drive volume on your MacBook Pro/Air. So the first three methods are recommended if you need to delete particular files/folders. |
Suppose you are going to sell your MacBook Pro or Air; before selling your machine, you should consider how to permanently delete files on your Mac to protect private information. How to permanently delete files on Mac? This article will introduce effective ways to delete files on Mac permanently.
Empty Trash to Permanently Delete Files on MacBook Air
Moving files to Trash can be the easiest and fasted way when Mac users consider deleting them. But the files stored in Trash will not be deleted automatically until you empty the Trash.
Therefore, you may empty Trash when you want to permanently delete the files so that others can't restore Mac Trash data.
Trash's feature gives the opportunity to restore files accidentally deleted, but if you turn on the time-limited Settings, Trash will remove items automatically after 30 days. Guide on How to check Trash time limit settings:
Step 1. Go to "Finder > Settings", and click "Advanced".
Step 2. Unselect the option "Remove items from the Trash after 30 days".
Share this article on social media to help others learn how to empty Trash and permanently delete files on MacBook Air/Pro.
Suppose some essential data was mistakenly deleted after emptying Trash, and you want to recover permanently deleted Mac files ; the only way is to find data recovery software to help you recover them. EaseUS Data Recovery Wizard for Mac is a trusted and powerful data recovery tool that supports various file types on most devices.
With the trusted EaseUS software, you can recover emptied Mac Trash with a few clicks, following the steps below to get the deleted files back quickly:
Step 1. Select the drive to be scanned
In the main EaseUS Data Recovery Wizard window, there will be a list of the drives connected to your Mac. Select the drive you need to recover lost/deleted files from, and click the "Search for lost files" button.

Step 2. Select your lost data/files
EaseUS Data Recovery Wizard for Mac will immediately scan your selected disk volume and display the scanning results on the left pane. You can sort the results to find the wanted files if you are looking for certain files.

Step 3. Recover lost/deleted data
Once you have found the desired files, preview the files and then click "Recover" to begin the recovery of your deleted/lost Mac files.

How to Permanently Delete Files on Mac Shortcuts
Using shortcuts on Mac makes our work smooth, enhances efficiency, and avoids wasting time. Here are shortcuts for deletion on Mac:
- Press "Command + Delete": Move the selected item to the Trash.
- Press "Shift + Command + Delete": Empty the Trash.
- Press "Option + Shift + Command + Delete": Empty the Trash without confirmation dialog.
Suppose you press the "Command + Delete" keys but find that the file can't be deleted; you should check 3 things:
- The file is not currently in use.
- The file is not locked and read-only.
- You have permission to modify the file.
You can watch this video to learn how to delete files on a Mac that won't delete. It provides more details and tips.
- 00:27 Method 1. Delete Files Through Terminal
- 00:57 Method 2. Force Quit and Delete
- 01:23 Method 3. Change from Read-only to Read-Write
Use Terminal to Permanently Delete Folders on Mac
You can use the rm or rm -R command in Mac Terminal to delete files permanently. This can be dangerously easy:
- Run the command rm filename to delete the file named "filename" permanently.
- Run the command rm -R archives to permanently delete a directory full of archives containing sub-directories and files.

How to Recover Files Deleted by RM on Mac
This article introduces effective and simple ways to recover files deleted by the rm command on Mac computers. Read more >>
In addition, you can use the secure-erase command in Terminal to permanently delete files on Mac.
Note: the secure-erase command will wipe the entire disk securely; it can't delete a particular file/folder or erase a hard drive volume.
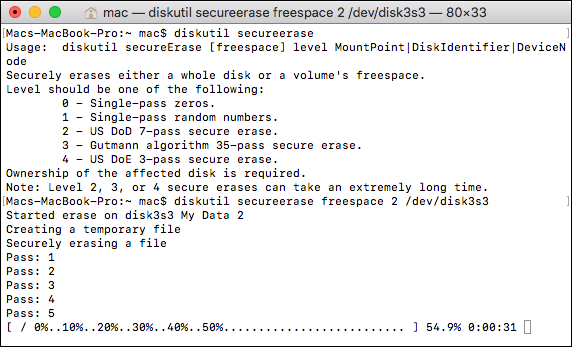
You can use the Terminal secure-erase command to securely wipe empty storage space on a Mac hard drive volume; refer to the following:
Step 1. Go to "Application > Utilities > Terminal" and type diskutil list.
Step 2. Type diskutil secureErase 2 disk#. Note that replace # with the hard disk number.
How to Permanently Delete Mac Files with Disk Utility

Note: This method can help you wipe a Mac hard drive volume rather than deleting individual files or folders from Mac hard drive.
Follow the steps below to wipe your Mac hard drive volume:
Step 1. Open "Disk Utility" on your MacBook Air.
Step 2. Choose the hard drive volume that contains files you want to permanently delete.
Step 3. Click "Erase" at the top menu, and a confirmation window popup.
Step 4. Enter the volume name, choose a format, like HFS+(Mac OS Extended), and click "Security Options".
Step 5. Choose "Most Secure" and click "OK" to start.
Conclusion
How to permanently delete files on Mac? You can empty Trash, use Mac shortcuts, Terminal command, and Disk Utility to permanently delete files on Mac. But notice that methods 3 and 4 are not used to delete individual file/folder.
It's suggested that using Mac shortcuts or empty Trash permanently delete files/folders on your MacBook Pro/Air. And users can't restore permanently deleted files unless they use professional data recovery software like EaseUS Data Recovery Wizard for Mac.
How to Permanently Delete Files on Mac FAQs:
Here are questions people also ask when they search for how to permanently delete files on Mac, and you can read the questions below to learn more about permanent deletion on Mac.
1. How can I turn off Trash "Delete Immediately" on Mac?
To turn off Delete Immediately Mac:
Step 1. Launch "Application" and go to "Terminal".
Step 2. At the command prompt, type: sudo rm -ri ~/.Trash and press "Return".
Step 3. Log out of your macOS or Mac OS X account and log back in.
2. How do you permanently erase data so that it cannot be recovered from Mac?
You can permanently erase data using one of the following 4 methods:
- Empty Trash to permanently delete files on your Mac.
- Press "Option + Shift + Command + Delete" to empty the Trash without confirmation dialog.
- Use the rm or secure-erase command in the Terminal to delete Mac files permanently.
- Wipe data from Disk Utility so that it can't be recovered from Mac.
3. What is the shortcut for permanently deleting files on Mac?
To permanently delete Mac files: press "Shift + Command + Delete" to empty the Trash, or press "Option + Shift + Command + Delete" to empty the Trash without confirmation dialog.
4. How to delete files on Mac that won't delete?
If an item is locked, you must confirm you want to move it to the Trash or unlock it before putting it in the Trash. To unlock the item:
Step 1. Select the item, and choose "File > Get Info".
Step 2. Deselect the Locked checkbox.
Was This Page Helpful?
Jaden is one of the editors of EaseUS, who focuses on topics concerning PCs and Mac data recovery. Jaden is committed to enhancing professional IT knowledge and writing abilities. She is always keen on new and intelligent products.
Brithny is a technology enthusiast, aiming to make readers' tech lives easy and enjoyable. She loves exploring new technologies and writing technical how-to tips. In her spare time, she loves sharing things about her game experience on Facebook or Twitter.
-
EaseUS Data Recovery Wizard is a powerful system recovery software, designed to enable you to recover files you’ve deleted accidentally, potentially lost to malware or an entire hard drive partition.
Read More -
EaseUS Data Recovery Wizard is the best we have seen. It's far from perfect, partly because today's advanced disk technology makes data-recovery more difficult than it was with the simpler technology of the past.
Read More -
EaseUS Data Recovery Wizard Pro has a reputation as one of the best data recovery software programs on the market. It comes with a selection of advanced features, including partition recovery, formatted drive restoration, and corrupted file repair.
Read More
Related Articles
-
SanDisk Drive Corrupted: 3 Effective Ways to Fix It
![author icon]() Brithny/Jun 28, 2026
Brithny/Jun 28, 2026 -
Mount Failed with 66: Volume Could Not Be Mounted - 3 Ways Here!
![author icon]() Brithny/May 19, 2026
Brithny/May 19, 2026 -
How to Encrypt Time Machine Backup on Mac with 3 Methods
![author icon]() Jaden/Jun 30, 2026
Jaden/Jun 30, 2026 -
Solved: Restore Data from Unmounted External Hard Drive on Mac
![author icon]() Tracy King/Jun 28, 2026
Tracy King/Jun 28, 2026