Create macOS Ventura Bootable USB - 4 Reasons
Is it necessary to create a macOS Ventura bootable USB? In some cases, creating a macOS bootable USB can be a great help. There are plenty of advantages create macOS Ventura bootable USB:
- You can install macOS Ventura on more than one Mac device without downloading macOS Ventura repeatedly.
- You don't have to worry about the downloading stuck when you are going to do a macOS upgrade.
- You can upgrade to macOS Ventura without the internet.
- If your Mac with macOS Ventura won't boot or run well, you can easily boot from a USB drive.
We will discuss how to create a macOS Ventura bootable USB in the next part, and there is a video about creating a macOS Ventura bootable USB. You can check the key points below:
- 01:21 A brief introduction about macOS Ventura
- 04:04 Download macOS Ventura
- 06:11 Open the Terminal on Mac
- 09:32 Boot from USB
How to Create macOS Ventura Bootable USB (with Pictures)
We have to mention that you need to prepare a USB flash drive that has more than 16GB of storage space and format it to Mac OS Extended. When you are creating a macOS Ventura bootable USB, make sure you have a stable internet environment. Now we will show you how to make a bootable USB for Mac.
Step 1. Search for macOS Ventura in Apple Store.
Step 2. Click "Get" to download macOS Ventura.
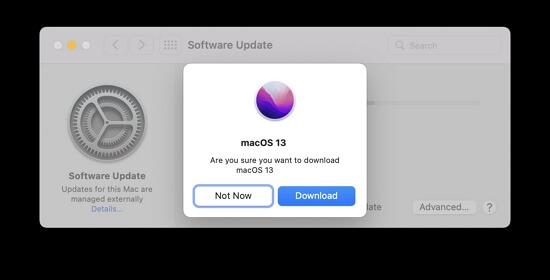
Step 3. Click "Download". If you are not ready to download it, you can click "Not now" to cancel.
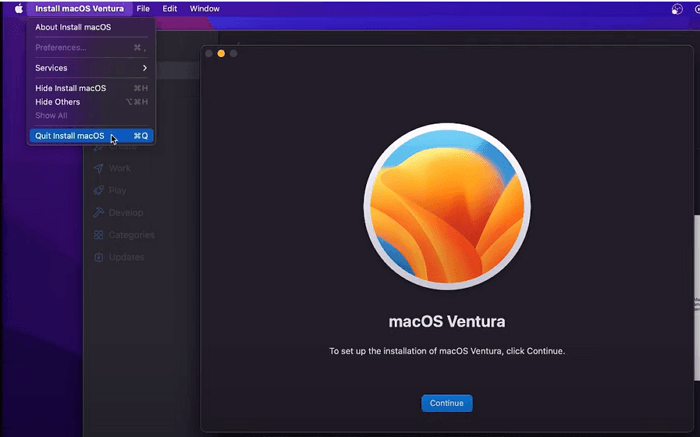
Step 4. When the downloading process is finished, click "Quit Install macOS" from the menu bar.
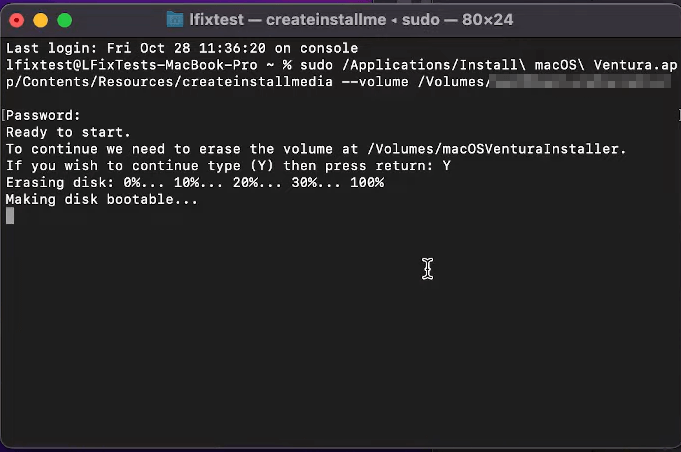
Step 5. Then you need to run Terminal on Mac. You can find Terminal under the Utilities folder.
Step 6. Connect the formatted USB to your Mac.
Step 7. Type in sudo /Applications/Install\ macOS\ Ventura.app/Contents/Resources/createinstallmedia --volume /Volumes/MyVolume. (Remember to replace "MyVolume" with your USB's name.)
Step 8. Press the Return key and enter your password.
How to Install macOS Ventura with Bootable USB
If you have created a macOS Ventura bootable USB and backed up your data on Mac, it is time to install macOS Ventura with a bootable USB. The operations are slightly different between Intel Macs and Apple Silicon Macs.
For Intel Mac:
Step 1. Connect your bootable USB to your Mac.
Step 2. Turn on the Mac and hold the Option key.
Step 3. Release the Option key when you see the startup window on the screen.
Step 4. Choose your bootable USB flash drive you just plug in.
Step 5. Select "Install macOS Ventura" and click "Continue". Then you just follow the prompts, and you can install macOS Ventura.
For Apple Silicon Mac:
Step 1. Connect your bootable USB to your Mac.
Step 2. Turn on the Mac and keep holding the power button.
Step 3. Release the key when you see the startup window on the screen.
Step 4. Choose your bootable USB flash drive you just plug in.
Step 5. Select "Install macOS Ventura" and click "Continue". Then you just follow the prompts, and you can install macOS Ventura.
Addition Guide: Recover Lost Data on macOS Ventura When Installation Stuck/Fail
There may be many problems that occur when you are installing macOS Ventura, and sometimes may cause macOS 13 Ventura installation failed suddenly. If you don't have a backup, losing data is unavoidable. When you install macOS Ventura with a bootable installer, it will perform a clean installation which means you will lose all your data on your Mac.
If you want to recover lost data when the macOS Ventura installation is stuck or after a clean installation, why don't you download EaseUS Data Recovery Wizard for Mac? This tool supports Mac Trash recovery and has many highlights.
macOS Ventura Data Recovery Software
- Recover deleted files on macOS Ventura, including music, documents, graphics, videos, etc.
- When MacBook Pro, Air cannot turn on, this tool can recover data from your unbootable MacBook.
- Recovering data from various storage media, including SD card recovery Mac, external hard drive recovery, etc.
To apply EaseUS Ventura recovery software on an unbootable Mac, you'll need to enter the Recovery Mode first. Then, just follow the tutorial below:
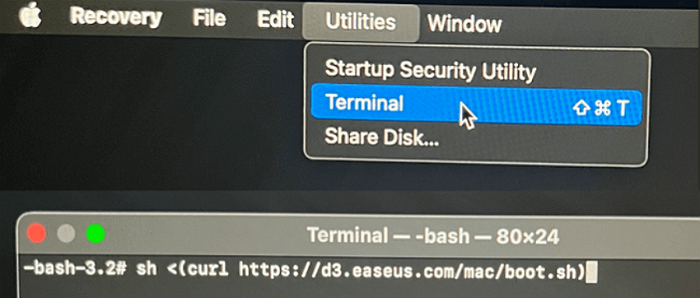
Step 1. Launch EaseUS Software in Recovery Mode
Select "Utilities > Terminal" from the top menu, and enter the command sh <(curl https://d3.easeus.com/mac/boot.sh). Hit "Return". Wait for the application to open, and it will take several minutes.
Note: If the Terminal displays either "No such file or directory" or "Could not resolve host," you should verify that the command line you entered is correctly spelled, ensure your Mac has a stable internet connection, and confirm that your macOS version is not lower than macOS 10.15.
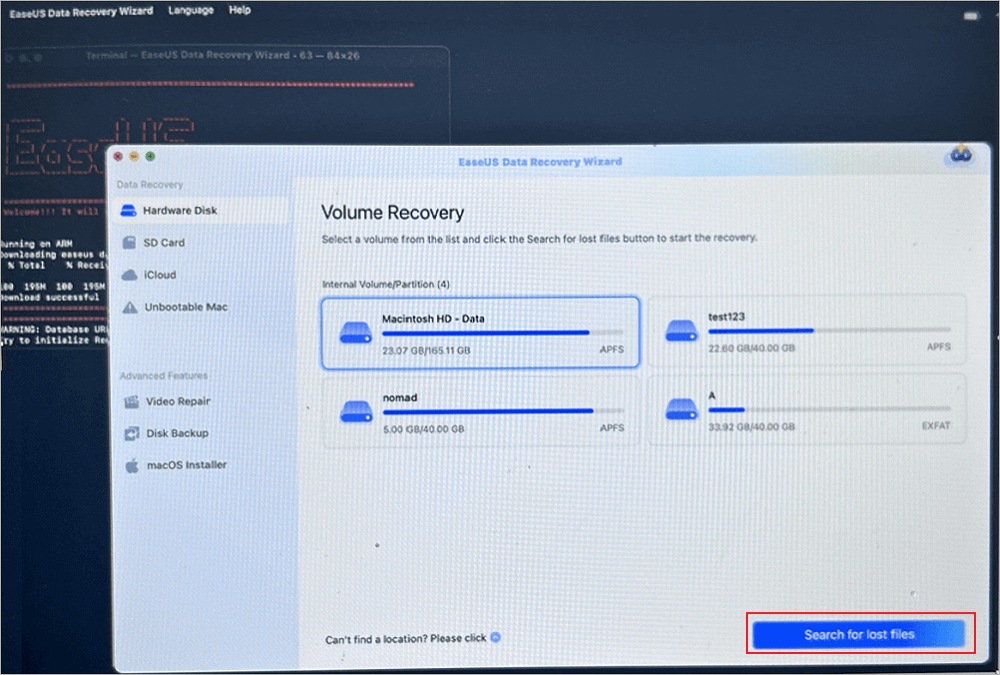
Step 2. Select the Volume on Your Mac Hard Drive
Select the volume where your lost data is stored, and click "Search for lost files". The EaseUS software will quickly locate all the recoverable data on the selected volume.
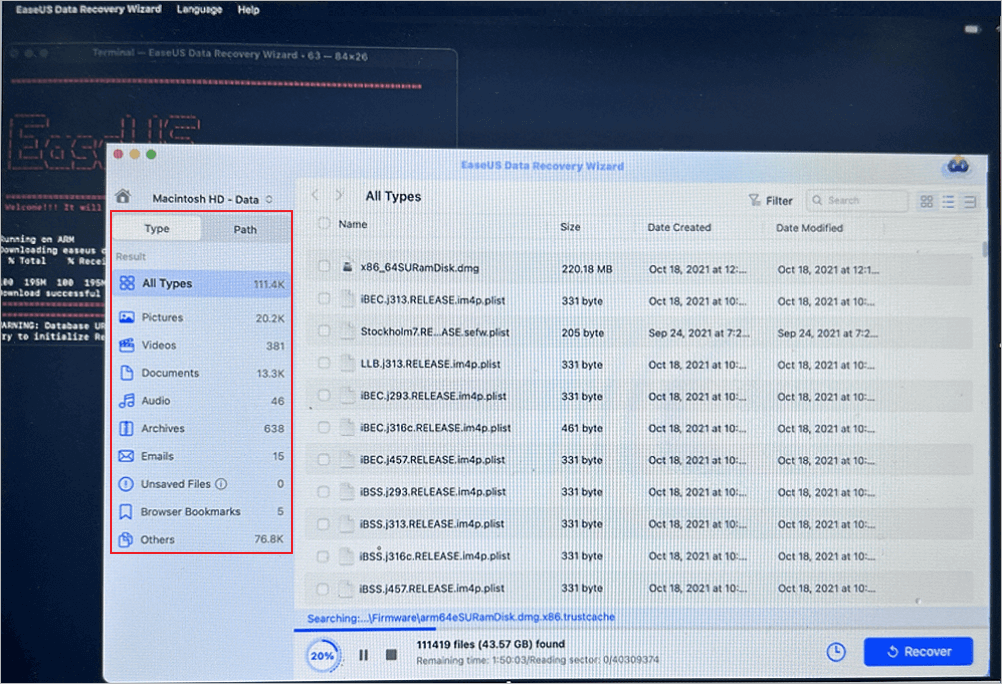
Step 3. Choose the Lost Data You Want
EaseUS software categorizes the scanned recoverable data by file type and storage path. Find the data you want by clicking "Type" or "Path" in the left panel. Then, check the boxes in front of the data you want to recover.
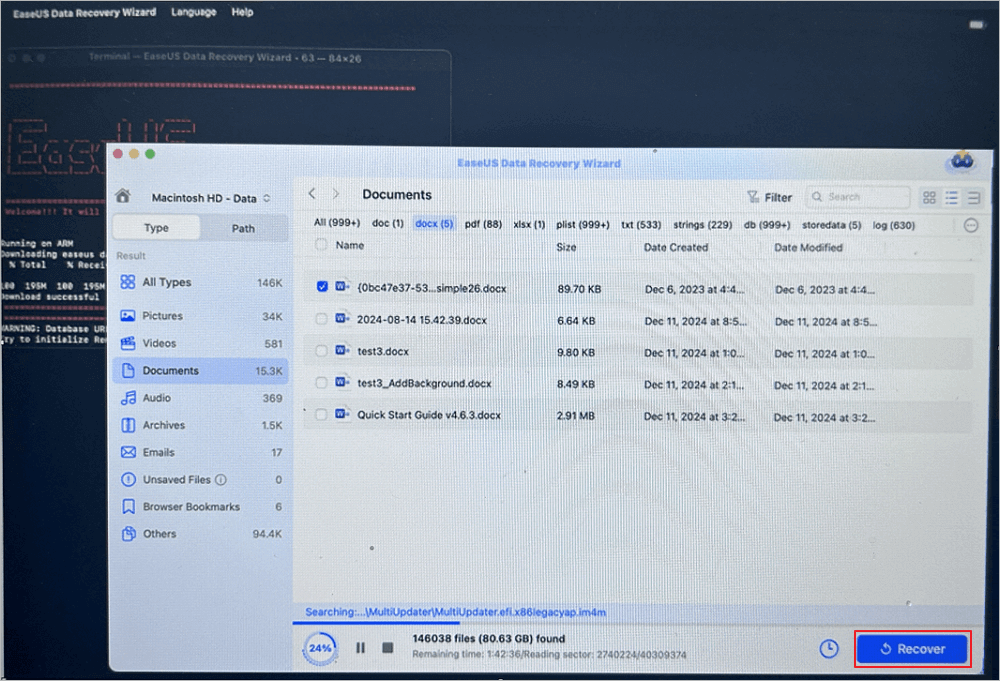
Step 4. Recover and Save Data on an External Disk
Click the "Recover" button, and a pop-up window will show up saying, "Please select a target location to save". Choose the external disk as the new storage location of your recovered data.
The Closing Words
Creating a macOS Ventura bootable USB is not difficult. We hope you can create a bootable USB successfully after reading this article.
When you encounter the issues below while using your Mac or MacBook, you can download and install EaseUS Data Recovery Wizard for Mac and recover lost or deleted data.
- Mac cannot boot successfully, and you need the data on Mac.
- The macOS system crashed, and you lost essential data on your Mac.
- You accidentally empty the Trash and need to recover data from the emptied Trash.
- When you want to recover lost files after the Monterey update.
Create macOS Ventura Bootable USB FAQs
Reading this part's additional questions and answers may help you know more about creating macOS Ventura bootable USB.
How do I make a bootable macOS Ventura USB?
You can make a bootable macOS Ventura USB in a few steps:
- 1. Prepare a USB that has more than 16 GB of storage space, and format it to Mac OS Extended.
- 2. Download the macOS Ventura resource on Mac.
- 3. Use Terminal to make a macOS Ventura bootable USB.
Can you boot macOS Ventura from a USB drive?
You can boot macOS Ventura from a USB drive by following the steps below:
- 1. Prepare a USB that has more than 16 GB of storage space, and format it to Mac OS Extended.
- 2. Download the macOS Ventura resource on Mac.
- 3. Use Terminal to make a macOS Ventura bootable USB.
- 4. Connect your bootable USB to your Mac.
- 5. Turn on the Mac and keep holding the power button or Option key.
- 6. Release the key when you see the startup window on the screen.
- 7. Choose the bootable USB flash drive you just plug in.
- 8. Select "Install macOS Ventura" and click "Continue". Then you just follow the prompts, and you can install macOS Ventura.
Should I upgrade to macOS Ventura?
macOS Ventura vs macOS Monterey, upgrade or not?
macOS Ventura is the latest version of macOS. You can use your iPhone as a Webcam with macOS Ventura and unsend messages on macOS Ventura. There are many useful new features on macOS Ventura, and if you are interested in these new features, you should upgrade to macOS Ventura.
How do I clean install macOS Ventura?
You can clean install macOS Ventura with a macOS bootable installer.
- 1. Prepare a USB that has more than 16 GB of storage space, and format it to Mac OS Extended.
- 2. Download the macOS Ventura resource on Mac.
- 3. Use Terminal to make a macOS Ventura bootable USB.
- 4. Connect your bootable USB to your Mac.
- 5. Turn on the Mac and keep holding the power button or Option key.
- 6. Release the key when you see the startup window on the screen.
- 7. Choose the bootable USB flash drive you just plug in.
- 8. Select "Install macOS Ventura" and click "Continue". Then you just follow the prompts, and you can install macOS Ventura.
Was This Page Helpful?
Dany is an editor of EaseUS who lives and works in Chengdu, China. She focuses on writing articles about data recovery on Mac devices and PCs. She is devoted to improving her writing skills and enriching her professional knowledge. Dany also enjoys reading detective novels in her spare time.
Related Articles
-
6 Ways to Fix Windows Update Not Working Windows 11/10
![author icon]() Cedric/2026-06-30
Cedric/2026-06-30 -
[Fixed] Function Keys Not Working | 6 Tested Methods
![author icon]() Dany/2025-12-12
Dany/2025-12-12 -
What Laptop Hard Drive Size Should I Use [2025 Explanation]
![author icon]() Sherly/2025-07-04
Sherly/2025-07-04 -
How to Fix a Media Driver Your Computer Needs Is Missing in Windows
![author icon]() Daisy/2025-07-04
Daisy/2025-07-04
EaseUS Data Recovery Services
EaseUS data recovery experts have uneaqualed expertise to repair disks/systems and salvage data from all devices like RAID, HDD, SSD, USB, etc.