"After I upgraded to macOS Monterey, my PDF files in Books disappeared. Where are these files in the backup (Time Machine)?" - Apple Community
Common Problems After Update to macOS Monterey
macOS Monterey (version 12), released on October 25, 2021, is the eighteenth major release of macOS. While it doesn't bring significant changes or overhauls, it includes several new features and improvements.
One of the most notable changes is the addition of support for AirPlay to Macs, allowing them to be used as wireless displays for other devices. Another helpful addition is the contiguous side-by-side mode for apps, making it easier to work with multiple apps simultaneously. Finally, macOS Monterey also includes minor but welcome tweaks, such as the ability to pin messages in the Mail app and new emoji.
Despite its many positive aspects, updating macOS Monterey can cause many problems like data loss, stuck issues, or installation errors. Some users also complained about missing files after the Mac update to Monterey.
- macOS Monterey is unresponsive - Some users have reported that their Macs become unresponsive after updating.
- Apps problems - Some users have encountered issues with apps and drivers that are no longer compatible with the new operating system.
- macOS Monterey takes a long time to update - In addition, some users have found that updating to macOS Monterey takes far longer than expected, leading to frustration and inconvenience.
- Losing data after update - When you download macOS Monterey and perform a clean install, you may be at risk of data loss.
As such, it's essential to be aware of these potential issues before updating your Mac. Then, perform a macOS update without data loss.
4 Ways to Recover Lost Files After macOS Monterey Update
The macOS Monterey update brings a host of new features to the Mac, but it also has the potential to cause problems. One common issue is that users find some files lost after the Monterey update. If you're facing this problem, don't despair. After the macOS Monterey update, you can recover lost files on Mac in several ways.
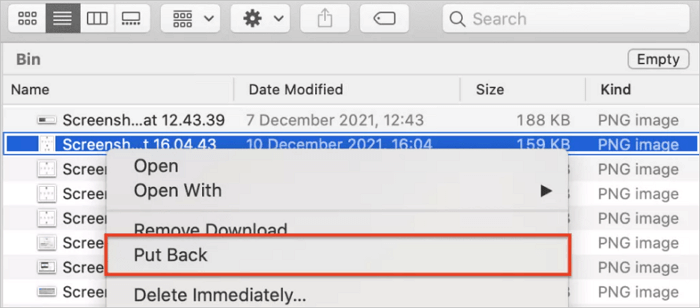
Method 1. Check macOS Monterey Trash to Recover Lost Data
There are four ways to recover lost files after the macOS Monterey update. The first way is to recover lost files after the macOS Monterey update from Mac Trash. When you delete a file in macOS, it's not deleted; it's just moved to the Trash. To recover a file from the Trash, follow the steps below:
Step 1. Open the Trash Bin icon on your desktop.
Step 2. Right-click on wanted files and select the "put back" option to recover lost files on macOS Monterey.
Method 2. Recover Lost Files After macOS Monterey Update with Software [100% Working]
Data recovery software is the most effective way to recover lost files after the macOS Monterey update. It scans your hard drive for lost files and then lets you choose which ones you want to recover. EaseUS Data Recovery Wizard for Mac is a helpful data recovery tool that can recover lost files after the macOS Monterey update. It offers a variety of features to help you recover your data:
- Recover deleted files on macOS Ventura/Monterey/Big Sur/Catalina/High Sierra update
- Restore macOS Monterey data from a variety of storage devices, including HDDs, SSDs, USBs, and more.
- Employ powerful scanning algorithms to find all your lost files on different file systems and operating systems.
Follow the steps below to recover data from macOS Monterey.
Step 1. Select the location
Select the disk where you lost data after updating to macOS Sonoma/Ventura/Monterey/Big Sur. Then, click "Search for lost files".

Step 2. Find lost data after the scan
EaseUS Data Recovery Wizard for Mac will immediately scan your selected disk volume and display the scanning results on the left pane. Use the file type and file path to find wanted data on Mac.

Step 3. Recover data after macOS update
Select the target files that were unknowingly lost during or after the update and click the "Recover" button to get them all back.

Method 3. Restore Lost Data from Time Machine Backup
The Time Machine backup is another way to recover lost files after the macOS Monterey update. Time Machine backs up your entire system, including your libraries, applications, and user data. If you've lost files after the update, you can restore them from your Time Machine backup.
Step 1. Launch Time Machine on your Mac.
Step 2. Find the specific files you want to restore using the onscreen up and down arrows to locate them.
Step 3. Preview the files by pressing Space Bar.
Step 3. Click the "Restore" button, and the deleted file will be returned to its original location.

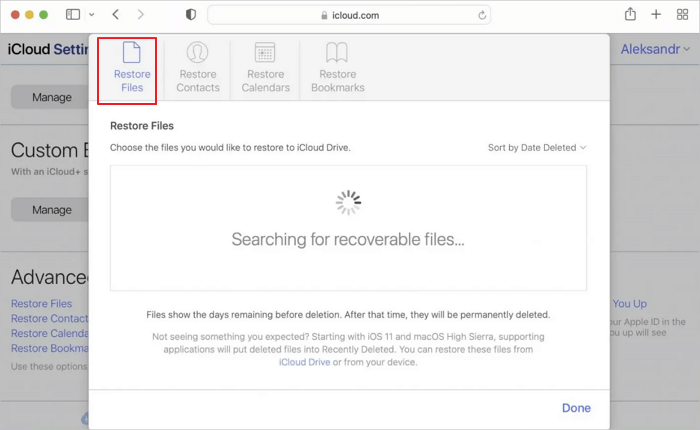
Method 4. Restore Lost Data from iCloud on macOS Monterey
iCloud is a cloud-based storage service from Apple that offers users 5GB of free storage. Files stored in iCloud are accessible from any device with an internet connection. It is integrated with the macOS operating system, making it easy to store and sync files between Macs, iPhones, and iPads. After the macOS Monterey update, some users have reported losing files from their Macs. If you've lost files after updating to macOS Monterey, you can recover them by following the steps below:
Step 1. Go to iCloud.com and sign in with your account.
Step 2. Go to "Settings > Advanced > Restore Files"
Step 3. Check the boxes to the left of the file or folder you want to recover.
Step 4. Click the "Restore Files". The recovered file will be saved to your Downloads folder.
Conclusion
If you lost files after updating to macOS Monterey, there are a few ways to recover them. First, check to see if the files are in your Trash folder. If they're not there, try using EaseUS Mac data recovery software or Time Machine. If you still can't find your lost files, you may need to use iCloud. Whatever method you use, make sure to back up your data regularly to avoid losing important files in the future.
Monterey Data Recovery FAQs
If you still have problems, read the questions and answers below to get additional help. It will take a few minutes, but it will be worth the time.
1. Does updating macOS delete everything?
Does updating macOS delete everything? No, updating macOS will not remove data or erase the hard drive at all.
2. How to downgrade macOS Ventura to Monterey?
Downgrade macOS Ventura to Monterey:
- Downgrade with Time Machine
- Downgrade with macOS Recovery
- Downgrade with Bootable Installer
3. Should I update my Big Sur to Monterey?
You can get the answer if you know the difference between Monterey and Big Sur (Monterey vs. Big Sur).
4. How do I recover files after macOS Monterey update?
You can use EaseUS Mac data recovery software to recover lost files after a macOS Monterey upgrade:
- Download and install EaseUS Data Recovery Wizard for Mac.
- Start the software and select the disk that contains the deleted files.
- Click the Search for lost files button to scan the disk for lost files.
- Review and preview the found files and select those you want to recover.
- Click the Recover button to restore lost files from macOS Monterey.
Was This Page Helpful?
Cedric Grantham is a senior editor and data recovery specialist of EaseUS. He mainly writes articles and how-to tips about data recovery on PC and Mac. He has handled 10,000+ data recovery cases and is good at data recovery of NTFS, FAT (FAT32 and ExFAT) file systems, and RAID structure reorganization.
Brithny is a technology enthusiast, aiming to make readers' tech lives easy and enjoyable. She loves exploring new technologies and writing technical how-to tips. In her spare time, she loves sharing things about her game experience on Facebook or Twitter.
Related Articles
-
How to Recover Tesla Dashcam Footage [with 3 Proven Methods]
![author icon]() Brithny/Jun 30, 2026
Brithny/Jun 30, 2026 -
disk0s2 Not Mounted | Fix disk0s2 (Macintosh HD) Not Mounting on Mac
![author icon]() Brithny/Jun 17, 2026
Brithny/Jun 17, 2026 -
How to Turn Off Empty Trash Automatically on Mac
![author icon]() Jaden/Jun 30, 2026
Jaden/Jun 30, 2026 -
How to Repair Corrupted Video Files on Mac [macOS Ventura applicable]
![author icon]() Jaden/Jan 19, 2026
Jaden/Jan 19, 2026